Bluenose - Model Shipways MS2130 - 1/64 - By JeffT [COMPLETED BUILD]

Planking the decks!
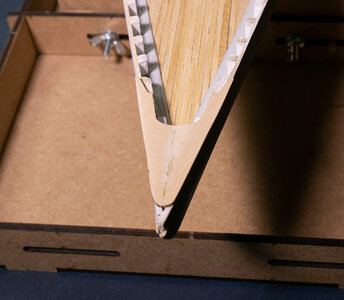
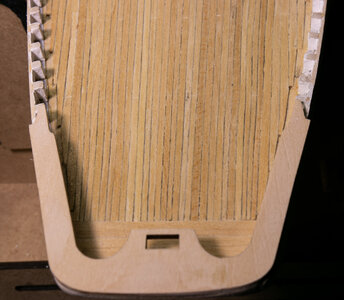
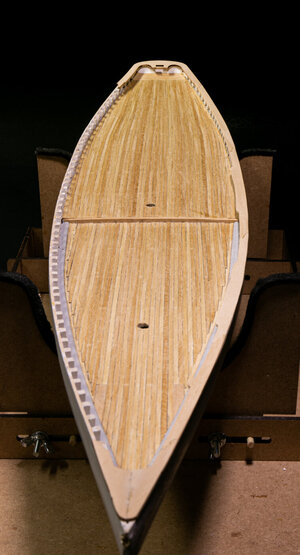
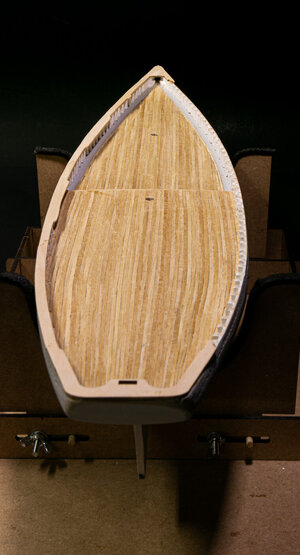
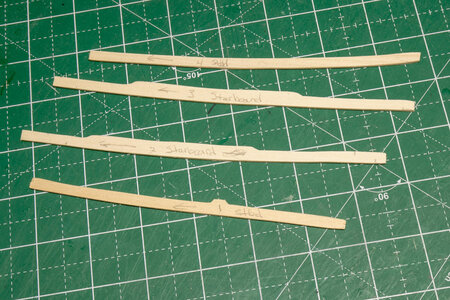
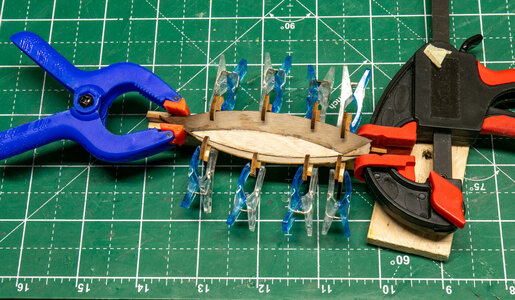
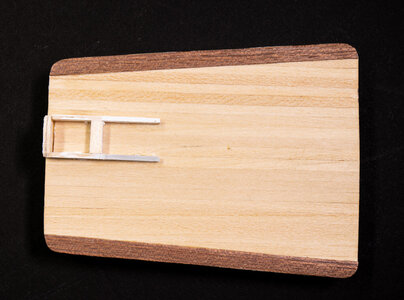
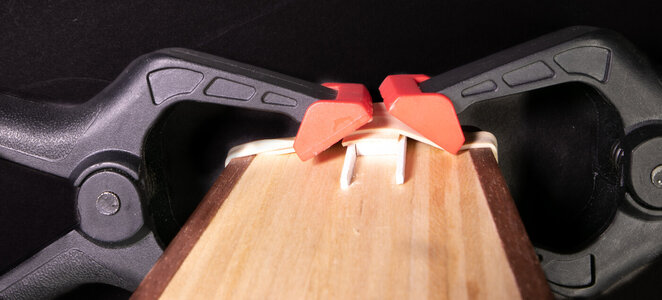
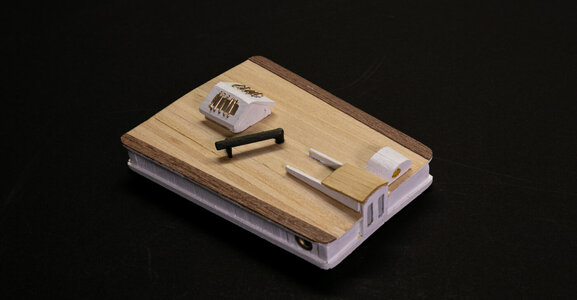
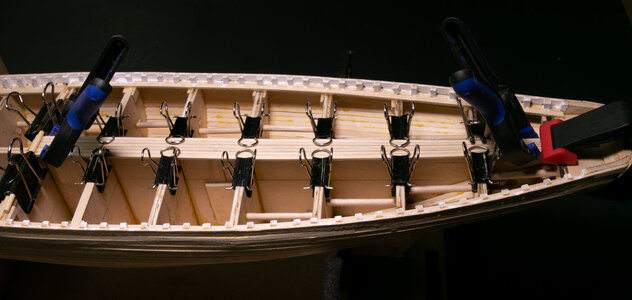
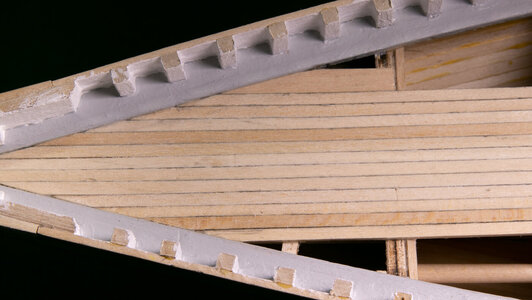
Both halves of the deck have their own challenges. Planking the deck was done in a manner similar to the hull planking using modified binder clips as far out to the side as I could. Note the wide plank near the bow where some machinery will sit. Both the foredeck and the quarterdeck were nibbed. I had some trepidation about doing nibbing the planks, but it went fairly well. The aft-most part of the quarterdeck has the planks that taper to about 2/3 the width for the last 6 inches or so. They were tapered with a small plane (typically about 6 planks at a time). I will present the completed deck in a future post.
IMG_7109.jpgIMG_7112.jpgIMG_7113.jpgIMG_7114.jpg
 
Very nice Jeff. It seems you were properly conscious of scale on these deck boards - it looks just about right!
Planking the decks!
Both halves of the deck have their own challenges. Planking the deck was done in a manner similar to the hull planking using modified binder clips as far out to the side as I could. Note the wide plank near the bow where some machinery will sit. Both the foredeck and the quarterdeck were nibbed. I had some trepidation about doing nibbing the planks, but it went fairly well. The aft-most part of the quarterdeck has the planks that taper to about 2/3 the width for the last 6 inches or so. They were tapered with a small plane (typically about 6 planks at a time). I will present the completed deck in a future post.
View attachment 367411View attachment 367412View attachment 367413View attachment 367414
Looks very nice
 
Stanchions, stanchions and more stanchions.

Stanchions are made from 1/8 x 1/8 stock. I didn't measure very accurately on length for each one. I just made sure they were long enough to be higher than the bulwarks. They were glued to the bulwarks and the water ways. This was a fairly simple step, but it took some time as I was adding 9 or 10 each session.
View attachment 365121View attachment 365122View attachment 365123
Good morning Jeff. Those stanchions make her look awesome. Worth the time and effort. Cheers Grant
 
Planking the decks!
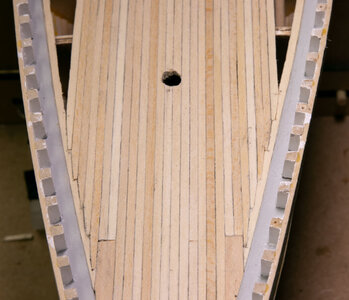
Both halves of the deck have their own challenges. Planking the deck was done in a manner similar to the hull planking using modified binder clips as far out to the side as I could. Note the wide plank near the bow where some machinery will sit. Both the foredeck and the quarterdeck were nibbed. I had some trepidation about doing nibbing the planks, but it went fairly well. The aft-most part of the quarterdeck has the planks that taper to about 2/3 the width for the last 6 inches or so. They were tapered with a small plane (typically about 6 planks at a time). I will present the completed deck in a future post.
View attachment 367411View attachment 367412View attachment 367413View attachment 367414
Picture 2: no nibble boards...
Pictures 3 and 4: and there they are, nibble boards!
So about forward of the windlass you didn't apply nibble boards, is there any rationale behind this configuration?
 
Picture 2: no nibble boards...
Pictures 3 and 4: and there they are, nibble boards!
So about forward of the windlass you didn't apply nibble boards, is there any rationale behind this configuration?
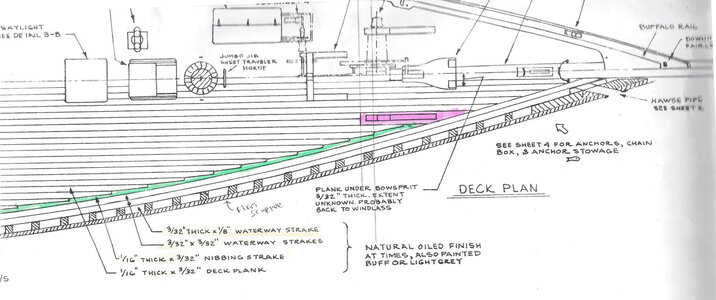
I followed the planking diagram on the plans. I wondered about the reasons for not doing nibbling all the way to the bow as well, but I went with the plans.

Bluenose Decking.jpg
 
I followed the planking diagram on the plans. I wondered about the reasons for not doing nibbling all the way to the bow as well, but I went with the plans.

View attachment 367879
Fair enough.
A lot of it will be obscured almost entirely, but it looks a bit inconsistent.
The decks do look great, especially the tapering of the planks of quarterdeck is source for some envy...
 
Planking the decks!
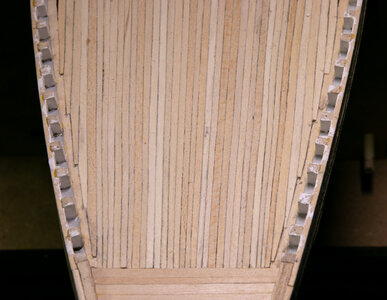
Both halves of the deck have their own challenges. Planking the deck was done in a manner similar to the hull planking using modified binder clips as far out to the side as I could. Note the wide plank near the bow where some machinery will sit. Both the foredeck and the quarterdeck were nibbed. I had some trepidation about doing nibbing the planks, but it went fairly well. The aft-most part of the quarterdeck has the planks that taper to about 2/3 the width for the last 6 inches or so. They were tapered with a small plane (typically about 6 planks at a time). I will present the completed deck in a future post.
View attachment 367411View attachment 367412View attachment 367413View attachment 367414
I followed the planking diagram on the plans. I wondered about the reasons for not doing nibbling all the way to the bow as well, but I went with the plans.

View attachment 367879
Nice planking, Jeff. I won’t be surprising that I like the tapered planks on the aft deck. ;)
And about not nibbling in the front: I hadn't even noticed that on the MS/Lankford drawings. But I mainly concentrated on drawings 4, 5 and 6. It’s a ‘nice’ example of the different interpretation of the (original) BN.
Jenson, Lankford, Eisnor, all have different details. Good for you for following a plan. But don't be afraid to apply some AL, FI or BL. :)
Regards, Peter
 
I followed the planking diagram on the plans. I wondered about the reasons for not doing nibbling all the way to the bow as well, but I went with the plans.

View attachment 367879
Are you planing on staining the deck planks, and if so what will you be using. I have seen the bluenose II and loved the color of her decks
 
Are you planing on staining the deck planks, and if so what will you be using. I have seen the bluenose II and loved the color of her decks
I have applied a light golden ok stain to the deck, but not enough to change the appearance much.
 
I have installed the main rail around the entire length of the ship. This was a step that I had some concern about from the beginning. Other build logs have suggested that the laser cut pieces for the bow and stern don't fit and that they had to scratch build new pieces. I found that my bow was slightly too "sharp" and that the laser cut piece was a little too wide. I solved the problem by splitting the piece down the middle and doing just a bit of sanding before gluing it back together.
IMG_0002.jpg
The stern piece is where other builders have had the most problems. I think I got lucky on the stern rail piece in that it was only off by about 0.5 mm. The piece had enough flex that I was able to squeeze it toward the center of the ship on the starboard side so that it lined up perfectly. I was greatly surprised that my stern was so close to what it needed to be. Sometimes it works out that being lucky is as good as being skilled.
IMG_0004.jpg
The main rails were then installed. These required some shaping for the integral pin rails and the scarfing joints. The pictures only show the port rail installed, but both are now in place.
IMG_7118.jpgIMG_7119.jpg
 
I have installed the main rail around the entire length of the ship. This was a step that I had some concern about from the beginning. Other build logs have suggested that the laser cut pieces for the bow and stern don't fit and that they had to scratch build new pieces. I found that my bow was slightly too "sharp" and that the laser cut piece was a little too wide. I solved the problem by splitting the piece down the middle and doing just a bit of sanding before gluing it back together.
View attachment 369098
The stern piece is where other builders have had the most problems. I think I got lucky on the stern rail piece in that it was only off by about 0.5 mm. The piece had enough flex that I was able to squeeze it toward the center of the ship on the starboard side so that it lined up perfectly. I was greatly surprised that my stern was so close to what it needed to be. Sometimes it works out that being lucky is as good as being skilled.

View attachment 369099
The main rails were then installed. These required some shaping for the integral pin rails and the scarfing joints. The pictures only show the port rail installed, but both are now in place.
View attachment 369100View attachment 369101
Looking good
 
I forgot to include this picture of the starboard main rail in my last post. The kit does not include the rail as laser-cut pieces, so they are cut from wider pieces so that the belaying pin portions are integral with the main rail. I cut them by first coping the plans onto different pieces of paper (as four separate sections) and lying them on top of the correct size of stock wood. I used a Dremel Moto-Saw to cut them out. After sanding to the correct size and shape, they were joined with scarf joints which you can see on the port rail in my previous post.
IMG_7120.jpg

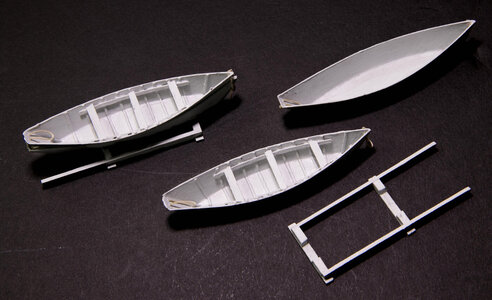
At the time I was at this step it was still full winter, so no sanding or painting of the hull was not possible since these are outdoors tasks. I decided to start working on deck fittings and equipment. I started with the fishing boats (dories). These are made from the thinnest plywood possible. The kit gives you enough to make 8 dories, but I only finished 4. The kit also supplies some laser-cut pieces to help shape the dories while the glue dries.
IMG_7122.jpg

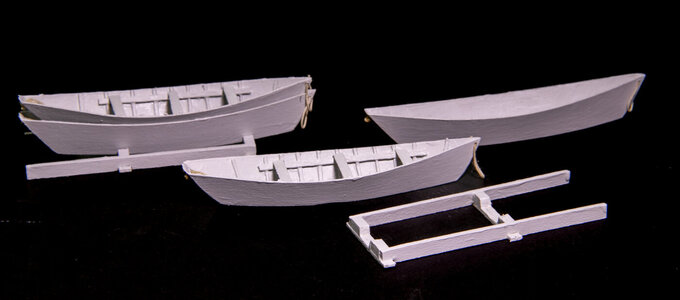
I ended up with 4 useable dories and 2 in the scrap cup. Since the dories are stacked on the deck, I only finished the insides of 2 with thwarts and ribs. I also made the 2 racks for the dories and painted everything a light gray. Rope loops were added to the bow and stern of each dory as well.
IMG_7172.jpgIMG_7173.jpg
I will decide on whether to make oars or not at a future time.
 
I forgot to include this picture of the starboard main rail in my last post. The kit does not include the rail as laser-cut pieces, so they are cut from wider pieces so that the belaying pin portions are integral with the main rail. I cut them by first coping the plans onto different pieces of paper (as four separate sections) and lying them on top of the correct size of stock wood. I used a Dremel Moto-Saw to cut them out. After sanding to the correct size and shape, they were joined with scarf joints which you can see on the port rail in my previous post.
View attachment 370551

At the time I was at this step it was still full winter, so no sanding or painting of the hull was not possible since these are outdoors tasks. I decided to start working on deck fittings and equipment. I started with the fishing boats (dories). These are made from the thinnest plywood possible. The kit gives you enough to make 8 dories, but I only finished 4. The kit also supplies some laser-cut pieces to help shape the dories while the glue dries.
View attachment 370552

I ended up with 4 useable dories and 2 in the scrap cup. Since the dories are stacked on the deck, I only finished the insides of 2 with thwarts and ribs. I also made the 2 racks for the dories and painted everything a light gray. Rope loops were added to the bow and stern of each dory as well.
View attachment 370553View attachment 370554
I will decide on whether to make oars or not at a future time.
No matter the kit, those dories are nasty little buggers.
Congrats on completing four of them, well done!
 
I forgot to include this picture of the starboard main rail in my last post. The kit does not include the rail as laser-cut pieces, so they are cut from wider pieces so that the belaying pin portions are integral with the main rail. I cut them by first coping the plans onto different pieces of paper (as four separate sections) and lying them on top of the correct size of stock wood. I used a Dremel Moto-Saw to cut them out. After sanding to the correct size and shape, they were joined with scarf joints which you can see on the port rail in my previous post.
View attachment 370551

At the time I was at this step it was still full winter, so no sanding or painting of the hull was not possible since these are outdoors tasks. I decided to start working on deck fittings and equipment. I started with the fishing boats (dories). These are made from the thinnest plywood possible. The kit gives you enough to make 8 dories, but I only finished 4. The kit also supplies some laser-cut pieces to help shape the dories while the glue dries.
View attachment 370552

I ended up with 4 useable dories and 2 in the scrap cup. Since the dories are stacked on the deck, I only finished the insides of 2 with thwarts and ribs. I also made the 2 racks for the dories and painted everything a light gray. Rope loops were added to the bow and stern of each dory as well.
View attachment 370553View attachment 370554
I will decide on whether to make oars or not at a future time.
You do beautiful work. Have not started mine but it won’t come close to yours.
 
Planking the decks!
Both halves of the deck have their own challenges. Planking the deck was done in a manner similar to the hull planking using modified binder clips as far out to the side as I could. Note the wide plank near the bow where some machinery will sit. Both the foredeck and the quarterdeck were nibbed. I had some trepidation about doing nibbing the planks, but it went fairly well. The aft-most part of the quarterdeck has the planks that taper to about 2/3 the width for the last 6 inches or so. They were tapered with a small plane (typically about 6 planks at a time). I will present the completed deck in a future post.
View attachment 367411View attachment 367412View attachment 367413View attachment 367414
….and well done on the joints on he curved deck . Not easy. I gave it a go on my Xebec and gave up - couldn’t get it right. Nice. Cheers Grant
I forgot to include this picture of the starboard main rail in my last post. The kit does not include the rail as laser-cut pieces, so they are cut from wider pieces so that the belaying pin portions are integral with the main rail. I cut them by first coping the plans onto different pieces of paper (as four separate sections) and lying them on top of the correct size of stock wood. I used a Dremel Moto-Saw to cut them out. After sanding to the correct size and shape, they were joined with scarf joints which you can see on the port rail in my previous post.
View attachment 370551

At the time I was at this step it was still full winter, so no sanding or painting of the hull was not possible since these are outdoors tasks. I decided to start working on deck fittings and equipment. I started with the fishing boats (dories). These are made from the thinnest plywood possible. The kit gives you enough to make 8 dories, but I only finished 4. The kit also supplies some laser-cut pieces to help shape the dories while the glue dries.
View attachment 370552

I ended up with 4 useable dories and 2 in the scrap cup. Since the dories are stacked on the deck, I only finished the insides of 2 with thwarts and ribs. I also made the 2 racks for the dories and painted everything a light gray. Rope loops were added to the bow and stern of each dory as well.
View attachment 370553View attachment 370554
I will decide on whether to make oars or not at a future time.
Good morning Bill. Some challenging work well achieved. Man those Dories are small. I’m with Johan here, on all the Bluenose builds these provide some consternation for the modelers. Awesome job. Cheers Grant
 
You do beautiful work. Have not started mine but it won’t come close to yours.
Don't sell yourself short. I am in awe of some of the builders here and attempt to learn from their expertise regularly. I have found that moving at a thoughtful pace is key to doing a good job. That and figuring out how to fix mistakes as you go.
 
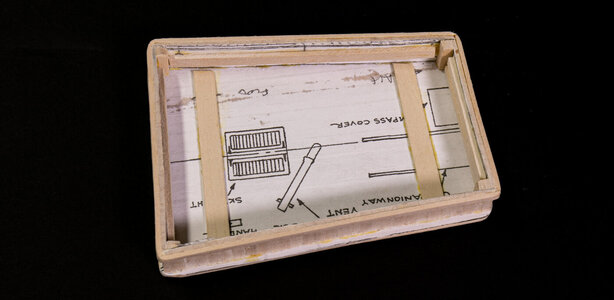
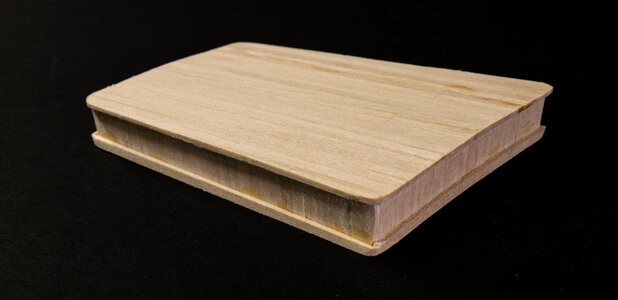
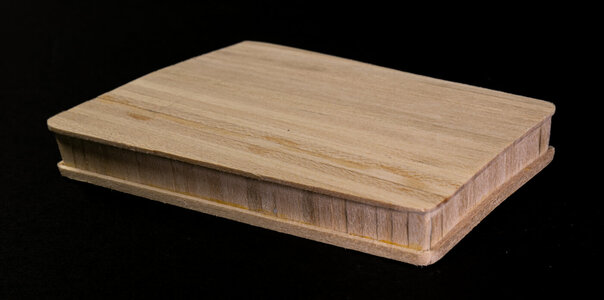
The main cabin was constructed by gluing planks to paper cutouts of the plans. This gave some rigidity as well as getting the correct size. Framing material was added around the outside and strips were glued on the inside to further strengthen and square the cabin structure. I like the planked look as opposed to making the sides and tops out of sheet material.
IMG_7182.jpgIMG_7178.jpgIMG_7180.jpg
Thin walnut strips were added to the long sides to simulate bait cutting boards. The beginning construction on the entryway was started.
IMG_7196.jpg

The roof of the cabin entryway was also glued in place.
IMG_7199.jpg

The final cabin ready for gluing to the deck. I place sandpaper on the deck (sanding side up) to sand the deck curve into the bottom of the assembly. The smoke vent was made from dowel cut at 45 degrees and glued at a right angle.
IMG_7243.jpg
 
Last edited:
Back
Top