-

Win a Free Custom Engraved Brass Coin!!!
As a way to introduce our brass coins to the community, we will raffle off a free coin during the month of August. Follow link ABOVE for instructions for entering.
-

PRE-ORDER SHIPS IN SCALE TODAY!
The beloved Ships in Scale Magazine is back and charting a new course for 2026!
Discover new skills, new techniques, and new inspirations in every issue.
NOTE THAT OUR FIRST ISSUE WILL BE JAN/FEB 2026
You are using an out of date browser. It may not display this or other websites correctly.
You should upgrade or use an alternative browser.
You should upgrade or use an alternative browser.
Bluenose - Model Shipways MS2130 - 1/64 - By JeffT [COMPLETED BUILD]
I coated them diluted white glue to help then hold shape when tying the pieces that are perpendicular to the line of the ship. Kind of like tying ratlines onto shrouds.Love your footropes. Wish mine were as good as these.
Onto the foremast. I forgot to take specific pictures on the mainmast construction, but it will show up in later pictures and it is basically the same as the foremast, only longer. Both masts have a lot of metal work including rings from brass strip and brass rods. Lots of struggling during this phase, but one of the reasons to build this model was to get more experience with this part of model ship building. First off, here's the 2 parts of the foremast in their completed form. Like the bowsprit the forward edge is supposed to straight and the tailing edge is where the material is removed (at least at the top part of the lower mast section.
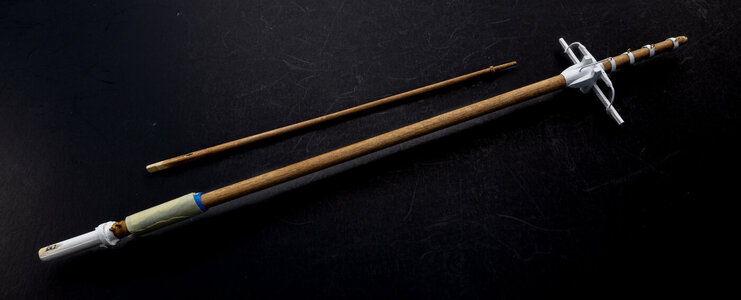
I suggest that you not look at the foot of the mast where the "B" is written as I have it on the stern side instead of the bow side of the mast. If that was the biggest error I make on the build it would be a miracle!
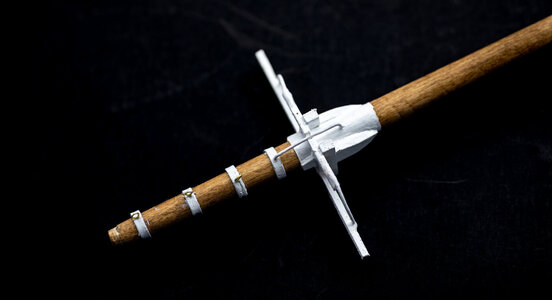
Here's the upper past of the lower mast. The eyebolts are supposed to be staggered and not in a straight line. I really wanted to put them in a straight line but stayed with the plans.
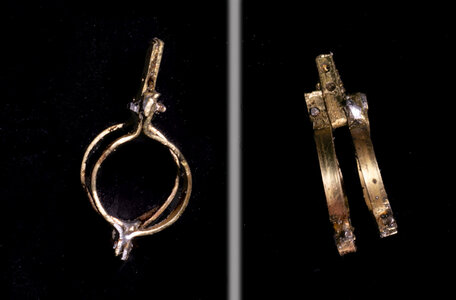
The lower mast has hardware to support the foremast boom. This consisted of 2 bands linked together at the aft side. I simplified this from the plans so that I could actually make something that looked acceptable. I cleaned it up from what is shown in the picture.
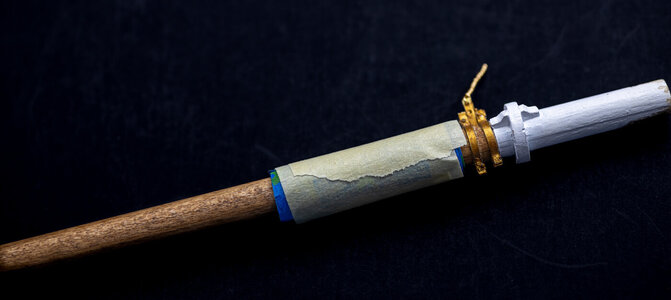
The boom gear attached to the foremast. note the twisted wire "pigtail" that I added. This will be trimmed later to fit into the end of the boom, another modification of mine to simplify the construction. The mast hoops are under the tape which is there to protect the fragile hoops until I am ready for them. Forgetting to add the hops before adding the parts at both ends would be a real problem.
The mainmast has also been completed and both masts have been assembled. The shrouds and ratlines on the upper parts of the masts are in place and the masts are ready to be placed.

I suggest that you not look at the foot of the mast where the "B" is written as I have it on the stern side instead of the bow side of the mast. If that was the biggest error I make on the build it would be a miracle!
Here's the upper past of the lower mast. The eyebolts are supposed to be staggered and not in a straight line. I really wanted to put them in a straight line but stayed with the plans.

The lower mast has hardware to support the foremast boom. This consisted of 2 bands linked together at the aft side. I simplified this from the plans so that I could actually make something that looked acceptable. I cleaned it up from what is shown in the picture.

The boom gear attached to the foremast. note the twisted wire "pigtail" that I added. This will be trimmed later to fit into the end of the boom, another modification of mine to simplify the construction. The mast hoops are under the tape which is there to protect the fragile hoops until I am ready for them. Forgetting to add the hops before adding the parts at both ends would be a real problem.

The mainmast has also been completed and both masts have been assembled. The shrouds and ratlines on the upper parts of the masts are in place and the masts are ready to be placed.
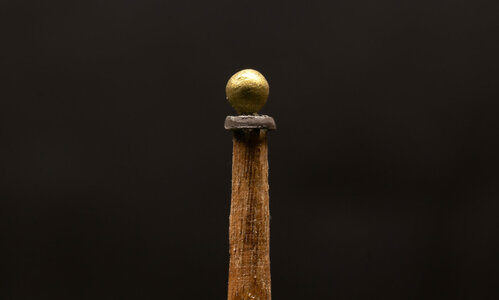
I added the ball and round piece at the top of each mast. The parts are not included in the kit so you are on your own for making them. I made the ball from a round-headed straight pin. I searched through the Admiral's sewing supplies but couldn't find any the correct size. I used ones that were oversized and made them smaller but turning them down using my mini lathe. I had several break while filing them to a smaller size, but it was an easy task and not a problem. The circle under the pin was made from small dowel that had the holes for the flag halyards and the pin drilled before cutting them from the dowel to the correct thickness. These are probably a bit thicker than they should be but not too noticeably so. Some gold paint on the head of the pin and I had what I needed.

Definitely not a speed build. It is actually a catching up build. I started it 19-Oct-2022 but did not start the log until 23-Feb-2023. The log has almost caught up to where I am today (finished lower ratlines on the starboard side of the main mast). I will likely finish the port side ratlines in about 3-4 days. My next post will probably be a view of the completed foremast with its shrouds & ratlines in place. After that it's going to be nearly real time with the log postings.
- Joined
- Sep 3, 2021
- Messages
- 5,199
- Points
- 738

Even so, you're about 8 months in your build and to me it appears as if you're moving very fast; I completed the basic mast assembly about two months ago and the shrouds were done some four weeks back.Definitely not a speed build. It is actually a catching up build. I started it 19-Oct-2022 but did not start the log until 23-Feb-2023. The log has almost caught up to where I am today (finished lower ratlines on the starboard side of the main mast). I will likely finish the port side ratlines in about 3-4 days. My next post will probably be a view of the completed foremast with its shrouds & ratlines in place. After that it's going to be nearly real time with the log postings.
In all, your build is impressive, regardless of the speed. The hardware details of the masts are looking great!
Jeff this is looking stunning. I’m jealous as I haven’t been able to work on mine in about 10 days, mostly due to a trip to visit the in-laws. Hopefully, maybe I’ll have some free time tomorrow. I can’t wait to try to close the gap a little in our builds.
You continue to set a high bar.
You continue to set a high bar.
Good morning Jeff. You are owning this. Cheers GrantOnto the foremast. I forgot to take specific pictures on the mainmast construction, but it will show up in later pictures and it is basically the same as the foremast, only longer. Both masts have a lot of metal work including rings from brass strip and brass rods. Lots of struggling during this phase, but one of the reasons to build this model was to get more experience with this part of model ship building. First off, here's the 2 parts of the foremast in their completed form. Like the bowsprit the forward edge is supposed to straight and the tailing edge is where the material is removed (at least at the top part of the lower mast section.
View attachment 381158
I suggest that you not look at the foot of the mast where the "B" is written as I have it on the stern side instead of the bow side of the mast. If that was the biggest error I make on the build it would be a miracle!
Here's the upper past of the lower mast. The eyebolts are supposed to be staggered and not in a straight line. I really wanted to put them in a straight line but stayed with the plans.
View attachment 381159
The lower mast has hardware to support the foremast boom. This consisted of 2 bands linked together at the aft side. I simplified this from the plans so that I could actually make something that looked acceptable. I cleaned it up from what is shown in the picture.
View attachment 381161
The boom gear attached to the foremast. note the twisted wire "pigtail" that I added. This will be trimmed later to fit into the end of the boom, another modification of mine to simplify the construction. The mast hoops are under the tape which is there to protect the fragile hoops until I am ready for them. Forgetting to add the hops before adding the parts at both ends would be a real problem.
View attachment 381160
The mainmast has also been completed and both masts have been assembled. The shrouds and ratlines on the upper parts of the masts are in place and the masts are ready to be placed.
Hugh, your competitive side is showing!Jeff this is looking stunning. I’m jealous as I haven’t been able to work on mine in about 10 days, mostly due to a trip to visit the in-laws. Hopefully, maybe I’ll have some free time tomorrow. I can’t wait to try to close the gap a little in our builds.
You continue to set a high bar.
You've done a lot of good stuff since the last time I saw your BN, Jeff. Thanks for the detailed explanations.
Done with both the fore and main mast shrouds and ratlines. Not much to say about these other than although the ratlines are not perfect, they look OK. I made the shrouds a slightly bigger diameter than called for just because I thought they looked better a bit oversized. The shrouds on the real thing were twisted metal and significantly smaller than is typical for earlier vessels. If you have watched Captains Courageous you would have seen them cutting away metal shrouds after the accident with the schooner near the end of the movie. If you have not watched this movie and your are building a Grand Banks schooner like the Bluenose, I highly recommend it. I borrowed the movie from my local library, but I understand it is available (at the time of this posting) on YouTube as a paid movie.
Next up will be installing the fore and aft standing rigging.
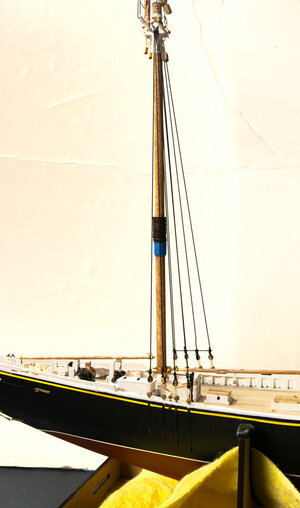

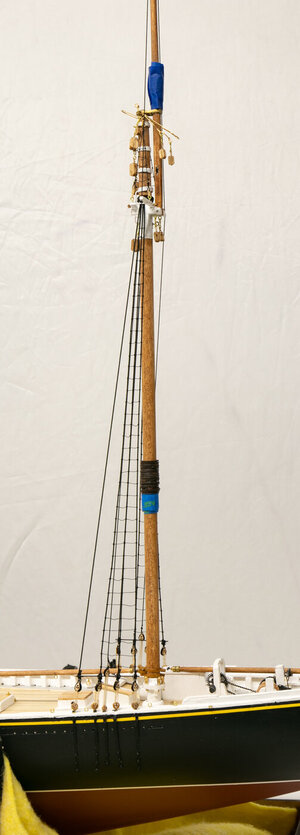
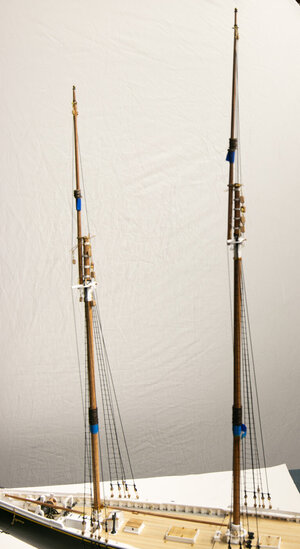
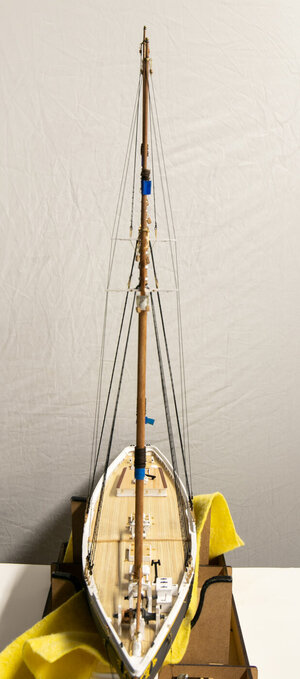
Next up will be installing the fore and aft standing rigging.


Hi Jeff. You BN is now starting to show her great lines more and more. Nice rigging of the shrouds and ratlines.Done with both the fore and main mast shrouds and ratlines. Not much to say about these other than although the ratlines are not perfect, they look OK. I made the shrouds a slightly bigger diameter than called for just because I thought they looked better a bit oversized. The shrouds on the real thing were twisted metal and significantly smaller than is typical for earlier vessels. If you have watched Captains Courageous you would have seen them cutting away metal shrouds after the accident with the schooner near the end of the movie. If you have not watched this movie and your are building a Grand Banks schooner like the Bluenose, I highly recommend it. I borrowed the movie from my local library, but I understand it is available (at the time of this posting) on YouTube as a paid movie.
Next up will be installing the fore and aft standing rigging.
View attachment 381682View attachment 381683View attachment 381684View attachment 381685
View attachment 381686
Regards, Peter
Last edited:
- Joined
- Jan 13, 2023
- Messages
- 30
- Points
- 48

Beautiful workmanship, looking fantasticHi Jeff. You BN is now starting to show her great lines more and more. Nice rigging of the shouds.
Regards, Peter
Thanks Peter.Hi Jeff. You BN is now starting to show her great lines more and more. Nice rigging of the shrouds and ratlines.
Regards, Peter
Thanks. The Bluenose has beautiful lines and the MS kit does a nice job giving the builder ideas on how the improve the look of the model.Beautiful workmanship, looking fantastic
Kurt Konrath
Kurt Konrath
Not having the upper eyebolts in straight line makes sense to me, as that would create a weak spot down the length of the mast. Almost like putting a Maul into the top of a log and hitting it.
Very likely the reason for the offset eyes.Not having the upper eyebolts in straight line makes sense to me, as that would create a weak spot down the length of the mast. Almost like putting a Maul into the top of a log and hitting it.
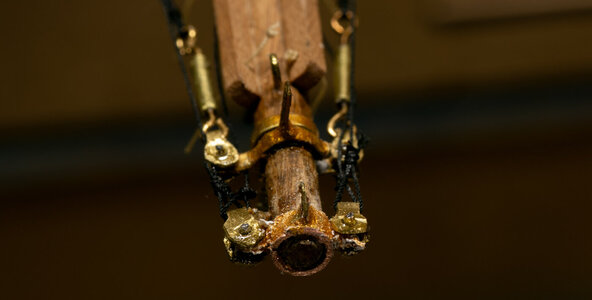
My innate clumsiness got me as I finished my last series of photos. My bowsprit rigging got caught on my vise and broke one of the anchoring rings at the bow. It snapped my solder joint on one of the "ears" and broke open my solder joint of the ring itself.
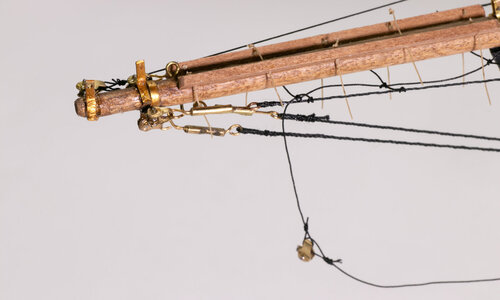
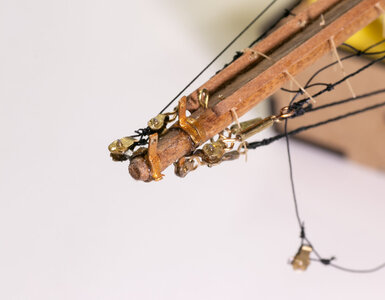
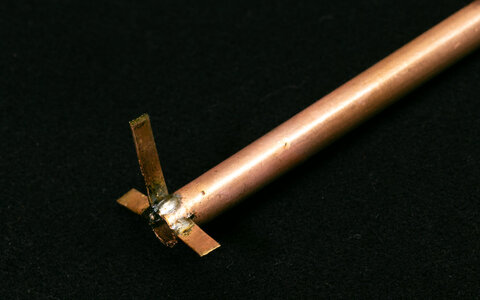
I spent some time thinking about how to fix this without having to redo the rigging if possible. I decided it was worth trying something novel (for me). The forwardmost ring has 3 "ears" for rigging that needed to be replaced. I had some copper tubing of just the correct diameter. I started by sawing slots in the end of the tube for the ears to slot into.
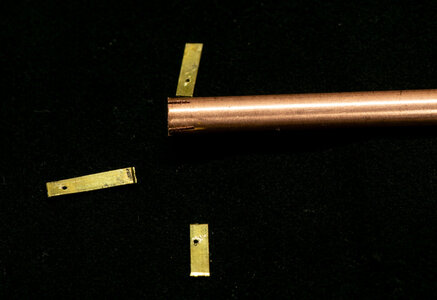
Next, I soldered the brass strip "ears" in place. This sounds easy but wasn't really that easy. I chose to use some wider brass than I had additional used since the balloon jib stay is likely to need something fairly strong to be attached to.
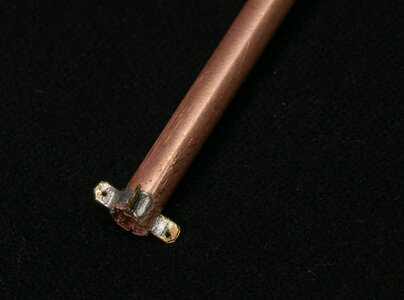
Once I had the soldering completed, I cleaned up the excess solder with a round file and filed the inner surface smooth with the same file. One of the joints was not well soldered and I ended up redoing one of the "ears". I checked the fit before cutting the ring off the tubing and after some additional filing on the inside of the joints it fit well.
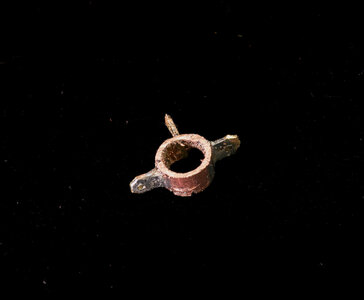
I cut the end from the tubing and slid it in place. Some paint to cover the solder and copper color and the new piece was slid onto the bowsprit.
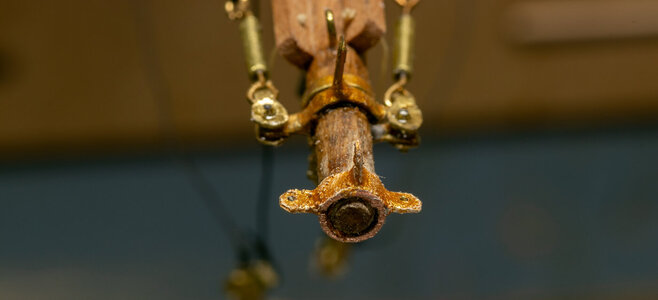
The original shackles were reused as I was able to remove the pins by using some CA glue remover to aid in pulling out the original pins. I had assumed that I would need to make new shackles, but got lucky here. I was able to re-pin the shackles without having to retie the rigging which would have also meant redoing the footropes.
And this is why I haven't attached the catheads yet. They would not last a week while I am actively working on the ship.


I spent some time thinking about how to fix this without having to redo the rigging if possible. I decided it was worth trying something novel (for me). The forwardmost ring has 3 "ears" for rigging that needed to be replaced. I had some copper tubing of just the correct diameter. I started by sawing slots in the end of the tube for the ears to slot into.

Next, I soldered the brass strip "ears" in place. This sounds easy but wasn't really that easy. I chose to use some wider brass than I had additional used since the balloon jib stay is likely to need something fairly strong to be attached to.

Once I had the soldering completed, I cleaned up the excess solder with a round file and filed the inner surface smooth with the same file. One of the joints was not well soldered and I ended up redoing one of the "ears". I checked the fit before cutting the ring off the tubing and after some additional filing on the inside of the joints it fit well.

I cut the end from the tubing and slid it in place. Some paint to cover the solder and copper color and the new piece was slid onto the bowsprit.


The original shackles were reused as I was able to remove the pins by using some CA glue remover to aid in pulling out the original pins. I had assumed that I would need to make new shackles, but got lucky here. I was able to re-pin the shackles without having to retie the rigging which would have also meant redoing the footropes.

And this is why I haven't attached the catheads yet. They would not last a week while I am actively working on the ship.
Nice recovery!
- Joined
- Sep 3, 2021
- Messages
- 5,199
- Points
- 738

Now that's a nasty redo/repair. Nice solution.My innate clumsiness got me as I finished my last series of photos. My bowsprit rigging got caught on my vise and broke one of the anchoring rings at the bow. It snapped my solder joint on one of the "ears" and broke open my solder joint of the ring itself.
View attachment 381833
View attachment 381834
I spent some time thinking about how to fix this without having to redo the rigging if possible. I decided it was worth trying something novel (for me). The forwardmost ring has 3 "ears" for rigging that needed to be replaced. I had some copper tubing of just the correct diameter. I started by sawing slots in the end of the tube for the ears to slot into.
View attachment 381835
Next, I soldered the brass strip "ears" in place. This sounds easy but wasn't really that easy. I chose to use some wider brass than I had additional used since the balloon jib stay is likely to need something fairly strong to be attached to.
View attachment 381836
Once I had the soldering completed, I cleaned up the excess solder with a round file and filed the inner surface smooth with the same file. One of the joints was not well soldered and I ended up redoing one of the "ears". I checked the fit before cutting the ring off the tubing and after some additional filing on the inside of the joints it fit well.
View attachment 381837
I cut the end from the tubing and slid it in place. Some paint to cover the solder and copper color and the new piece was slid onto the bowsprit.
View attachment 381838
View attachment 381839
The original shackles were reused as I was able to remove the pins by using some CA glue remover to aid in pulling out the original pins. I had assumed that I would need to make new shackles, but got lucky here. I was able to re-pin the shackles without having to retie the rigging which would have also meant redoing the footropes.
View attachment 381840
And this is why I haven't attached the catheads yet. They would not last a week while I am actively working on the ship.


