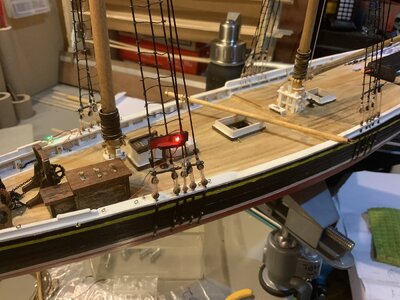
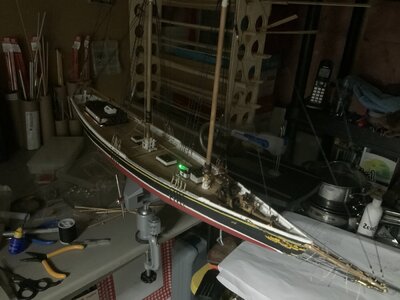
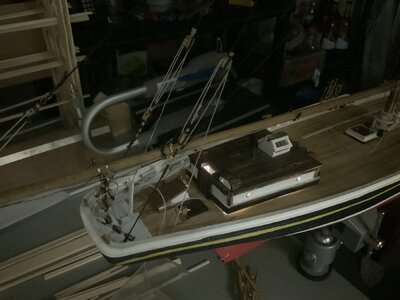
This is an awesome Bluenose practicum. Has lots of details not included in the plans or regular instructions. Might be helpful @PT-2 . http://modelshipbuilder.com/e107_im...eisnor/bn-1-4/Bluenose Practicum Standard.pdf
-

Win a Free Custom Engraved Brass Coin!!!
As a way to introduce our brass coins to the community, we will raffle off a free coin during the month of August. Follow link ABOVE for instructions for entering.
-

PRE-ORDER SHIPS IN SCALE TODAY!
The beloved Ships in Scale Magazine is back and charting a new course for 2026!
Discover new skills, new techniques, and new inspirations in every issue.
NOTE THAT OUR FIRST ISSUE WILL BE JAN/FEB 2026
You are using an out of date browser. It may not display this or other websites correctly.
You should upgrade or use an alternative browser.
You should upgrade or use an alternative browser.
I had to slit the transom rail as it does not quite fit the stern properly. I did this by cutting it in 2 places on either side of the center just before the corner. If you pull it back so it meets the stancheons then it overhangs too far, sliding it forward and it’s too narrow. It was an easy fix, I’ve seen others recreate the entire piece but it was easy to drop in a filler piece on each side.Here are a few of my procedure making a tracing of the outer inverted hull to draw the main railing and dividing it into manageable sections to cut and fit before securing them in place after the repainting and touch up are done beneath that rail. Then I may do the deck planking before hull for access from beneath as may be needed.View attachment 194379
Next to draw the rail and separate sections to cut from the stock material providedView attachment 194380
Then the rough cut sections laid out again for the pic after dry setting them on the stancheonsView attachment 194381
When placed on the stanchions for some unknown reason the forward most did not quite match with the laser cut bow rail (Y shape) but as those were too long I an cut and file them back to fit with the bow piece as needed for the hull itself. Those two will be the last ones set as I will work aft to fore. Some patching filler (sawdust and glue) will likely be needed for some small cracks between the complex joining ends when rotated into final alignment athwartships. The top will be painted out white anyway so that may be one of those covered issue. Rich (PT-2)
she's looking good Rich. I still haven't built a bluenose. maybe some day
Thank you for the reference and recommendation. I found it some months ago and have been referring to it frequently to bring some into my MS2130 Rich (PT-2_This is an awesome Bluenose practicum. Has lots of details not included in the plans or regular instructions. Might be helpful @PT-2 . http://modelshipbuilder.com/e107_images/custom/msbimages/eisnor/bn-1-4/Bluenose Practicum Standard.pdf
I am doing the transom planking beneath this piece to sand down for the base to the transom main rail piece. I think that I have it OK from prior dry fits but will check again when ready to place and may have to follow your tack.. Thanks, Rich (PT-2)I had to slit the transom rail as it does not quite fit the stern properly. I did this by cutting it in 2 places on either side of the center just before the corner. If you pull it back so it meets the stancheons then it overhangs too far, sliding it forward and it’s too narrow. It was an easy fix, I’ve seen others recreate the entire piece but it was easy to drop in a filler piece on each side.
Something else I remember from this part of the build. The cat heads, major pain in the ass. Once you make them do not install, the slightest brush against them mangles them. I pulled them off, along with the anchors and set them aside until the end. Just a suggestion. 
Nice touch with the running lights and very good advise on the cats. I am far "abaft" in the wake of your transom. Rich (PT-2)Something else I remember from this part of the build. The cat heads, major pain in the ass. Once you make them do not install, the slightest brush against them mangles them. I pulled them off, along with the anchors and set them aside until the end. Just a suggestion.
Cool idea for a warm inviting cabin and spaces beneath deck. Rich (PT-2)Got the lights done on both sides, here’s the night shot.
View attachment 194846View attachment 194847
Adjusting is like life itself as adjustments are frequently needed. When in the Navy I had a chief advise me to keep my feet dancing on the shifting deck so that I wouldn't fall down. Rich (PT-2)W
Progress is going slowly as I spend time looking at other references as to how Bluenose in a fishing condition was set up both on the MS2130 plan annotations, and the Bluenose II book which has significant lookbacks and details from the original schooner, and the 1/4 inch POF practicum, melding all of them together going outside of the MS2130 box/plan/parts. Spent some time trying decking plank layout for lengths and tapering widths. I"ll combine tapering longer planking pieces with scribed butt ends and fasteners conforming to the 12 ft max length that I found reference. Also that the decking was White Pine with oakum caulking and finished with two coats boiled linseed oil. Here are a few photos of limited progress to date: Only the waterways are glued down. All else is dry fit, no glue until the nibbing strakes are all taken care of. All deck planking has been rubbed with a very soft Eagle chem sealed Draughting 314 pencil. Working centerline outwardsAdjusting is like life itself as adjustments are frequently needed. When in the Navy I had a chief advise me to keep my feet dancing on the shifting deck so that I wouldn't fall down. Rich (PT-2)
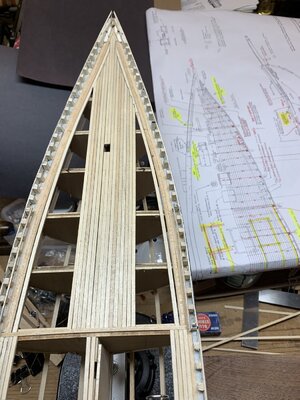
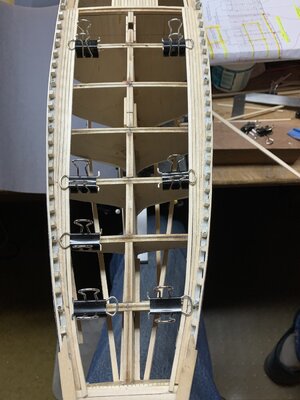 Next aft working with the curved outboard inward with my transom narrow plank end marks for tapering. and a shot of the plan looking aft with the kit main rail part with I trimmed of as you can see at that strange shape is nowhere to be found other than in this plan.
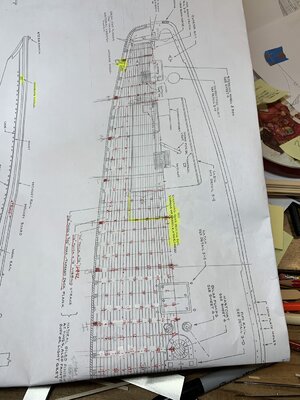
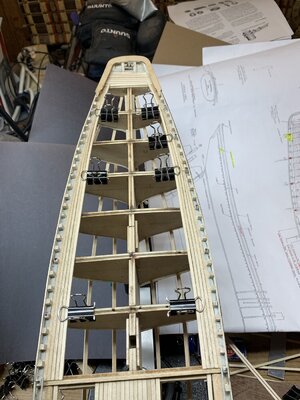 When I get some more of the decking done I think that I will place the main railing full length before hull planking turning the hull over in the clamp for that.
Strange. . . I seem to have deleted my opening comments and only put up some photos of the dry fit decking planks, no glue yet until everything fits and nests together. All of the deck plank edges are being rubbed with an Eagle chem sealed Draughting 314 which is very soft. I have cut in four "gury sluces" which were on the schooner but not shown on the model plans/elevations as I will proceed with the build to present it as much as I can in a fishing equipage, not racing. I think that the large gury sluces probably had a hatch cover when racing but will not have those as they would have been stowed away somewhere.View attachment 195359View attachment 195360Next aft working with the curved outboard inward with my transom narrow plank end marks for tapering. and a shot of the plan looking aft with the kit main rail part with I trimmed of as you can see at that strange shape is nowhere to be found other than in this plan.View attachment 195362View attachment 195361 When I get some more of the decking done I think that I will place the main railing full length before hull planking turning the hull over in the clamp for that.
This is looking very good! She’s going to be beautiful when you’re done! Making me want to build one...lol. By the way, which kit are you building (manufacturer, scale)?View attachment 195359View attachment 195360Next aft working with the curved outboard inward with my transom narrow plank end marks for tapering. and a shot of the plan looking aft with the kit main rail part with I trimmed of as you can see at that strange shape is nowhere to be found other than in this plan.View attachment 195362View attachment 195361 When I get some more of the decking done I think that I will place the main railing full length before hull planking turning the hull over in the clamp for that.
Last edited:
Canoe21
Lawrence
Hello Chris, Great job you are doing on your Bluenose. I built the Bluenose II many years ago and I have been stuck with model ship building ever since. A great hobby. Thanks for your Phil Eisnor build plans they sure will come in handy when I start Heidrich's Bluenose POF build that I am looking forward. Just love the detail that you have added to your build including the running lights.This is an awesome Bluenose practicum. Has lots of details not included in the plans or regular instructions. Might be helpful @PT-2 . http://modelshipbuilder.com/e107_images/custom/msbimages/eisnor/bn-1-4/Bluenose Practicum Standard.pdf
Regards Lawrence
Canoe21
Lawrence
Hello Rich Supper job you are doing on your Bluenose, Just love your main deck Nibing, this takes a lot of time to get it correct but it is well worth the extra effort. This build is great practice for your Heinrich POF Bluenose that I am also looking forward.
Regards Lawrence
Regards Lawrence
Hey Rich, suggestion before gluing down your planks. Create a frame for all your hatches and openings with scrap wood. I found this very helpful from another build and did this for my deck openings. Also if you're considering any lighting now is the time to run your wires.
My Thanksgiving Thanks to all who have shared their "look see" at my decking progress, and suggestions which I will take note of with this MS2130 1/64 scale (3/16" per ft.) kit. In the process of looking back at the plans (continually) I saw that I made a mistake in the width of the main rail but it is too wide from taking the full width of the transom piece forward. Taking note of the reduction in width that actually was cut into that piece I will continue that reduction forward to the mid-ships wider pin railing section. This time not by hand as before but a way to try out an oscillating spindle sander that I ordered to rough out the reduction. If my splicing joinery doesn't fit I'll rip down a plank of the same thickness and make them over again for better joints. I should be able to use the former ones as templates and not have to go back to my inverted hull paper tracing which can then serve as a check. For now I am continuing on the forward deck starboard side and at the same time occasionally move back to the long tapered after-deck pieces for variation in attention span. I like the foredeck nibbing and have worked out a process to make that progress more rapidly and with better precision.Hey Rich, suggestion before gluing down your planks. Create a frame for all your hatches and openings with scrap wood. I found this very helpful from another build and did this for my deck openings. Also if you're considering any lighting now is the time to run your wires.
For our USA members . . . "Happy Thanksgiving" for what you have. For our out of country members I hope that you take a moment to also reflect upon what you have on the positive side and be able to resolve what has not been positive for a more calm tack into the future. Rich (PT-2)
Happy Thanksgiving Enjoy your family time. Good luck with main rail rebuild. Looking forward to the pics.
Learned a hard lesson from my precise dry-fit decking nibbed end joints and overall. While dry and a precise fit does not carry over with the light touches of TightBond which must have just enough moisture in it to cause the wood side grain decking to swell enough that the former fitting joint would not seat. The notched nibbing strake became weak enough to settle between the bulkheads, lower than the more substantial decking so that those pieces ended up above the notches better than half. Lots of sanding brought those high planks down to "almost" where they were dry but I am not happy with the result. On the port side I am gluing down the dry prefit and making adjustments as I proceed. I'll only notch the nibbing strake as I need for each new plank to keep it as strong and in place as I can. I put some heated curve into the after-deck planks and sand the taper down toward the transom. Some views of today's frustration and slow progress:My Thanksgiving Thanks to all who have shared their "look see" at my decking progress, and suggestions which I will take note of with this MS2130 1/64 scale (3/16" per ft.) kit. In the process of looking back at the plans (continually) I saw that I made a mistake in the width of the main rail but it is too wide from taking the full width of the transom piece forward. Taking note of the reduction in width that actually was cut into that piece I will continue that reduction forward to the mid-ships wider pin railing section. This time not by hand as before but a way to try out an oscillating spindle sander that I ordered to rough out the reduction. If my splicing joinery doesn't fit I'll rip down a plank of the same thickness and make them over again for better joints. I should be able to use the former ones as templates and not have to go back to my inverted hull paper tracing which can then serve as a check. For now I am continuing on the forward deck starboard side and at the same time occasionally move back to the long tapered after-deck pieces for variation in attention span. I like the foredeck nibbing and have worked out a process to make that progress more rapidly and with better precision.
For our USA members . . . "Happy Thanksgiving" for what you have. For our out of country members I hope that you take a moment to also reflect upon what you have on the positive side and be able to resolve what has not been positive for a more calm tack into the future. Rich (PT-2)
Some sanding dust is visible as not fully cleaned out as the work continues (Sloppy watch crew work . . . no excuses:
Bow first with glued and heavily sanded down starboard half. port side being secured as I progress:
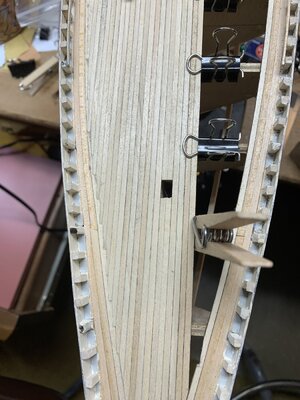
Now the tapered stern planking working foredeck then aft and alternating P&S on the after-
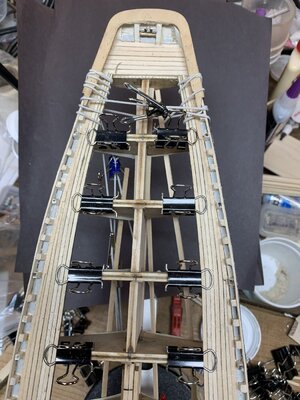 decking; when it is all down and sanded I may mark the plank ends and nailing dots for pencil marking (.3 mm drafting pencil lead) to get that off of my mind. Then as I said back to correct the main railing width issue.


