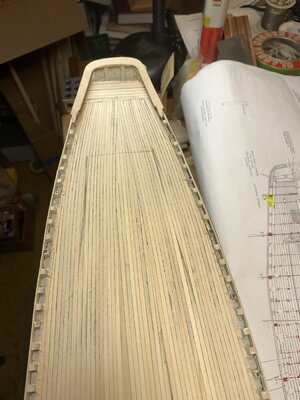
Thank you for your compliments of the planking such as I could install it for finish scraping and the lines of the hull which I have to be patient before turning back over to look forward with the beautifully knuckle curved bow. RichThat photo shows the beautiful lines of the ship model.
.
-

Win a Free Custom Engraved Brass Coin!!!
As a way to introduce our brass coins to the community, we will raffle off a free coin during the month of August. Follow link ABOVE for instructions for entering.
-

PRE-ORDER SHIPS IN SCALE TODAY!
The beloved Ships in Scale Magazine is back and charting a new course for 2026!
Discover new skills, new techniques, and new inspirations in every issue.
NOTE THAT OUR FIRST ISSUE WILL BE JAN/FEB 2026
You are using an out of date browser. It may not display this or other websites correctly.
You should upgrade or use an alternative browser.
You should upgrade or use an alternative browser.
About the variable 10-pointed divider, it is an excellent tool that I use for many different things where division into multiple equally spaced points are needed. My larger 12 inch one takes over where these little ones are limited at their max. It saves a compounding error if I were to use only a compass, locked in, and walking the points across the span. I combine that with the use of my proportional divider which is marked for both lines and circles (never have used the circle gradations but will have to experiment with that to understand what is involved. . . radius, diameter, ???
For planking I primarily recognize the experience that I gained from doing to stripper canoes guided by Gilles guiding me and that group. Any suggestions are always accepted on my pier. Rich (PT-2)
For planking I primarily recognize the experience that I gained from doing to stripper canoes guided by Gilles guiding me and that group. Any suggestions are always accepted on my pier. Rich (PT-2)
The source of one pair is a national secret. . . but one small and the larger one are marked Theo. Alteneder & Sons. I bought those back in the 1970s and have not checked to see if they are still available. No recollection of cost for either. I used them a lot in photo rectification along with proportional dividers as well and many more years in our architectural office. Rich (PT-2)HI RICH, GOOD WORK THERE I LOVE THE 10 POINT DIVIDERS WHERE DID YOU GET THEM ARE THEY STILL AVAILABLE. GOD BLESS STAY SAFE YOU AND YOURS DONJ
Nice planking Rich. Now I need to find one of those divider tools. 
The variable point dividers tell me where. . . my problem is in shaping the planks to match the widths. Some not so true but it all works out in the end and no ship of any size is perfectly symmetrical. Rich (PT_2)
yNice planking Rich. Now I need to find one of those divider tools.
You are doing a stellar job. Love this ship and all the history behind it.
Cheers ~
Cheers ~
For me the history of the people and fishing as well as the racing make the schooner more personally involving as I try to fashion and set each piece. Thanks. I'll post a status photo later. Rich (PT-2)
oYou are doing a stellar job. Love this ship and all the history behind it.
Cheers ~
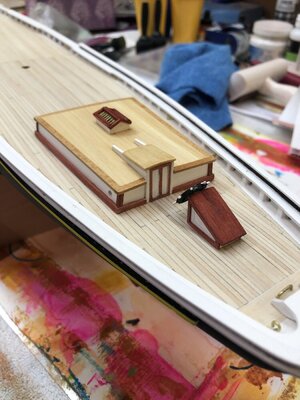
Here is the present status of a rather ragged decking plank job done forwards to the MS2130 Plan for nibbing and then from Bluenose II book which does not have the after deck waterways and decking nibbed, only tapered I'll tell my variance on that below:For me the history of the people and fishing as well as the racing make the schooner more personally involving as I try to fashion and set each piece. Thanks. I'll post a status photo later. Rich (PT-2)
o
First full decking both fore and aft

Now the after decking without nibbing per Bluenose II drawings for curves only but my closure using the planking widths of the MS plan at mid ships and curving aft shows the V closure difference from the MS plans. . . like closing the bottom of a canoe. . . oh well. Most of that a bit forward is covered by the main cabin. Scarf joints in deck planking not in either source, only butt joints and I have not seen other types of deck joints so I guess butt which I will mark/scribe into the full length planks will simulate that manner.

Now the midships decking with plank widths as shown in MS2130. Sanding and scraping just begun and needs work to even out high and low planks.


Next will be to redo the main rail pieces all around or if they will not fit to totally replace the present ones narrowed down to proper width and with tight mating scarf joints as in the present ones which are too wide. The rail joints between the transom and bow pieces with scarf joint ends are assumed to be continued as such but nothing in drawings that I see makes this clear which way to go: scarf or butt.
Great and steady progress on the deck, Rich. I like the joggling you made. I also use single edge blades to scrape desks, they efficient and cheap disposables.
Thanks for the encouragement sent along. It was a bit disappointing to not have symmetry in the decking planks P&S necessitating some additional inserted double tapered fillers but those may not be noticed when the deck items are installed. Still had the problem of some planks being too low (mostly between bulkheads that were not symmetrically cambered P&S) so there will be a decision to continue sanding/scraping until all are flush before going through the 1/16 inch thickness. No way to measure that unless someone can give me a recommendation. I don't want to push a test hole through as that will not be an accurate known point of penetration disallowing any pushing of fibers ahead before they are finally penetrated but beyond the actual face beneath. ?????? The easier out is to just accept a few lower ones which is not in the quality spirit of SoS builds.Good job Rich! Once you have done the finishing on the deck, I know it will look stellar! The nibbing of the planks is a nice detail which adds to the overall effect!
Used my newly acquired Wen oscillating spindle sander to reduce the erroneous mail railing widths to a rough line and will now do the hand sanding/filing and see how the scarf joints work out. Option will to start from the beginning with new ones. The Wen is loud and the spacing disks around the sanding drum are just a bit beneath the face of the table itself which causes the ends of short pieces to jamb necessitating backing the piece up for a new angle or lifting the end up enough to continue. I am going to call their tech support and see if these are a defect or their recommended fix. My own idea is to place some small wire beneath as a spacer. We'll see what works best.
I made my main rails from a single sheet. It’s so much easier. Also added monkey rail to the solid main rail and Buffalo rail prior to installing on the ship. Also custom made stern main rail. Just turn her upside down and trace her outline in thick cardboard. You will save yourself a lot of time and aggravation. 

Thanks for your recommendation. Previously I did invert the hull to trace it and draw the railings. As a piece needs to be longer than 24" I will have to go to our local model/hobby shop to see if they have the thickness and length needed. In the mean time I will try to see that I can do with the sections that I have. Your work looks very nice with the after deck planks looking of the same width and parallel to the keel line. Mine following the curved hull are ragged in comparison and create challenges in marking simulated ends and fasteners. Rich (PT-2)I made my main rails from a single sheet. It’s so much easier. Also added monkey rail to the solid main rail and Buffalo rail prior to installing on the ship. Also custom made stern main rail. Just turn her upside down and trace her outline in thick cardboard. You will save yourself a lot of time and aggravation. View attachment 198409
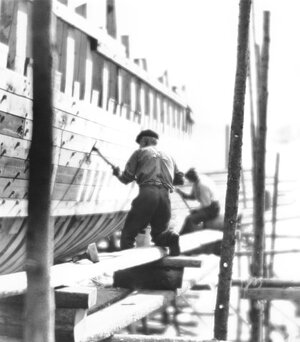
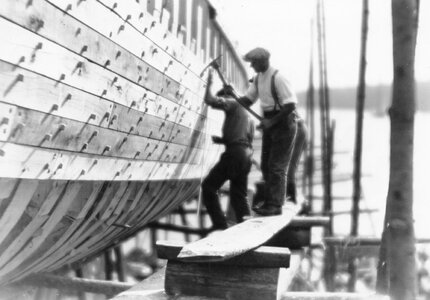
That is also an excellent view of the treenails which are drawn and dimensions provided in the Bluenose II book. Thanks for these. What about, or is it feasible to build a library of collected photos and historical "look see" in our forum for general and future reference and assistance for those of us wanting to look back? RichHi Rich. Please see the attached pictures from MacAskill showing the butt-joints in the original Bluenose's planking.
View attachment 198416
View attachment 198417
Here is a contemporary Bluenose II planking insight:Hi Rich. Please see the attached pictures from MacAskill showing the butt-joints in the original Bluenose's planking.
View attachment 198416
View attachment 198417
Rich (PT-2)
Just for the fun and spirit could we post the ballad?Rich I think that is a great idea. As part of the Bluenose Main Support group page, it would make an excellent addition!
Bluenose II Restoration
In 2010 Covey Island Boatworks incorporated a new joint venture company together with Lunenburg Foundry and Snyders Shipyard. The mandate of this new company, “Lunenburg Shipyard Alliance”, (LSA) is to promote Nova Scotia’s craftsmanship and boatbuilding skills to the world and help to bring...
coveyisland.com
Rich (PT-2)
Didn't copy in the ballad. . . let's try again:Just for the fun and spirit could we post the ballad?
Our own form of a cheerleader recollection and inspiration.Bluenose II Restoration
In 2010 Covey Island Boatworks incorporated a new joint venture company together with Lunenburg Foundry and Snyders Shipyard. The mandate of this new company, “Lunenburg Shipyard Alliance”, (LSA) is to promote Nova Scotia’s craftsmanship and boatbuilding skills to the world and help to bring...coveyisland.com
Rich (PT-2)
Hello Rich, just getting caught up on this log. You have done a marvelous job on the hull and deck planking. You are too modest! Keep up the good work!


