Bluenose

Hello Rich, just getting caught up on this log. You have done a marvelous job on the hull and deck planking. You are too modest! Keep up the good work!
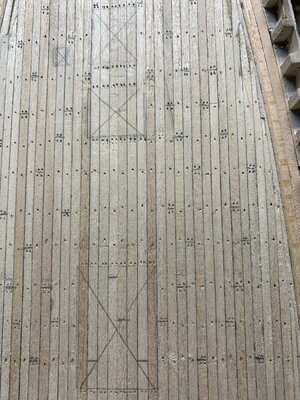
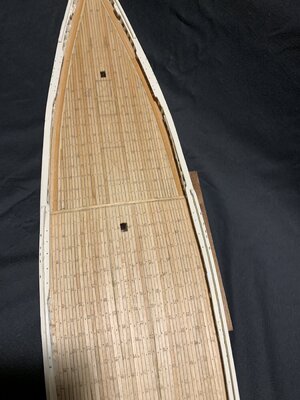
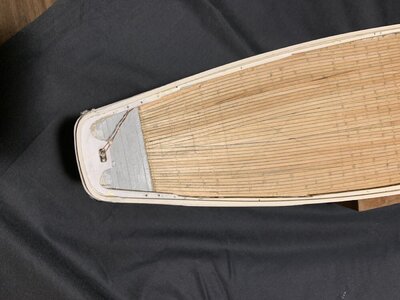
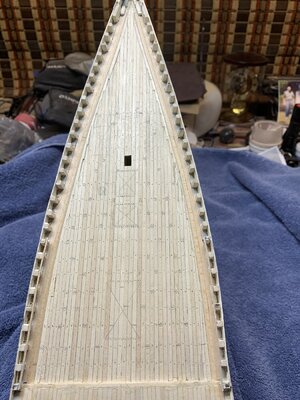
Thanks for your "kind" reply. I have taken a questionable tack in using the general deck planking principles for the fishing schooners gleaned from a 1;48 practicum of around 12 ft long, I have marked out the foredeck and applied a spacing practice to mark the butted plank ends (2 fasteners each) Foredeck Planking.jpgFordeck Planking fastening.jpgand the alternating up of down single fastener into the beam below, using a sharp awl and .3 mm pencil for darkening the depression. It shocked me how this "change of visual scale" took on a cluttered appearance from the former smooth caulked decking lines. I am now doing the same on the after deck which is a greater challenge as the planks narrow/taper down I width as they curve around approaching the transom. I'm almost chicken to post any photos of that but will anyway. . . . holding my breath for what the reaction may be. It is not the typical very uniform decking/fastening that I have seen elsewhere I SoS builds or any of the Bluenose model submissions. Not up to Ohla's standards but what my hands and vision produce.
 
Thanks for your "kind" reply. I have taken a questionable tack in using the general deck planking principles for the fishing schooners gleaned from a 1;48 practicum of around 12 ft long, I have marked out the foredeck and applied a spacing practice to mark the butted plank ends (2 fasteners each) View attachment 198917View attachment 198918and the alternating up of down single fastener into the beam below, using a sharp awl and .3 mm pencil for darkening the depression. It shocked me how this "change of visual scale" took on a cluttered appearance from the former smooth caulked decking lines. I am now doing the same on the after deck which is a greater challenge as the planks narrow/taper down I width as they curve around approaching the transom. I'm almost chicken to post any photos of that but will anyway. . . . holding my breath for what the reaction may be. It is not the typical very uniform decking/fastening that I have seen elsewhere I SoS builds or any of the Bluenose model submissions. Not up to Ohla's standards but what my hands and vision produce.
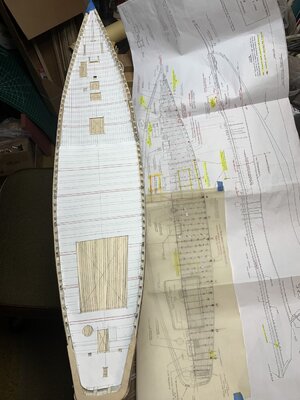
After putting the bow before the stern I should back up and show the layout drawing that I did for both decks before beginning the planking fasteners.Laying out the Decks.jpgLaying out the Decks.jpg
Here you can see the deck areas to be covered with other items as well as beams associated with the faux stations and kit bulkhead stations in red. Only the foredeck drawing included the 1/8 inch strips as the afterdeck has curved and tapered ones. That one is a challenge to figure out how to show the fasteners for the deck planks as matching the beams and combings. Rich (PT-2)
 
Good layout Rich which makes perfect sense! Those deck fastenings sure look busy and like a heck of a job.
 
Good layout Rich which makes perfect sense! Those deck fastenings sure look busy and like a heck of a job.
For me they gave me my first comprehension of the scale of the model in trying to capture that of the schooner for which we have seen some photos and old film clips. That is my own objective to capture the schooner in the fishing mode. With all of the sanding then scraping to get the plank top faces aligned I almost went through them and have had some punctures in softly pushing the fasteners' locations. A Dutchman required in one place and yellow glue with sanding dust in others. Rich
 
Thank you, nice work in posting this information. This is a great source for many of the details on the Bluenose build.
The thread/library doors never close and all additions are appreciated. No checkout card needed for return visits. Rich (PT-2)
 
Great photo’s. My windlass looks nothing like the real thing. Poetic license. View attachment 199369
I need your experience and recommendation on how to coordinate the main rail and monkey board on top along with the monkey rail as to installing those three with the slots for chain plates and longer eyebolts through all to the deck aligned. I have been mentally working round this problem for days. I did fabricate the main rail in five sections between the transom main rail and bow rail laser cut pieces as recommended in two different instructions but not really talked about t all in the MS2130 instructions. My main rail scarf joints are not all tight but as they are painted I will apply some filler, sand smooth, and paint over once they are glued down. That starts the alignment of the holes issue. Please share your experience as I need that to add to me own ideas to avoid an additional compounding problem in getting these rails installed to move forward. Thanks, Rich (PT-2)
 
I need your experience and recommendation on how to coordinate the main rail and monkey board on top along with the monkey rail as to installing those three with the slots for chain plates and longer eyebolts through all to the deck aligned. I have been mentally working round this problem for days. I did fabricate the main rail in five sections between the transom main rail and bow rail laser cut pieces as recommended in two different instructions but not really talked about t all in the MS2130 instructions. My main rail scarf joints are not all tight but as they are painted I will apply some filler, sand smooth, and paint over once they are glued down. That starts the alignment of the holes issue. Please share your experience as I need that to add to me own ideas to avoid an additional compounding problem in getting these rails installed to move forward. Thanks, Rich (PT-2)
Hi Rich, The rail installation can be very frustrating, or relatively easy, as was in my case. I will explain exactly what I did, and perhaps that will help. I purchased matte board ( for framing pictures). It has about the same stiffness as the bass wood we are using, and it can also be used as a building board when done. I traced the outline of the hull on the matte board, and added 2mm to the tracing to simulate the main rail overlap of the hull. I then traced the main rail dimensions onto the matte board, and used that as a template for main rail fabrication. I remade the transom main rail (the kit supplied part is unusable), then port and starboard rails from a single piece of basswood. I then scarfed and glued the new transom main rail, the port and starboard rails, and the kit supplied bow main rail together into one single piece. I trial fit this piece to the ship, and sanded where required ( the 2mm overlap was sufficient for minor variations).

This single main rail piece was masked where it contacted the stanchions and top most plank on the B.N., and also topside where the monkey board would be glued. I added the buffalo rail, and then spray painted top and bottom in white..be sure to fill and sand before masking. I use Tamiya tape, or cut narrow strips of yellow frog tape for masking. Both work very well.

I then formed the monkey board. I soaked the board in hot water for ten minutes, and using the matte board, I pinned and slowly shaped the board, the dried it with my heat gun. Then I masked the top and bottom edges, and spray painted black. I always lightly sand every piece of basswood before using it. Its a good habit to get into.

The monkey board is now glued onto the main rail. The monkey rail was also fabricated from a single piece of basswood sheet, sanded, masked where it meets the monkey board, and spray painted white. It was then glued onto the monkey rail. We now have a painted and finished ONE PIECE main rail with all its accoutrements.

Be sure to have a solid cradle for the next part. I trial fit the main rail to the B.L., added several pin holes through the main rail into stanchions, three on each side. These predrilled pin holes would serve to position the main rail accurately once I was ready to glue. I then removed the masking tape under the main rail, and applied PVA to the mating surfaces, carefully positioning the main rail with pins through my predrilled holes, and added lots of weights to the rail. I used short lengths of 2x4's which when placed across the main rail kept it perfectly horizontal to the deck, then weights on top of those. When the glue set, voila. a job well done, and painted to boot.

Its a simple matter of marking the main rail paraphernalia once it is on the ship. Hope that helps.
 
Hello Rich, just getting caught up on this log. You have done a marvelous job on the hull and deck planking. You are too modest! Keep up the good work!
Long after the prior status photos and work is my rather sorry looking work as of 29 December. In my case as evidenced, slow work is not necessarily good work. It is with some reluctance that I'll put up the current status where I know there are a lot of poorly done items but they are what my hands and poor eye sight (singular to one only) produces. Lots of touchups as I continually see things that I didn't see before.
Here is the hand painted hull and lines with the rough planking that is visible in the old photos. . . not a filled in and smoothed out showcase model:
Painted Hull.jpg
Then some decking photos with the more random plank lengths terminating on some of the frames and fasteners before I knew that they were probably plugged over and not visible as with Bluenose II photos that I recently found:After decking.jpgFore decking.jpgAft decking.jpg
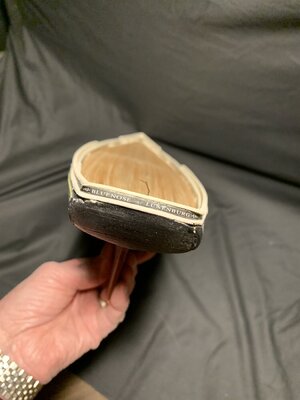
Transom with YQ's pdf file printed and applied after several runs to get it to scale.Transom.jpg
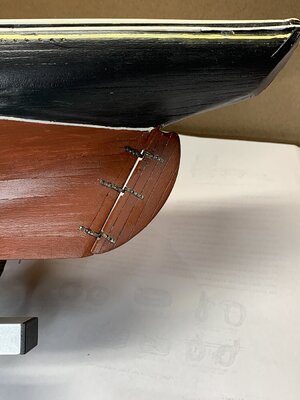
Next hull wise will be the rudder once can figure out how to hold the 1/16th inch brass strips in place to locate the through rudder fastener rods, all aligned as well as learning how to solder the pintel and a tubular gudgeon. For breaks I can always cut and taper down the masts and booms.
Somewhere in the future this schooner may be completed but I don't know when; just trusting that it will. Rich
 
Long after the prior status photos and work is my rather sorry looking work as of 29 December. In my case as evidenced, slow work is not necessarily good work. It is with some reluctance that I'll put up the current status where I know there are a lot of poorly done items but they are what my hands and poor eye sight (singular to one only) produces. Lots of touchups as I continually see things that I didn't see before.
Here is the hand painted hull and lines with the rough planking that is visible in the old photos. . . not a filled in and smoothed out showcase model:
View attachment 202230
Then some decking photos with the more random plank lengths terminating on some of the frames and fasteners before I knew that they were probably plugged over and not visible as with Bluenose II photos that I recently found:View attachment 202231View attachment 202232View attachment 202233
Transom with YQ's pdf file printed and applied after several runs to get it to scale.View attachment 202234
Next hull wise will be the rudder once can figure out how to hold the 1/16th inch brass strips in place to locate the through rudder fastener rods, all aligned as well as learning how to solder the pintel and a tubular gudgeon. For breaks I can always cut and taper down the masts and booms.
Somewhere in the future this schooner may be completed but I don't know when; just trusting that it will. Rich
Forgo to say that like hitting your thumb with a hammer and continuing again, I did the rails in sections with scarf joints which flat looked OK but when on the curved hull went askew and had to have some filler work. At least I got the chain-plate slots aligned by using a few short lengths of the strip stock.
 
@Hello Rich. In China there is a general fear among all students of "losing face" (as they call it) - i.e. making mistakes. However, it is through those exact mistakes that the learning process occurs. I keep telling them that if they knew everything I was teaching them, then why bother to come to class? It is at he moment of discomfort and dissatisfaction, that the mind cflears itself for the most productive learning and information-gathering session. Don't despair about anything - keep it at it. Once you have completed her (and I have no doubt that you will) you will stand back and be amazed at what you have actually achieved.
 
Forgo to say that like hitting your thumb with a hammer and continuing again, I did the rails in sections with scarf joints which flat looked OK but when on the curved hull went askew and had to have some filler work. At least I got the chain-plate slots aligned by. using a few short lengths of the strip stock.
Your build looks fine. Great job on the nibbling. The hull looks like an actual working ship, not a plastic model. I had some problems with the rudder installation. Gudgeons/pintels were attached together with thin wire soldered to both. A tube made things too large and difficult to attach. Consider forgoing the tube. I attached the brass with c.a. Bad mistake. It lifted the hull paint from the slow springiness of the fittings. After removal, and repainting the affected hull area, I reattached the fittings with pins glued into the hull..The pins took the strain and the paint is fine. I would send photos but I am in Florida, and the B.L. is in drydock in Toronto.
 
@Hello Rich. In China there is a general fear among all students of "losing face" (as they call it) - i.e. making mistakes. However, it is through those exact mistakes that the learning process occurs. I keep telling them that if they knew everything I was teaching them, then why bother to come to class? It is at he moment of discomfort and dissatisfaction, that the mind cflears itself for the most productive learning and information-gathering session. Don't despair about anything - keep it at it. Once you have completed her (and I have no doubt that you will) you will stand back and be amazed at what you have actually achieved.
Thank you for your well advised admonition. I realize that I have only the track before my bow and the wake behind is passed over. Rich
 
Your build looks fine. Great job on the nibbling. The hull looks like an actual working ship, not a plastic model. I had some problems with the rudder installation. Gudgeons/pintels were attached together with thin wire soldered to both. A tube made things too large and difficult to attach. Consider forgoing the tube. I attached the brass with c.a. Bad mistake. It lifted the hull paint from the slow springiness of the fittings. After removal, and repainting the affected hull area, I reattached the fittings with pins glued into the hull..The pins took the strain and the paint is fine. I would send photos but I am in Florida, and the B.L. is in drydock in Toronto.
Thanks for your experienced advise regarding the rudder pintels and gudgeons. I guess that if I "drill" only a short distance into the rudder and sternpost, setting a 0.020 brass rod and trimming it off with nail clippers and then filing it flush it can simulate a fully penetrating fastener. That gets me out of the precise alignment of holes on each side which would be highly unlikely with my limited machining skills with my drill press and XY table in stabilization of the brass strip. Thanks again. Rich
 
Thanks for your experienced advise regarding the rudder pintels and gudgeons. I guess that if I "drill" only a short distance into the rudder and sternpost, setting a 0.020 brass rod and trimming it off with nail clippers and then filing it flush it can simulate a fully penetrating fastener. That gets me out of the precise alignment of holes on each side which would be highly unlikely with my limited machining skills with my drill press and XY table in stabilization of the brass strip. Thanks again. Rich
Thats what I did, and it worked fine. A little bit of ca on the end of the pin holds it well. I used pins with small heads.
 
@Hello Rich. In China there is a general fear among all students of "losing face" (as they call it) - i.e. making mistakes. However, it is through those exact mistakes that the learning process occurs. I keep telling them that if they knew everything I was teaching them, then why bother to come to class? It is at he moment of discomfort and dissatisfaction, that the mind cflears itself for the most productive learning and information-gathering session. Don't despair about anything - keep it at it. Once you have completed her (and I have no doubt that you will) you will stand back and be amazed at what you have actually achieved.
Not related to Chinese philosophy but generalizing and worth contemplation and realization is, "The end of all our exploring will be to arrive at where we started, and to know it for the first time." Just a thought in a way related to our expectations about our builds at the laying of the keel to the launching and final rigging. Rich
 
Not related to Chinese philosophy but generalizing and worth contemplation and realization is, "The end of all our exploring will be to arrive at where we started, and to know it for the first time." Just a thought in a way related to our expectations about our builds at the laying of the keel to the launching and final rigging. Rich
Following a night trying to drill holes through the 1/16 x 1/64 inch brass for pintles and gudgeon strips, wasting several from wandering holes and broken bits, I made a jig to hold the strips in place and produced a reasonable but not really good set with soldered pintels, blackened them before being bent and installed on the rudder with CV and small black nails cut off before gluing it in place and then completing installation of the gudgeons in the same manner.Bluenose MS2130 Rudder 1.2.21.jpg With some received recommendations how to alter the bits and drilling process I will next do the deadeye chain plate strips.
Have a great new 2021 with your YQ POF Bluenose builds as I continue far in your wakes. Rich
 
Use a small punch to set the hole locations or a nail. Should help stop the wandering bits.
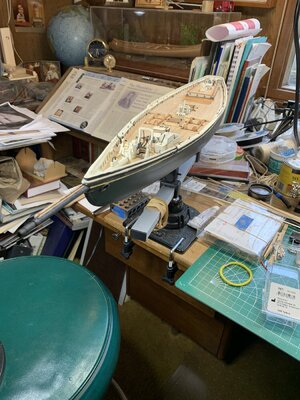
Far past time to put up some photos of progress since the last shot of the rudder installation.
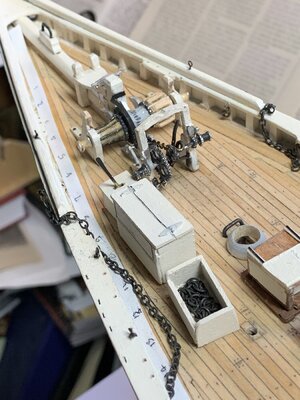
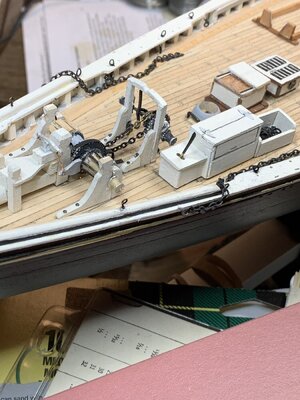
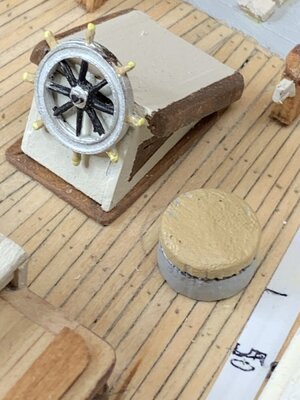
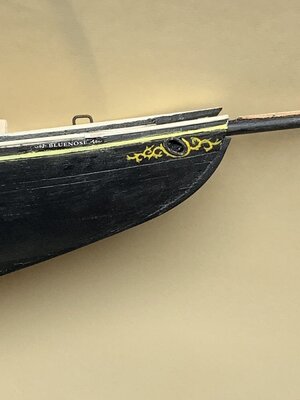
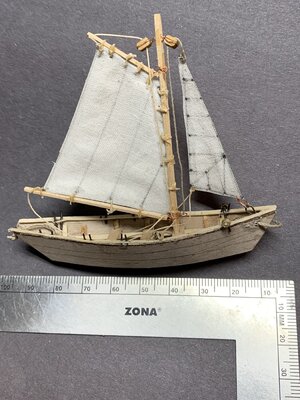
Winch and windlass foredeck.jpgForedeck Winch and Windlass.jpgForedeck.jpgAfter Deck Wheel and wheel box.jpgBN Bow Scroll and Name.jpgHere is a diversion item taking a kit dory and rigging it for sailing out to a fishing location the oar used as a rudder is not shown but there are four for each dory. The others will be done for a nested condition.
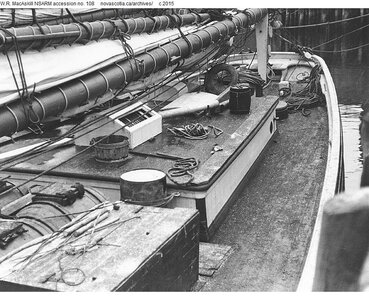
I am using this old photo to provide guidance for how I have done the main cabin and provision for deck storage forward of that with deck protective planks, baiting prep storage box, liver oil tanks, and barrels not shown here. This guided me in how to place the venting pipe on to of the cabin, differently than shown on the kit plans.
Cabin Top.jpgDory Boat Rigged for Sailing.jpg
 
Wow - you have been busy Rich - and you have made great progress. Are all those deck fittings still going to be stained or do they stay like that in their natural state?
 
Back
Top