Every step done, is a step towards completion! The small stuff counts. Before long you will be putting on sails! 
-

Win a Free Custom Engraved Brass Coin!!!
As a way to introduce our brass coins to the community, we will raffle off a free coin during the month of August. Follow link ABOVE for instructions for entering.
-

PRE-ORDER SHIPS IN SCALE TODAY!
The beloved Ships in Scale Magazine is back and charting a new course for 2026!
Discover new skills, new techniques, and new inspirations in every issue.
NOTE THAT OUR FIRST ISSUE WILL BE JAN/FEB 2026
You are using an out of date browser. It may not display this or other websites correctly.
You should upgrade or use an alternative browser.
You should upgrade or use an alternative browser.
Yes.Every step done, is a step towards completion! The small stuff counts. Before long you will be putting on sails!
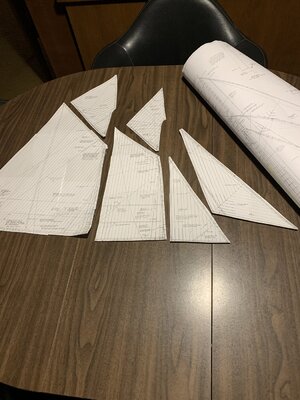
beginning get ready to change hats and moniker to "Sails" as the plans are copyrighted I could not have full sized sheets copied to cut out for sail patterns. I spent some time making 1:1 at 8x111 and taping those together for rough patterns with the seam lines afterwards drawn on. I will make the sails to bend them to the spars on dummy masts laid flat. When laying them out for the photo I noticed that I missed the Balloon Jib from the Foretopmast.
Easier to tie off the booms, gaffs, and hoops that way and have them in place when I transfer to the actual lower mast to then step it. In my approach there are a number of different elements moving forward at roughly the same time bringing those prepped items into play when it is easier for my hands and poor one-eyed vision. One challenge is to try to remember where I have laid aside tagged items around the room. . . then bring them out to assemble them. The same will be used for shrouds and ratlines with the challenge there of getting the deadeyes to the proper shroud length/height. When those are finally set I will have the proper lines to fasten the lower deadeyes' chain plates to the hull. As you say, one step at a time brings me closer to home port. Rich
Great work Rich! I may have to use you as a resource when it’s time for me to make sails! As I have nothing to go by yet.Yes.
beginning get ready to change hats and moniker to "Sails" as the plans are copyrighted I could not have full sized sheets copied to cut out for sail patterns. I spent some time making 1:1 at 8x111 and taping those together for rough patterns with the seam lines afterwards drawn on. I will make the sails to bend them to the spars on dummy masts laid flat. When laying them out for the photo I noticed that I missed the Balloon Jib from the Foretopmast.View attachment 219080
Easier to tie off the booms, gaffs, and hoops that way and have them in place when I transfer to the actual lower mast to then step it. In my approach there are a number of different elements moving forward at roughly the same time bringing those prepped items into play when it is easier for my hands and poor one-eyed vision. One challenge is to try to remember where I have laid aside tagged items around the room. . . then bring them out to assemble them. The same will be used for shrouds and ratlines with the challenge there of getting the deadeyes to the proper shroud length/height. When those are finally set I will have the proper lines to fasten the lower deadeyes' chain plates to the hull. As you say, one step at a time brings me closer to home port. Rich
If I can get access to a large format copier in an office where I worked a decade ago I will see about doing a full size copy of the sail plan sheet which has a lot of running rigging shown. Otherwise it may be to do some smaller areas to be assembled with some controlling dimensions from corners to corners. Having not cut out any material or begun sewing the hemmed edges for the small narrow width I will find out how the kit fabric serves the need or purchasing other fabric which may be thinner and fold tight hems better.Great work Rich! I may have to use you as a resource when it’s time for me to make sails! As I have nothing to go by yet.
Now in pursuit of scale where feasible I have been experimenting to twist 30 ga. copper wire into the 5/8" dia. bowsprit whisker cables with a swedged end to the faux turnbuckle which is presently too large and awaiting arrival of 1.5 mm dia tube smaller than the 2 mm used and shown here for the turnbuckle and swedge fitting.If I can get access to a large format copier in an office where I worked a decade ago I will see about doing a full size copy of the sail plan sheet which has a lot of running rigging shown. Otherwise it may be to do some smaller areas to be assembled with some controlling dimensions from corners to corners. Having not cut out any material or begun sewing the hemmed edges for the small narrow width I will find out how the kit fabric serves the need or purchasing other fabric which may be thinner and fold tight hems better.
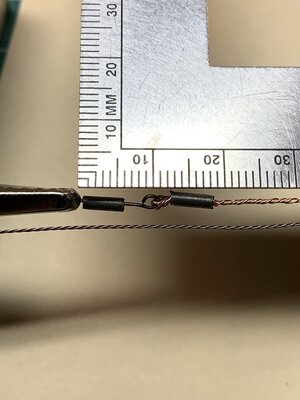
A comparison of the first to sizes :
Larger one is 5 strand with 0.0310" diameter, not blackened,
and the smaller one is 3 strand with 0.0205" dia. and was blackened.
The goal is to arrive at something simulating the actual 5/8" cable and is in a visual proportion to a correct turnbuckle which I found in the recent book, The American Fishing Schooners, p. 659 tp be 14" long and 3" dia. with 13.5" threaded end eye rods. That sound like using the 1.5 mm tube as 1 mm tubes are too small.
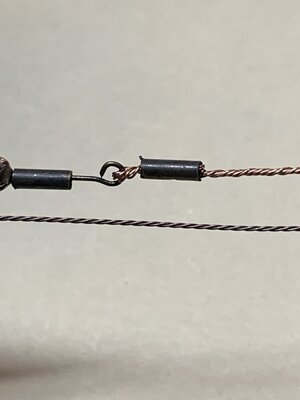 It will be interesting to see how this works out as I will be removing the turnbuckles in place which are too large and were a hopeful and naïve starting trial. Rich
Upon doing a visual double check at 3/16 inch a 14 inch turnbuckle is about 5 mm and the 3 inch diameter is just over 1 mm using the 2 mm tubing that I have which looks too fat so the 1.5 mm tubes, when they arrive, should be a good resolution. I will then make a visually based, decision about the diameter of the wire cables and whisker shrouds for the bowsprit. The same will have to be done for the two chains from the stem to the end of the bowsprit for a good size to use. RichNow in pursuit of scale where feasible I have been experimenting to twist 30 ga. copper wire into the 5/8" dia. bowsprit whisker cables with a swedged end to the faux turnbuckle which is presently too large and awaiting arrival of 1.5 mm dia tube smaller than the 2 mm used and shown here for the turnbuckle and swedge fitting. View attachment 219895
A comparison of the first to sizes :
Larger one is 5 strand with 0.0310" diameter, not blackened,
and the smaller one is 3 strand with 0.0205" dia. and was blackened.
The goal is to arrive at something simulating the actual 5/8" cable and is in a visual proportion to a correct turnbuckle which I found in the recent book, The American Fishing Schooners, p. 659 tp be 14" long and 3" dia. with 13.5" threaded end eye rods. That sound like using the 1.5 mm tube as 1 mm tubes are too small.
View attachment 219896It will be interesting to see how this works out as I will be removing the turnbuckles in place which are too large and were a hopeful and naïve starting trial. Rich
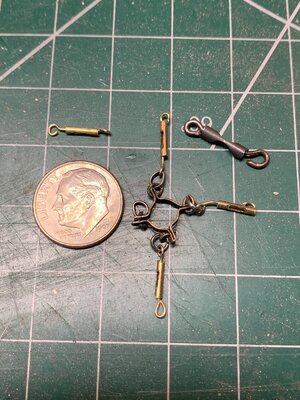
The 1/5 mm thin wall tubes arrived so I made replacement turnbuckles to the scaled length and diameter shown in The American Schooners for those items. It worked out just right at the 1:64 scale.Upon doing a visual double check at 3/16 inch a 14 inch turnbuckle is about 5 mm and the 3 inch diameter is just over 1 mm using the 2 mm tubing that I have which looks too fat so the 1.5 mm tubes, when they arrive, should be a good resolution. I will then make a visually based, decision about the diameter of the wire cables and whisker shrouds for the bowsprit. The same will have to be done for the two chains from the stem to the end of the bowsprit for a good size to use. Rich
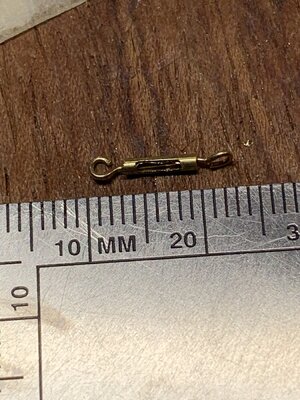
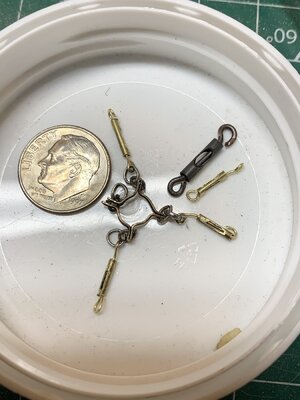
No on the mat with the black prior oversized for comparison
and now with this bowsprit fitting on the nose awaiting other connections for the running rigging
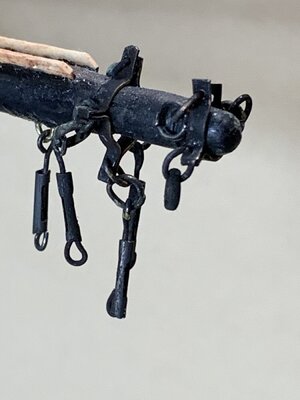
I will try to do the bowsprit rigging with twisted wire for the lines that were cables and thread for the hemp lines following the resources that I have. Oh yes, those soldered tube fairleads have been filed down to the same thickness as the wire following data that I found in the Schooners book. "Flying" fairleads on jib sheet lines and elsewhere were lignum vitae same as some fixed metal ones but they break when I try to drill and file those to thickness. As Ike said, "The devil is in the details." No idle hands here. Rich
Great job Rich!
Nice work, Dean.
Size does matter!
It's a good thing you weren't immediately satisfied.
Regards, Peter
Size does matter!
It's a good thing you weren't immediately satisfied.
Regards, Peter
I agree these are a marked improvement. Perseverance wins. Well done!
Thanks. As the 1.5 tubes are too small to act as swedges with the twisted wire fed back inside as with the 2mm tube, I think that I will try to split a piece longitudinally, lay the wire inside and crimp it down. I will try soldering the seam but that may not be necessary. Tensioning the twisted wire without damaging the fragile eye fitting will be the biggest problem forcing me to return to thread.I agree these are a marked improvement. Perseverance wins. Well done!
Rich
Here is the rigged bowsprit assembly with the small scaled cables and out of scale jibs' furling lines which I may end up cutting off as they would only be taken there when it was necessary to haul the jib down and furl it tying across the top with lines from each side. If I were to decide to present a furled jib I could use a set of these otherwise they are distracting. I learned that it is very difficult to pull the cables taut, around the eye, and back into the swedge so some have curvature that I don't like but could not pull straight without dislodging the wye fitting. The blackened brass does look very used and in need of repairs when back at port which is more apparent in the photos than visually which remains my presentation objective.Thanks. As the 1.5 tubes are too small to act as swedges with the twisted wire fed back inside as with the 2mm tube, I think that I will try to split a piece longitudinally, lay the wire inside and crimp it down. I will try soldering the seam but that may not be necessary. Tensioning the twisted wire without damaging the fragile eye fitting will be the biggest problem forcing me to return to thread.
Rich
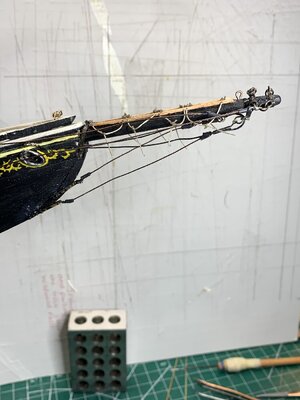
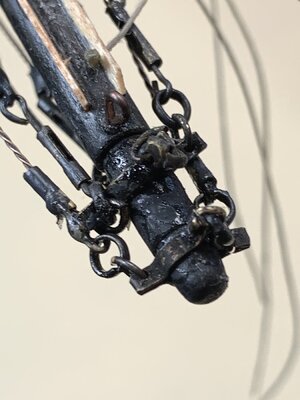
You are making a great metalsmith work on the bowsprit, Rich  This copper eyelet feels lonely among the blackening siblings.
 This copper eyelet feels lonely among the blackening siblings.
 You are making a great metalsmith work on the bowsprit, RichThis copper eyelet feels lonely among the blackening siblings.
Thank you. The MS2130 kit provided a limited amount of 1/64 x 1/16 inch strips to fabricate fittings. With failed attempts and redos I was running out and found that K&S Precision metals no longer offers that size (discontinued). I bought several lengths of the 1/64 x 1 inch in 36 inch lengths thinking that at worse case I could have those cut down as shearing is not precise enough. The local machine shop, ABC Tool and Die Co. who made my drill press jig which I posted earlier, produced about 15 of the 1/16 inch strips for me so I am now well stocked. It was expensive but as I needed the brass I rationalize worth it.You are making a great metalsmith work on the bowsprit, RichThis copper eyelet feels lonely among the blackening siblings.

If any SoS members need strips like that the phone number is 1-541-484-0721 and their web site can be found by Googling ABC Tool and Die Co. Manufacturing L.L.C. located in Eugene, Oregon, USA
ABC Tool and Die Eugene Oregon Machine Shop for Custom Fabrication
Based in the Eugene - Springfield area in Lane County, Oregon, ABC Tool and Die Co. serves the Northwest with contract manufacturing and custom machining. Full capability shop specializing in custom design, plastic machining, and metal fabrication; our creative staff will design and build your...
www.abctool.com
I took my larger stock for their cutting and that was returned so material would have to be provided or for them to order for any work. Rich
Rich,
Brilliantly detailed metal work - well done!!!
Brilliantly detailed metal work - well done!!!
In tapering BN spars with the sail face straight and the others tapering down, here is a Rube Goldberg gizmo of some different "tools" assembled to just touch the top tangent point of a round spar. The other end, filed to two parallel faces in the mast step is in a small vice. After marking one side of the spar it is rotated 180 degrees in the vice to do the same thing on the other side. It works very well for filing flat opposed faces in the spar to mount other components. Don't fall out of your chairs laughing at this conglomerationRich,
Brilliantly detailed metal work - well done!!!
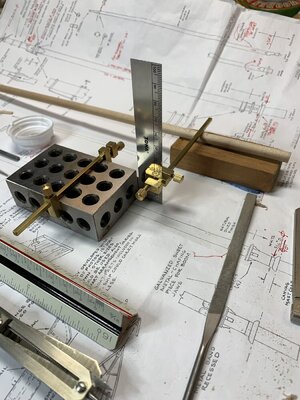
123 block holds the square vertically which supports the horizontal leg to the spar. My magnifier headband with LED to illuminate the touch point was not feasible to include in this setup. Always looking for new uses for old common things. After all, jokes are just new combinations of other things in a new arrangement. Why not things in our hobby? Rich
In the mix of working ahead to have small things ready for use when needed and bounding around between fittings on the spars, improving small soldering skills, filing mast hoops, shaping small oval deadeyes, and while waiting for my order of replacement blocks for those in the kit I have made a jig for tying the ratlines. First I served two doubled over shroud lines together for laying them over the top of the loser main mast. Then I drew out the shroud lines for the ratlines and put down some guidance nails, stretched out the shrouds and have begun tying the ratlines. Properly the outer ends should have eye-splices and clove hitch in the middle shroud only but for practicality I am tying all three with clove hitches and a spot of clearIn tapering BN spars with the sail face straight and the others tapering down, here is a Rube Goldberg gizmo of some different "tools" assembled to just touch the top tangent point of a round spar. The other end, filed to two parallel faces in the mast step is in a small vice. After marking one side of the spar it is rotated 180 degrees in the vice to do the same thing on the other side. It works very well for filing flat opposed faces in the spar to mount other components. Don't fall out of your chairs laughing at this conglomeration View attachment 221841
123 block holds the square vertically which supports the horizontal leg to the spar. My magnifier headband with LED to illuminate the touch point was not feasible to include in this setup. Always looking for new uses for old common things. After all, jokes are just new combinations of other things in a new arrangement. Why not things in our hobby? Rich
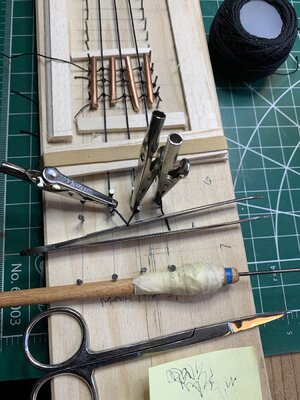 glue.
glue.I am using short pieces of heavier copper wire to provide a consistent sag to the ratlines . . . at least in theory.
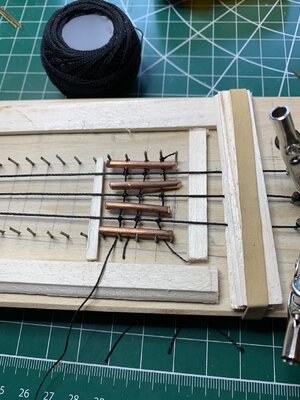
When I have completed port and starboard for the main mast I'll make another similar jig sized for the lower main mast. I'll not do the upper shroud/ratlines until I step the upper masts to check the dimensions then. One knot at a time but way fewer than with those three-masted square riggers that so many in SoS love to build and rig. Rich (PT-2)
When I was about half way done with this lower main mast set of rat lines I saw that they were too large and cut all of them off to begin again with a smaller thread tied across the shrouds.In the mix of working ahead to have small things ready for use when needed and bounding around between fittings on the spars, improving small soldering skills, filing mast hoops, shaping small oval deadeyes, and while waiting for my order of replacement blocks for those in the kit I have made a jig for tying the ratlines. First I served two doubled over shroud lines together for laying them over the top of the loser main mast. Then I drew out the shroud lines for the ratlines and put down some guidance nails, stretched out the shrouds and have begun tying the ratlines. Properly the outer ends should have eye-splices and clove hitch in the middle shroud only but for practicality I am tying all three with clove hitches and a spot of clear View attachment 224551glue.
I am using short pieces of heavier copper wire to provide a consistent sag to the ratlines . . . at least in theory.View attachment 224558
When I have completed port and starboard for the main mast I'll make another similar jig sized for the lower main mast. I'll not do the upper shroud/ratlines until I step the upper masts to check the dimensions then. One knot at a time but way fewer than with those three-masted square riggers that so many in SoS love to build and rig. Rich (PT-2)
Here are a series of photos of the present process that I am following.
Starting with a slip knot to secure one end:
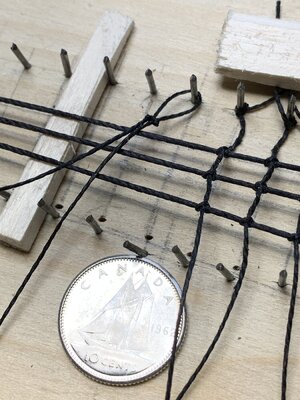
Then pulling it tight and with the line over the shroud passing it underneath and pulling it up to the right
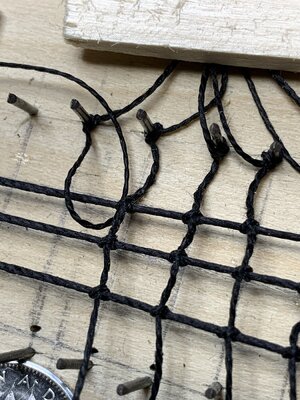
then to the left another loop reaching through with tweezers to pull it back through
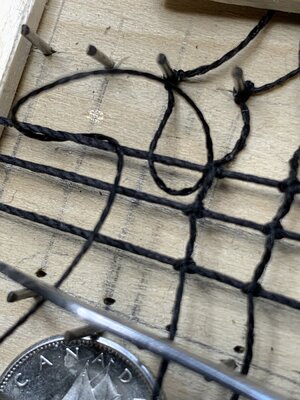
Then adjusting the loops and tightening them around the shroud along the ratline alignment which will be adjusted again later
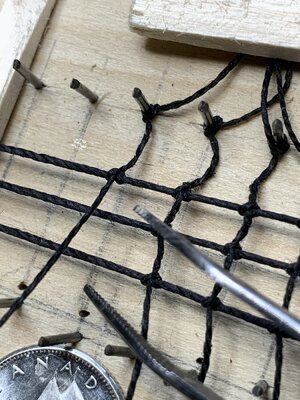 Next repeating the sequence for the middle shroud and again for the third one approximating the positions before final adjustment and a locking dab of glue to each one
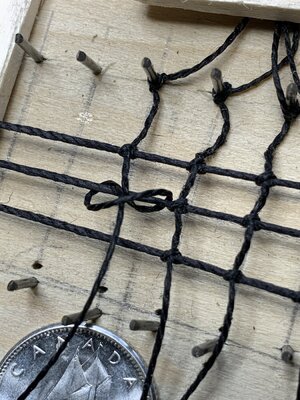
When all are tied I remove the shrouds, flip them over and trim off the bitter ends with a razor tight to the side of the knots, then bringing the first side back up I will secure the running light and metal bar which will be at the same spacing and just above the upper oval deadeyes.
Slow but nothing compared to what SoS members have to do with their large square rigged ships. Suggestions are welcome but this is under way for with the second main lower mast (P&S flips) and then the upper masts where your suggestions may come into play. . . otherwise I will respace things and continue in this manner. Rich PT-2
Rich,
you should run your rigging ropes over a lit candle to get rid of the fuzz. Looking good.
you should run your rigging ropes over a lit candle to get rid of the fuzz. Looking good.
You are right. I have been prepping them running the thread on my beeswax block and pulling it over my fingers to work it in. That may be part of what is seen but the flame would melt it in better. All of which may work against absorption of the glue into the fibers. I'll give it a try. Thanks.. RichRich,
you should run your rigging ropes over a lit candle to get rid of the fuzz. Looking good.


