Dean, The Turnbuckles are faux so they do not function to tension the associated lines. If you have workable ones you will be much better off than I was. RichThat is actually an assembly of separate pieces as you can see but all pushed onto the bowsprit with the inside band/collar. Not all were to scale but it was what I could produce back then. The test well be to see if anything pulls loose when I try to bend (literally) the twisted wire stays up to the foremast as the sails have had the oval wire hoops through the leach which will have to be threaded onto the stay at the time of mounting. The sail weight will add to the tension and finally the small tubular swedges that I made to secure the ends. I have tested the tube diameter and it just works for the wire to pass through twice, once coming up and then after through the fitting and back down beside itself to be pinched closed. Of course, if the wire stays don't work I will surrender and to back to thread stays which I would like to avoid as the actual stays were wire cables without turnbuckles. In actual 1:1 they were able to do this back then with their own swedging tools.
With your skill your bowsprit fittings should turn out better than mine.
Rich
-

Win a Free Custom Engraved Brass Coin!!!
As a way to introduce our brass coins to the community, we will raffle off a free coin during the month of August. Follow link ABOVE for instructions for entering.
-

PRE-ORDER SHIPS IN SCALE TODAY!
The beloved Ships in Scale Magazine is back and charting a new course for 2026!
Discover new skills, new techniques, and new inspirations in every issue.
NOTE THAT OUR FIRST ISSUE WILL BE JAN/FEB 2026
You are using an out of date browser. It may not display this or other websites correctly.
You should upgrade or use an alternative browser.
You should upgrade or use an alternative browser.
I was referring to the band itself, you bent it out of one piece to make 4 lugs…very clever!That is actually an assembly of separate pieces as you can see but all pushed onto the bowsprit with the inside band/collar. Not all were to scale but it was what I could produce back then. The test well be to see if anything pulls loose when I try to bend (literally) the twisted wire stays up to the foremast as the sails have had the oval wire hoops through the leach which will have to be threaded onto the stay at the time of mounting. The sail weight will add to the tension and finally the small tubular swedges that I made to secure the ends. I have tested the tube diameter and it just works for the wire to pass through twice, once coming up and then after through the fitting and back down beside itself to be pinched closed. Of course, if the wire stays don't work I will surrender and to back to thread stays which I would like to avoid as the actual stays were wire cables without turnbuckles. In actual 1:1 they were able to do this back then with their own swedging tools.
With your skill your bowsprit fittings should turn out better than mine.
Rich
I call those lugs "Ears" as they get earringsI was referring to the band itself, you bent it out of one piece to make 4 lugs…very clever!
These initial shrouds and rat lines were replace three times with the prior ones being deep-sixed. I didn't realize how long it has been since I last posted anything about the progress but my BN is now masted with bent sails and the associated running rigging along with faux rope hanks at the belaying pins for the lines' falls.You are right. I have been prepping them running the thread on my beeswax block and pulling it over my fingers to work it in. That may be part of what is seen but the flame would melt it in better. All of which may work against absorption of the glue into the fibers. I'll give it a try. Thanks.. Rich
My method of shaping large fore/aft sails is to lay the model over to port, spray moisten the cloth and then use a spray fabric stiffener (starch) and let it dry for the first of several evolutions of the the same process:
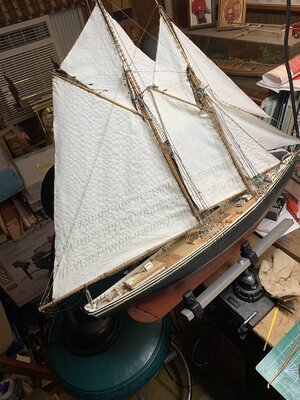
another view slightly zoomed in:
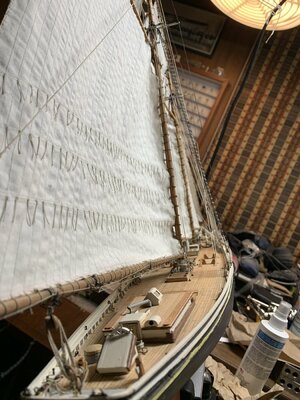
As you can see the dories have not been placed, nor have the barrels, cans, and miscl. fishing items been placed on the decks at this point. The luff and leach of the sails will be smoothed out as the sail stiffening process continues.
Now, here is my BN POB version of the YQ frames cathedral view, looking up the stbd side with the standing and running rigging falls to pins:
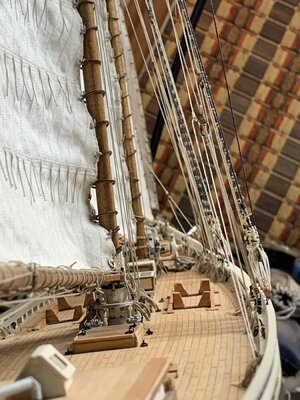
My own presentation goal is a rugged working schooner under sail with all of the variables and wear and tear visible from usage.
I'll provide closer detail shots with better lighting and views in the future. In the background of the first photo is the middle portion of my first 19 inch strip canoe visible between the balloon jib and a roll of pistol targets on the right.
Rich
- Joined
- Sep 3, 2021
- Messages
- 5,190
- Points
- 738

Hello Rich,My own presentation goal is a rugged working schooner under sail with all of the variables and wear and tear visible from usage.
A beautiful looking Bluenose, that's for sure.
I'm looking forward to how your ideas work out on "weathering" your model. Currently I'm in the process of adding some bits and pieces, (barrels, oars, some buckets) but I'm staying well away of weathering my model, mainly because I don't have a clue on how to do it and I am really scared of ruining my model.
In the past I applied weathering to some kit-build aircraft models, but I feel this is something out of my league.
Hope to see some beautiful rugged schooner pictures from you soon!
Johan
Thank you, Heinrich. It is a work in progress and can't return to Lunesberg until the hold is full. RichIt is good to see your progress Rich. You have managed to execute a very realistic view of a working schooner.
Thanks Johan,Hello Rich,
A beautiful looking Bluenose, that's for sure.
I'm looking forward to how your ideas work out on "weathering" your model. Currently I'm in the process of adding some bits and pieces, (barrels, oars, some buckets) but I'm staying well away of weathering my model, mainly because I don't have a clue on how to do it and I am really scared of ruining my model.
In the past I applied weathering to some kit-build aircraft models, but I feel this is something out of my league.
Hope to see some beautiful rugged schooner pictures from you soon!
Johan
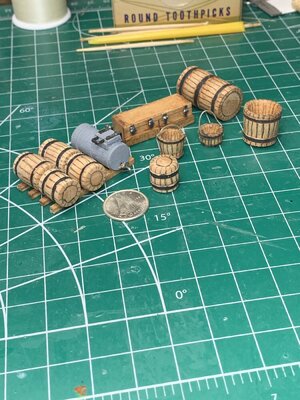
The weathering process may largely be presented by my crude building and work. We'll see how it all works out. Here is a shot of some of the fishing items that I will have by the after cabin. Turned these out months ago on my lathe. Redoing the dories will be the biggest challenge as those in the kit with the jig are not acceptable in any concept.
I did one dory masted with sail and one without but ready to receive the mast, oars, and float to follow.
Here are three shots of some of the dory fleet as it is at the start of October:Thanks Johan,
The weathering process may largely be presented by my crude building and work. We'll see how it all works out. Here is a shot of some of the fishing items that I will have by the after cabin. Turned these out months ago on my lathe. Redoing the dories will be the biggest challenge as those in the kit with the jig are not acceptable in any concept.
View attachment 259528
I did one dory masted with sail and one without but ready to receive the mast, oars, and float to follow.
First the partial fleet:
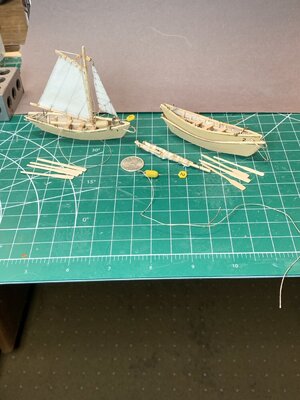

Now closer to the dory set up for sailing to the fishing area:
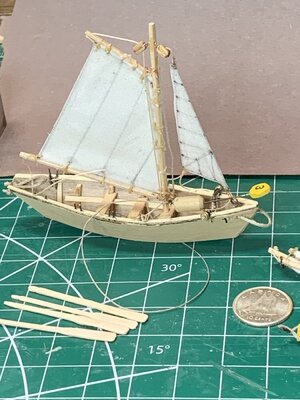
And now the nested dory ready to be loaded prior to offloading but without the hooks line tub to be made but line float and oars to be loaded
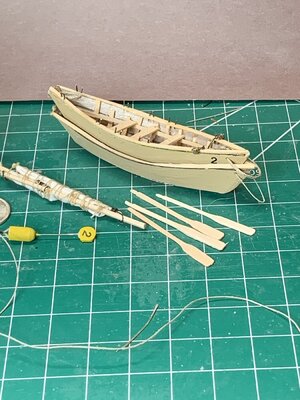
You can see the bow mounted "hurdy-gurdy" crank for hauling in lines or an anchor.
Rich
Hi Rich.
You did a fine job on your BN and the dories. The sails looks natural and the tiny work on the dories with the fishing details looks great.
And I like ‘the starboard overlooking’ pictures very mutch.
Regards, Peter
You did a fine job on your BN and the dories. The sails looks natural and the tiny work on the dories with the fishing details looks great.
And I like ‘the starboard overlooking’ pictures very mutch.
Regards, Peter
- Joined
- Sep 3, 2021
- Messages
- 5,190
- Points
- 738

Rich,Here are three shots of some of the dory fleet as it is at the start of October:
First the partial fleet:
View attachment 259529
Now closer to the dory set up for sailing to the fishing area:
View attachment 259530
And now the nested dory ready to be loaded prior to offloading but without the hooks line tub to be made but line float and oars to be loaded
View attachment 259531
You can see the bow mounted "hurdy-gurdy" crank for hauling in lines or an anchor.
Rich
I'm really impressed by your work and attention for details.
At the same time, I am quite sure you are heading for a very convincing "rugged" build. Both the fishing accessories and the dories with their gear are all adding to the credibility of your build.
Johan
This is looking great Rich! You have been very busy! I'm certain the finished ship will be well displayed! 
My thanks to Peter, Johan, and Dean for your reactions. After the high stbd. photo I saw too much tension in the stbd. balloon sheet being too tight and distorting the jib and stay. . . true to my voyage I cut the lower portion of that off and replaced it this morning in a more slack manner (which it should have been as the passive sheet on stbd. tack). Now proceeding with placement of the main boom tackle and lines to be followed by placing the barrels, fish gear prep box, and buckets around the aft deck area. Then the dory fleet will be called back for refitting and nesting. The masted dory with sail will be presented off the schooner as a lost at sea straggler. RichThis is looking great Rich! You have been very busy! I'm certain the finished ship will be well displayed!
Rich your model looks superb! I was wondering where your progress updates had got to. It has been a delight and an education to follow your development and research, you must be proud of the result. Well done!These initial shrouds and rat lines were replace three times with the prior ones being deep-sixed. I didn't realize how long it has been since I last posted anything about the progress but my BN is now masted with bent sails and the associated running rigging along with faux rope hanks at the belaying pins for the lines' falls.
My method of shaping large fore/aft sails is to lay the model over to port, spray moisten the cloth and then use a spray fabric stiffener (starch) and let it dry for the first of several evolutions of the the same process:
View attachment 259523
another view slightly zoomed in:
View attachment 259524
As you can see the dories have not been placed, nor have the barrels, cans, and miscl. fishing items been placed on the decks at this point. The luff and leach of the sails will be smoothed out as the sail stiffening process continues.
Now, here is my BN POB version of the YQ frames cathedral view, looking up the stbd side with the standing and running rigging falls to pins:
View attachment 259525
My own presentation goal is a rugged working schooner under sail with all of the variables and wear and tear visible from usage.
I'll provide closer detail shots with better lighting and views in the future. In the background of the first photo is the middle portion of my first 19 inch strip canoe visible between the balloon jib and a roll of pistol targets on the right.
Rich

Very nice work, Rich. I especially like the last picture from the stern looking forward on the starboard side.These initial shrouds and rat lines were replace three times with the prior ones being deep-sixed. I didn't realize how long it has been since I last posted anything about the progress but my BN is now masted with bent sails and the associated running rigging along with faux rope hanks at the belaying pins for the lines' falls.
My method of shaping large fore/aft sails is to lay the model over to port, spray moisten the cloth and then use a spray fabric stiffener (starch) and let it dry for the first of several evolutions of the the same process:
View attachment 259523
another view slightly zoomed in:
View attachment 259524
As you can see the dories have not been placed, nor have the barrels, cans, and miscl. fishing items been placed on the decks at this point. The luff and leach of the sails will be smoothed out as the sail stiffening process continues.
Now, here is my BN POB version of the YQ frames cathedral view, looking up the stbd side with the standing and running rigging falls to pins:
View attachment 259525
My own presentation goal is a rugged working schooner under sail with all of the variables and wear and tear visible from usage.
I'll provide closer detail shots with better lighting and views in the future. In the background of the first photo is the middle portion of my first 19 inch strip canoe visible between the balloon jib and a roll of pistol targets on the right.
Rich
Last edited:
Rich,
Your pictures are great, love the Dories.
Jan
Your pictures are great, love the Dories.
Jan
Your questioning was not off track as I posted very few updates and with large progress gaps in between. Thank you for your compliment as I stilll have a way to go before I can say the schooner is hove to and waiting for additional touches. RichRich your model looks superb! I was wondering where your progress updates had got to. It has been a delight and an education to follow your development and research, you must be proud of the result. Well done!
There is really nothing to add to what other members commented. Your Dorries look really good, and I really like the full sail representation. You have a good eye for those small and oftentimes omitted by others' details. 

Thank you for your response and reaction to this schooner still in progress but at least in smaller details. RichThere is really nothing to add to what other members commented. Your Dorries look really good, and I really like the full sail representation. You have a good eye for those small and oftentimes omitted by others' details.
I agree with Jimsky, you have a great attention to detail on your ship. This makes for a very realistic model. I look forward to seeing everything in place. 


