Bluenose

I think it’s looking very good.
My deck planking was done on a ply deck. So I just put wood glue on the back of each plank and spread with a toothpick, and then pressed in place. However there was enough variance in wood thickness from board to board that required I do a lot of sanding to get it all level. So sanding is a must. Some people scrape with a razor prior to sanding. It’s kind of like planing the boards.
Tips and tricks of the game everywhere. I envision scraping with a razor blade more like dragging than a forward cutting action that a planner or plane executes which could get me in a lot of trouble of the grain direction would cause the blade to dive deeper than wanted. Sanding sounds much saver for me with this broad scale but I may give the blade a try for learning. Thanks. Rich (PT-2)
 
Tips and tricks of the game everywhere. I envision scraping with a razor blade more like dragging than a forward cutting action that a planner or plane executes which could get me in a lot of trouble of the grain direction would cause the blade to dive deeper than wanted. Sanding sounds much saver for me with this broad scale but I may give the blade a try for learning. Thanks. Rich (PT-2)
Yes you drag the razor, i just meant you were removing material with a blade verses sanding.
 
Yes you drag the razor, i just meant you were removing material with a blade verses sanding.
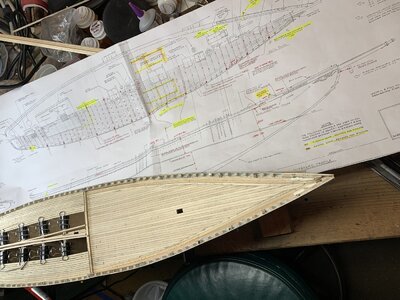
Friday saw the completion of setting the nibbed foredeck planking and some continuation of the curved and tapered after decking. After some foredeck sanding to even out the mis-aligned nibbed plank ends (vertically) they are somewhat more flush but not what I was wanting to attain. On the port side I dry-set two for the nibbing notch and when glued the innermost of those using the dry set ones for alignment and location of the notches. Again with my macular degeneration I did not notice that some plank nibbed ends were too low until late on. I now realize that I need to rotate my clamp/hull every time to look at the positioning while the glue is still viscous and the plank end adjusted. Build and learn, . . . over and over. The soft draughting pencil lead works well as I have lightly rubbed both side of every plank and the sanding does not carry the graphite into the surface wood grain.Foredecking installed.jpg
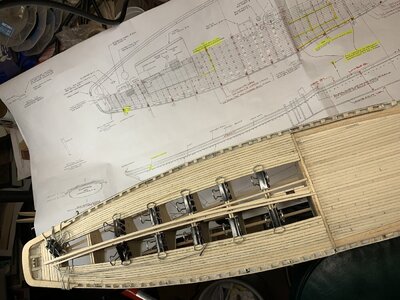
Next just a closer view of the after deck in progress without any sanding so farAfter deckng in progress.jpgAfter deckng in progress.jpg
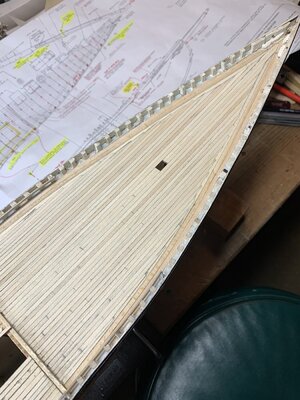
Back to a closer view of the nibbing which has had some sandingFore NIbbing with some sanding.jpgSAfter deckng in progress.jpgFore NIbbing with some sanding.jpgI somehow seem to be inserting repetitive photos somehow without that intention which was not my intention. Maybe just lost in the fog of my mind trying to follow that ringing tone in my ears. Rich (PT-32
 
Friday saw the completion of setting the nibbed foredeck planking and some continuation of the curved and tapered after decking. After some foredeck sanding to even out the mis-aligned nibbed plank ends (vertically) they are somewhat more flush but not what I was wanting to attain. On the port side I dry-set two for the nibbing notch and when glued the innermost of those using the dry set ones for alignment and location of the notches. Again with my macular degeneration I did not notice that some plank nibbed ends were too low until late on. I now realize that I need to rotate my clamp/hull every time to look at the positioning while the glue is still viscous and the plank end adjusted. Build and learn, . . . over and over. The soft draughting pencil lead works well as I have lightly rubbed both side of every plank and the sanding does not carry the graphite into the surface wood grain.View attachment 195700
Next just a closer view of the after deck in progress without any sanding so farView attachment 195701View attachment 195701
Back to a closer view of the nibbing which has had some sandingView attachment 195702SView attachment 195701View attachment 195702I somehow seem to be inserting repetitive photos somehow without that intention which was not my intention. Maybe just lost in the fog of my mind trying to follow that ringing tone in my ears. Rich (PT-32
I think it’s looking very good despite the minor flaws you mentioned, which can’t be detected in the pictures. You will probably be the only one who notices when it’s built. We agonize over minor flaws as we build, not taking into account that once completed they most likely go unnoticed by anyone who may look at our work. That’s mainly because there will be too many details to look at, therefore minor flaws will be overlooked! So don’t sweat the small stuff. Learn from it and keep moving forward.
By the way, which manufacturers kit is this? And what is the scale? It looks like a good size ship!
The kit is Model Shipways from Model Expo, 3/16 per foot. 1/64 scale. The hull itself is 26-1/2" long with a 5" beam. Length with bowsprit is 30" and with the main boom over the transom giving a model length of 35" and 26" height. Thank you for your support as this is my first ship/schooner build but I did get some introductory experience with two of the strip canoes which was my original entry plan into planking. Rich (PT-2)
 
Hello Rich Supper job you are doing on your Bluenose, Just love your main deck Nibing, this takes a lot of time to get it correct but it is well worth the extra effort. This build is great practice for your Heinrich POF Bluenose that I am also looking forward.
Regards Lawrence
Question for you from me in your wake.. . when you did the hull planking:
1. Did you divide each strake into the four parts per the instructions with tapering as needed as that plank/strake was extended.
2. Did you work from H aft with two plank sections and then the same way with two planks forward?
or
3. Did you seat the plank in the stem and proceed aft?
4. When you had butted plank sections, was the joint perpendicular across the plank and half onto the bulkhead for each end? or did you use an angled section for each centered on the bulkhead?

With the narrow bulkhead surface a straight up and down butt joint makes securing and/or nailing those small contact areas very delicate and demands more sanding to fair the joint out.

I am not going to use treenails as at our scale they are too large and small brass rod/pin nails unless well filed down and painted over will not be the appearance that I think we/I want in the hull.

I am backtracking now to again layout the planking for tapering as needed to maintain the number of planks per belt area, My hull is not perfectly symmetrical port/Stbd which is to be expected so this difference will only be visible when looking aft from the stem and forward from the rudder/transom. I want to get those as symmetrically matching as I can and will possibly work both sides at the same time for that symmetry in plank end width. I'll not use spiling but just comparative width checks at the bulkheads and visual sanding/filing for uniformity of the tapers.

Thanks for sharing your experience and recommendations/guidelines. Rich (PT-2)
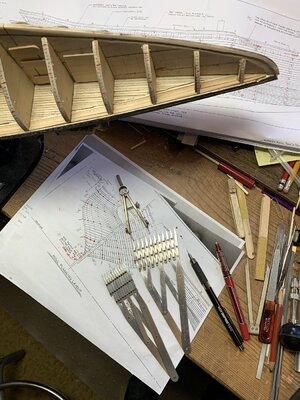
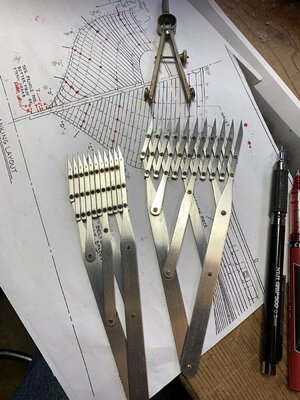
Luckily I had a sense while trying to sleep that I had better not close the after deck but turn the hull over to clamp it for hull planking. (Forget about the main rail correction for now.) I sanded of the prior belt and planking marks and am in the process of doing that again with much better success, I think, with the inverted hull. Here is the process under way using regular dividers and a special variable 10 points divider which I use for a lot of different tasks demanding division between given points into multiple parts:Marking the bulkheads for planking again.jpg
A
Dividers of two types for varying widths.jpgA closer view of the two small 6-inch ones and not shown the same instrument in a 12-inch size for larger tasks. they save a lot of time for me. I am looking to laying the belt strakes and then filling in eh planking between them with tapered sections as needed following a guideline of about 5-inch lengths per plank section. That will make smooth alignment more challenging but tapering easier along the full length of each plant. . . or so it seems.. . I will see. Rich (PT-2)
 
It looks as if you have it all nicely planned out Rich! Thumbsup I am sure it will all go well.

Please post your introduction (with picture) on the Bluenose Group as well!
 
Yes we certainly know that they are all "laid to rest", but don't think of that now! ROTF
 
Nope . . . no future in pessimism. Rich
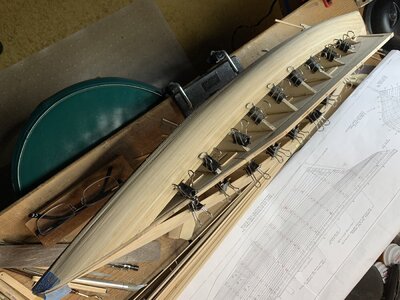
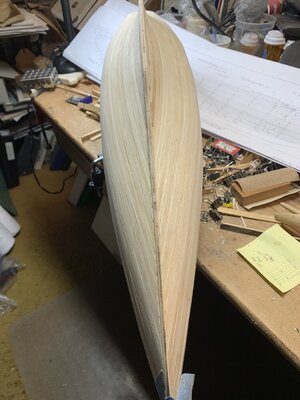
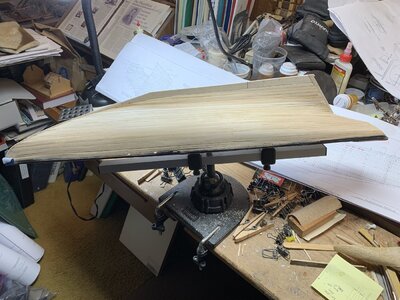
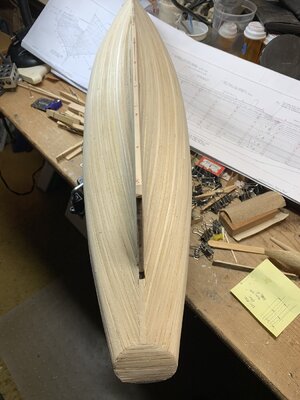
After realizing that I had to plank the hull inverted clamped between aft deck planking I worked from the waist up keel-wards, just like doing my two prior stripper canoes. Disregarded the 1:48 POF practicum to have plank length no more that 5 inches. Problem with my POB is that those are too far apart and at times created bends rather than flowing curves in some planks in spite of a lot of prep fairing of the outer faces. I ran planks as long as the provided stock would reach to bulkheads and located my butt joints there with the standard two separating planks between joints on the same bulkhead. As of tonight after removing a few planks before the Garboard and then replacing them I have the hull planking closed off and will do some scraping and sanding to smooth out any of the planking high points and align faces of planks adjoining some lower set ones for a smooth flowing hull. I am not going to paste up the hull but want to have plank edges and fastener (depressions) visible in the painted hull. Still need to do touch up work at the waste scuppers, gulley sluces, and accent cove.Planking the hull.jpgBinder clips are very handy until closer to the keel and planking go vertically.Hull Planking Closed Keel view.jpgNow looking bow to sternStarboard Planked.jpgRagged work along the way is the sign of a newbie with vision problems necessitating reworking and a lot of finishing requTransom View Forward.jpgired before any thoughts of paint again. After fairing out with scraping/sanding and some adhesive with sawdust filler in cracks I'll lightly score the plank edges, butt joints properly spaced, and small nail indentations. Then flip the hull and go back to complete the afterdeck planking.
 
Hi Rich. I think that hull looks great! You will be surprised when the final sanding and finishing are done at just how sleek it will be.
 
HI RICH, GOOD WORK THERE I LOVE THE 10 POINT DIVIDERS WHERE DID YOU GET THEM ARE THEY STILL AVAILABLE. GOD BLESS STAY SAFE YOU AND YOURS DONJ
 
After realizing that I had to plank the hull inverted clamped between aft deck planking I worked from the waist up keel-wards, just like doing my two prior stripper canoes. Disregarded the 1:48 POF practicum to have plank length no more that 5 inches. Problem with my POB is that those are too far apart and at times created bends rather than flowing curves in some planks in spite of a lot of prep fairing of the outer faces. I ran planks as long as the provided stock would reach to bulkheads and located my butt joints there with the standard two separating planks between joints on the same bulkhead. As of tonight after removing a few planks before the Garboard and then replacing them I have the hull planking closed off and will do some scraping and sanding to smooth out any of the planking high points and align faces of planks adjoining some lower set ones for a smooth flowing hull. I am not going to paste up the hull but want to have plank edges and fastener (depressions) visible in the painted hull. Still need to do touch up work at the waste scuppers, gulley sluces, and accent cove.View attachment 197225Binder clips are very handy until closer to the keel and planking go vertically.View attachment 197226Now looking bow to sternView attachment 197227Ragged work along the way is the sign of a newbie with vision problems necessitating reworking and a lot of finishing requView attachment 197229ired before any thoughts of paint again. After fairing out with scraping/sanding and some adhesive with sawdust filler in cracks I'll lightly score the plank edges, butt joints properly spaced, and small nail indentations. Then flip the hull and go back to complete the afterdeck planking.
Excellent planking job!
 
Back
Top