-

Win a Free Custom Engraved Brass Coin!!!
As a way to introduce our brass coins to the community, we will raffle off a free coin during the month of August. Follow link ABOVE for instructions for entering.
You are using an out of date browser. It may not display this or other websites correctly.
You should upgrade or use an alternative browser.
You should upgrade or use an alternative browser.
Bonhomme Richard - Pear Cross section kit (with scratch duplicate using alder) Unicorn Model
enjoy the time with your grandchildren - the section can wait some days
This looks like a beautiful kit Brad, i wish you a lot of fun building it, and of course also the second one of the Alder wood.
Also i see excellent workmanship in de foto's you are showing here, i hope you had fun with the grandchildren ?
Also i see excellent workmanship in de foto's you are showing here, i hope you had fun with the grandchildren ?
Question on Barrel sizes provided by the Unicorn. I built the larger of the two provided in the kit.
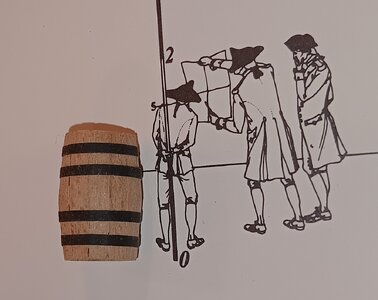
It goes together awesome and looks great, until you look at in a scale context (see photo) below. The plans pictured are the Bonhomme Richard from Jean Boudroit set: 1/4" = 1ft. Same scale as the Unicorn kit.
The inspectors are trying to determine: 1) Which contractor built this monstrosity, 2) Will it fit in any of the hatches, and 3) The weight of the thing filled with rum or water!
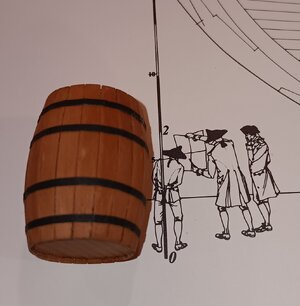
Obviously, there's a problem, so I did some research and found out what butt-load is and where a ton came from! See chart below: A Butt is the second biggest barrel, below a Tun and holds 108 gallons (a Butt-Load of rum!). A Tun is the biggest barrel and holds 240-250 US gallons x 8.34lbs/gallon = 1951-2085lbs or about a US Ton.
I will build the smaller barrels provided by Unicorn and see what the dimensions turn out to be. If neither are accurate, I will end up having to turn some barrels on the lathe (a butt-load of additional work?) and use the excellent barrel planks/tops/bottoms that unicorn provided to clad whatever I turn.
Does anyone know if there was a standard barrel size that British ships like the Bonhomme Richard would have had in their cargo hold?
Thanks in advance for any additional information or answers!
It goes together awesome and looks great, until you look at in a scale context (see photo) below. The plans pictured are the Bonhomme Richard from Jean Boudroit set: 1/4" = 1ft. Same scale as the Unicorn kit.
The inspectors are trying to determine: 1) Which contractor built this monstrosity, 2) Will it fit in any of the hatches, and 3) The weight of the thing filled with rum or water!

Obviously, there's a problem, so I did some research and found out what butt-load is and where a ton came from! See chart below: A Butt is the second biggest barrel, below a Tun and holds 108 gallons (a Butt-Load of rum!). A Tun is the biggest barrel and holds 240-250 US gallons x 8.34lbs/gallon = 1951-2085lbs or about a US Ton.
- Firkin – 9 gallons
- Kilderkin – 18 gallons
- Barrel – 36 gallons
- Hogshead – 54 gallons
- Butt – 108 gallons
- Tun – 216 gallons
I will build the smaller barrels provided by Unicorn and see what the dimensions turn out to be. If neither are accurate, I will end up having to turn some barrels on the lathe (a butt-load of additional work?) and use the excellent barrel planks/tops/bottoms that unicorn provided to clad whatever I turn.
Does anyone know if there was a standard barrel size that British ships like the Bonhomme Richard would have had in their cargo hold?
Thanks in advance for any additional information or answers!
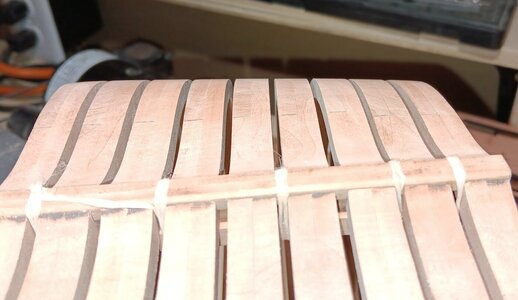
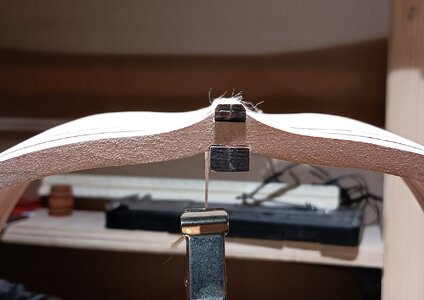
Baby-sitting duty is over and I made some progress sanding the outer hull. Photos show the outer hull after sanding with 120 and 240 grit sticks.
I'm happy with the results so far. I will wait to use 400 grit paper, until I have cut the cannon ports and added some planking (inside and out) to really stiffen the hull up.
Next, I plan on glueing the top part of the keel, which has the slots for each frames to slip into. This will give the frames support as I sand and fair the inside contours. Like Uwe, I will leave the bottom half of the keel off, so the edges and corners are not damaged, as there is still lots of sanding and fairing to do on the inside! The color and grain of the supplied wood looks awesome. I can't wait until it is fully sanded and the first coat of WATCO oil is applied. It will POP!! Still looks a little pinker than the other pearwood I've used.


This is looking great Brad.
found this
There were different sizes of barrels used for wine, beer, scotch, rum, sherry, beer, etc.

The type of barrels used to store water were called ‘butts’, which were approximately equated to 108 imperial gallons (130 US gallons or 491 litres) for beer or 126 imperial gallons (151 US gallons or 573 litres) for wine (also known as a pipe), although the Oxford English Dictionary notes that "these standards were not always precisely adhered to".[1][2]
(Note the different measurements for beer or wine, which is why imperial and US gallons are different but that’s a whole other story.)
The Royal Navy used a standard measurement (the wine measurement of 126 imperial gallons) so that the ship’s purser would be able to calculate and order the maximum number of butts that would fit into a ship’s hold, and the naval architects used those same sizes when designing a ship to make the best use of the hold’s dimensions.
The hold that these water butts were stored in was dark and damp being below the water line of the ship with little ventilation. Over time, the water would become foul, sometimes with algae and small organisms growing in it. (more on that later).
Because water at sea had to be strictly rationed to ensure that there’d be enough for the voyage, only one butt at a time would be lifted from the hold to the galley to use for softening the salt pork and beef that was used for stews, and for drinking under the supervision of the cooks.
When a butt was brought up to the galley it was ‘scuttled’. The word ‘scuttle’ means “to open a hole or holes”. This is where the word ‘scuttlebutt’ for gossip comes from as the sailors would take the opportunity for a little bit of chatting while they drank their water.

 www.quora.com
 en.wikipedia.org
There were different sizes of barrels used for wine, beer, scotch, rum, sherry, beer, etc.
The type of barrels used to store water were called ‘butts’, which were approximately equated to 108 imperial gallons (130 US gallons or 491 litres) for beer or 126 imperial gallons (151 US gallons or 573 litres) for wine (also known as a pipe), although the Oxford English Dictionary notes that "these standards were not always precisely adhered to".[1][2]
(Note the different measurements for beer or wine, which is why imperial and US gallons are different but that’s a whole other story.)
The Royal Navy used a standard measurement (the wine measurement of 126 imperial gallons) so that the ship’s purser would be able to calculate and order the maximum number of butts that would fit into a ship’s hold, and the naval architects used those same sizes when designing a ship to make the best use of the hold’s dimensions.
The hold that these water butts were stored in was dark and damp being below the water line of the ship with little ventilation. Over time, the water would become foul, sometimes with algae and small organisms growing in it. (more on that later).
Because water at sea had to be strictly rationed to ensure that there’d be enough for the voyage, only one butt at a time would be lifted from the hold to the galley to use for softening the salt pork and beef that was used for stews, and for drinking under the supervision of the cooks.
When a butt was brought up to the galley it was ‘scuttled’. The word ‘scuttle’ means “to open a hole or holes”. This is where the word ‘scuttlebutt’ for gossip comes from as the sailors would take the opportunity for a little bit of chatting while they drank their water.

How was water stored in British sail ships?
Answer (1 of 5): “How was water stored in British sail ships?” There were different sizes of barrels used for wine, beer, scotch, rum, sherry, beer, etc. The type of barrels used to store water were called ‘butts’, which were approximately equated to 108 imperial gallons (130 US gallons or 491 ...
English wine cask units - Wikipedia
Thank-you, Uwe and Peter for the response. I'm building the smaller barrel and it looks to be the correct size (about the dimensions of a barrel or hogshead above. I'll post a picture of the small one, next to the larger barrel in the kit so one can see how out of scale the large barrels are. It would have been nice if they provided two sizes (Butts & Barrels) or (Barrels and 1/4 casks) so they could be arranged in a less boring manner than just one size. Maybe I'll have to fabricate a few different sizes as the build progresses.found this
There were different sizes of barrels used for wine, beer, scotch, rum, sherry, beer, etc.

The type of barrels used to store water were called ‘butts’, which were approximately equated to 108 imperial gallons (130 US gallons or 491 litres) for beer or 126 imperial gallons (151 US gallons or 573 litres) for wine (also known as a pipe), although the Oxford English Dictionary notes that "these standards were not always precisely adhered to".[1][2]
(Note the different measurements for beer or wine, which is why imperial and US gallons are different but that’s a whole other story.)
The Royal Navy used a standard measurement (the wine measurement of 126 imperial gallons) so that the ship’s purser would be able to calculate and order the maximum number of butts that would fit into a ship’s hold, and the naval architects used those same sizes when designing a ship to make the best use of the hold’s dimensions.
The hold that these water butts were stored in was dark and damp being below the water line of the ship with little ventilation. Over time, the water would become foul, sometimes with algae and small organisms growing in it. (more on that later).
Because water at sea had to be strictly rationed to ensure that there’d be enough for the voyage, only one butt at a time would be lifted from the hold to the galley to use for softening the salt pork and beef that was used for stews, and for drinking under the supervision of the cooks.
When a butt was brought up to the galley it was ‘scuttled’. The word ‘scuttle’ means “to open a hole or holes”. This is where the word ‘scuttlebutt’ for gossip comes from as the sailors would take the opportunity for a little bit of chatting while they drank their water.

How was water stored in British sail ships?
Answer (1 of 5): “How was water stored in British sail ships?” There were different sizes of barrels used for wine, beer, scotch, rum, sherry, beer, etc. The type of barrels used to store water were called ‘butts’, which were approximately equated to 108 imperial gallons (130 US gallons or 491 ...www.quora.com
English wine cask units - Wikipedia
en.wikipedia.org
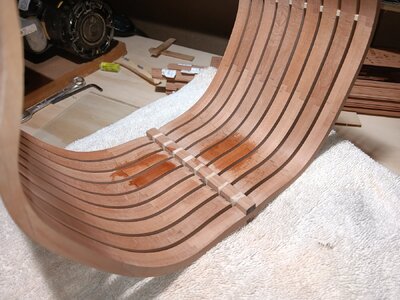
In preparation for sanding the inside of the cross section, I built a small cradle that will support the frames as I sand from any angle.
It is working very well! There is a lot of sanding to fair the inside (just like the outside) so I expect another 2-days to get a smooth and faired interior. The pictures below show how the simple cradle supports the frames while sanding. 1. It is just two studs glued to a board. 2. I lined it with a towel folded several times. 3. I can rotate the hull in all directions and the frames are supported.
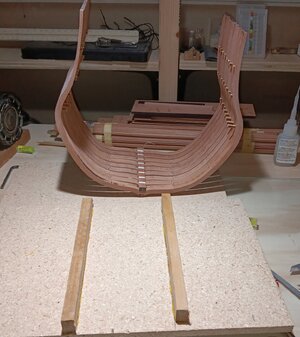
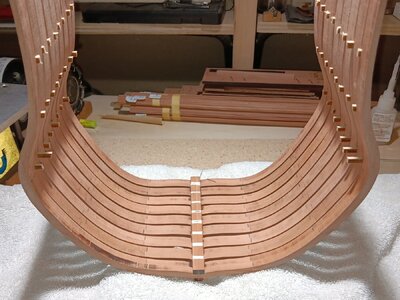
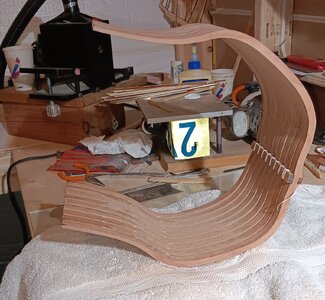
It is working very well! There is a lot of sanding to fair the inside (just like the outside) so I expect another 2-days to get a smooth and faired interior. The pictures below show how the simple cradle supports the frames while sanding. 1. It is just two studs glued to a board. 2. I lined it with a towel folded several times. 3. I can rotate the hull in all directions and the frames are supported.


I know most of this it obvious to many of you but I'm documenting also for a beginner.
Interior sanding/fairing process. With good light it is easy to see the areas that need fairing in (photo 1). Also pencil marks can show where the paper has not reached. I use sanding sticks I make. The thickness is dependent on the degree of curve. Flat areas are thick and hard to bend. The more curvature, the thinner I make the sticks (photo 2). I also made the smaller barrel that came with the kit (photo 3). It looks much more to scale than the large ones in the kit. Probably about the size of a Butt or Hogshead.
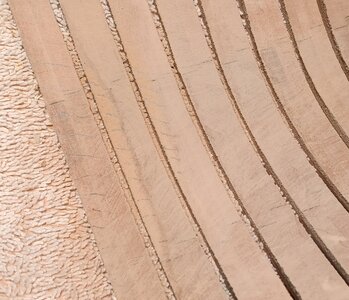
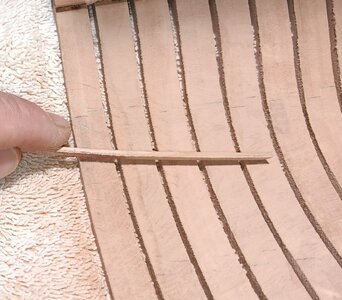
Interior sanding/fairing process. With good light it is easy to see the areas that need fairing in (photo 1). Also pencil marks can show where the paper has not reached. I use sanding sticks I make. The thickness is dependent on the degree of curve. Flat areas are thick and hard to bend. The more curvature, the thinner I make the sticks (photo 2). I also made the smaller barrel that came with the kit (photo 3). It looks much more to scale than the large ones in the kit. Probably about the size of a Butt or Hogshead.


4 days (maybe 8-9 hours) of fairing/sanding the interior and she is fair. Next I'll hit the whole interior with 240grit and post some pictures.
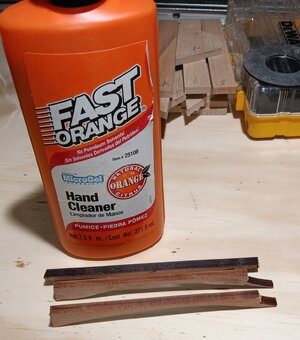
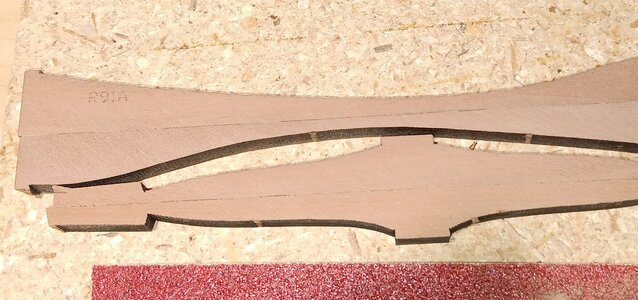
I wanted to post some pictures of my testing of a product someone said will remove the char.
1) It has a gritty pumice feel. I rubbed the two pieces below for 1 minute each and then wiped it down with a paper towel. The black char was definitely reduced significantly!
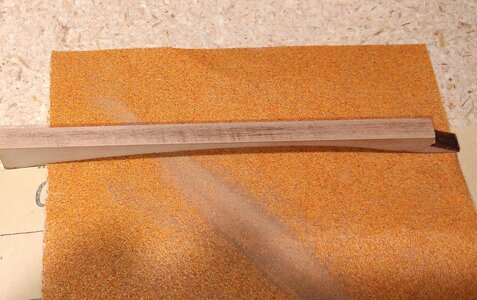
2) I then sanded each test piece 20 times on 120grit sandpaper. The dust is much cleaner/less sooty! The piece itself has much less noticeable black char. At this point it looks very promising!
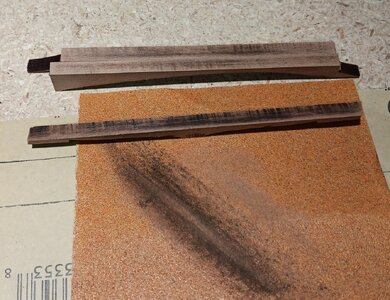
3. I then glued each test piece together to see what the finished glued joints would look like. The top one is the one I used the Fast Orange on. The difference is hardly perceptible, but the top one has less black in the joint, so it is a slightly cleaner and less noticeable joint. Hard to get a feel from the pictures. I plan on using the Fast Orange for char removal on all the pieces and will let everyone know what the joints look like on the riders. I'm hoping the joints will be even less noticeable than the ones on the frames.
I wanted to post some pictures of my testing of a product someone said will remove the char.
1) It has a gritty pumice feel. I rubbed the two pieces below for 1 minute each and then wiped it down with a paper towel. The black char was definitely reduced significantly!

2) I then sanded each test piece 20 times on 120grit sandpaper. The dust is much cleaner/less sooty! The piece itself has much less noticeable black char. At this point it looks very promising!


3. I then glued each test piece together to see what the finished glued joints would look like. The top one is the one I used the Fast Orange on. The difference is hardly perceptible, but the top one has less black in the joint, so it is a slightly cleaner and less noticeable joint. Hard to get a feel from the pictures. I plan on using the Fast Orange for char removal on all the pieces and will let everyone know what the joints look like on the riders. I'm hoping the joints will be even less noticeable than the ones on the frames.

Good morning Brad. Played a little catch up here. This really looks like a stunning kit. You are doing it justice no doubt! Cheers Grant
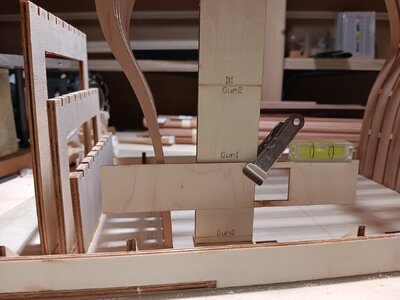
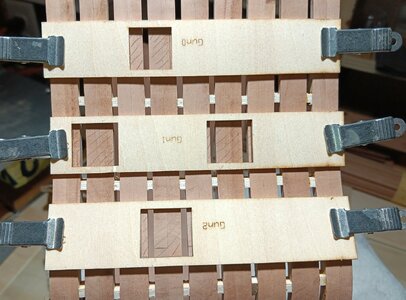
The inside is fair and smooth. I'm testing finishes on the sanded pearwood. Plus I marked the gunports using the jigs supplied in the kit. All seems to be progressing well!
1) I went from 120 to 240 and finally 400 grit. The 400 seemed to polish the pearwood nicely and bring out the grain. I did two test spots with WATCO Danish wood oil. Top was Clear and bottom was light Walnut. I'll let them dry but I'm leaning toward the clear.
2. Using the height gauge, I made marks on the hull to line up the three gunport jigs. Pretty simple way to get the gunport heights correct. It's always a bit nerve-wracking to cut into the hull, so the gauges and jigs give me confidence the cuts will be correct the first time! I will have to add an additional row of spacers at the top of three frames (see red spots), as they will be very thin/fragile after cutting the ports.
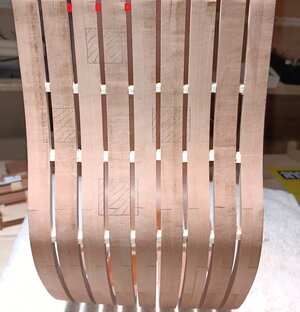
1) I went from 120 to 240 and finally 400 grit. The 400 seemed to polish the pearwood nicely and bring out the grain. I did two test spots with WATCO Danish wood oil. Top was Clear and bottom was light Walnut. I'll let them dry but I'm leaning toward the clear.

2. Using the height gauge, I made marks on the hull to line up the three gunport jigs. Pretty simple way to get the gunport heights correct. It's always a bit nerve-wracking to cut into the hull, so the gauges and jigs give me confidence the cuts will be correct the first time! I will have to add an additional row of spacers at the top of three frames (see red spots), as they will be very thin/fragile after cutting the ports.


Nice clean work Brad! It all looks very promising!
This is looking fantastic Brad, and the size of the barrel is looking much better in the correct size then the previous one.
Today was spent working on the method to make accurate cannon ports. I am trying to follow the construction depicted by Jean Boudroit (left photo with the horizontal gunport sills cut into the frame at an angle) versus what the kit directions show (right):
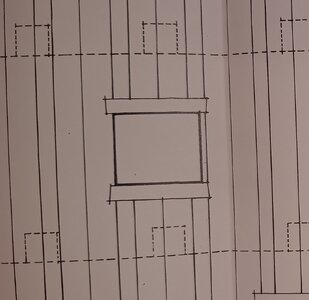
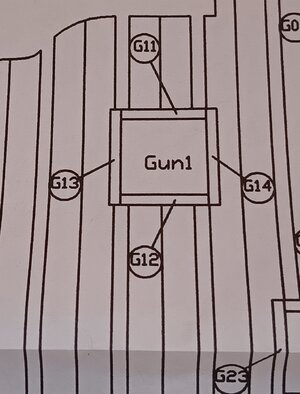
First is the time-consuming job of cutting the port out with small needle saws, keeping parallel to the deck:
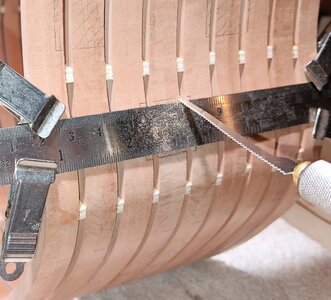
Next I cut into the adjacent frame to the proper depth, making multiple slits. Then used a chisel to remove the cut wood.
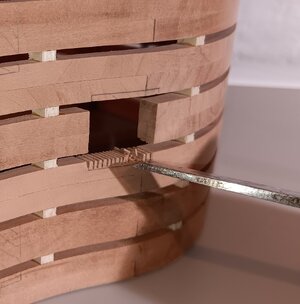
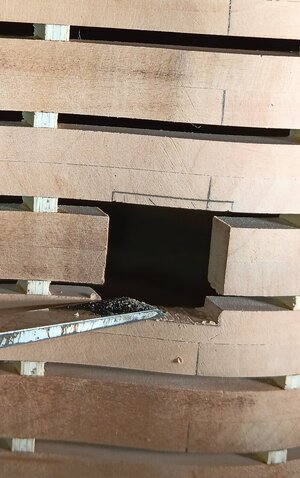
Next, I used a surgical scalpel to cut the proper angle for the horizontal gunport frames/sills to wedge into. One side is complete (photo 2).
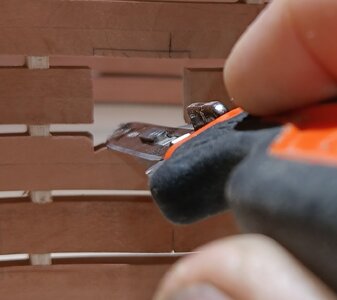
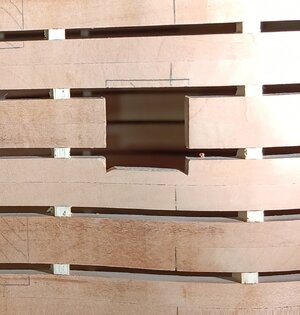
Progress, however small is progress. I'm pleased with the result and look forward to framing the ports and see how this method turns out.


First is the time-consuming job of cutting the port out with small needle saws, keeping parallel to the deck:

Next I cut into the adjacent frame to the proper depth, making multiple slits. Then used a chisel to remove the cut wood.


Next, I used a surgical scalpel to cut the proper angle for the horizontal gunport frames/sills to wedge into. One side is complete (photo 2).


Progress, however small is progress. I'm pleased with the result and look forward to framing the ports and see how this method turns out.
Very nice Brad. I had to cut some similar notches for the sills and headers on the Kingfisher. Watch out for keeping the inside and the outside the same. I had some of these turn out great - others, not so much...Today was spent working on the method to make accurate cannon ports. I am trying to follow the construction depicted by Jean Boudroit (left photo with the horizontal gunport sills cut into the frame at an angle) versus what the kit directions show (right):
View attachment 430704 View attachment 430705
First is the time-consuming job of cutting the port out with small needle saws, keeping parallel to the deck:
View attachment 430722
Next I cut into the adjacent frame to the proper depth, making multiple slits. Then used a chisel to remove the cut wood.
View attachment 430731View attachment 430740
Next, I used a surgical scalpel to cut the proper angle for the horizontal gunport frames/sills to wedge into. One side is complete (photo 2).
View attachment 430743View attachment 430744
Progress, however small is progress. I'm pleased with the result and look forward to framing the ports and see how this method turns out.
Paul,
Yes, it's a challenge, once you start modifying the kits. As you can see from the first picture below, the horizontal cross members no longer fit, as my filing the header sills into the frames meant the header needed to be longer.
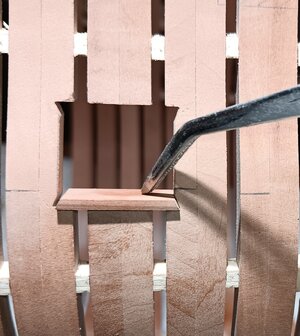
This meant I needed to make new headers/sills, just a hair longer. The good news: The upper ports all get narrower, so I can use the headers/sills from the deck below. This will keep the need to construct new pieces to a minimum. Below is a photo of the pieces dry fit in the gunport. I think the result is worth the extra work.
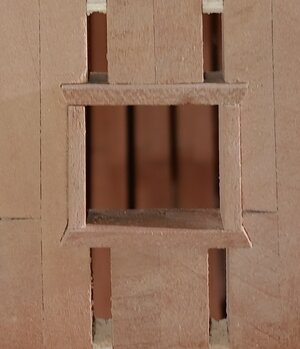
Yes, it's a challenge, once you start modifying the kits. As you can see from the first picture below, the horizontal cross members no longer fit, as my filing the header sills into the frames meant the header needed to be longer.

This meant I needed to make new headers/sills, just a hair longer. The good news: The upper ports all get narrower, so I can use the headers/sills from the deck below. This will keep the need to construct new pieces to a minimum. Below is a photo of the pieces dry fit in the gunport. I think the result is worth the extra work.


