-

Win a Free Custom Engraved Brass Coin!!!
As a way to introduce our brass coins to the community, we will raffle off a free coin during the month of August. Follow link ABOVE for instructions for entering.
-

PRE-ORDER SHIPS IN SCALE TODAY!
The beloved Ships in Scale Magazine is back and charting a new course for 2026!
Discover new skills, new techniques, and new inspirations in every issue.
NOTE THAT OUR FIRST ISSUE WILL BE JAN/FEB 2026
You are using an out of date browser. It may not display this or other websites correctly.
You should upgrade or use an alternative browser.
You should upgrade or use an alternative browser.
Buccaneer 1:100 by Occre - Build log
5/17 to 5/28
Been back in Vallarta about a week and finally pulled the Molino out. Just too many things going on to find some free time before today.
Started by putting the three wales on the stern and then put felt on the stand.

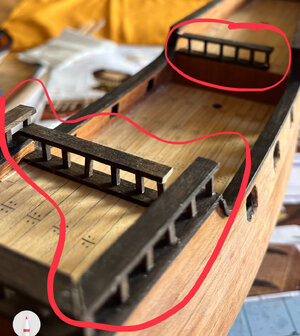
Making some minor modifications to the plans in regards to the ladders and to the railings.
First off there is not any ladders to the poop deck so I’m going to add one. I’ve known for a bit I was going to add one, and had been wondering about making one but instead I decided that I would take one of the two that went to the fore deck. This gives me one ladder to each deck.
The plans also do not have any railings on the fore or on poop decks so I’ll be adding them.
The ladders are approximately 9mm so I’m creating railings that will leave 10mm openings. I’ll place all three of the ladders on the port side.
I cut some 2mm x 7mm boards to create the bottom and top of each of the three railings and then 2mm x 2mm to make the balusters - the front two are 8mm while the one on the poop deck is only 5mm to align with the gunwale. All are stained walnut.

I glue the bottom of each railings to the deck, and the balusters to them. There are 6 on both railings on the fore and quarter decks; the poop deck only has 5.
Once dried, I glued the tops onto the balusters.

Onto (or back to) the wales. The next wale (4th down on the back half of the ship) is made with 2mm x 4mm board and runs from the balcony to the front of the foredeck, just below the bottom of the gun ports. While there is some curve “around” the ship (on the 2mm side), the more difficult bend is on the 4mm side as it curves beneath the gun ports. I put a number of straight pins into the board and then put a piece of masking tape under where the wake will be positioned. The tape is only to help keep glue off of the rest of the hull. Working from the stern to the bow, I position the wale and then push the pins in. At the overhang on the bow, I hold it in place with a rubber band and a small clamp.

While doing this, I ended up breaking the railings off around the foredeck as I mistakenly used it for leverage to hold/position the wale. Just another example of “it” being wood and glue and is an easy repair.
The wale on the starboard side was a bit easier and even though I tried to be careful with the railings on the foredeck, I again broke it and had to repair.
So if I had one mulligan for this portion, it would be to not build the railings until after the wales were completed.
While waiting for the glue to dry before going after the next wale, I thought try painting the gunport frames and lids. After seeing a build log with some after market frames and lids, I decided to give them a try. These are not provided by OcCre.
I start with some primer.
Then I paint the lids in much the way I painted the doors; adding a little paint in various spots using 5 different browns.
The frames are painted a dark brown.
Once the lids were fully dried, I added a wash of brown over everything to hide the primer.
To wrap them up, I painted “hinges” on both the lids and frames black. I want them to be noticeable, but not to stand out.
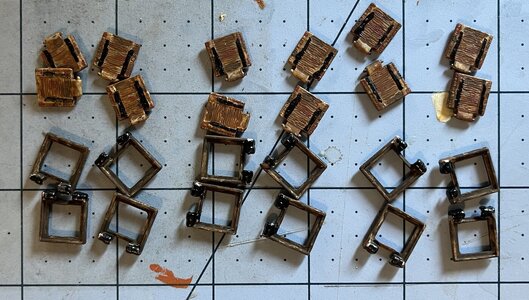
Overall they look ok, but not as good as the doors do.
I cut and stain the 4 remaining wales and bend them at the bow. While bending them my electronic bending iron broke. The metal shaft has always be wobbly but today it just broke off. Given I had only bent one of the four wales I was at as bit of a standstill. Sure I could buy a soldering iron down here in Mexico but I already have 2 of them at home so I don’t have to buy one if I don’t have to.
And then I remembered seeing at least one person using an actual clothes iron to bend boards so I gave it a try. And it worked. It didn’t give me as much control but it actually was faster.
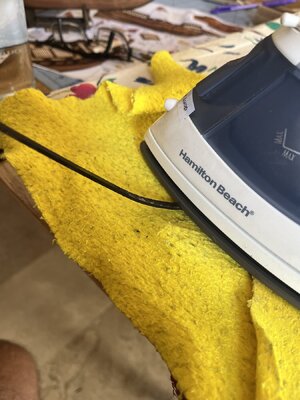
They all needed a little touch up with the stain. Not sure why I stained them before bending, but I did.
While waiting for the touch up stain to dry I started working on the small wales at the very bow of the ship. There are actually 3 on each side that use 2mm x 2mm boards. A little measuring, sanding, and staining and they go on fairly smoothly.
The lower wales turned out to be challenging for me for at least two reasons…
It’s all about the curve at the bow. I can’t get the wale to stay tight against the hull. I can get one portion but then I realize it’s pulled away in another area. I decide to just work on parts of the bow and once it is dry, I’ll work on the rest.
To help hold the very front tip of the wale in place, I attached a small board to the top of the bow stem, leaving a gap the thickness of the wale. This plus a few pins and a couple of rubber bands gets the front inch or two to hold tight.

Once dried, the rest is easy to glue in place. To keep a consistent distance between the two wales I use a 8mm board as a spacer.

It probably took about 4 hours of actual work-time to get the 2 wales on the starboard side done.
For the port side, I’m going to use my freshly learned technique and attach a small board to the bow stem to keep the front tip-off the wale snuggly against the hull. I then puta number of pins into each wale, and the put glue on the front two inches. I put them into place (which is a lot easier since I removed the railings), and push the first few pins into the hull and then put a couple of rubber bands over the front curve.
The remaining portions of the wales go very smoothly.
I add in the beam for the emergency rudder chains but due to my modification of adding chase guns, the beam has to sit higher and be made with three pieces of board. One on each side and then a third between the 2 balcony supports. Since the beam can’t sit at the same height as the bottom wale, I add a small section of stained board right above the wale from the rear of the balcony to the stern.
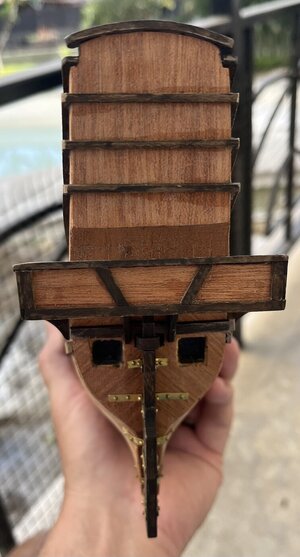
I wrap up the wales by attaching the 4 vertical wales between the gun ports on each side.
It takes about an hour or so to clean up everything up; cutting, trimming, sanding, and staining on all the various wales.
Next up is staining portions of the top of the hull and somehow I manage to stain a little bit too much. So even though I like to say just about anything can be fixed because “it’s only wood and glue”, I found something that can’t be. Decorations go in this area at a later stage so it will end up being a minor thing.
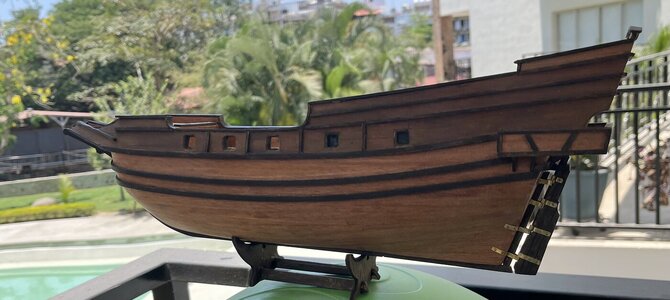
My time this season in Vallarta is coming to an end, and I kept holding off on posting this in the hope I’d get more completed. I still may, but thought I’d post this now. I hate putting the Molino away until I’m back in October, but that just means that I get to start working on my Bluenose again.
So when I return, it’s time for the hull decorations, the windows, the door, and varnishing the hull.
Time for this portion: 18.5 hours
Total time to date: 163.5 hours

Been back in Vallarta about a week and finally pulled the Molino out. Just too many things going on to find some free time before today.
Started by putting the three wales on the stern and then put felt on the stand.
Making some minor modifications to the plans in regards to the ladders and to the railings.
First off there is not any ladders to the poop deck so I’m going to add one. I’ve known for a bit I was going to add one, and had been wondering about making one but instead I decided that I would take one of the two that went to the fore deck. This gives me one ladder to each deck.
The plans also do not have any railings on the fore or on poop decks so I’ll be adding them.
The ladders are approximately 9mm so I’m creating railings that will leave 10mm openings. I’ll place all three of the ladders on the port side.
I cut some 2mm x 7mm boards to create the bottom and top of each of the three railings and then 2mm x 2mm to make the balusters - the front two are 8mm while the one on the poop deck is only 5mm to align with the gunwale. All are stained walnut.

I glue the bottom of each railings to the deck, and the balusters to them. There are 6 on both railings on the fore and quarter decks; the poop deck only has 5.
Once dried, I glued the tops onto the balusters.

Onto (or back to) the wales. The next wale (4th down on the back half of the ship) is made with 2mm x 4mm board and runs from the balcony to the front of the foredeck, just below the bottom of the gun ports. While there is some curve “around” the ship (on the 2mm side), the more difficult bend is on the 4mm side as it curves beneath the gun ports. I put a number of straight pins into the board and then put a piece of masking tape under where the wake will be positioned. The tape is only to help keep glue off of the rest of the hull. Working from the stern to the bow, I position the wale and then push the pins in. At the overhang on the bow, I hold it in place with a rubber band and a small clamp.

While doing this, I ended up breaking the railings off around the foredeck as I mistakenly used it for leverage to hold/position the wale. Just another example of “it” being wood and glue and is an easy repair.
The wale on the starboard side was a bit easier and even though I tried to be careful with the railings on the foredeck, I again broke it and had to repair.
So if I had one mulligan for this portion, it would be to not build the railings until after the wales were completed.
While waiting for the glue to dry before going after the next wale, I thought try painting the gunport frames and lids. After seeing a build log with some after market frames and lids, I decided to give them a try. These are not provided by OcCre.
I start with some primer.
Then I paint the lids in much the way I painted the doors; adding a little paint in various spots using 5 different browns.
The frames are painted a dark brown.
Once the lids were fully dried, I added a wash of brown over everything to hide the primer.
To wrap them up, I painted “hinges” on both the lids and frames black. I want them to be noticeable, but not to stand out.

Overall they look ok, but not as good as the doors do.
I cut and stain the 4 remaining wales and bend them at the bow. While bending them my electronic bending iron broke. The metal shaft has always be wobbly but today it just broke off. Given I had only bent one of the four wales I was at as bit of a standstill. Sure I could buy a soldering iron down here in Mexico but I already have 2 of them at home so I don’t have to buy one if I don’t have to.
And then I remembered seeing at least one person using an actual clothes iron to bend boards so I gave it a try. And it worked. It didn’t give me as much control but it actually was faster.

They all needed a little touch up with the stain. Not sure why I stained them before bending, but I did.
While waiting for the touch up stain to dry I started working on the small wales at the very bow of the ship. There are actually 3 on each side that use 2mm x 2mm boards. A little measuring, sanding, and staining and they go on fairly smoothly.
The lower wales turned out to be challenging for me for at least two reasons…
- I don’t have a plank bender so they kinda are what they are.
- The railing KEEPS getting in the way / so I just removed it.

It’s all about the curve at the bow. I can’t get the wale to stay tight against the hull. I can get one portion but then I realize it’s pulled away in another area. I decide to just work on parts of the bow and once it is dry, I’ll work on the rest.
To help hold the very front tip of the wale in place, I attached a small board to the top of the bow stem, leaving a gap the thickness of the wale. This plus a few pins and a couple of rubber bands gets the front inch or two to hold tight.

Once dried, the rest is easy to glue in place. To keep a consistent distance between the two wales I use a 8mm board as a spacer.

It probably took about 4 hours of actual work-time to get the 2 wales on the starboard side done.
For the port side, I’m going to use my freshly learned technique and attach a small board to the bow stem to keep the front tip-off the wale snuggly against the hull. I then puta number of pins into each wale, and the put glue on the front two inches. I put them into place (which is a lot easier since I removed the railings), and push the first few pins into the hull and then put a couple of rubber bands over the front curve.
The remaining portions of the wales go very smoothly.
I add in the beam for the emergency rudder chains but due to my modification of adding chase guns, the beam has to sit higher and be made with three pieces of board. One on each side and then a third between the 2 balcony supports. Since the beam can’t sit at the same height as the bottom wale, I add a small section of stained board right above the wale from the rear of the balcony to the stern.

I wrap up the wales by attaching the 4 vertical wales between the gun ports on each side.
It takes about an hour or so to clean up everything up; cutting, trimming, sanding, and staining on all the various wales.
Next up is staining portions of the top of the hull and somehow I manage to stain a little bit too much. So even though I like to say just about anything can be fixed because “it’s only wood and glue”, I found something that can’t be. Decorations go in this area at a later stage so it will end up being a minor thing.

My time this season in Vallarta is coming to an end, and I kept holding off on posting this in the hope I’d get more completed. I still may, but thought I’d post this now. I hate putting the Molino away until I’m back in October, but that just means that I get to start working on my Bluenose again.
So when I return, it’s time for the hull decorations, the windows, the door, and varnishing the hull.
Time for this portion: 18.5 hours
Total time to date: 163.5 hours

12/13 to 12/20
Life is finally at a point where I can work on the Molino. It’s hard to believe that my 2 months here in Puerto Vallarta are almost over but it’s been a crazy couple of months, starting even before we came down. Most of the craziness has been good, but there’s been some bad too. But things are finally at a point where emotionally, mentally, and physically, I’m ready to work on the Molino.
I start by trying to correct a mistake I made “last” time (a little over 6 months ago!?) where I stained a little more than I should have. For the most part this area will be covered by the hull decorations, but I used it as an easing into “task” on the Molino. I mixed some paint to try to match the unstained portions of the hull. The goal was to make it lighter, and while not close to perfect, I feel better about it. The paint is noticeable in this picture but I’m hoping that when the decorations are in place, it will look better.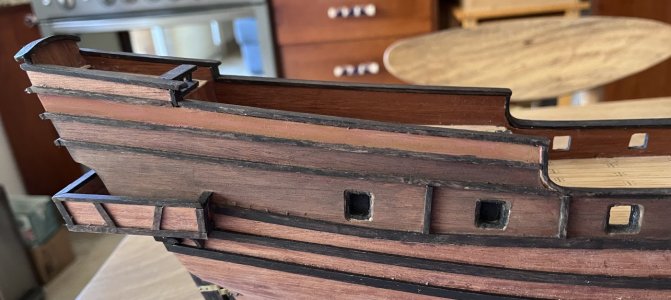
I then started on the hull decorations. OcCre gives you colored paper to do these but I planned (as many people have before me) to make these little triangles out of strips of wood. Heck, I had even bought the wood back in the States at least a year ago. But now that I’m at the point in the build, I switched gears and went with the paper ones instead. The biggest reason for following the directions instead of using the thin boards were that the thin boards would stick out as far as the existing stained pieces of wood - and I just don’t think that will look as good as the paper ones.

I first go after the smaller double triangles. I measure the length of the area to be covered with the decorations (8”) and then measure the width every 2 inches (as it tapers slightly towards midship).
I mark these measurements out on the paper decorations and then cut it out. I then cut the individual triangles out and test fit them into the area. Each needs to be just a little bit shorter and needs the trimmed.
I use as brush to apply a water thinned-down white glue and put two triangles (top and bottom) in place. Brush on a little more of the thinned out glue and repeated until the area is covered.
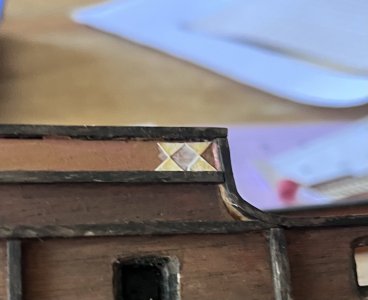
Not super fast, but what is in this hobby?

I then do the same with the short section at the bow of the ship and then repeat the process for the other side of the ship.

Next I follow the same process for the larger triangles. As the glue dried, I noticed a few did not lay flat or are not lined up well. For those I put a little water on the triangle that isn’t looking good, gently scrape it off, and then put a replacement triangle in place.
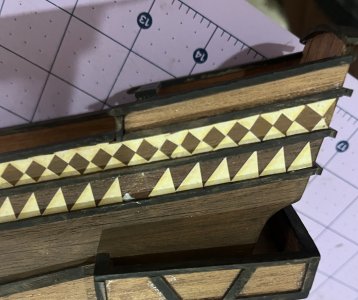
Before beginning these decorations I felt that the paper ones would be a bit easier than creating wood ones (which also played into my decision of using the paper ones), but in retrospect, the paper ones were possibly a bit harder as it’s much easier to trim and sand small pieces wood than to cut and trim very small pieces of paper. I ended up using a few knife blades on the process.

I didn’t get a lot accomplished, but all in all, I’m pleased with the results.

These last two pictures show that the painted section that didn’t seem to match in the first picture of this post, blend in as I had hoped they would.
Unfortunately it’s now time to put the Molino away again as we only have two days left and we still have a bunch to do. The biggest time consumer we have is that we recently bought a second condo in the same building, and are trying to both upgrade and move into it - while juggling renters in both units.
I plan on working on my Bluenose back in Colorado but we’re only going to be there for about a month before we leave on our next adventure… a month long cruise from Chile, and then across the Drake Passage to Antarctica, and then up the east coast of South America to the Falkland Islands and wrap up in Santos (Sao Paulo), Brazil.

Next up for the Molino (probably when we return in late March)… the windows and the door of the Captain’s cabin.
Time for this portion: 8 hours
Total time to date: 171.5 hours
Life is finally at a point where I can work on the Molino. It’s hard to believe that my 2 months here in Puerto Vallarta are almost over but it’s been a crazy couple of months, starting even before we came down. Most of the craziness has been good, but there’s been some bad too. But things are finally at a point where emotionally, mentally, and physically, I’m ready to work on the Molino.
I start by trying to correct a mistake I made “last” time (a little over 6 months ago!?) where I stained a little more than I should have. For the most part this area will be covered by the hull decorations, but I used it as an easing into “task” on the Molino. I mixed some paint to try to match the unstained portions of the hull. The goal was to make it lighter, and while not close to perfect, I feel better about it. The paint is noticeable in this picture but I’m hoping that when the decorations are in place, it will look better.

I then started on the hull decorations. OcCre gives you colored paper to do these but I planned (as many people have before me) to make these little triangles out of strips of wood. Heck, I had even bought the wood back in the States at least a year ago. But now that I’m at the point in the build, I switched gears and went with the paper ones instead. The biggest reason for following the directions instead of using the thin boards were that the thin boards would stick out as far as the existing stained pieces of wood - and I just don’t think that will look as good as the paper ones.

I first go after the smaller double triangles. I measure the length of the area to be covered with the decorations (8”) and then measure the width every 2 inches (as it tapers slightly towards midship).
I mark these measurements out on the paper decorations and then cut it out. I then cut the individual triangles out and test fit them into the area. Each needs to be just a little bit shorter and needs the trimmed.
I use as brush to apply a water thinned-down white glue and put two triangles (top and bottom) in place. Brush on a little more of the thinned out glue and repeated until the area is covered.

Not super fast, but what is in this hobby?

I then do the same with the short section at the bow of the ship and then repeat the process for the other side of the ship.

Next I follow the same process for the larger triangles. As the glue dried, I noticed a few did not lay flat or are not lined up well. For those I put a little water on the triangle that isn’t looking good, gently scrape it off, and then put a replacement triangle in place.

Before beginning these decorations I felt that the paper ones would be a bit easier than creating wood ones (which also played into my decision of using the paper ones), but in retrospect, the paper ones were possibly a bit harder as it’s much easier to trim and sand small pieces wood than to cut and trim very small pieces of paper. I ended up using a few knife blades on the process.

I didn’t get a lot accomplished, but all in all, I’m pleased with the results.

These last two pictures show that the painted section that didn’t seem to match in the first picture of this post, blend in as I had hoped they would.
Unfortunately it’s now time to put the Molino away again as we only have two days left and we still have a bunch to do. The biggest time consumer we have is that we recently bought a second condo in the same building, and are trying to both upgrade and move into it - while juggling renters in both units.
I plan on working on my Bluenose back in Colorado but we’re only going to be there for about a month before we leave on our next adventure… a month long cruise from Chile, and then across the Drake Passage to Antarctica, and then up the east coast of South America to the Falkland Islands and wrap up in Santos (Sao Paulo), Brazil.

Next up for the Molino (probably when we return in late March)… the windows and the door of the Captain’s cabin.
Time for this portion: 8 hours
Total time to date: 171.5 hours
Nicely done Hugh! Have a safe trip back to Lakewood. Your trip to South America sounds amazing. Magic Mike
4/11 to 4/18
Wow. Hard to believe it has been almost 4 months since I’ve done anything other than look at the Molino, but today I finally felt comfortable enough with the condo chores that I could sit down and actually begin working.
I’ve gotten smarter in my builds and when I wrap up my work for a trip, I note what I expect to work on when I return. Sure, I need a little refreshing but it is a lot easier to pick up where I had left off. Four months is a bit long between work sessions (even for me), but we’ve been really busy since our last trip to Vallarta. Sandwiched between two 3 week stays at home in Colorado, we took a month long cruise around the southern tip of South America. The time off/away really went fast.
First up are the windows and the door of the Captain’s cabin and the decorations on the Captain’s balcony. I had previously painted them so all I need to do was remove them from the brass sheet and clean up the small burrs where they had been connected. After test placing the door, I decided to change the trim (frame) from brown to black as it kinda blended in. I also touched up all of the edges of the windows and the door with black paint.
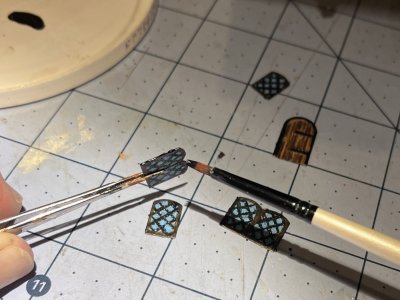
Glueing them was very straightforward except that when I needed to move them a little to get them where I wanted them ended up leaving traces of the CV glue. Got to remember to use less or use thicker glue.
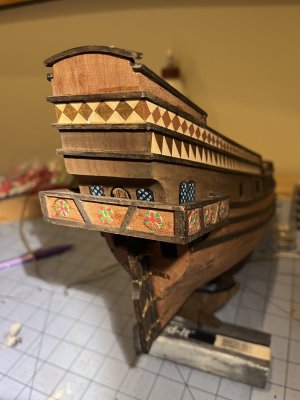
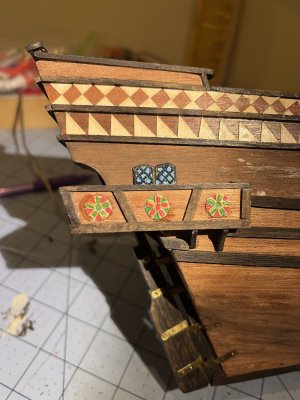
Next up is repairing the rails. I kept knocking them off when working on the whales way back in May of last year so I removed them until “later”. Guess “later” is finally “now”. The parts are all cut so it’s just a little bit of cleanup where the glue had been and then reglueing.

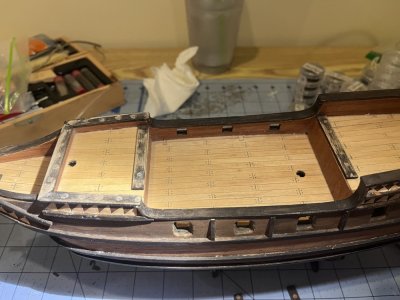
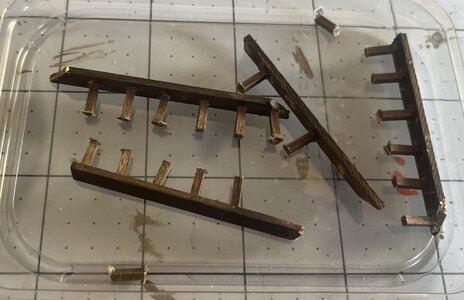
Given I’ve knocked them off so many times, I thought maybe it would be a good time to try something I had read in a post a while back on a Reddit sub (r/ModelShips by r/ghostman1846). U/ghostman1846 had drilled a small hole in each baluster, glued a small nail into the hole and then done the same for the other side. It may be overkill but I’m going to try it. I won’t do it on each baluster, but instead do it at the end baluster for each rail. So instead of 30+ pins, I only did it to 12. Definitely doable.


And if you haven’t checked out this sub on Reddit, or Reddit in general, I recommend you do. While there aren’t full build logs, there are a lot of good pics and info on builds.
I have a bunch of 0.5 mm diameter pins/nails that are 7.2 mm long that will do the trick. I drilled the holes using a pin-vise and then cut the heads off of the nails. I then inserted them into the holes, headless end first.
I placed each railing section into place and then marked where the hole for the pin needed to be drilled. One by one the sections went on and even though it has been over a year since I first attached the rails, and then reattached them (and actually reattached again), they feel the most secure that they’ve ever been. I don’t think these newly attached rails would stand up to the rigors I put the rails through while trying to attach the wales, but they feel very secure.
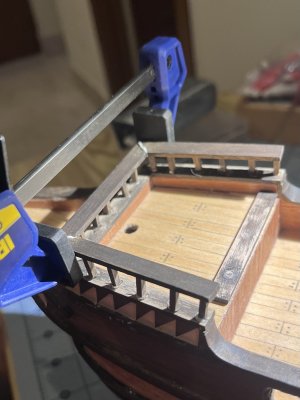
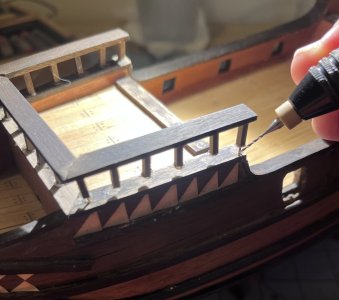
I’ll need to touch up the stain, but I’ll do that when I’m staining the frames of the grates.
I’m also going to fess up that I haven’t really been following the instructions (does anyone?), but rather basing what to do next on my gut feeling after reading and watching a number of build logs. I’m going to start following the numbered sequence of the instructions BUT will continue using the build logs to enhance the instructions. I’m a process guy so this is something that I’ve struggled with since picking up the hobby. I want the structure of instructions and now I think I’ve found a happy medium between the instructions and the various build logs. I’m not too far out of sequence but there will be some steps/parts that I’ve already completed.
The next numbered parts are those of the grates. They start by creating two 15x15 grates which will be cut down to the correct size once the glue has dried. These 15x15 grates are easy to put together, but each one requires 150 “dots” of glue - which means tired fingers because of all of the squeezing of the glue bottle. Yes, there are 150 dots as your mind has time to calculate these types of things when you are doing such a repetitive task.
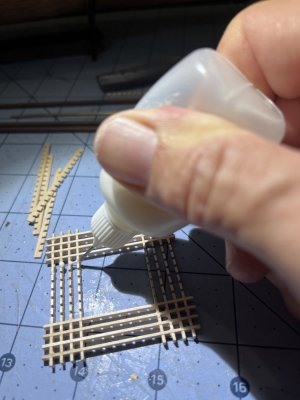
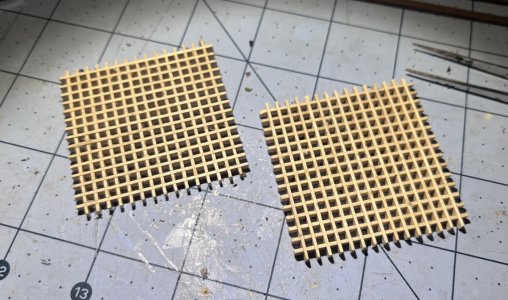
Once the glue has dried, the 15x15 grates are cut down to the desired sizes. There are five grates in total, of three different sizes; two 10x8 (parts E15/16), one 5x4 (parts E13/14), and two 6x4 (parts F12/13).
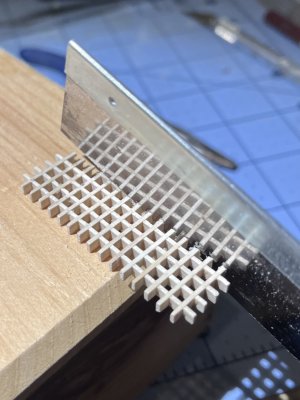
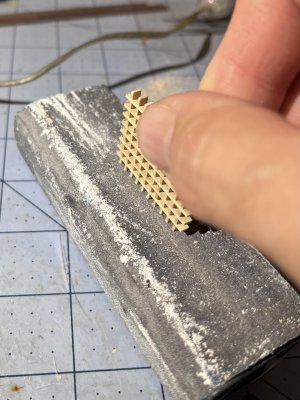
The frames are then added using a walnut strip. I cut the short sides for each grate first and glued them in place. Then a little sanding to help ensure the “ends” are equal/even, and then I cut and glued the long slides in place.
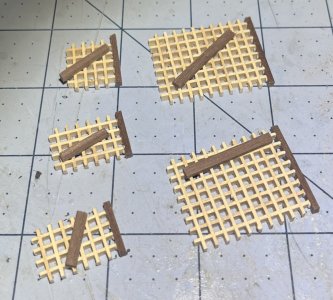
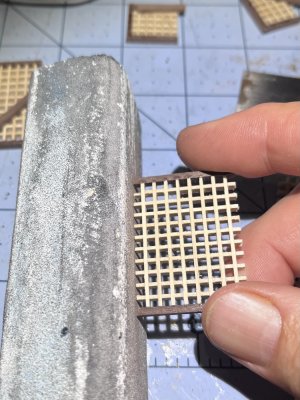
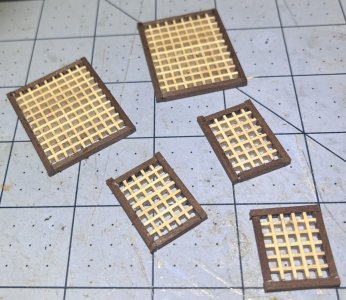
The grates will be right on top of the deck so I tape off where they will be so I can paint the areas under each grate to give the holds some depth.
Now some painting and staining.
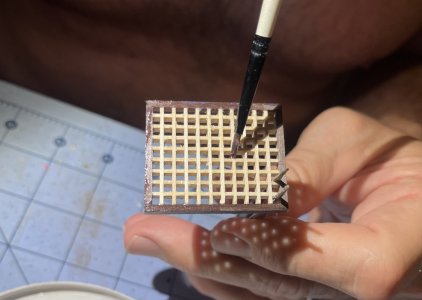
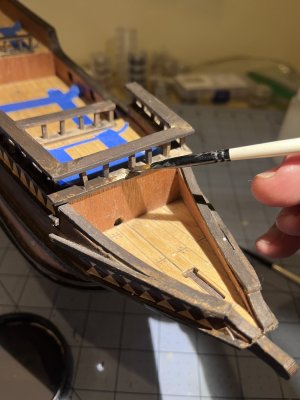
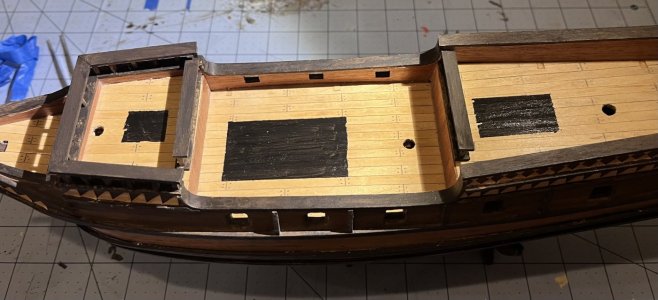
After everything dries, the grates are glued into place.

The Molino is really beginning to look like a ship. Next up… the cannons!
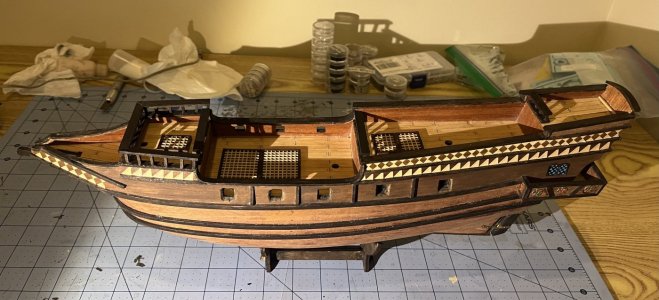
Time for this portion: 8.5 hours
Total time to date: 180 hours
Wow. Hard to believe it has been almost 4 months since I’ve done anything other than look at the Molino, but today I finally felt comfortable enough with the condo chores that I could sit down and actually begin working.
I’ve gotten smarter in my builds and when I wrap up my work for a trip, I note what I expect to work on when I return. Sure, I need a little refreshing but it is a lot easier to pick up where I had left off. Four months is a bit long between work sessions (even for me), but we’ve been really busy since our last trip to Vallarta. Sandwiched between two 3 week stays at home in Colorado, we took a month long cruise around the southern tip of South America. The time off/away really went fast.
First up are the windows and the door of the Captain’s cabin and the decorations on the Captain’s balcony. I had previously painted them so all I need to do was remove them from the brass sheet and clean up the small burrs where they had been connected. After test placing the door, I decided to change the trim (frame) from brown to black as it kinda blended in. I also touched up all of the edges of the windows and the door with black paint.

Glueing them was very straightforward except that when I needed to move them a little to get them where I wanted them ended up leaving traces of the CV glue. Got to remember to use less or use thicker glue.


Next up is repairing the rails. I kept knocking them off when working on the whales way back in May of last year so I removed them until “later”. Guess “later” is finally “now”. The parts are all cut so it’s just a little bit of cleanup where the glue had been and then reglueing.


Given I’ve knocked them off so many times, I thought maybe it would be a good time to try something I had read in a post a while back on a Reddit sub (r/ModelShips by r/ghostman1846). U/ghostman1846 had drilled a small hole in each baluster, glued a small nail into the hole and then done the same for the other side. It may be overkill but I’m going to try it. I won’t do it on each baluster, but instead do it at the end baluster for each rail. So instead of 30+ pins, I only did it to 12. Definitely doable.


And if you haven’t checked out this sub on Reddit, or Reddit in general, I recommend you do. While there aren’t full build logs, there are a lot of good pics and info on builds.
I have a bunch of 0.5 mm diameter pins/nails that are 7.2 mm long that will do the trick. I drilled the holes using a pin-vise and then cut the heads off of the nails. I then inserted them into the holes, headless end first.
I placed each railing section into place and then marked where the hole for the pin needed to be drilled. One by one the sections went on and even though it has been over a year since I first attached the rails, and then reattached them (and actually reattached again), they feel the most secure that they’ve ever been. I don’t think these newly attached rails would stand up to the rigors I put the rails through while trying to attach the wales, but they feel very secure.


I’ll need to touch up the stain, but I’ll do that when I’m staining the frames of the grates.
I’m also going to fess up that I haven’t really been following the instructions (does anyone?), but rather basing what to do next on my gut feeling after reading and watching a number of build logs. I’m going to start following the numbered sequence of the instructions BUT will continue using the build logs to enhance the instructions. I’m a process guy so this is something that I’ve struggled with since picking up the hobby. I want the structure of instructions and now I think I’ve found a happy medium between the instructions and the various build logs. I’m not too far out of sequence but there will be some steps/parts that I’ve already completed.
The next numbered parts are those of the grates. They start by creating two 15x15 grates which will be cut down to the correct size once the glue has dried. These 15x15 grates are easy to put together, but each one requires 150 “dots” of glue - which means tired fingers because of all of the squeezing of the glue bottle. Yes, there are 150 dots as your mind has time to calculate these types of things when you are doing such a repetitive task.


Once the glue has dried, the 15x15 grates are cut down to the desired sizes. There are five grates in total, of three different sizes; two 10x8 (parts E15/16), one 5x4 (parts E13/14), and two 6x4 (parts F12/13).


The frames are then added using a walnut strip. I cut the short sides for each grate first and glued them in place. Then a little sanding to help ensure the “ends” are equal/even, and then I cut and glued the long slides in place.


The grates will be right on top of the deck so I tape off where they will be so I can paint the areas under each grate to give the holds some depth.
Now some painting and staining.
- Clear satin on the grates
- Walnut stain on the rails
- Black on the deck


After everything dries, the grates are glued into place.

The Molino is really beginning to look like a ship. Next up… the cannons!

Time for this portion: 8.5 hours
Total time to date: 180 hours
Hugh, the railings and crates look great as does the paint. Magic Mike
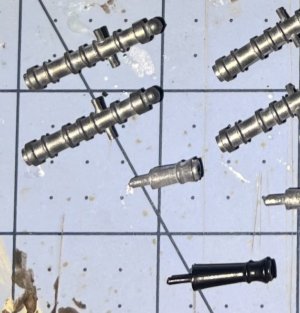
The kit came with two different styles of cannons; 8 are full cannons while the other four are “dummy” cannons with just the tips of the barrels. But the two types have very different styles of barrels.
I’m adding 2 chase guns which will be adding a third type as well. The ones I added are the black “dummy” cannons, but other than being a bit longer than the other, kit supplied “dummy” cannons, look similar / but would probably mean a bigger/heavier cannon or possibly the black ones are just a different scale.
Can someone tell me the difference between the two shown?

4/19 to 4/25
Stained the mast rings and glued them in place.
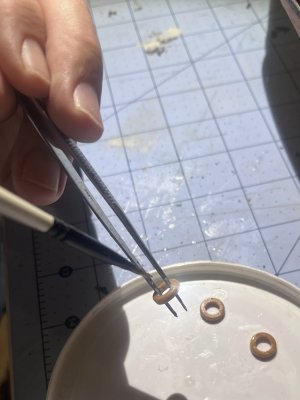
I have gone back and forth on how I should paint the cannons and have landed on the following:
The kit came with two distinctive styles of cannons; eight are full cannons with carriages while the other four are “dummy” cannons (just the tips of the barrels). The two cannons have quite different styles of barrels. In addition, I am adding two chase guns to the stern which ended up being a third type of cannon. The ones I added are the black “dummy” cannons. They look like the other, kit supplied “dummy” cannons but are a bit longer. I am assuming the length means it is a bigger/heavier cannon or the ones that I purchased are just a different scale.

Can someone tell me the difference between the cannons?
Time to give a quick shout-out to my mother-in-law, Alice, as she gave me some cash for my birthday with the express request that I use the money to buy something for my ships. While I will not get to show her the finished model as she recently passed away, I was able to show her pictures of what she got for me as well as pictures of where they would go. She also got me the metal gunport lids and frames that I will be adding later. Thanks Alice. You will forever be part of the Molino.
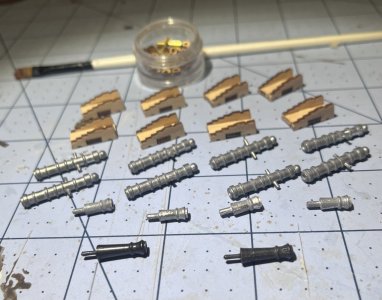
All the cannon barrels are metal and require a little sanding to remove the parting line. The lines were minimal but visible.
I painted all of them with a primer and remembered that I do not have any matte black paint. For many of us, and even myself when I am at home, this is not much of a problem as paint is available. Here in Mexico that is not always the case. I remember seeing a store a couple of years ago not too far away that had a limited selection of paint. I knew the general direction of where it was but could not located it on a map. So, I just walked up and down the streets for awhile until I found it. Their selection was even less than what I remembered, but they did have a black that they said was not shiny. The 50 pesos (~$2.50 US) price was not bad, so I buy it and surprisingly “Negro Intenso” does mean “matte”.
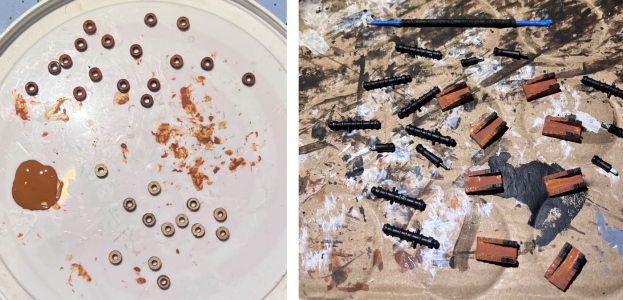
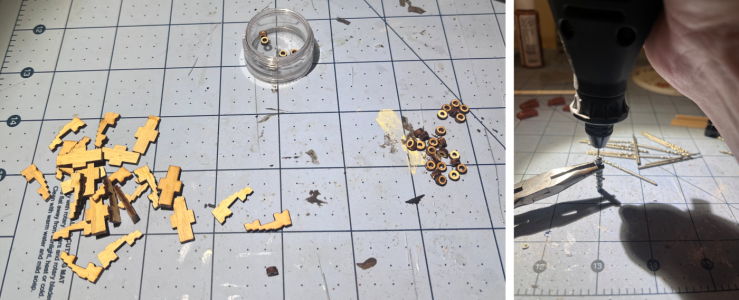
I use a toothpick to paint the gold of the bands on the barrels.
I fashioned the stool bed & quoin out of a thin strip of deck planking and painted them a dark brown.
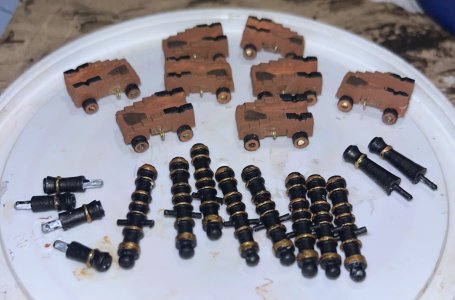
With everything pained, I put together the carriages and added the wheels.
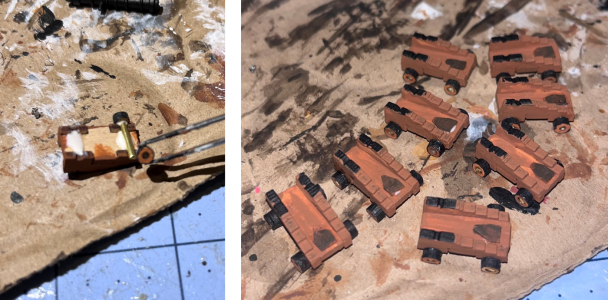
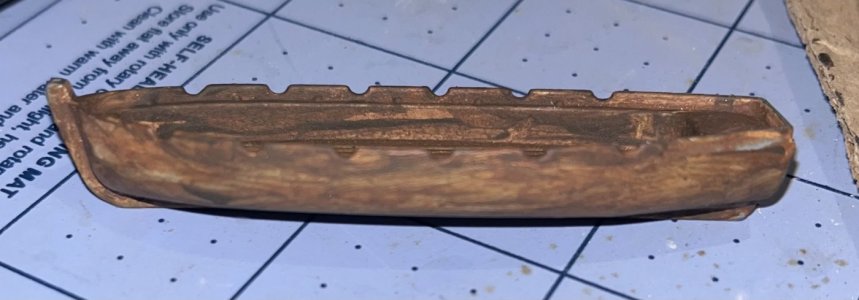
During the painting process, I painted the lifeboat with primer followed by two different shades of brown. It still needs more detail, but it is coming together.
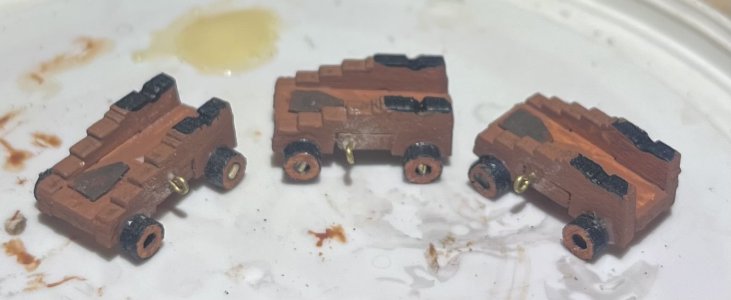
0.02mm eyebolts are added to each side of the carriages between the wheels for the recoil rope.
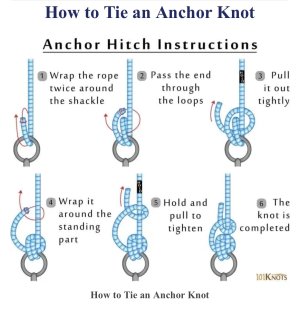
Given I have not yet done any rigging I reached out to a friend back in Denver from the Rocky Mountain Shipwrights and asked what knot he recommended that I use to attach the recoil ropes to the eyebolts. Phil is one of our go-to members for anything rigging related and he said to go with an anchor bend knot (also known as anchor hitch and fisherman’s bend), at least if the eyebolts are big enough to allow the line to go through it twice AND if the eyebolts are not yet attached to the bulwark. Otherwise, he said to go with two half hitches (also known as anchor as a double half hitch and clove hitch).
It was not super easy, but the line could fit through the eyebolt twice, so I researched anchor bend knots and got to work. A while back while researching knots for The Scuttlebutt (our club newsletter which I write and edit), I found the site 101knots which I hope everyone knows about. Great pictures of many types of knots along with when and where they are used. And then YouTube was great for videos.
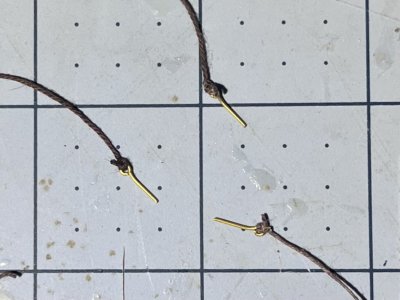
I decided to make life a bit easier by making two of these recoil ropes per cannon, with them attached under the button/breech. I feel this will be easier and look better than one line with eyebolts on either end. Easier as I will not have to worry about the cannon & carriage while tying the second eyebolt and will look better as I will have more control over the length of the recoil ropes making them all similar in length.

In this manner I created sixteen eyebolts with line.
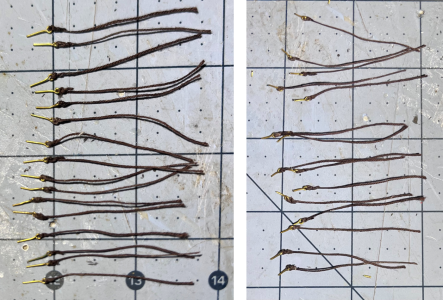
As with most things, I got better and faster the more I did, but it still took me about 3 hours. The biggest take-a-way is that do not be stingy on the length of each line. In fact, it was a lot easier to tie when the line was about 6” to 8” longer than the ~2” that was needed.
Each line was then cut down to about 2” and each eyebolt was cut in half.
To lash up the cannons, I fed a line through the eyebolts on the carriage sides, making sure that the lines both had about the same length extending past the front of the carriage.
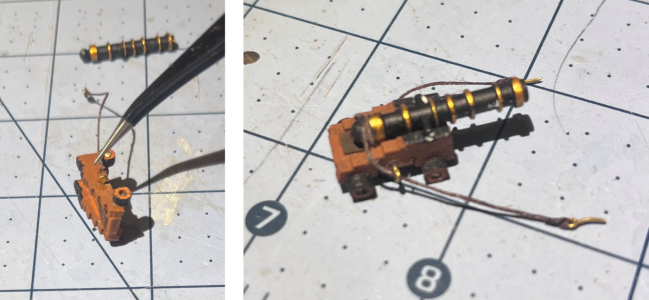
I put three dots of glue (one on each trunion and one on the quion - again I hope these are the correct terms) on the carriage, followed by a line of glue around the button/breech.
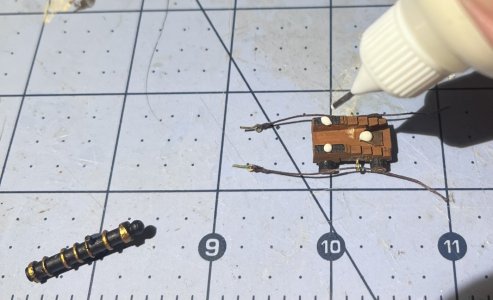
I then wrapped each line around the button/breech and tucked the tails up and under barrel of the cannon where they would be held in place by the glue.
As the glue dried, I drilled holes in the bulwarks for the eyebolts of the recoil ropes.
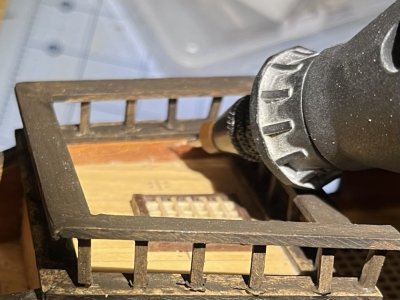
I put the cannons in place and glued the eyebolts into the bulwarks.
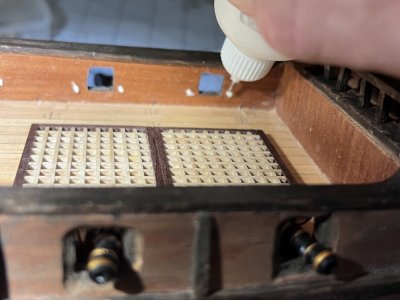
Once the eyebolts were dry, I gently picked up each cannon and applied glue under the wheels.
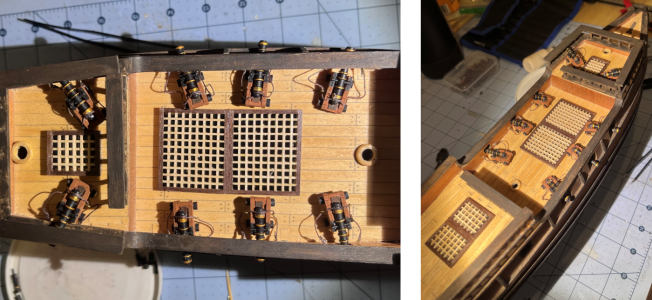
The Molino is armed.
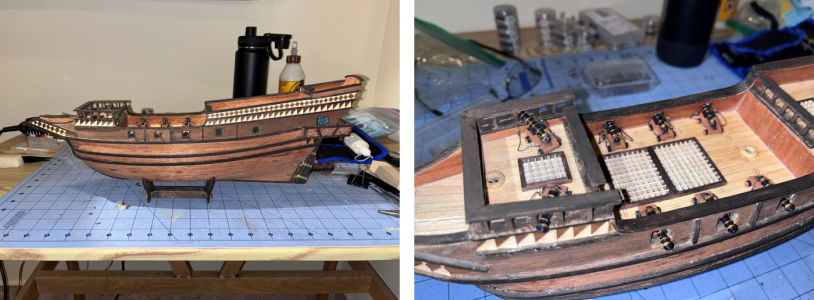
Time for this portion: 13 hours
Total time to date: 193 hours
Stained the mast rings and glued them in place.

I have gone back and forth on how I should paint the cannons and have landed on the following:
- Chocolate brown
- Main body of the carriages
- Sides/ “spokes” of the wheels
- Black
- Tops of the carriages
- “Tread” of the wheels3
- Cannon barrels
- Gold
- Banding of the cannon barrels
- Dark brown
- Stool bed & Quoin (hope these are the right terms)

The kit came with two distinctive styles of cannons; eight are full cannons with carriages while the other four are “dummy” cannons (just the tips of the barrels). The two cannons have quite different styles of barrels. In addition, I am adding two chase guns to the stern which ended up being a third type of cannon. The ones I added are the black “dummy” cannons. They look like the other, kit supplied “dummy” cannons but are a bit longer. I am assuming the length means it is a bigger/heavier cannon or the ones that I purchased are just a different scale.

Can someone tell me the difference between the cannons?
Time to give a quick shout-out to my mother-in-law, Alice, as she gave me some cash for my birthday with the express request that I use the money to buy something for my ships. While I will not get to show her the finished model as she recently passed away, I was able to show her pictures of what she got for me as well as pictures of where they would go. She also got me the metal gunport lids and frames that I will be adding later. Thanks Alice. You will forever be part of the Molino.

All the cannon barrels are metal and require a little sanding to remove the parting line. The lines were minimal but visible.
I painted all of them with a primer and remembered that I do not have any matte black paint. For many of us, and even myself when I am at home, this is not much of a problem as paint is available. Here in Mexico that is not always the case. I remember seeing a store a couple of years ago not too far away that had a limited selection of paint. I knew the general direction of where it was but could not located it on a map. So, I just walked up and down the streets for awhile until I found it. Their selection was even less than what I remembered, but they did have a black that they said was not shiny. The 50 pesos (~$2.50 US) price was not bad, so I buy it and surprisingly “Negro Intenso” does mean “matte”.

I use a toothpick to paint the gold of the bands on the barrels.

I fashioned the stool bed & quoin out of a thin strip of deck planking and painted them a dark brown.

With everything pained, I put together the carriages and added the wheels.

During the painting process, I painted the lifeboat with primer followed by two different shades of brown. It still needs more detail, but it is coming together.

0.02mm eyebolts are added to each side of the carriages between the wheels for the recoil rope.

Given I have not yet done any rigging I reached out to a friend back in Denver from the Rocky Mountain Shipwrights and asked what knot he recommended that I use to attach the recoil ropes to the eyebolts. Phil is one of our go-to members for anything rigging related and he said to go with an anchor bend knot (also known as anchor hitch and fisherman’s bend), at least if the eyebolts are big enough to allow the line to go through it twice AND if the eyebolts are not yet attached to the bulwark. Otherwise, he said to go with two half hitches (also known as anchor as a double half hitch and clove hitch).
It was not super easy, but the line could fit through the eyebolt twice, so I researched anchor bend knots and got to work. A while back while researching knots for The Scuttlebutt (our club newsletter which I write and edit), I found the site 101knots which I hope everyone knows about. Great pictures of many types of knots along with when and where they are used. And then YouTube was great for videos.

I decided to make life a bit easier by making two of these recoil ropes per cannon, with them attached under the button/breech. I feel this will be easier and look better than one line with eyebolts on either end. Easier as I will not have to worry about the cannon & carriage while tying the second eyebolt and will look better as I will have more control over the length of the recoil ropes making them all similar in length.

In this manner I created sixteen eyebolts with line.

As with most things, I got better and faster the more I did, but it still took me about 3 hours. The biggest take-a-way is that do not be stingy on the length of each line. In fact, it was a lot easier to tie when the line was about 6” to 8” longer than the ~2” that was needed.
Each line was then cut down to about 2” and each eyebolt was cut in half.

To lash up the cannons, I fed a line through the eyebolts on the carriage sides, making sure that the lines both had about the same length extending past the front of the carriage.

I put three dots of glue (one on each trunion and one on the quion - again I hope these are the correct terms) on the carriage, followed by a line of glue around the button/breech.

I then wrapped each line around the button/breech and tucked the tails up and under barrel of the cannon where they would be held in place by the glue.
As the glue dried, I drilled holes in the bulwarks for the eyebolts of the recoil ropes.

I put the cannons in place and glued the eyebolts into the bulwarks.

Once the eyebolts were dry, I gently picked up each cannon and applied glue under the wheels.

The Molino is armed.

Time for this portion: 13 hours
Total time to date: 193 hours
Good morning Hugh. Very cool- love all the extra details going in. Cheers Grant4/19 to 4/25
Stained the mast rings and glued them in place.
View attachment 515911
I have gone back and forth on how I should paint the cannons and have landed on the following:
I started by cutting out the carriage pieces and gave them a light sanding. They will be easy to put together, but in addition to the paint scheme above, I plan to upgrade them by adding recoil ropes and drilling out the cannon barrels.
- Chocolate brown
- Main body of the carriages
- Sides/ “spokes” of the wheels
- Black
- Tops of the carriages
- “Tread” of the wheels3
- Cannon barrels
- Gold
- Banding of the cannon barrels
- Dark brown
- Stool bed & Quoin (hope these are the right terms)
View attachment 515912
The kit came with two distinctive styles of cannons; eight are full cannons with carriages while the other four are “dummy” cannons (just the tips of the barrels). The two cannons have quite different styles of barrels. In addition, I am adding two chase guns to the stern which ended up being a third type of cannon. The ones I added are the black “dummy” cannons. They look like the other, kit supplied “dummy” cannons but are a bit longer. I am assuming the length means it is a bigger/heavier cannon or the ones that I purchased are just a different scale.
View attachment 515913
Can someone tell me the difference between the cannons?
Time to give a quick shout-out to my mother-in-law, Alice, as she gave me some cash for my birthday with the express request that I use the money to buy something for my ships. While I will not get to show her the finished model as she recently passed away, I was able to show her pictures of what she got for me as well as pictures of where they would go. She also got me the metal gunport lids and frames that I will be adding later. Thanks Alice. You will forever be part of the Molino.
View attachment 515914
All the cannon barrels are metal and require a little sanding to remove the parting line. The lines were minimal but visible.
I painted all of them with a primer and remembered that I do not have any matte black paint. For many of us, and even myself when I am at home, this is not much of a problem as paint is available. Here in Mexico that is not always the case. I remember seeing a store a couple of years ago not too far away that had a limited selection of paint. I knew the general direction of where it was but could not located it on a map. So, I just walked up and down the streets for awhile until I found it. Their selection was even less than what I remembered, but they did have a black that they said was not shiny. The 50 pesos (~$2.50 US) price was not bad, so I buy it and surprisingly “Negro Intenso” does mean “matte”.
View attachment 515915
I use a toothpick to paint the gold of the bands on the barrels.
View attachment 515917
I fashioned the stool bed & quoin out of a thin strip of deck planking and painted them a dark brown.
View attachment 515918
With everything pained, I put together the carriages and added the wheels.
View attachment 515919
During the painting process, I painted the lifeboat with primer followed by two different shades of brown. It still needs more detail, but it is coming together.
View attachment 515921
0.02mm eyebolts are added to each side of the carriages between the wheels for the recoil rope.
View attachment 515922
Given I have not yet done any rigging I reached out to a friend back in Denver from the Rocky Mountain Shipwrights and asked what knot he recommended that I use to attach the recoil ropes to the eyebolts. Phil is one of our go-to members for anything rigging related and he said to go with an anchor bend knot (also known as anchor hitch and fisherman’s bend), at least if the eyebolts are big enough to allow the line to go through it twice AND if the eyebolts are not yet attached to the bulwark. Otherwise, he said to go with two half hitches (also known as anchor as a double half hitch and clove hitch).
It was not super easy, but the line could fit through the eyebolt twice, so I researched anchor bend knots and got to work. A while back while researching knots for The Scuttlebutt (our club newsletter which I write and edit), I found the site 101knots which I hope everyone knows about. Great pictures of many types of knots along with when and where they are used. And then YouTube was great for videos.
View attachment 515923
I decided to make life a bit easier by making two of these recoil ropes per cannon, with them attached under the button/breech. I feel this will be easier and look better than one line with eyebolts on either end. Easier as I will not have to worry about the cannon & carriage while tying the second eyebolt and will look better as I will have more control over the length of the recoil ropes making them all similar in length.
View attachment 515924
In this manner I created sixteen eyebolts with line.
View attachment 515925
As with most things, I got better and faster the more I did, but it still took me about 3 hours. The biggest take-a-way is that do not be stingy on the length of each line. In fact, it was a lot easier to tie when the line was about 6” to 8” longer than the ~2” that was needed.
Each line was then cut down to about 2” and each eyebolt was cut in half.
View attachment 515927
To lash up the cannons, I fed a line through the eyebolts on the carriage sides, making sure that the lines both had about the same length extending past the front of the carriage.
View attachment 515928
I put three dots of glue (one on each trunion and one on the quion - again I hope these are the correct terms) on the carriage, followed by a line of glue around the button/breech.
View attachment 515929
I then wrapped each line around the button/breech and tucked the tails up and under barrel of the cannon where they would be held in place by the glue.
As the glue dried, I drilled holes in the bulwarks for the eyebolts of the recoil ropes.
View attachment 515930
I put the cannons in place and glued the eyebolts into the bulwarks.
View attachment 515931
Once the eyebolts were dry, I gently picked up each cannon and applied glue under the wheels.
View attachment 515932
The Molino is armed.
View attachment 515933
Time for this portion: 13 hours
Total time to date: 193 hours
To me it's a constant learning process. I follow a number of build logs (yours included) and always look for ways to improve my skills and if possible, improve the look of the ship.I like your work and attention to details. Wish I had done some of the same for my Buccaneer. Looking forward to stepping up my game on the next ship I do.
4/26 to 4/30
I lave less than a week left in Vallarta before we head to Cali for my daughter’s graduation so time is precious.
I started by putting the door and window on the fo’c’sle (please correct me if I’m using the wrong term) and the cleats between the cannons.
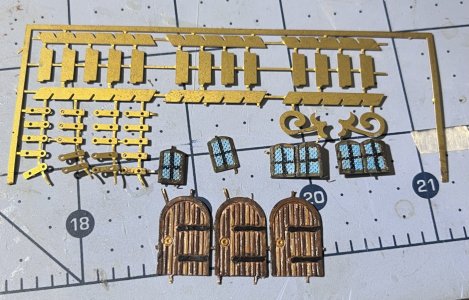
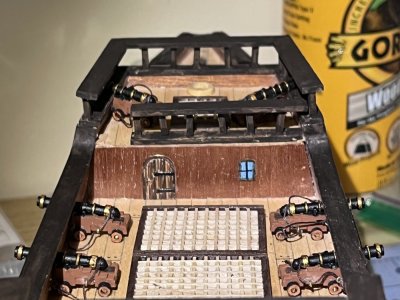
None of the build logs and videos gave any advice on how to attach them. The only thing I could find was on YouTube on @sorinul75 channel and all it said was “It was a little tricky glue these elements.” A “little tricky” was an understatement. They were a pain in my… fingertips, as I kept gluing them instead of the cleat.
There are four of them and each is made up of two pieces. Gluing them together was easy, but due to their small size, the angles of the pieces in relation to the bulwarks (which curves slightly inward) made them very difficult to hold while gluing… even with CA.
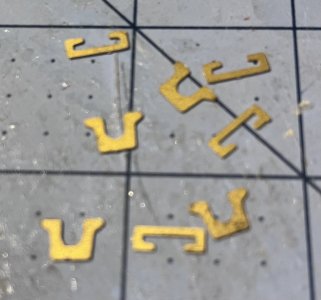
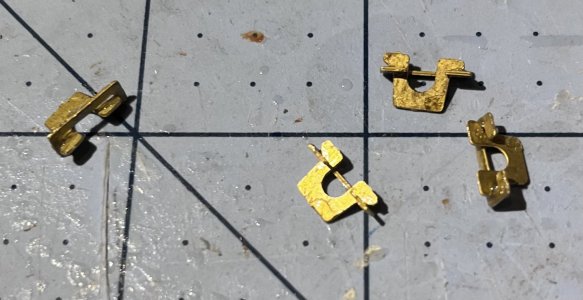
My fat fingers made using them impossible and trying to grasp them with tweezers was very frustrating. The CA preferred attaching my fingers together, or my fingers to the cleat, and once I got to the point of holding the cleat in the tweezers instead of my fingers, the glue would set up between the cleat and the tweezers.
I did get them attached, but it definitely took a lot longer than I expected.

The boat rack is super easy; two small stands that got stained and glued to the grates on the main deck. The two pieces are slightly different as the lifeboat’s keel & hull are slightly different on the bow and the stern. One of the stands fits good for the bow, but the other doesn’t let the stern completely rest in it. A little sanding of the tips of the stand and the stern fits a lot better in it.
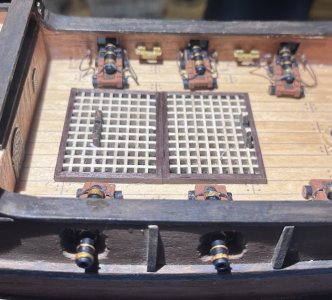
There are three ladders up next; all made of brass pieces. I have seen a number of builders swap these out with hand-crafted wooden ones, but I’m going to stick with the brass ones. If I don’t like how they look once they are built, I’ll upgrade them to wood.
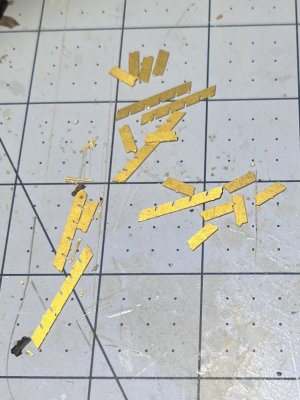
Each piece needs a little sanding as each has multiple remnants of where they were connected to the brass sheet.
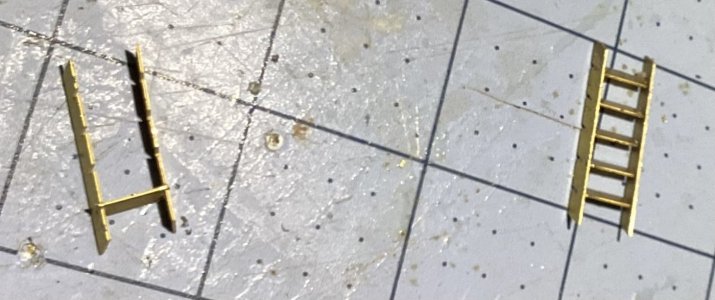
Gluing the first 2 ladders when a lot better than I expected but just as I was thinking how easy they were, the third one raised its head and began to kick my butt. It didn’t seem to matter what I did, I could not get the pieces to align and stay together. After several failures, I decided to stop fighting it. I gave everything a quick sanding and met a friend on the beach for a sunset beer.

I’ll give it another go tomorrow.
The morning came and some of the problems continued. I now feel that I probably got really lucky with the first two. And when I finally got it together, I realized that my finger was solidly attached to the side of the ladder. I know I could have pulled it off my finger but I didn’t want to have to rebuild it yet again.
So I used a knife, a pick, and my saw for about 10 to 15 minutes (like I said, it was solidly attached) to remove it, all the while being careful to not cause any bleeding.
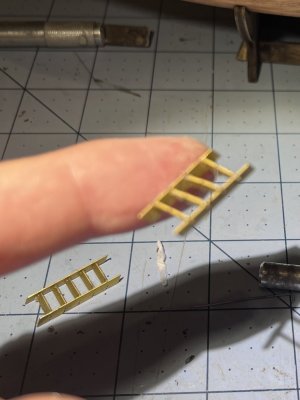
It will require a bit more clean up than the others, but they are ready to be painted.
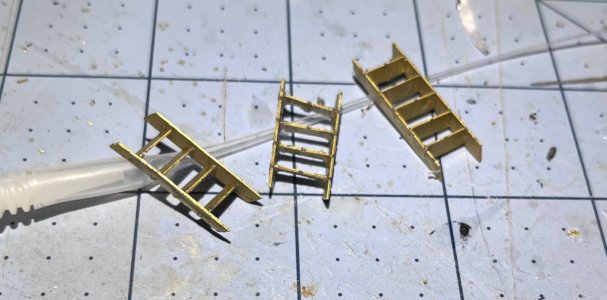
Now it’s off to California for my daughter’s graduation.
Time for this portion: 5 hours
Total time to date: 198 hours
I lave less than a week left in Vallarta before we head to Cali for my daughter’s graduation so time is precious.
I started by putting the door and window on the fo’c’sle (please correct me if I’m using the wrong term) and the cleats between the cannons.


None of the build logs and videos gave any advice on how to attach them. The only thing I could find was on YouTube on @sorinul75 channel and all it said was “It was a little tricky glue these elements.” A “little tricky” was an understatement. They were a pain in my… fingertips, as I kept gluing them instead of the cleat.
There are four of them and each is made up of two pieces. Gluing them together was easy, but due to their small size, the angles of the pieces in relation to the bulwarks (which curves slightly inward) made them very difficult to hold while gluing… even with CA.


My fat fingers made using them impossible and trying to grasp them with tweezers was very frustrating. The CA preferred attaching my fingers together, or my fingers to the cleat, and once I got to the point of holding the cleat in the tweezers instead of my fingers, the glue would set up between the cleat and the tweezers.
I did get them attached, but it definitely took a lot longer than I expected.

The boat rack is super easy; two small stands that got stained and glued to the grates on the main deck. The two pieces are slightly different as the lifeboat’s keel & hull are slightly different on the bow and the stern. One of the stands fits good for the bow, but the other doesn’t let the stern completely rest in it. A little sanding of the tips of the stand and the stern fits a lot better in it.

There are three ladders up next; all made of brass pieces. I have seen a number of builders swap these out with hand-crafted wooden ones, but I’m going to stick with the brass ones. If I don’t like how they look once they are built, I’ll upgrade them to wood.

Each piece needs a little sanding as each has multiple remnants of where they were connected to the brass sheet.

Gluing the first 2 ladders when a lot better than I expected but just as I was thinking how easy they were, the third one raised its head and began to kick my butt. It didn’t seem to matter what I did, I could not get the pieces to align and stay together. After several failures, I decided to stop fighting it. I gave everything a quick sanding and met a friend on the beach for a sunset beer.

I’ll give it another go tomorrow.
The morning came and some of the problems continued. I now feel that I probably got really lucky with the first two. And when I finally got it together, I realized that my finger was solidly attached to the side of the ladder. I know I could have pulled it off my finger but I didn’t want to have to rebuild it yet again.
So I used a knife, a pick, and my saw for about 10 to 15 minutes (like I said, it was solidly attached) to remove it, all the while being careful to not cause any bleeding.

It will require a bit more clean up than the others, but they are ready to be painted.

Now it’s off to California for my daughter’s graduation.
Time for this portion: 5 hours
Total time to date: 198 hours
- Joined
- Mar 13, 2025
- Messages
- 644
- Points
- 268

Both the cleats and the ladders were enemies for me also. Nice work.4/26 to 4/30
I lave less than a week left in Vallarta before we head to Cali for my daughter’s graduation so time is precious.
I started by putting the door and window on the fo’c’sle (please correct me if I’m using the wrong term) and the cleats between the cannons.
View attachment 517072 View attachment 517073
None of the build logs and videos gave any advice on how to attach them. The only thing I could find was on YouTube on @sorinul75 channel and all it said was “It was a little tricky glue these elements.” A “little tricky” was an understatement. They were a pain in my… fingertips, as I kept gluing them instead of the cleat.
There are four of them and each is made up of two pieces. Gluing them together was easy, but due to their small size, the angles of the pieces in relation to the bulwarks (which curves slightly inward) made them very difficult to hold while gluing… even with CA.
View attachment 517074 View attachment 517076
My fat fingers made using them impossible and trying to grasp them with tweezers was very frustrating. The CA preferred attaching my fingers together, or my fingers to the cleat, and once I got to the point of holding the cleat in the tweezers instead of my fingers, the glue would set up between the cleat and the tweezers.
I did get them attached, but it definitely took a lot longer than I expected.
View attachment 517078
The boat rack is super easy; two small stands that got stained and glued to the grates on the main deck. The two pieces are slightly different as the lifeboat’s keel & hull are slightly different on the bow and the stern. One of the stands fits good for the bow, but the other doesn’t let the stern completely rest in it. A little sanding of the tips of the stand and the stern fits a lot better in it.
View attachment 517079
There are three ladders up next; all made of brass pieces. I have seen a number of builders swap these out with hand-crafted wooden ones, but I’m going to stick with the brass ones. If I don’t like how they look once they are built, I’ll upgrade them to wood.
View attachment 517080
Each piece needs a little sanding as each has multiple remnants of where they were connected to the brass sheet.
View attachment 517081
Gluing the first 2 ladders when a lot better than I expected but just as I was thinking how easy they were, the third one raised its head and began to kick my butt. It didn’t seem to matter what I did, I could not get the pieces to align and stay together. After several failures, I decided to stop fighting it. I gave everything a quick sanding and met a friend on the beach for a sunset beer.
View attachment 517083
I’ll give it another go tomorrow.
The morning came and some of the problems continued. I now feel that I probably got really lucky with the first two. And when I finally got it together, I realized that my finger was solidly attached to the side of the ladder. I know I could have pulled it off my finger but I didn’t want to have to rebuild it yet again.
So I used a knife, a pick, and my saw for about 10 to 15 minutes (like I said, it was solidly attached) to remove it, all the while being careful to not cause any bleeding.
View attachment 517084
It will require a bit more clean up than the others, but they are ready to be painted.
View attachment 517085
Now it’s off to California for my daughter’s graduation.
Time for this portion: 5 hours
Total time to date: 198 hours
Hope things go well for your daughter's graduation.
Hugh, nicely done! Have fun in California! Magic Mike
5/7 to 5/12/25
I am back from my daughter’s graduation in California and down to about 2 weeks in Vallarta.
While away I decided that I was going to put handrails on the ladders. I started looking for ideas and found a number of examples that showed them being made of line/rope. They looked nice and would not make it too busy, so I was set.
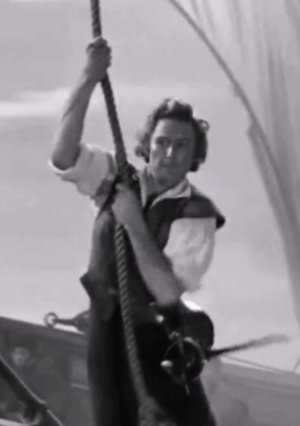
I sand and paint the ladders and then glue them into place. One of my modifications was to add a ladder up to the poop deck as the kit plans show none. Without the ladder, the only way for the crew to get to the poop deck would be to access it through the hatch (covered by the grates). I guess they could reach it Errol Flynn style by swinging up to it using a rope, but I think a ladder is more realistic.
I start by tying three short sections of line off to eyebolts using an anchor bend knot.
I drill small holes into the deck at the base of each of the ladders and glue the eyebolts into them. Additionally, I drill holes into the railing near the top of each ladder.
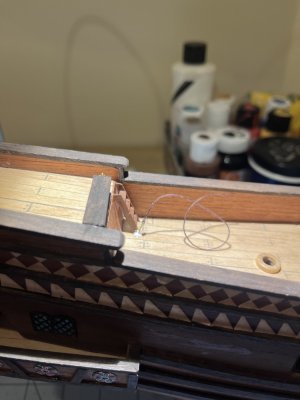
Once dried, I tied each of the rope tails off to the railing eyebolt, making sure they are not too tight. I used a toothpick to give me the amount of slack I wanted once the handrail was done. I then put a drop of glue on each knot.
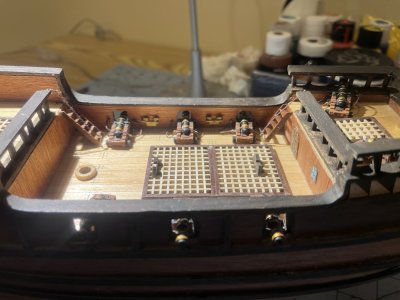
A few things stood out for me.
The Eagle is ninety meters (295 feet) in length, making it the largest tall ship flying the US flag. It is the only active square-rigger in United States government service. It was built in 1936 in Hamburg, Germany for the German Navy. After World War II, it was given to the United States as a war reparation. The Eagle is a three-masted barque with more than 6,797 square meters (22,300 square feet) of sail and 9.7 kilometers (6 miles) of rigging. It has served as a classroom at sea to future Coast Guard officers since 1946.
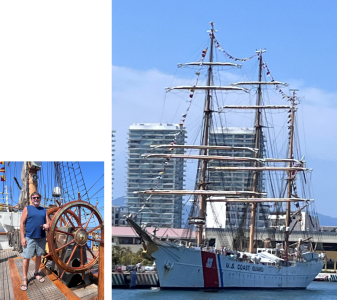
A beautiful and majestic ship.
The fife rails seem pretty straight forward as each of them is made with three pieces of lumber plus either 3 or 4 belaying pins.
After cutting the lumber you must cut some gouges into them so that they connect together in much the same way as Lincoln Logs went together as a kid. The instructions say the fife rail should be 8mm off the deck meaning that is where the gouge should be, but the posts are 15mm and 18mm tall. Putting the gouges at 8mm just does not look right to me. I measured the belaying pins and decided to put the gouges at 4mm from the top. This puts the top of the rails at 11mm and 13mm, respectively.
This just looks better to me. Then I gouge the rail so that the distance outside of the posts is the same as the distance from the rail up to the top of the posts. Again, this just looks better to me.
On the larger one this looks great and there will be plenty of room for the four belaying pins, but on the smaller one this just does not give enough room for the three belaying pins. I cut another section of 25mm lumber and gouge it out a lot closer to the ends and there still is not enough space to install three belaying pins.
After measuring it out, the lumber needs to be 30mm not twenty-five. This will make the two fife rails look symmetrical.
There is an error in the instructions as it says (or appears to say) that 1mm holes need to be drilled in the rails for the belaying pins. In order to accommodate the pins that were supplied with the kit, a 1.3mm hole is needed.

I have also decided that I will be “pinning” these to the deck to give them additional support. This involves drilling holes into the bottom of each post and gluing a headless nail into the post. These nails will then be glued into holes drilled into the deck.
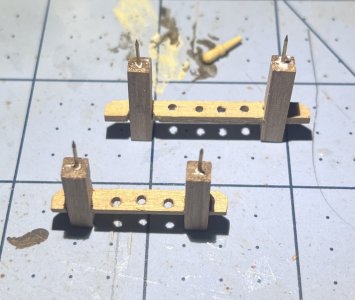
These rails and posts will be stained walnut and finished with a clear satin finish while the pins will be painted with gold.
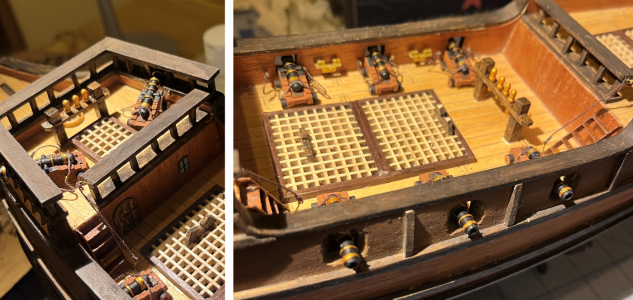
Once assembled they are attached to the deck.
This finishes everything listed as a step “E” in the OcCre instructions.
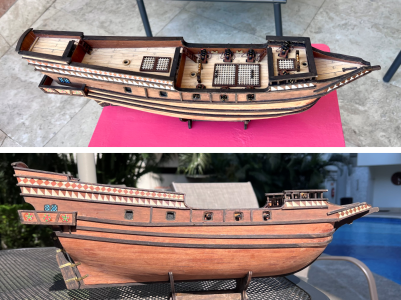
With a bit of sadness this wraps up my time working on the Molino for the season. She will be safely tucked away in the closet awaiting my return in October. But the sadness is tempered by the knowledge that shortly I will be able to start working on my Bluenose when I return to Colorado.
Time for this portion: 6 hours
Total time to date: 204 hours
I am back from my daughter’s graduation in California and down to about 2 weeks in Vallarta.

While away I decided that I was going to put handrails on the ladders. I started looking for ideas and found a number of examples that showed them being made of line/rope. They looked nice and would not make it too busy, so I was set.
I sand and paint the ladders and then glue them into place. One of my modifications was to add a ladder up to the poop deck as the kit plans show none. Without the ladder, the only way for the crew to get to the poop deck would be to access it through the hatch (covered by the grates). I guess they could reach it Errol Flynn style by swinging up to it using a rope, but I think a ladder is more realistic.

I start by tying three short sections of line off to eyebolts using an anchor bend knot.
I drill small holes into the deck at the base of each of the ladders and glue the eyebolts into them. Additionally, I drill holes into the railing near the top of each ladder.

Once dried, I tied each of the rope tails off to the railing eyebolt, making sure they are not too tight. I used a toothpick to give me the amount of slack I wanted once the handrail was done. I then put a drop of glue on each knot.

A few things stood out for me.
- Using two tweezers made the job easier but I need to improve my left-hand coordination.
- When using tweezers, I need to be more careful and not pull one away unintentionally. If I pull too much. I could break the work I have already done.
- I need to invest in one of those knot tying gadgets… the one with multiple arms with alligator clips on the ends.
The Eagle is ninety meters (295 feet) in length, making it the largest tall ship flying the US flag. It is the only active square-rigger in United States government service. It was built in 1936 in Hamburg, Germany for the German Navy. After World War II, it was given to the United States as a war reparation. The Eagle is a three-masted barque with more than 6,797 square meters (22,300 square feet) of sail and 9.7 kilometers (6 miles) of rigging. It has served as a classroom at sea to future Coast Guard officers since 1946.

A beautiful and majestic ship.
The fife rails seem pretty straight forward as each of them is made with three pieces of lumber plus either 3 or 4 belaying pins.
After cutting the lumber you must cut some gouges into them so that they connect together in much the same way as Lincoln Logs went together as a kid. The instructions say the fife rail should be 8mm off the deck meaning that is where the gouge should be, but the posts are 15mm and 18mm tall. Putting the gouges at 8mm just does not look right to me. I measured the belaying pins and decided to put the gouges at 4mm from the top. This puts the top of the rails at 11mm and 13mm, respectively.
This just looks better to me. Then I gouge the rail so that the distance outside of the posts is the same as the distance from the rail up to the top of the posts. Again, this just looks better to me.
On the larger one this looks great and there will be plenty of room for the four belaying pins, but on the smaller one this just does not give enough room for the three belaying pins. I cut another section of 25mm lumber and gouge it out a lot closer to the ends and there still is not enough space to install three belaying pins.
After measuring it out, the lumber needs to be 30mm not twenty-five. This will make the two fife rails look symmetrical.
There is an error in the instructions as it says (or appears to say) that 1mm holes need to be drilled in the rails for the belaying pins. In order to accommodate the pins that were supplied with the kit, a 1.3mm hole is needed.

I have also decided that I will be “pinning” these to the deck to give them additional support. This involves drilling holes into the bottom of each post and gluing a headless nail into the post. These nails will then be glued into holes drilled into the deck.

These rails and posts will be stained walnut and finished with a clear satin finish while the pins will be painted with gold.

Once assembled they are attached to the deck.
This finishes everything listed as a step “E” in the OcCre instructions.

With a bit of sadness this wraps up my time working on the Molino for the season. She will be safely tucked away in the closet awaiting my return in October. But the sadness is tempered by the knowledge that shortly I will be able to start working on my Bluenose when I return to Colorado.
Time for this portion: 6 hours
Total time to date: 204 hours
- Joined
- Dec 5, 2022
- Messages
- 1,119
- Points
- 443

Hey HughLo,
very nice hard work and you're doing a great job of sprucing up the ship. Keep it up and it will be a beautiful ship.
Your question was about what else you can call a railing. A ship's railing can also be called a railing or balustrade.
Best regards
Günter
very nice hard work and you're doing a great job of sprucing up the ship. Keep it up and it will be a beautiful ship.
Your question was about what else you can call a railing. A ship's railing can also be called a railing or balustrade.
Best regards
Günter

Nicely done Hugh! Which school did your daughter go to?
“Balustrade” sounds so much better than railing. ThanksHey HughLo,
very nice hard work and you're doing a great job of sprucing up the ship. Keep it up and it will be a beautiful ship.
Your question was about what else you can call a railing. A ship's railing can also be called a railing or balustrade.
Best regards
Günter


