Stephan, I am wondering if they ever respond to your querry?I send an e-mail with the question if they deliver to the USA below 2 kg. We wait.

-

SUBSCRIBE TO SHIPS IN SCALE TODAY!
The beloved Ships in Scale Magazine is back and charting a new course for 2026!
Discover new skills, new techniques, and new inspirations in every issue.
NOTE THAT OUR NEXT ISSUE WILL BE July/August 2026 -

Win a Free Custom Engraved Brass Coin!!!
As a way to introduce our brass coins to the community, we will raffle off a free coin during the month of August. Follow link ABOVE for instructions for entering.
You are using an out of date browser. It may not display this or other websites correctly.
You should upgrade or use an alternative browser.
You should upgrade or use an alternative browser.
overview Can you get the most out of your Proxxon MF70?
- Joined
- Aug 8, 2019
- Messages
- 5,769
- Points
- 738

Good that you ask. Short answer, no they didn't. Strange.Stephan, I am wondering if they ever respond to your querry?
- Joined
- Aug 8, 2019
- Messages
- 5,769
- Points
- 738
@Jimsky I got mail. Hope you got something about this answer.
*************************************************************************************************
Sehr geehrter Herr S. kertesz,
vielen Dank für Ihr Interesse an unseren Produkten.
Wir liefern nicht nach Amerika. Wir kooperieren jedoch mit Stepcraft US, Torrington, CT 06790
https://www.stepcraft.us/
Vieleicht können Sie dort das Produkt, dass Sie benötigen finden.
Mit freundlichen Grüßen
Petra Buttgereit
USOVO
Inh. Peter Urban
An der Beile 2
D-58708 Menden
Telefon 0049 (0) 2373 17911 65 Mail: mail@usovo.de
Besuchen Sie uns auf www.usovo.de
Visit us on www.usovo.de
***************************************************************************************************
English:
Dear Mr S. kertesz,
thank you for your interest in our products.
We do not deliver to America. However, we cooperate with Stepcraft US, Torrington, CT 06790
 www.stepcraft.us
Maybe you can find the product you need there.
With kind regards
Petra Buttgereit
*************************************************************************************************
Sehr geehrter Herr S. kertesz,
vielen Dank für Ihr Interesse an unseren Produkten.
Wir liefern nicht nach Amerika. Wir kooperieren jedoch mit Stepcraft US, Torrington, CT 06790
https://www.stepcraft.us/
Vieleicht können Sie dort das Produkt, dass Sie benötigen finden.
Mit freundlichen Grüßen
Petra Buttgereit
USOVO
Inh. Peter Urban
An der Beile 2
D-58708 Menden
Telefon 0049 (0) 2373 17911 65 Mail: mail@usovo.de
Besuchen Sie uns auf www.usovo.de
Visit us on www.usovo.de
***************************************************************************************************
English:
Dear Mr S. kertesz,
thank you for your interest in our products.
We do not deliver to America. However, we cooperate with Stepcraft US, Torrington, CT 06790
Stepcraft USA – Think it, Make it
Maybe you can find the product you need there.
With kind regards
Petra Buttgereit
Yes, Thank you, Steph. I get an email from Petra, a few minutes back. I already called stepcraft, they no longer partnered and selling Proxxon and their parts. I asked Tobi @Tobias for help, and he gladly suggested he will purchase it for me and ship it to the USA.@Jimsky I got mail. Hope you got something about this answer.
*************************************************************************************************
Sehr geehrter Herr S. kertesz,
vielen Dank für Ihr Interesse an unseren Produkten.
Wir liefern nicht nach Amerika. Wir kooperieren jedoch mit Stepcraft US, Torrington, CT 06790
https://www.stepcraft.us/
Vieleicht können Sie dort das Produkt, dass Sie benötigen finden.
Mit freundlichen Grüßen
Petra Buttgereit
USOVO
Inh. Peter Urban
An der Beile 2
D-58708 Menden
Telefon 0049 (0) 2373 17911 65 Mail: mail@usovo.de
Besuchen Sie uns auf www.usovo.de
Visit us on www.usovo.de
***************************************************************************************************
English:
Dear Mr S. kertesz,
thank you for your interest in our products.
We do not deliver to America. However, we cooperate with Stepcraft US, Torrington, CT 06790
Stepcraft USA – Think it, Make it
Maybe you can find the product you need there.
With kind regards
Petra Buttgereit
")

But when you take a closer look, they have mention the US in their postage costs-table
View attachment 285921
Yes, Uwe, that's right, I called the company today and the nice lady on the phone said it was a general text, however, and that's also the reason they don't deliver to the States is that you didn't choose the USA as the country when registering can specify. They have a partner company in the US, Stepcraft, but according to Jim, they no longer cooperate with Proxxon.
Yes, Tobi, you are correct, I did contact Stepcraft, BTW, they are making nice CNC machines, but...for about 2 years they no longer partnering with Proxxon. I use a generous proposal from Tobi. He will buy it and ship it to me. And this is all for free  (just kidding)
(just kidding)Greetings folks. The more I learn about the new collets system (ER), the more I understand what will be required for successful milling. Recall, in my post where I performed a number of tests with various endmills. For some reason, tests made with Proxxon endmills didn't yield precision results. This is while I considered Proxxon endmills a very good quality. Well... the mystery is actually hidden behind the collets themselves.
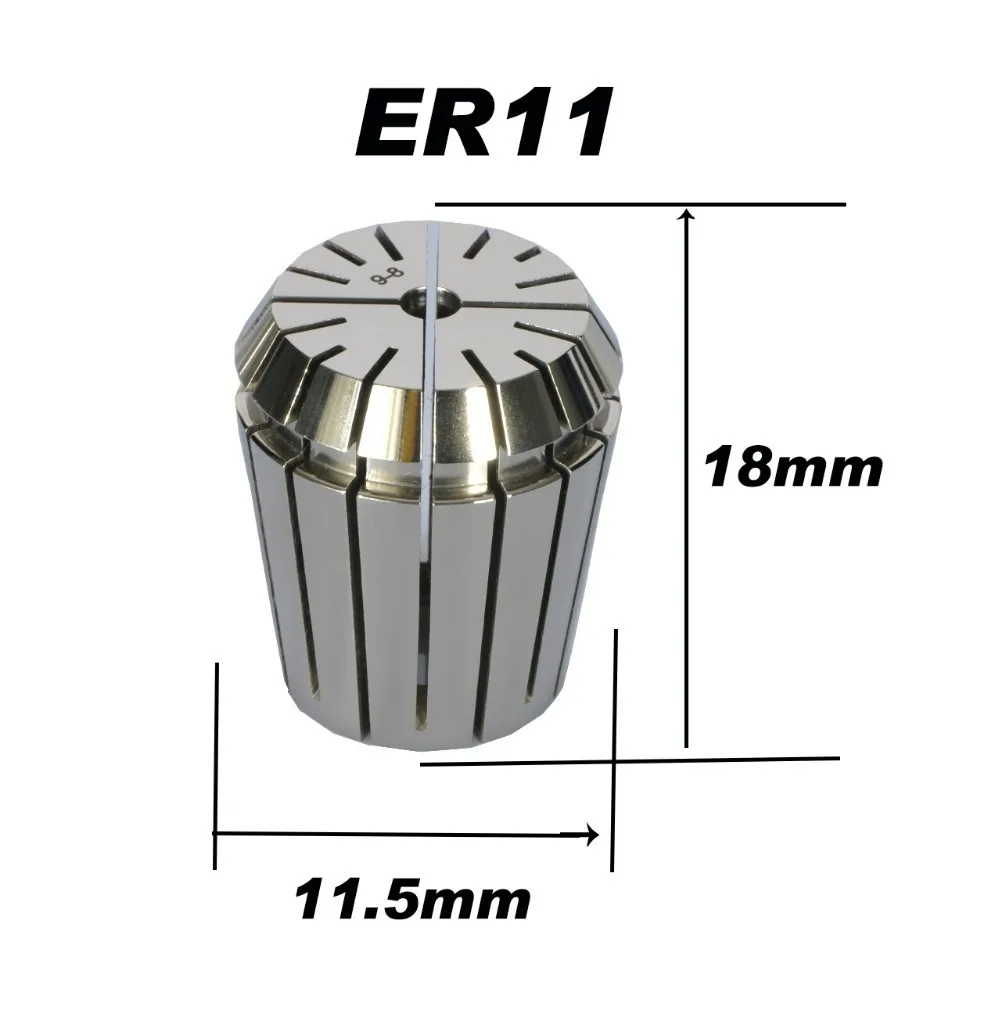
The collet sits in an internal tapered shaft that matches the taper of the collet. This taper compresses the collet against the tool and locks it into place. When the collet has loosened the ring that is clipped into the collet pulls it away from the taper lock releasing the collet and the tool. Take a look at the image below, the collet 'sits' or clips into the nut.

The ‘ER’ numbers are loosely associated with the diameter of the interchangeable collets, measured in millimeters. This gives you a general idea of their size and how big a spindle will have to be to accommodate each size. So ER11 will fit the 8mm endmills at the biggest. If you need bigger size endmills, you will go with ER16. The collets for each designation are all identical apart from the hole down the center, this dictates what size of the tool you can use with each collet. Most hobby machines will use an ER-11 or ER-16 size spindle.
Now is the interesting part. The collets are available in sets or as individual collets. Ther are metric as well as imperial collets. A good collet set (either metric or\and imperial) could cost you a fortune. For our purposes, specifically with Proxxon mill MF70, I don't see using all of the collects in the set. However, when you will buy the collets for your system, make you buy the correct one. What do I mean?
The ER systems collets are designed in a specific way to hold endmills for various jobs. If the collet is labeled 3.1mm (1/8 inch), it will not hold firmly an endmill with a diameter of 3mm. Well, it may hold it OK, but it may not be centered well while gripping. So here is my suggestion: Grip for your endmills correctly!
Apparently, most of my endmills are 3.15 ~ 3.18mm, and sure enough, Proxxon mills are 3.00 mm even. Some of the collets are designed to fit a range of sizes, they are labeled on the top like this: 3.0 - 2.5. This collet will fit all the endmills from 2.50 mm up to 3.00 mm. Don't try to push 3.17mm (1/8) diameter bits!! For 3.17mm endmills, you better use a 3.2mm - 3.0mm collet. This collet will also support endmills of 3.00mm. So...here is the dilemma: what collet should I need? I bought most of the endmills on Alixpress and they are labeled 3.00mm. However, they are 3.15 ~ 3.8mm. The answer is I need the collet labeled 3.2 - 3.0mm so it will fit all my 3.0\3.78mm endmills.
I bout this collet Techniks 04211-1/8 | 1/8" (0.125") Super Precision ER11 collet. It does scale down to support 3.00mm bit and cost $13.00, but it is of good quality. Highly suggested.
Once I use the 3.00mm collet for the Proxxon bit, I got the precision expected! Get the right collet size for your Grip!! Check the video below. It is 20 minutes, but worth every minute to watch...
The collet sits in an internal tapered shaft that matches the taper of the collet. This taper compresses the collet against the tool and locks it into place. When the collet has loosened the ring that is clipped into the collet pulls it away from the taper lock releasing the collet and the tool. Take a look at the image below, the collet 'sits' or clips into the nut.
The ‘ER’ numbers are loosely associated with the diameter of the interchangeable collets, measured in millimeters. This gives you a general idea of their size and how big a spindle will have to be to accommodate each size. So ER11 will fit the 8mm endmills at the biggest. If you need bigger size endmills, you will go with ER16. The collets for each designation are all identical apart from the hole down the center, this dictates what size of the tool you can use with each collet. Most hobby machines will use an ER-11 or ER-16 size spindle.
Now is the interesting part. The collets are available in sets or as individual collets. Ther are metric as well as imperial collets. A good collet set (either metric or\and imperial) could cost you a fortune. For our purposes, specifically with Proxxon mill MF70, I don't see using all of the collects in the set. However, when you will buy the collets for your system, make you buy the correct one. What do I mean?
The ER systems collets are designed in a specific way to hold endmills for various jobs. If the collet is labeled 3.1mm (1/8 inch), it will not hold firmly an endmill with a diameter of 3mm. Well, it may hold it OK, but it may not be centered well while gripping. So here is my suggestion: Grip for your endmills correctly!
Apparently, most of my endmills are 3.15 ~ 3.18mm, and sure enough, Proxxon mills are 3.00 mm even. Some of the collets are designed to fit a range of sizes, they are labeled on the top like this: 3.0 - 2.5. This collet will fit all the endmills from 2.50 mm up to 3.00 mm. Don't try to push 3.17mm (1/8) diameter bits!! For 3.17mm endmills, you better use a 3.2mm - 3.0mm collet. This collet will also support endmills of 3.00mm. So...here is the dilemma: what collet should I need? I bought most of the endmills on Alixpress and they are labeled 3.00mm. However, they are 3.15 ~ 3.8mm. The answer is I need the collet labeled 3.2 - 3.0mm so it will fit all my 3.0\3.78mm endmills.
I bout this collet Techniks 04211-1/8 | 1/8" (0.125") Super Precision ER11 collet. It does scale down to support 3.00mm bit and cost $13.00, but it is of good quality. Highly suggested.
Once I use the 3.00mm collet for the Proxxon bit, I got the precision expected! Get the right collet size for your Grip!! Check the video below. It is 20 minutes, but worth every minute to watch...
- Joined
- Aug 8, 2019
- Messages
- 5,769
- Points
- 738
Did you see this video?
He added a set of bearings to the z-axis. You can see this at about 2 minutes into the video. I ordered this bearings and ad them to the z-axis. Turning the adjustment wheel of the z-axis is very heavy and your cutter moves back and forth when you do this. But after adding these bearings, it goes very smoothly. I can turn the wheel with one finger.
Add a bearing above and below the plastic cap that is fastened with 4 socket-head screws (2 bearings in total) and put the whole back. It takes some effort to loosen and tighten the locknut. And the existing brass ring that sits between the locknut and the cap is no longer needed.
Be sure to add bearing grease to the shaft and bearings when reassembling.
I ordered these bearings on Ali-express. F6-12M You get 10 of them, so you can also provide the x,y-table with bearings. But in the video, he explains that this does not add much to an improving effect. So I did not do this.
Highly recommended for upgrading your MF-70.
Yes, Mon Amie. I saw this video highly recommend it as a must upgrade to all Proxxon MF70 users. It is worth saying, IMHO, that the most challenging task, while using MF70, requires some force and effort, is to use the vertical feed screw. This video is a great help as @Steef66 Stephan mentioned and can be accomplished without difficulties, but the improvement is worth trying.Did you see this video?
He added a set of bearings to the z-axis. You can see this at about 2 minutes into the video. I ordered this bearings and ad them to the z-axis. Turning the adjustment wheel of the z-axis is very heavy and your cutter moves back and forth when you do this. But after adding these bearings, it goes very smoothly. I can turn the wheel with one finger.
Add a bearing above and below the plastic cap that is fastened with 4 socket-head screws (2 bearings in total) and put the whole back. It takes some effort to loosen and tighten the locknut. And the existing brass ring that sits between the locknut and the cap is no longer needed.
Be sure to add bearing grease to the shaft and bearings when reassembling.
I ordered these bearings on Ali-express. F6-12M You get 10 of them, so you can also provide the x,y-table with bearings. But in the video, he explains that this does not add much to an improving effect. So I did not do this.
Highly recommended for upgrading your MF-70.
View attachment 297473

Here are the bearings I bought for this task and the link to AliExpress. * The red square is the part you will have to order.


3.84US $ 10% OFF|5pcs F2 F2.5 F3 F4 F5 F6 F7 F8 F9 F10 F12 Miniature Bearing Plane Thrust Ball Bearing - Bearings - AliExpress
Smarter Shopping, Better Living! Aliexpress.com
Many of you, who are reading this thread, know that I have obtained (thanks to @Tobias) the replacement spindle for my MF70.

This spindle is based on the ER11 collet system which will allow the endmills larger than 3.75 shaft diameter (see the above posts explaining the ER11 system). However, no one knew that I have already changed the spindle and my MF70 gets a brand new life using a large variety of endmills.
The replacement spindle came with two new bearings and instructions (in German). I did contact The Usovo company, and they gladly e-mailed me a copy in English. The instruction is clear enough but you MUST have some previous experience in mechanical work. I was so passionate about replacing the spindle so didn't take many photos, but ... did some.
I will not repeat the manual as it is pretty clear and straightforward but will outline some of my challenges and hints. Provided instruction doesn't require taking the milling head off, but...it is highly advisable\reccomended. This is not difficult and will require removing the motor and motor control panel along with the On/Off switch.

Once the contents of the 'head' are removed on the side, using the vertical feed wheel remove the head from the column.

Now, turn the head the same way it would be on the column (in the above photo it is upside down). Use the hardwood dowel top lightly on the top of the spindle until it slides down completely. The challenging part is to remove the old bearings as they pressed to the body. It is hard to explain the process and this is why I said you would need some previous experience in mechanical work. In the below photo, the head is ready to accept new bearings and a new spindle.

The assembly process was a bit quicker and the challenging part was to press the top bearings in the head's body while securing the spindle. The bottom bearing pressed from the bottom and the top one from the top. Unfortunately, no photos were taken while assembly, sorry folks. Here is how my Proxxon looks today.


Stay tuned for the test...
This spindle is based on the ER11 collet system which will allow the endmills larger than 3.75 shaft diameter (see the above posts explaining the ER11 system). However, no one knew that I have already changed the spindle and my MF70 gets a brand new life using a large variety of endmills.
The replacement spindle came with two new bearings and instructions (in German). I did contact The Usovo company, and they gladly e-mailed me a copy in English. The instruction is clear enough but you MUST have some previous experience in mechanical work. I was so passionate about replacing the spindle so didn't take many photos, but ... did some.
I will not repeat the manual as it is pretty clear and straightforward but will outline some of my challenges and hints. Provided instruction doesn't require taking the milling head off, but...it is highly advisable\reccomended. This is not difficult and will require removing the motor and motor control panel along with the On/Off switch.
Once the contents of the 'head' are removed on the side, using the vertical feed wheel remove the head from the column.
Now, turn the head the same way it would be on the column (in the above photo it is upside down). Use the hardwood dowel top lightly on the top of the spindle until it slides down completely. The challenging part is to remove the old bearings as they pressed to the body. It is hard to explain the process and this is why I said you would need some previous experience in mechanical work. In the below photo, the head is ready to accept new bearings and a new spindle.
The assembly process was a bit quicker and the challenging part was to press the top bearings in the head's body while securing the spindle. The bottom bearing pressed from the bottom and the top one from the top. Unfortunately, no photos were taken while assembly, sorry folks.
Here is how my Proxxon looks today.Stay tuned for the test...

Yes, Mon Amie. I saw this video highly recommend it as a must upgrade to all Proxxon MF70 users. It is worth saying, IMHO, that the most challenging task, while using MF70, requires some force and effort, is to use the vertical feed screw. This video is a great help as @Steef66 Stephan mentioned and can be accomplished without difficulties, but the improvement is worth trying.
View attachment 297487
Here are the bearings I bought for this task and the link to AliExpress. * The red square is the part you will have to order.
View attachment 297486
3.84US $ 10% OFF|5pcs F2 F2.5 F3 F4 F5 F6 F7 F8 F9 F10 F12 Miniature Bearing Plane Thrust Ball Bearing - Bearings - AliExpress
Smarter Shopping, Better Living! Aliexpress.comwww.aliexpress.com
Thank you Jimsky for the details and links. I ordered the F6-12M as you pointed. I will ask my friend to install them. Opening the MF70 scares me
, also if is just a few screws.Cheers
Daniel
Thanks, Daniel. Installing the thrust bearing could be done without a professional, but yea...professional will do it with confidence for sure.Thank you Jimsky for the details and links. I ordered the F6-12M as you pointed. I will ask my friend to install them. Opening the MF70 scares me
Cheers
Daniel
Greetings folks. As promised here are some tests with a dial indicator. For comparison reasons, I have made two groups of tests. The first group will be testing the ER11 adapter (I bought and used it before). The second group will be the ER11 spindle, which I was discussing in the above post.
ER11 adapter tests. This adapter is inserted on the original threaded spindle and tightened with two side set screws.
Test#1 On top of the adapter
Test#2 at the middle of the adapter
Test#3 at the end of the mill
As you can see, all three tests are reporting errors in precision. In fact, the errors are 20 hundred of an mm, for such an adapter, it is somewhat a lot. With such a tool, it will be difficult to archive precision., but it will be acceptable to even the flat surfaces.
ER11 Spindle test. This is the game-changer. You need to replace the original one which comes with Proxxon MF70. Worth every penny spent, and I am really happy with this change. bear in mind that you will need to buy good quality collets. The good thing, is you don't have to buy the whole set. Buy only the one you will use most. Example: 1.0mm, 2.0mm, 3.0mm, 1/8' (3.175mm), 4.0mm and 5.0mm. Endmills with larger shank sizes I wouldn't recommend using with this motor.
Test#1 On top of the spindle
Test#2 at the end of the mill
Now, you obviously see the difference. The dial indicators barely move, if it not moved at all. I am very happy with those tests and will expect precision milling in the near future. Here are the collets I use, I bout them here.
 www.aliexpress.com

I have great experience upgrading Proxxon MF70 and was rewarded with great results. Do you get most of your MF70?
ER11 adapter tests. This adapter is inserted on the original threaded spindle and tightened with two side set screws.
Test#1 On top of the adapter
Test#2 at the middle of the adapter
Test#3 at the end of the mill
As you can see, all three tests are reporting errors in precision. In fact, the errors are 20 hundred of an mm, for such an adapter, it is somewhat a lot. With such a tool, it will be difficult to archive precision., but it will be acceptable to even the flat surfaces.
ER11 Spindle test. This is the game-changer. You need to replace the original one which comes with Proxxon MF70. Worth every penny spent, and I am really happy with this change. bear in mind that you will need to buy good quality collets. The good thing, is you don't have to buy the whole set. Buy only the one you will use most. Example: 1.0mm, 2.0mm, 3.0mm, 1/8' (3.175mm), 4.0mm and 5.0mm. Endmills with larger shank sizes I wouldn't recommend using with this motor.
Test#1 On top of the spindle
Test#2 at the end of the mill
Now, you obviously see the difference. The dial indicators barely move, if it not moved at all. I am very happy with those tests and will expect precision milling in the near future. Here are the collets I use, I bout them here.
4.51US $ 46% OFF|Free Shipping High precision ER11 Accuracy 0.008mm Spring Collet for CNC Milling Machine Engraving Lathe Tool|Tool Holder| - AliExpress
Smarter Shopping, Better Living! Aliexpress.com
I have great experience upgrading Proxxon MF70 and was rewarded with great results. Do you get most of your MF70?
Are you able to spec the quill without the adapter? Is there a guaranteed accuracy? Or is it fully acceptable? You know, for a price, a machine shop might make a replacement. But if the quill is causing the wobble, maybe replace the bearings?Greetings folks. As promised here are some tests with a dial indicator. For comparison reasons, I have made two groups of tests. The first group will be testing the ER11 adapter (I bought and used it before). The second group will be the ER11 spindle, which I was discussing in the above post.
ER11 adapter tests. This adapter is inserted on the original threaded spindle and tightened with two side set screws.
Test#1 On top of the adapter
Test#2 at the middle of the adapter
Test#3 at the end of the mill
As you can see, all three tests are reporting errors in precision. In fact, the errors are 20 hundred of an mm, for such an adapter, it is somewhat a lot. With such a tool, it will be difficult to archive precision., but it will be acceptable to even the flat surfaces.
ER11 Spindle test. This is the game-changer. You need to replace the original one which comes with Proxxon MF70. Worth every penny spent, and I am really happy with this change. bear in mind that you will need to buy good quality collets. The good thing, is you don't have to buy the whole set. Buy only the one you will use most. Example: 1.0mm, 2.0mm, 3.0mm, 1/8' (3.175mm), 4.0mm and 5.0mm. Endmills with larger shank sizes I wouldn't recommend using with this motor.
Test#1 On top of the spindle
Test#2 at the end of the mill
Now, you obviously see the difference. The dial indicators barely move, if it not moved at all. I am very happy with those tests and will expect precision milling in the near future. Here are the collets I use, I bout them here.
4.51US $ 46% OFF|Free Shipping High precision ER11 Accuracy 0.008mm Spring Collet for CNC Milling Machine Engraving Lathe Tool|Tool Holder| - AliExpress
Smarter Shopping, Better Living! Aliexpress.com
View attachment 297775
I have great experience upgrading Proxxon MF70 and was rewarded with great results. Do you get most of your MF70?
It is the adapter causing the quill. The adapter has a bore, not a thread, and I just slide the adapter on top of the threaded spindle. It was mostly experimental.Are you able to spec the quill without the adapter? Is there a guaranteed accuracy? Or is it fully acceptable? You know, for a price, a machine shop might make a replacement. But if the quill is causing the wobble, maybe replace the bearings?
Replacement spindle is guaranteed accuracy, Phil! The spindle is turned in a stainless steel chuck and has a concentricity accuracy of approx. 0.01 mm.
I see the collets and am guess they insert into the adapter...was thinking maybe the quill was threaded or employed a Morse Taper....if its baprely moving, then that is what you want. (And wondering if there is any backlash?)It is the adapter causing the quill. The adapter has a bore, not a thread, and I just slide the adapter on top of the threaded spindle. It was mostly experimental.
Replacement spindle is guaranteed accuracy, Phil! The spindle is turned in a stainless steel chuck and has a concentricity accuracy of approx. 0.01 mm.
Last edited:
No backlash, no wobble or quill. The spindle doesn't attach via Morse taper, but the ER11 system has excellent milling results when upgraded.I see the collets and am guess they insert into the adapter...was thinking maybe the quill was threaded or employed a Morse Taper....if its baprely moving, then that is what you want. (And wondering if there is any backlash?)
- Joined
- Aug 8, 2019
- Messages
- 5,769
- Points
- 738
Yes, you got the most out of it. 5 mm. Is the max. I read that on the site of the manufactur. They have on that side also an gear to add and use bigger mills. But the price of that!!Do you get most of your MF70?
Thanks for sharing Jim.

I read this Tuesday 22nd, then I ordered two bearing from ebay @ 12:50. They were delivered by Royal Mail @11:00 am today (23rd). I made coffee and whilst drinking it, I fitted these bearings -took me all of 15 mins. between 'slurps'. What a transformation!
I've got an E11 collett set, so now I propose to try making a shim sleeve for the adaptor. To buy the spindle conversion from Germany is cost prohibitive, €23 post + customs rip-off charges! I can live with the slight run-out, as we use to say on inspection at Rank Xerox in decade past "It's not got to fly!"
I've got an E11 collett set, so now I propose to try making a shim sleeve for the adaptor. To buy the spindle conversion from Germany is cost prohibitive, €23 post + customs rip-off charges! I can live with the slight run-out, as we use to say on inspection at Rank Xerox in decade past "It's not got to fly!"