One of the suggestions from our member (I cannot recall his nickname), is to buy an ER11 conversion adapter with a bore 5.00mm diameter and make an 8.0mm thread. This way you can simply attach it to the original spindle. It is a great alternate solution, but you must have the tools for this task.I read this Tuesday 22nd, then I ordered two bearing from ebay @ 12:50. They were delivered by Royal Mail @11:00 am today (23rd). I made coffee and whilst drinking it, I fitted these bearings -took me all of 15 mins. between 'slurps'. What a transformation!
I've got an E11 collett set, so now I propose to try making a shim sleeve for the adaptor. To buy the spindle conversion from Germany is cost prohibitive, €23 post + customs rip-off charges! I can live with the slight run-out, as we use to say on inspection at Rank Xerox in decade past "It's not got to fly!"
-

Win a Free Custom Engraved Brass Coin!!!
As a way to introduce our brass coins to the community, we will raffle off a free coin during the month of August. Follow link ABOVE for instructions for entering.
-

PRE-ORDER SHIPS IN SCALE TODAY!
The beloved Ships in Scale Magazine is back and charting a new course for 2026!
Discover new skills, new techniques, and new inspirations in every issue.
NOTE THAT OUR FIRST ISSUE WILL BE JAN/FEB 2026
You are using an out of date browser. It may not display this or other websites correctly.
You should upgrade or use an alternative browser.
You should upgrade or use an alternative browser.
overview Can you get the most out of your Proxxon MF70?
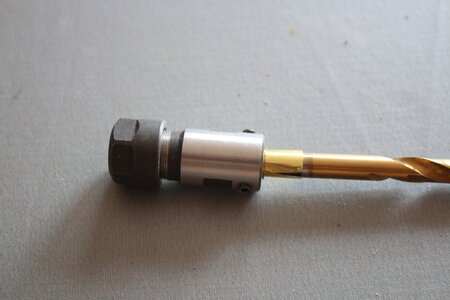
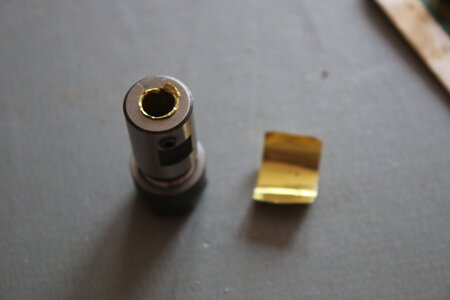
I did consider this but as the adaptor is hardened I decided not to go that direction. I cut from a piece of 0.001" brass shim, a strip 15mm x 24mm, [24mm being the circumference of the spindle] formed it around the shank of a 7.5mm drill bit & inserted it. The adapter fits by 'screwing' on to the spindle, which produces a very shallow thread. I tightened the grub screws (I previously drilled dimples in the spindle to prevent thread damage), then checked run-out = 0.001". OK by me, but the shim is a one-time use, but it's simple enough to replace whenever the adaptor is required, if not wanted to be kept permanently attached.One of the suggestions from our member (I cannot recall his nickname), is to buy an ER11 conversion adapter with a bore 5.00mm diameter and make an 8.0mm thread. This way you can simply attach it to the original spindle. It is a great alternate solution, but you must have the tools for this task.
Stuart
- Joined
- Aug 8, 2019
- Messages
- 5,585
- Points
- 738

Can you show us in a picture perhaps?I did consider this but as the adaptor is hardened I decided not to go that direction. I cut from a piece of 0.001" brass shim, a strip 15mm x 24mm, [24mm being the circumference of the spindle] formed it around the shank of a 7.5mm drill bit & inserted it. The adapter fits by 'screwing' on to the spindle, which produces a very shallow thread. I tightened the grub screws (I previously drilled dimples in the spindle to prevent thread damage), then checked run-out = 0.001". OK by me, but the shim is a one-time use, but it's simple enough to replace whenever the adaptor is required, if not wanted to be kept permanently attached.
Stuart
Can you show us in a picture perhaps?
Hi Steef,Can you show us in a picture perhaps?
I've taken these photos, hopefully of some use. I carefully peined a lip on the shim to stop it disappearing down the 'rabbit hole', seemed to work as it came back off the spindle ok for next time. I'd fit it and use it all the time if it wasn't for the fact I use a vice which renders the adaptor too long for some jobs.
Stuart
- Joined
- Aug 8, 2019
- Messages
- 5,585
- Points
- 738

ThanksHi Steef,
I've taken these photos, hopefully of some use. I carefully peined a lip on the shim to stop it disappearing down the 'rabbit hole', seemed to work as it came back off the spindle ok for next time. I'd fit it and use it all the time if it wasn't for the fact I use a vice which renders the adaptor too long for some jobs.
Stuart
View attachment 298345
View attachment 298346
Thanks, Daniel. Installing the thrust bearing could be done without a professional, but yea...professional will do it with confidence for sure.
Happy Easter all !!! @Jimsky, yesterday my friend installed the bearings. As you said, it was a piece of cake. The difference is amazing . We both also have a Sherline too. He was so fascinated with the change and the bearings price that he will order for the sherlines. As soon as he provides me the bearings info for the Sherline I will post it here.
Thank you to all !!!!!! For this tip !!!
Cheers
Daniel
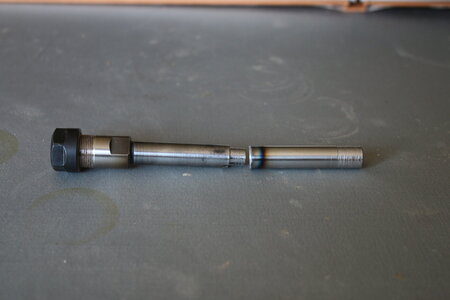
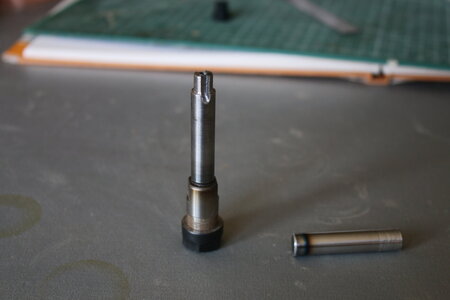
Hi all, I gave up on the shim 'bodge' & bought an adaptor with 5mm bore & a M8 x 0.75mm tap. I annealed the adaptor to be able to drill & tap it, but, although I used my mini lathe to start the tap, it still did not run true, forget that idea, go to plan C . I bought an E11 collet shaft 10mm dia. x 100mm which was on offer in UK for £10 (33% off). I cut the shaft to match the MF70's shaft, annealed it then turned the 8mm dia. spigot, drilled & tapped the end 3mm, & milled the two 3mm keyways. At the same time I fitted thrust bearing to the X & Y leadscrews & added a 1" spacer block to the milling head. The shaft runs 'purrrfict'. Total cost approx. £40. Plan B cost app. £15 . Addthe two & still at least 60% cheaper than the conversion from Germany.
The 3rd photo shows the mod. to the cross slides' end caps to accept the thrusts.
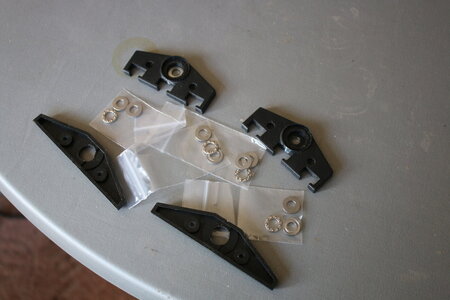
The 3rd photo shows the mod. to the cross slides' end caps to accept the thrusts.


Glad it works out for you!! Happy milling!Hi all, I gave up on the shim 'bodge' & bought an adaptor with 5mm bore & a M8 x 0.75mm tap. I annealed the adaptor to be able to drill & tap it, but, although I used my mini lathe to start the tap, it still did not run true, forget that idea, go to plan C . I bought an E11 collet shaft 10mm dia. x 100mm which was on offer in UK for £10 (33% off). I cut the shaft to match the MF70's shaft, annealed it then turned the 8mm dia. spigot, drilled & tapped the end 3mm, & milled the two 3mm keyways. At the same time I fitted thrust bearing to the X & Y leadscrews & added a 1" spacer block to the milling head. The shaft runs 'purrrfict'. Total cost approx. £40. Plan B cost app. £15 . Addthe two & still at least 60% cheaper than the conversion from Germany.
The 3rd photo shows the mod. to the cross slides' end caps to accept the thrusts.
View attachment 310267
View attachment 310268
View attachment 310270
Hi Jim, thanks, yes I've been happily milling this week making fittings for my Bounty. One thing I would like to eliminate is the backlash in the Z-axis, the 'locking' screw is not man enough to lock the slide, so, first I will re-drill & tap for an M5 screw. Anyone have any ideas on anti-backlash cure?
Stuart
Stuart
- Joined
- Aug 8, 2019
- Messages
- 5,585
- Points
- 738

What do you mean by backlash? The clearance when you turn on the weel when moving too the other direction?
If it is that the only solution will be to change the adjustment axle and screws for a more precise type. I seen an video on YouTube for that. Was not easy to do. I did attached an venier on the z-axle to measure the movement and don"t look to the scale on the turning wheel of the z-axle. Easier method that works well for me.
If it is that the only solution will be to change the adjustment axle and screws for a more precise type. I seen an video on YouTube for that. Was not easy to do. I did attached an venier on the z-axle to measure the movement and don"t look to the scale on the turning wheel of the z-axle. Easier method that works well for me.
Hi Stephan, thanks, yes that's what we call 'backlash'. It's about 0.25mm. When milling aluminium with a 5 or 6mm cutter the vibration causes the cutter head to wind itself down slightly & increase the cut. I will try a bigger lock screw before anything else.
Stuart
Stuart
- Joined
- Aug 8, 2019
- Messages
- 5,585
- Points
- 738

The machine is not made for a 5 or 6 mm cutter! The max is 3,2 mm for aluminium. Maybe wood for 5 or 6 like Jim did in the above. The motor will burn. And parts will move around like your z-axle. The powers on your tool will be high to much. A lot of parts of the machine are made of aluminium not steel. That's why your z-axle moves when you use a big cutter. A bigger screw will not work. That's why the German store also sells a planetary gear for the motor to reduce these powers when using an ER11 collet.
Thanks again Stephan, all points duly noted. I do have another mill which I built myself using a Makita trim router that I usually use for aluminium, but it's in my workshop, but not wanting to brave some bad weather I decided to use my MF, BUT carefully so not to overload it. This was just a 'one-off'. It's fine on wood with a 6mm router bit.The machine is not made for a 5 or 6 mm cutter! The max is 3,2 mm for aluminium. Maybe wood for 5 or 6 like Jim did in the above. The motor will burn. And parts will move around like your z-axle. The powers on your tool will be high to much. A lot of parts of the machine are made of aluminium not steel. That's why your z-axle moves when you use a big cutter. A bigger screw will not work. That's why the German store also sells a planetary gear for the motor to reduce these powers when using an ER11 collet.
Regards Stuart
I have to agree with Steef, especially the bigger the screw, the bigger the imbalance and affects the motor.
I have to agree with all of the above folks and also agree with you as well. For aluminum and\or brass the 6.00mm (and higher) endmills I would not recommend. For wood of all kinds, it will work just fine.Hi Jim, thanks, yes I've been happily milling this week making fittings for my Bounty. One thing I would like to eliminate is the backlash in the Z-axis, the 'locking' screw is not man enough to lock the slide, so, first I will re-drill & tap for an M5 screw. Anyone have any ideas on anti-backlash cure?
Stuart
Also, to eliminate the backlash at the 'Z-axis', you would need to change the main bolt with a different tread type. It is not so easy and requires some machinist skils\tools. However, I use thrust bearings (the same we use for x\y-axis), and I have a 95% improvement. Not that it is starting to easily operate, but it almost removes the backlash. I would even say, I didn't feel it at all. Also, now it is possible to use the mill as the drill press.
- Joined
- Aug 8, 2019
- Messages
- 5,585
- Points
- 738

The best and cheapest way to deal with the backlash on the z-axis is to do it like I solved it. Don't use the adjustment wheel and the measuring on the wheel. I use a venier caliber, a cheap one for a few euro's plastic but it works fine on my MF70
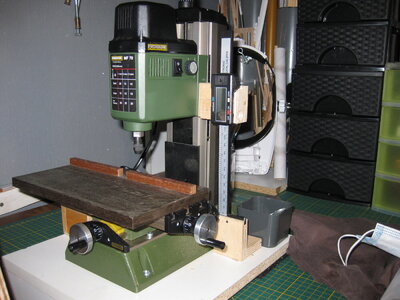
when I turn the adjustment wheel I can see exactly the movement of the z-axis
Like Jim said, you need some skills to mechanical change the backlash

when I turn the adjustment wheel I can see exactly the movement of the z-axis
Like Jim said, you need some skills to mechanical change the backlash
The best and cheapest way to deal with the backlash on the z-axis is to do it like I solved it. Don't use the adjustment wheel and the measuring on the wheel. I use a venier caliber, a cheap one for a few euro's plastic but it works fine on my MF70
View attachment 312059
when I turn the adjustment wheel I can see exactly the movement of the z-axis
Like Jim said, you need some skills to mechanical change the backlash
Hi Steef66
Have you posted the way you attached that Vernier ?
If you haven't, can you post/explain how you did it.
Thank you !
Daniel
- Joined
- Aug 8, 2019
- Messages
- 5,585
- Points
- 738

Here you can see a little bit how it's done. I used a venier that's made of plastic. On ali just a few euro. That is good enough for the job because the accuracy is 0,05 mm. That is enough for our hobby. Because it is plastic it's easy to adapt and drill in it. I use double tape and CA glue to attach it to the motor hous and make a mold of wood to hold the venier. All the parts sticking out or what are in the way I cut off.Hi Steef66
Have you posted the way you attached that Vernier ?
If you haven't, can you post/explain how you did it.
Thank you !
Daniel
Hope this will help you.
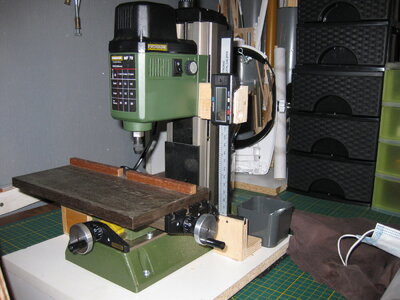
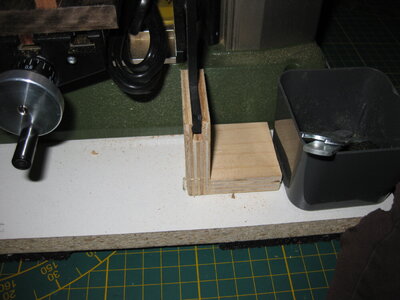
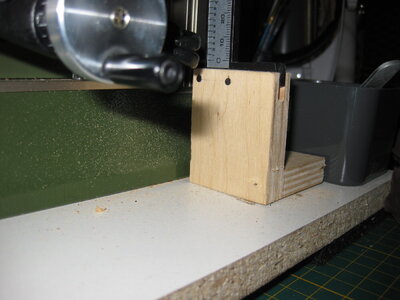
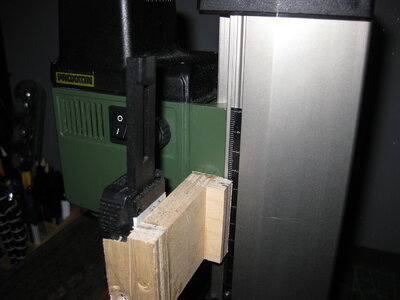
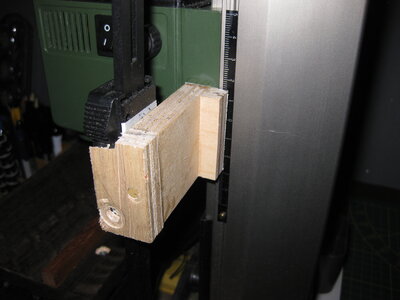
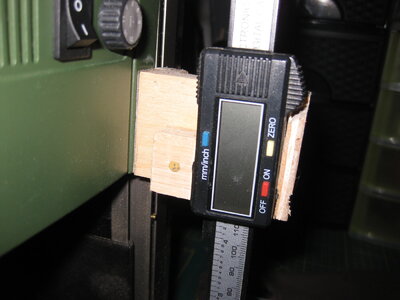
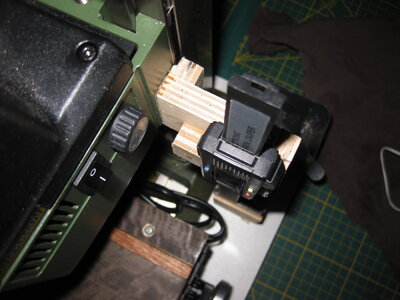
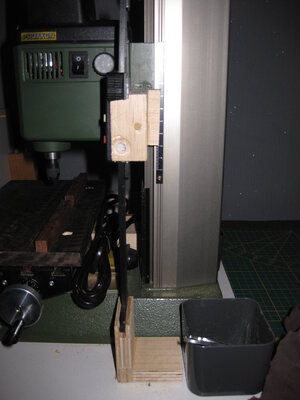
Here you can see a little bit how it's done. I used a venier that's made of plastic. On ali just a few euro. That is good enough for the job because the accuracy is 0,05 mm. That is enough for our hobby. Because it is plastic it's easy to adapt and drill in it. I use double tape and CA glue to attach it to the motor hous and make a mold of wood to hold the venier. All the parts sticking out or what are in the way I cut off.
Hope this will help you.
View attachment 312125View attachment 312126View attachment 312127View attachment 312128View attachment 312129View attachment 312130View attachment 312131View attachment 312132
Fantastic !!! Thank you very much !!!!
Daniel


