Nice call on the supplemental railings. And well executed.Ok I’ve been busy this weekend. Not showing pics of every little thing, but I have:
Added fairleads to upper deck, drilled holes for all cannon eyes, drilled holes for mounting Falconettes, installed false barrels (look like Falconettes), drilled holes for mast eyes in decks, rigged some cannons, installed four cannons, installed landings and stairs that go to upper deck, built custom railings for landings to upper deck.
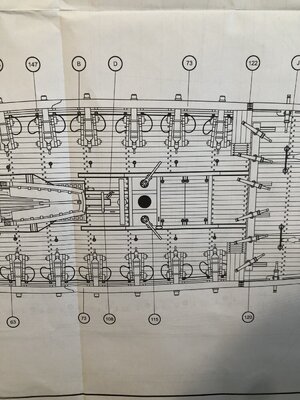
So they show building the landing and stairs to upper deck and then later building cannons and installing them. Two of the cannons are under the landing and behind the stairs! No way I’m attempting to install them after! So I installed two cannons on each side and then built the landing and stairs. They looked dangerous with no railings. To keep my men from falling overboard, i added some custom railings that I think tie in well.
Pics...
View attachment 197430View attachment 197431View attachment 197432View attachment 197433View attachment 197444View attachment 197445View attachment 197447
-

Win a Free Custom Engraved Brass Coin!!!
As a way to introduce our brass coins to the community, we will raffle off a free coin during the month of August. Follow link ABOVE for instructions for entering.
-

PRE-ORDER SHIPS IN SCALE TODAY!
The beloved Ships in Scale Magazine is back and charting a new course for 2026!
Discover new skills, new techniques, and new inspirations in every issue.
NOTE THAT OUR FIRST ISSUE WILL BE JAN/FEB 2026
You are using an out of date browser. It may not display this or other websites correctly.
You should upgrade or use an alternative browser.
You should upgrade or use an alternative browser.
- Joined
- Aug 16, 2019
- Messages
- 870
- Points
- 343

Nicely done  on the Corel model it is open under the pop deck so I was in the obligation to place the gun carriage first also the stair are a lots better on your model good work.
 on the Corel model it is open under the pop deck so I was in the obligation to place the gun carriage first also the stair are a lots better on your model good work.
10 cannons and carriages have been built and installed now. 10 more to go.
Taking a break from them and working on the Falconettes that go on the upper deck.
Taking a break from them and working on the Falconettes that go on the upper deck.
Last edited:
I like it very much. Beautiful to look at.
I like it very much. Beautiful to look at.
This is an excellent blend of wood tones and crisp detailing. I wonder though if you bring the cannons back inside with a loading clearance at the bulkhead, how does that match the length of the recoil hawsers. As they are now they seem too long with all of the looped hawser beside the carriage. Where would the gun crew be standing (typically at the sides) and not get caught in the "flying" hawser when fired? The length may be OK when you check that but as I know that you like precision and details I thought that I would ask. I should have seen this with your first placement but it didn't pop into my eye/brain until now. I'm not tied up in this and know that your finished ship will be excellent. Rich (PT-2)I like it very much. Beautiful to look at.
@PT-2 ...
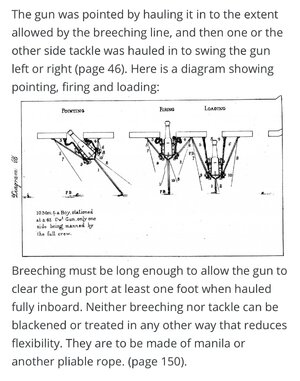
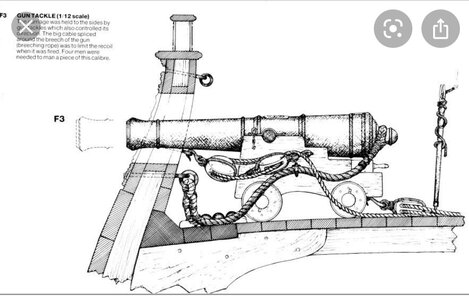
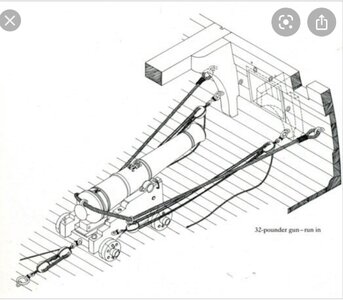
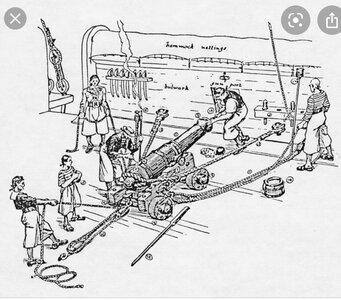
Rich, look at the first picture I provided of cannons with recoil rope and eyes. The ropes are extended to ensure the proper length before I put the eyes on and serve the line. When I make the rope, I determine the length by making it a little longer than the barrel. Not sure if this is correct? In fact, they may be a little short?
Below are some pictures to support that method...I think they are very close to being the correct length. Exactly how they laid on the deck is the real question.


Last edited:
The assignment for working the cannons under the poop deck must have been given to the 'new' guys. Pretty miserable working conditions (as if any position on a ship was pleasant...).10 cannons and carriages have been built and installed now. 10 more to go.
Taking a break from them and working on the Falconettes that go on the upper deck.
View attachment 197620View attachment 197621View attachment 197622
- Joined
- Aug 16, 2019
- Messages
- 870
- Points
- 343

The finish of the deck is just  well done
 well done
@dockattner ...The assignment for working the cannons under the poop deck must have been given to the 'new' guys. Pretty miserable working conditions (as if any position on a ship was pleasant...).
I suppose it depends on the weather? If it’s cold and raining outside...I’m thinking I want to be under cover!
@Charles QC ...The finish of the deck is justwell done
Thank you Charles. I feel I got a bit lucky on that. I just used some stain I had left over from a project (Minwax Golden Oak). Then I used steel wool and some 2000 grit sand paper to dull the finish and weather it.
I see a lot of people using glossy stain on everything and that’s not how a ship looked, especially on the deck.
Last edited:
Finished with the Falconettes (small cannons). Made mounting brackets, painted and installed. They were actually fun to do.
Now we are starting to get some guns on this ship!
Now we are starting to get some guns on this ship!
Last edited:
Thank you! Appreciate it.Hey, she’s got some teeth now! Looking really good Dean!
Very nice with the upper falconettes. I agree with the non-glossy finish appearance. An aside to angling the carriage to one side or the other, you will see in one view a "crow" on the deck which was also used by the crew to lever the carriage and wheels sidewise. That is related to the guideline of 500 lbs per gun crewman from what has been provided to me separately. Rich (PT-2)Hey, she’s got some teeth now! Looking really good Dean!
Yes, they also used it to lift the end of the cannon and adjust the block to change angle.Very nice with the upper falconettes. I agree with the non-glossy finish appearance. An aside to angling the carriage to one side or the other, you will see in one view a "crow" on the deck which was also used by the crew to lever the carriage and wheels sidewise. That is related to the guideline of 500 lbs per gun crewman from what has been provided to me separately. Rich (PT-2)
Now I know. Hadn't thought about that. RichYes, they also used it to lift the end of the cannon and adjust the block to change angle.
Back at Dean’s cannon factory...
Second set of 10 cannons have been started!
I build the sides with individual boards stacked and staggered...
then those are glued to a base with a front brace. Then the axles are glued on the bottom...
then I build the quions...
then each quoin is glued to the base and the location adjusted with a cannon barrel in place to assure the proper angle of the cannon at assembly.
Next I will bend all the brass trunnions, paint the cannons, make the wheels and hubs, drill holes in the sides for eye pins, paint the carriages...and then start assembling them and finally add the breach rope and eyes.
See you next time with more progress pics...
Last edited:
Dean,
Very great work -
Very great work -
@oldflyer ...Dean,
Very great work -
Thank you!
Due to the fact that the cannon carriage casting provided in the kit was not to my liking, and also a bit too short, which made the cannon angle upwards thru the opening, I decided to scratch build my own carriages and cannon assemblies. A lot more work, but worth it in the end!
Last edited:


