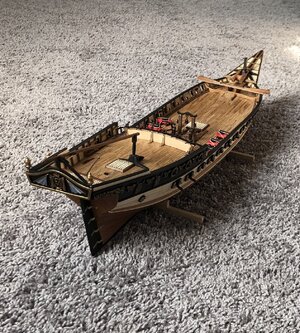
Well done! Hard to wait for the final red finish. Rich (PT-2)Thank you!
Due to the fact that the cannon carriage casting provided in the kit was not to my liking, and also a bit too short, which made the cannon angle upwards thru the opening, I decided to scratch build my own carriages and cannon assemblies. A lot more work, but worth it in the end!
-

Win a Free Custom Engraved Brass Coin!!!
As a way to introduce our brass coins to the community, we will raffle off a free coin during the month of August. Follow link ABOVE for instructions for entering.
-

PRE-ORDER SHIPS IN SCALE TODAY!
The beloved Ships in Scale Magazine is back and charting a new course for 2026!
Discover new skills, new techniques, and new inspirations in every issue.
NOTE THAT OUR FIRST ISSUE WILL BE JAN/FEB 2026
You are using an out of date browser. It may not display this or other websites correctly.
You should upgrade or use an alternative browser.
You should upgrade or use an alternative browser.
Point taken!Dean's SHIPYARD, Dean - not factory! Unless, you want to call it "Dean's Armory" for the time being!
So today I moved closer to completion on the cannon assemblies at Dean’s shipyard!
First I painted the carriages red, then I made the wheels and bent all the trunnion caps...
Then I added the wheel hubs and painted the cannons black...
Then I glued on the wheels...
next I painted all the wheels black...
tomorrow I will install the cannons, add the trunnion caps, the eyes, and add nail heads, dry brush cannons, then add breach rope and eyes...
See you then...
I also ordered something very cool to add to the ship, I hope it arrives tomorrow! I’m really excited about it!
Last edited:
Nice looking carriages so far. It will be great to see the full assembly waiting for the tackles. Rich (PT-2)So today I moved closer to completion on the cannon assemblies at Dean’s shipyard!
First I painted the carriages red, then I made the wheels and bent all the trunnion caps...
View attachment 198294
Then I added the wheel hubs and painted the cannons black...
View attachment 198295
Then I glued on the wheels...
View attachment 198296
next I painted all the wheels black...
View attachment 198297
tomorrow I will install the cannons, add the trunnion caps, the eyes, and add nail heads, dry brush cannons, then add breach rope and eyes...
See you then...
I also ordered something very cool to add to the ship, I hope it arrives tomorrow! I’m really excited about it!
So close to being done with cannons. When finally done and installed, I just might dance on the table...lol
Today I glued on the cannons and the trunnion caps...
Then I glued in the eyes...
after that I added the nail heads, using a straight pin with glue on it, I dab the glue on to represent round nail heads...
then after the glue dried, I dry brushed some bronze on the cannons, and painted the nail heads gold...
now I’m ready to start making the ropes and put eyes on them...that makes 4 eyes per cannon, and a total of 80 eyes (20 cannons), which is why I had to order more eye pins!!!
And once looking online at the fittings section of my favorite store, I found something I had to have...lol. Soon enough I will share that once I install them.
I’m like a kid in a candy store, I end up looking at every section and every page browsing through what they have, to see if there is something I can’t live without...ha ha!
I am going to order some MS pulleys in single and double, they are the best I’ve seen. So that will be next on my list.
Until next time...
Last edited:
online. Perfect size I think...
and with that ...we must sail the sea of carpet, in search of those final 10 cannons on a distant shore...a place called Dean’s Armory!
Until then...
and with that ...we must sail the sea of carpet, in search of those final 10 cannons on a distant shore...a place called Dean’s Armory!
Until then...
Last edited:
Oh what a joy to behold floating on a lightly ruffled cats' paw sea! Rich (PT-2)Thanks for the compliments to all, and thanks for checking in.
Today my much anticipated parts arrived and I had to do assembly and paint...then they were glued in. I didn’t even wait for the glue to dry before I took pics...lol. So ignore the white glue, it will disappear when it dries!
So...what’s missing from the stern of my beloved Cazador?
View attachment 198382Exactly...lanterns!!!! Why didn’t it have any? Well mine does after finding these jewels online. Perfect size I think...
View attachment 198383View attachment 198384
and with that ...we must sail the sea of carpet, in search of those final 10 cannons on a distant shore...a place called Dean’s Armory!
Until then...
View attachment 198385View attachment 198386View attachment 198387
The lanterns are a GREAT addition!!
Thank you!The lanterns are a GREAT addition!!
Wow, just had two cups of tea as I worked my way through your build log. Very impressive. The last batch of pictures of the ship sailing the “Rug Sea” are absolutely great. Kudos from my Admiral, she loved the pictures.
Jan
Jan
Thank you, much appreciated! It’s been a long journey to get this far. I like taking pictures on the grey carpet, as it’s a better background than my cluttered build area!Wow, just had two cups of tea as I worked my way through your build log. Very impressive. The last batch of pictures of the ship sailing the “Rug Sea” are absolutely great. Kudos from my Admiral, she loved the pictures.
Jan
I would like to offer that your build area doesn't even approach the definition
of a "cluttered build area". I know because I can see my own in comparison :-( Rich PT-2)Thank you, much appreciated! It’s been a long journey to get this far. I like taking pictures on the grey carpet, as it’s a better background than my cluttered build area!
Like your build very mutch,nice to look at.And I am impressed at that puzzel of yours 8.000 pieces,my wife and I have buildt many 4.000 pieces puzzel
//Lasse
//Lasse
Today was a milestone. The cannons finally done!
To ensure the ropes are the same length, I use this method. Pull ropes in front of cannon, put eyes on line, add glue above. Then fold rope on itself and glue.
then I tie thread around the rope, add glue and serve rope with thread.
Then I glue the eye to the bulkheads, and when dry, I lift cannon and add glue to wheels and place cannon. When that glue dries, I adjust the ropes.
Now for pictures of cannons in place. I still have to add eyes behind all of the cannons on the deck. Need to drill holes first.
However all the cannon assemblies are finished and in place!
I chose to leave them in this state, as if the rear pulley and ropes were unhooked for room to walk the deck. Mainly because I don’t have the amount of small pulleys it would take to rig all of that. Next war ship I will add.
Now I have to make all of the oars, next the anchors, and finally the ships boat. I’m looking forward to that! Already have ideas on embellishments for that!
Last edited:


