Thank you. I had a good time with this bit. I tried different combinations, the final one just looked “Right”.That is a very nice personal touch on your steamer, Jan. It looks ‘natural’ and indeed: much better then the side-steps.
Regards, Peter
-

Win a Free Custom Engraved Brass Coin!!!
As a way to introduce our brass coins to the community, we will raffle off a free coin during the month of August. Follow link ABOVE for instructions for entering.
-

PRE-ORDER SHIPS IN SCALE TODAY!
The beloved Ships in Scale Magazine is back and charting a new course for 2026!
Discover new skills, new techniques, and new inspirations in every issue.
NOTE THAT OUR FIRST ISSUE WILL BE JAN/FEB 2026
You are using an out of date browser. It may not display this or other websites correctly.
You should upgrade or use an alternative browser.
You should upgrade or use an alternative browser.
Chaperon 1884 Stern Wheeler
- Thread starter Pathfinder65
- Start date
- Watchers 35
-
- Tags
- chaperon model shipways
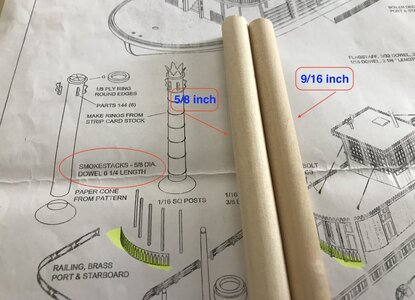
That’s a deja-vu, Jan. Also my problem with the smokestacks. Made them eventually from PVC electric tube.Thought that I'd start the smokestacks while waiting for glue to dry on my other build.
BUT...
View attachment 324622
Unfortunately the dowels supplied in the kit are not the same diameter. I now need to make a trip to the hardware store
Good luck at the hardware store. But watch out, it is there like walking in a candystore ………. Toys for Boys …….
Regards, Peter
True, true, true. I always seem to manage finding items that I “really” need.That’s a deja-vu, Jan. Also my problem with the smokestacks. Made them eventually from PVC electric tube.
Good luck at the hardware store. But watch out, it is thenre like walking in a candystore ………. Toys for Boys …….
Regards, Peter
Last edited:
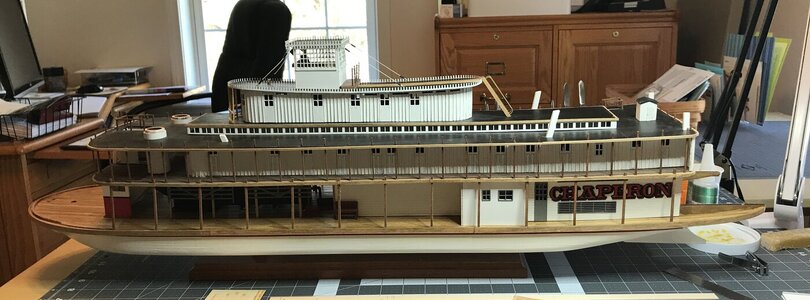
Good morning Jan. I’m sure the world is turning faster on its axis….time moves quicker now days. Good to see your stern wheeler back ready for some more play time. Cheers GrantWow, hard to believe how much time has passed since I last worked on this build.
View attachment 443920
The Admiral and I dusted, vacuumed and generally cleaned over a years worth of dust from the hull. Now I have to get my mind around to where did I leave off or where do I start.
To be continued.
Jan
Nice to see here back on your table, Jan. She deserves a nice finish.Wow, hard to believe how much time has passed since I last worked on this build.
View attachment 443920
The Admiral and I dusted, vacuumed and generally cleaned over a years worth of dust from the hull. Now I have to get my mind around to where did I leave off or where do I start.
To be continued.
Jan
Regards, Peter
OK, where to continue the build.
Hmm, the paddle wheel looked like a good start.
Seems simple enough to help to get back into the build mode.
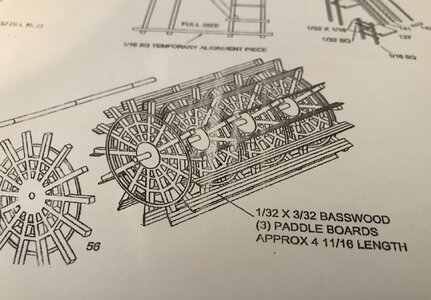
Oh boy, after a couple of days of fiddling, measuring, lot's of coffee and bad words, I finally have everything lined up, squared to the inside distance between the wheels (1 5/16 in/33.5mm).
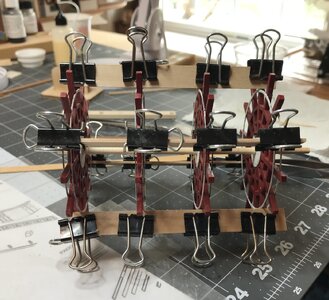
My method probably isn't the best construction technique, but it's working for me.
The dowel/axle was inserted into a piece of 1 X 3, a piece of wax paper placed on the 1X 3 and then the first wheel was clamped and glued to the dowel/axel. It was the only way I could figure out to have the first wheel square on the dowel/axle.
The next step was to cut four pieces of 1/16 X 1/2in to the length of the paddle boards, slide the second wheel on to the axle, clamp the paddle boards at the first wheel and the second, making sure the the interior distance spacing between the wheels was at 1 5/16in. A little bit of glue on the second wheel hub fixed it to the axle. The process continued with wheels three and four.
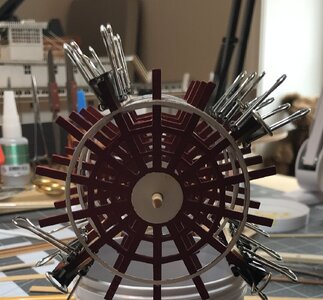
Hmm, looks like a Porcupine.
The plan is to start adding the paddle boards tomorrow. I don't know if I'll use the wood supplied in the kit. It's 1/32 X 3/32in. I glued several pieces to the right width (3 of them side by side), but when scraping and sanding them they "Bowed" and seem way to flexible.
Jan
Hmm, the paddle wheel looked like a good start.
Seems simple enough to help to get back into the build mode.

Oh boy, after a couple of days of fiddling, measuring, lot's of coffee and bad words, I finally have everything lined up, squared to the inside distance between the wheels (1 5/16 in/33.5mm).

My method probably isn't the best construction technique, but it's working for me.
The dowel/axle was inserted into a piece of 1 X 3, a piece of wax paper placed on the 1X 3 and then the first wheel was clamped and glued to the dowel/axel. It was the only way I could figure out to have the first wheel square on the dowel/axle.
The next step was to cut four pieces of 1/16 X 1/2in to the length of the paddle boards, slide the second wheel on to the axle, clamp the paddle boards at the first wheel and the second, making sure the the interior distance spacing between the wheels was at 1 5/16in. A little bit of glue on the second wheel hub fixed it to the axle. The process continued with wheels three and four.

Hmm, looks like a Porcupine.
The plan is to start adding the paddle boards tomorrow. I don't know if I'll use the wood supplied in the kit. It's 1/32 X 3/32in. I glued several pieces to the right width (3 of them side by side), but when scraping and sanding them they "Bowed" and seem way to flexible.
Jan
Last edited:
Ha! I would not have considered a paddlewheel a simple endeavor!the paddle wheel looked like a good start.
Seems simple enough to help to get back into the build mode.
True, true, true. But then I'm much more proficient chasing mischievous electrons in my model RR wiring than building wooden boat models. I'm still a "Novice" and learning as I go.Ha! I would not have considered a paddlewheel a simple endeavor!
Jan
Yup, that was bit of a puzzle to get started. Now I only need fourteen paddle boards to complete the wheel.It looks like a very intricate step in the build, but you will be very pleased once it’s done.
Jan
What you show looks good, Jan. You have to find a method that suits you. It seems like a simple object but still needs the necessary attention to get it straight and turning. The paddles will strengthen the structure.OK, where to continue the build.
Hmm, the paddle wheel looked like a good start.
Seems simple enough to help to get back into the build mode.
View attachment 445041
Oh boy, after a couple of days of fiddling, measuring, lot's of coffee and bad words, I finally have everything lined up, squared to the inside distance between the wheels (1 5/16 in/33.5mm).
View attachment 445042
My method probably isn't the best construction technique, but it's working for me.
The dowel/axle was inserted into a piece of 1 X 3, a piece of wax paper placed on the 1X 3 and then the first wheel was clamped and glued to the dowel/axel. It was the only way I could figure out to have the first wheel square on the dowel/axle.
The next step was to cut four pieces of 1/16 X 1/2in to the length of the paddle boards, slide the second wheel on to the axle, clamp the paddle boards at the first wheel and the second, making sure the the interior distance spacing between the wheels was at 1 5/16in. A little bit of glue on the second wheel hub fixed it to the axle. The process continued with wheels three and four.
View attachment 445043
Hmm, looks like a Porcupine.
The plan is to start adding the paddle boards tomorrow. I don't know if I'll use the wood supplied in the kit. It's 1/32 X 3/32in. I glued several pieces to the right width (3 of them side by side), but when scraping and sanding them they "Bowed" and seem way to flexible.
Jan
Regards, Peter
- Joined
- Sep 3, 2021
- Messages
- 5,199
- Points
- 738

Dangerous assumption...Seems simple enough to help to get back into the build mode.
Thank you Peter. My biggest problem was finding a starting point. I think I fiddled with that for a whole day.What you show looks good, Jan. You have to find a method that suits you. It seems like a simple object but still needs the necessary attention to get it straight and turning. The paddles will strengthen the structure.
Regards, Peter
Jan
Yup, you’re absolutely right. It’s a lot like our swimming pool. You have to pick a spot and jump in. I think I wound up in the deep end, a little bit over my head.Dangerous assumption...
Jan
The Paddlewheel:
Rainy, cold day here, good time to tackle the Paddlewheel portion of the build.
The kit instructions called for three 1/32 X 3/32 strips to be glued together to form the paddles. I needed fourteen paddles. The oops moment occurred when checking the first three paddles that I had glued, they varied in width and just didn't look like I thought they should. SO.. I changed the paddle gluing method to four strips and trimmed them to all the same width as best as I could. I made a bunch of them before I had fourteen that I liked.
Anyway, my result dry fitted.
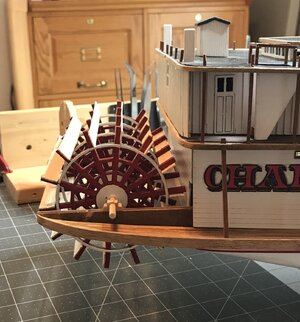
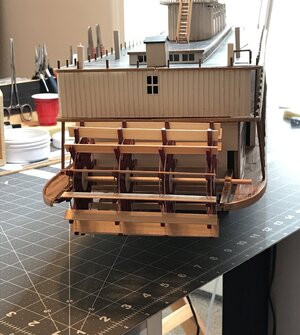
A lot more piddly stuff to go.
Jan
Rainy, cold day here, good time to tackle the Paddlewheel portion of the build.
The kit instructions called for three 1/32 X 3/32 strips to be glued together to form the paddles. I needed fourteen paddles. The oops moment occurred when checking the first three paddles that I had glued, they varied in width and just didn't look like I thought they should. SO.. I changed the paddle gluing method to four strips and trimmed them to all the same width as best as I could. I made a bunch of them before I had fourteen that I liked.
Anyway, my result dry fitted.


A lot more piddly stuff to go.
Jan
Last edited:
That is a very nice outcome, Jan. Time invested ultimately pays off.The Paddlewheel:
Rainy, cold day here, good time to tackle the Paddlewheel portion of the build.
The kit instructions called for three 1/32 X 3/32 strips to be glued together to form the paddles. I needed fourteen paddles. The oops moment occurred when checking the first three paddles that I had glued, they varied in width and just didn't look like I thought they should. SO.. I changed the paddle gluing method to four strips and trimmed them to all the same width as best as I could. I made a bunch of them before I had fourteen that I liked.
Anyway, my result dry fitted.
View attachment 445207
View attachment 445208
A lot moe piddly stuff togo.
Jan
Regards, Peter
True story..Ha! I would not have considered a paddlewheel a simple endeavor!
Good morning Jan. Looking spot on. I enjoy paddle steamers and it is good to see you working on her again.Cheers GrantThe Paddlewheel:
Rainy, cold day here, good time to tackle the Paddlewheel portion of the build.
The kit instructions called for three 1/32 X 3/32 strips to be glued together to form the paddles. I needed fourteen paddles. The oops moment occurred when checking the first three paddles that I had glued, they varied in width and just didn't look like I thought they should. SO.. I changed the paddle gluing method to four strips and trimmed them to all the same width as best as I could. I made a bunch of them before I had fourteen that I liked.
Anyway, my result dry fitted.
View attachment 445207
View attachment 445208
A lot moe piddly stuff togo.
Jan

