Charles Royal Yacht, 1674, Scale 1:64, by Woody Joe (Japan)

Good tools are the key!
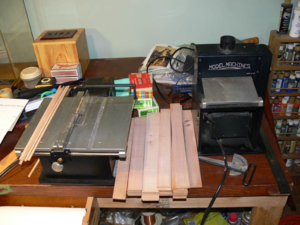
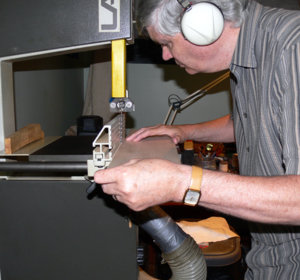
I have the Byrnes saw, plus the thicknesser and the sanding disk. All three are fantastic and to my mind well worth the money (including shipping from the USA, customs fees and converters to run them from our 240V electric supply)
I have used them all extensively on my build of 'King's Fisher' (see below), cutting boxwood and ebony perfectly.
I've no experience of the Proxxon saw, but my pen sanders from them are excellent, so would imagine it will be good.

Ted
I can sign under each and all of your words, Ted! Good (proper) tools for the given job - are 50% of success!
 
I have tried the Proxxon saw and found it underpowered, and had trouble cutting 1/8" Ebony, while my Byrans saw cuts it like a hot knife through butter. Having the right tool to do the job is key. Match up your Byrans saw with his thickness sander and you have a setup that will cut your wood into planks ready to install. I also have a Laguna bandsaw to cut the Pearwood into the thickness to use in the Byrans table saw. I bought the Laguna especially to be able to cut straight boards from big stock.

Bob

modellers power tools.jpgcutting strips.jpg
 
Jim - excellent log for a very attractive model. Your planking is excellent, and I really enjoyed your scraper tutorial. Dan just recently taught me how to do this, and I have to say that custom made mouldings really sharpen up the appearance of a model. The idea to stack different diameter grinding wheels had not occurred to me - cool tip!
 
Jim - excellent log for a very attractive model. Your planking is excellent, and I really enjoyed your scraper tutorial. Dan just recently taught me how to do this, and I have to say that custom made mouldings really sharpen up the appearance of a model. The idea to stack different diameter grinding wheels had not occurred to me - cool tip!
Mouldings do enhance the visual effects and 'dress up' model. I am glad, you can use this technique in your future builds. There are many ways to achieve the same results ;)
 
I was a commercial electrician for many years and one of the best things about my job was passing on what I knew to the younger guys / apprentices. When I was learning my trade, it was like pulling teeth to get some guys to show you how to do something as if their trade secrets were what was keeping them employed. Little did they realise that when everyone does well, the company does really well and the customers were always happy. It felt really good to see young people prosper and take pride in what they did. Thanks again for sharing what you know and that goes to everyone here! Ok..back to ship modeling :)
As a woodworker, I can really relate to that. For a time, I worked at Steinway Piano Co., as a pattern maker, and the most knowledgeable guys were really reluctant to share information. Now, I work for the city, and nobody cares about anythingROTFROTF
 
I am also impressed with the quality of the white metal castings. This is a very nice kit from which to make all of the upgrades that you have.

I will say though Jim, as long-standing members of The Shipcraft Guild of New York (City), I am going to make it my personal quest to make you more comfortable with paint.

I’m good with paint on plastic and drywall. I have some ideas about how to proceed on a scale wooden surface. Let’s make it happen!
 
Greeting fellow shipwrights!

Browsing multiple build logs on various shipbuilder forums I have never thought, that one day I will open my own shipbuilding log. I just thought, that those types of logs a great responsibility to engage others in your build process: not just show what you do, instead, share your knowledge how you do it. I am hoping that someone may benefit the log and find it somehow valuable. I will try my best and make it fun to read, avoiding I did this…and I did that. But on the end, it is only you, fellow ship-model crafters who will make this future log interesting. Without further ado let me begin…

The Ship: Charles Royal Yacht, Period of the ship – 1674, Scale - 1/64, Nationality of the ship – England. All my research leads to believe that this Yacht didn’t exist, and it just a representation of the Charles Royal Yacht built in 1674 during the reign of King Charles II (1660-1685). The plans are made with reference to a number of royal yachts built in that era.

The Kit: Wile this is not a kit review, I ‘d like to give some thoughts about it. This is a single plank on bullheads contractions. This kit has improved the traditional composting scheme of the hull assembly by running the keel from solid wood instead of plywood! Yea, real wood! Laser markings on frames (bulkheads), stems and keels greatly help in positioning parts relative to each other, and the quality of bulkheads is great. All supplied wood was dry and very good quality. Although, I couldn’t find\figure out what species various wood is. The yacht's décor consists of a set of white cast metal, brass photo etching and laser-cut wooden elements. For the mast and spars, round billets of light wood are provided, and for rigging, there are light and dark threads of five standard sizes. Unfortunately, the blocks and deadeyes are made of plastic, which is its only significant disadvantage. But blocks are of the correct form and moulded with the shaves. The armament of the yacht consists of eight cast guns (while metal) on wooden carriages. The model is completed with three coloured flags printed on fabric and a stand with a "Charles Royal Yacht" sign. The model assembly of the sailboat is shown on a 20-page colour instruction (all in Japanese), and the drawings are given on three sheets of A3 format.

The kit price: $300.00 ~ 450.00 (US) Personally, I think it overpriced, I will explain why later in the log.

The build: Before I will put photographs and show some the progress, I’d like to explain why this kit brought attention to my eyes, and become a fun to build since January 2018. Thoughts are always ahead of actions, and mine were no exceptions. I have had to finish my project when thinking what to build next. I’d love to build a three-decker, with carvings and decorations and massive armoury but…I quickly realize that this will be a simple multiple years project, which I don’t want to engage on. I switch my interest to something less time consuming, however still have decorations an armament so I can get an end results much quirkier. The choice fell on a single-mast schooner or yacht. On one Russian forum, I found build log about Charles Royal Yacht and I found it very attractive from the pictures of a real model. This was a crucial bold point in my discovery, and… you are correct, I bought the kit!!

Here is what inside the box. I didn’t make pictures myself (never thought about my own log), so I borrow those from the site I bought the kit. If you have any questions, comments please reply. Remember this build log is for all of us, and without the input is obsolete.


View attachment 61722View attachment 61723View attachment 61724View attachment 61725View attachment 61726View attachment 61728View attachment 61729View attachment 61730View attachment 61731View attachment 61732View attachment 61733View attachment 61734View attachment 61735View attachment 61736View attachment 61737View attachment 61738View attachment 61739View attachment 61740View attachment 61741View attachment 61742View attachment 61743View attachment 61744View attachment 61745View attachment 61727View attachment 61746
love your log - keep it flowing ! Bryan
 
Greeting fellow shipwrights!

Browsing multiple build logs on various shipbuilder forums I have never thought, that one day I will open my own shipbuilding log. I just thought, that those types of logs a great responsibility to engage others in your build process: not just show what you do, instead, share your knowledge how you do it. I am hoping that someone may benefit the log and find it somehow valuable. I will try my best and make it fun to read, avoiding I did this…and I did that. But on the end, it is only you, fellow ship-model crafters who will make this future log interesting. Without further ado let me begin…

The Ship: Charles Royal Yacht, Period of the ship – 1674, Scale - 1/64, Nationality of the ship – England. All my research leads to believe that this Yacht didn’t exist, and it just a representation of the Charles Royal Yacht built in 1674 during the reign of King Charles II (1660-1685). The plans are made with reference to a number of royal yachts built in that era.

The Kit: Wile this is not a kit review, I ‘d like to give some thoughts about it. This is a single plank on bullheads contractions. This kit has improved the traditional composting scheme of the hull assembly by running the keel from solid wood instead of plywood! Yea, real wood! Laser markings on frames (bulkheads), stems and keels greatly help in positioning parts relative to each other, and the quality of bulkheads is great. All supplied wood was dry and very good quality. Although, I couldn’t find\figure out what species various wood is. The yacht's décor consists of a set of white cast metal, brass photo etching and laser-cut wooden elements. For the mast and spars, round billets of light wood are provided, and for rigging, there are light and dark threads of five standard sizes. Unfortunately, the blocks and deadeyes are made of plastic, which is its only significant disadvantage. But blocks are of the correct form and moulded with the shaves. The armament of the yacht consists of eight cast guns (while metal) on wooden carriages. The model is completed with three coloured flags printed on fabric and a stand with a "Charles Royal Yacht" sign. The model assembly of the sailboat is shown on a 20-page colour instruction (all in Japanese), and the drawings are given on three sheets of A3 format.

The kit price: $300.00 ~ 450.00 (US) Personally, I think it overpriced, I will explain why later in the log.

The build: Before I will put photographs and show some the progress, I’d like to explain why this kit brought attention to my eyes, and become a fun to build since January 2018. Thoughts are always ahead of actions, and mine were no exceptions. I have had to finish my project when thinking what to build next. I’d love to build a three-decker, with carvings and decorations and massive armoury but…I quickly realize that this will be a simple multiple years project, which I don’t want to engage on. I switch my interest to something less time consuming, however still have decorations an armament so I can get an end results much quirkier. The choice fell on a single-mast schooner or yacht. On one Russian forum, I found build log about Charles Royal Yacht and I found it very attractive from the pictures of a real model. This was a crucial bold point in my discovery, and… you are correct, I bought the kit!!

Here is what inside the box. I didn’t make pictures myself (never thought about my own log), so I borrow those from the site I bought the kit. If you have any questions, comments please reply. Remember this build log is for all of us, and without the input is obsolete.


View attachment 61722View attachment 61723View attachment 61724View attachment 61725View attachment 61726View attachment 61728View attachment 61729View attachment 61730View attachment 61731View attachment 61732View attachment 61733View attachment 61734View attachment 61735View attachment 61736View attachment 61737View attachment 61738View attachment 61739View attachment 61740View attachment 61741View attachment 61742View attachment 61743View attachment 61744View attachment 61745View attachment 61727View attachment 61746
Being rather new to SoS I am amazed at how many builds are in progress while new kits are being bought. My aging brain has enough problems in keeping track of one build's ending one night and remembering where to continue the next day. I always used to do that in the architectural office, leaving my table ready to continue in the morning, having completed my last task of the day, and spending too much of my sleep envisioning resumption in the morning. Sometimes a good thing though as new perspectives arose and could be taken advantage of in the continuation. Same thing in my one build but also thinking out and planning starting the next build . . . one at a time but multiple???? Wow. Beyond me. PT-2
 
Here is a simple CA applicator made in 5 minutes from a sewing needle using a rotary tool and cut-off disk. First, cut the thread insert a quarter from the end, just enough to make an opener. Using the same disk smooth both sides about 45 degrees make it a knife like. That's it! Oh... made a nice handle for comfort! :)

View attachment 68931

Happy Modelling!
Great idea. I have been using wood tooth picks which only last so long befoe the sharp tip is a blob of solidified CA. How do you clean out your needle applicator in a continual adhesive process of rigging or securing any type of items? PT-2
 
How long or how much work can be done per tube? PT-2
Hello PT-2. It is well depends what will you solder. To solder the ringbolts it will take you years as it will require a tinny nob on the surface. However, if you need to solder two brass sheets together, it will required considerably larger amount of paste.
 
Great idea. I have been using wood tooth picks which only last so long befoe the sharp tip is a blob of solidified CA. How do you clean out your needle applicator in a continual adhesive process of rigging or securing any type of items? PT-2
Hello @PT-2 This is budget applicator and doesn't require much effort to make it. However, there is a much better tool, IMHO, called 'glue looper' by Creative Dynamics. I am using this tool since long (when building plastic models), and still! They have different applicator for various viscosity CA glues, Check it out...

 
Being rather new to SoS I am amazed at how many builds are in progress while new kits are being bought. My aging brain has enough problems in keeping track of one build's ending one night and remembering where to continue the next day. I always used to do that in the architectural office, leaving my table ready to continue in the morning, having completed my last task of the day, and spending too much of my sleep envisioning resumption in the morning. Sometimes a good thing though as new perspectives arose and could be taken advantage of in the continuation. Same thing in my one build but also thinking out and planning starting the next build . . . one at a time but multiple???? Wow. Beyond me. PT-2

I hear you and completely understand your wonder, PT-2. Our abilities are varies, we all have different skills. and timings. Personally, I like to have more than one project in the pipeline. Often time , when building, it doesn't work the way it should or the way i would like it to be. Then, i switch to a different ship (different task). At time, neither of the builds can motivate to continue...yea...it happens quite often...Then I need a quick project, I called a "weekend", to start Friday and completed Sunday for full satisfactory and motivation returning to main projects. Oh well...
 
HI ALL MY THOUGHTS FROM A DERANGED MIND, I FULLY AGREE WITH JIM NORMALLY I HAVE 2 SMALL AND QUICK PROJECTS TO FALL BACK ON, AND 2 MAIN BS, AND MY GOAL IS COMPLETED MODELS, BUT SINCE THIS HORRIBLE VIRUS STARTED I HAVE TAKEN MY DAUGHTER-IN-LAW (A NURSE) ADVICE TO BUY KITS AND TOOLS AND STAY HOME, AS I AM GETTING MORE AND MORE HYPER, WITH ANXITY AND PANIC ATTACKS, I HAVE A GREAT MANY BUILDS GOING ON A LOT AND MY GOAL RIGHT NOW IS TO KEEP MY SANITY AND THE ONLY WAY I KNOW TO DO THAT IS MY SHIP MODELING, SO I SWITCH A LOT BUT TRYING TO KEEP MY BUILDS TO SMALLER BOATS (THANKS TO JIM) WITH A QUICKER TIMELINE, AS I HAVE NO IDEA HOW LONG I AM GOING TO ISOLATE MYSELF AT THIS TIME IT LOOKS LIKE A SUBSTANAL TIME, JUST MY THOUGHTS. GOD BLESS STAY SAFE DON
 
HI ALL MY THOUGHTS FROM A DERANGED MIND, I FULLY AGREE WITH JIM NORMALLY I HAVE 2 SMALL AND QUICK PROJECTS TO FALL BACK ON, AND 2 MAIN BS, AND MY GOAL IS COMPLETED MODELS, BUT SINCE THIS HORRIBLE VIRUS STARTED I HAVE TAKEN MY DAUGHTER-IN-LAW (A NURSE) ADVICE TO BUY KITS AND TOOLS AND STAY HOME, AS I AM GETTING MORE AND MORE HYPER, WITH ANXITY AND PANIC ATTACKS, I HAVE A GREAT MANY BUILDS GOING ON A LOT AND MY GOAL RIGHT NOW IS TO KEEP MY SANITY AND THE ONLY WAY I KNOW TO DO THAT IS MY SHIP MODELING, SO I SWITCH A LOT BUT TRYING TO KEEP MY BUILDS TO SMALLER BOATS (THANKS TO JIM) WITH A QUICKER TIMELINE, AS I HAVE NO IDEA HOW LONG I AM GOING TO ISOLATE MYSELF AT THIS TIME IT LOOKS LIKE A SUBSTANAL TIME, JUST MY THOUGHTS. GOD BLESS STAY SAFE DON
Good concepts to find rewards where they are available. . . glean the low hanging fruit. . . . . PT-2
 
Hi Jim
I have surched a little about your Yacht, to find out what figurehead the model should have. There is a model of a Yacht in the NMM what was named
Charles. Built 1675, this model show a simple lion figurehead

Best regards
Willi (schifferlbauer)

View attachment 105739
The Woody Joe kit is clearly based on the NMM model.
I am currently building it, bashing the kit to approximate to a Dockyard model similar to the NMM model.
However I have just noticed that the NMM model does not have port-hole openings at the 4 rearmost wreaths, which seems incorrect.
These port-holes would serve the royal or V.I.P. accommodation.
Woody Joe has provided the circular openings at 3 out of these 4 locations.
 
Last edited:
Back
Top