Being of an older generation, Google and the internet is not my first "language" or resource but has come increasingly forward as the years pass. I still prefer a good book/paper document to a monitor and person to person conversation, face to face, with body language forming a significant part of the exchange. I was not aware of Google translators as I am not aware of the bulk of what is contained within "basic" programs such as Excel and Word as my needs are more limited in the broad spectrum of what some advanced users need. I'll have to get out of my boat's gunnels and give Google Translator a port visit, assuming the dockage fees are reasonable for this old crew. Thanks, RichYou shouldn't be too critical to yourself, Rich. How many people who know different languages can actually build the models? But you can, and for the most part, it doesn't require to be a polyglot. Leave the languages to Google Translate, and be proud to be American.
-

Win a Free Custom Engraved Brass Coin!!!
As a way to introduce our brass coins to the community, we will raffle off a free coin during the month of August. Follow link ABOVE for instructions for entering.
-

PRE-ORDER SHIPS IN SCALE TODAY!
The beloved Ships in Scale Magazine is back and charting a new course for 2026!
Discover new skills, new techniques, and new inspirations in every issue.
NOTE THAT OUR FIRST ISSUE WILL BE JAN/FEB 2026
You are using an out of date browser. It may not display this or other websites correctly.
You should upgrade or use an alternative browser.
You should upgrade or use an alternative browser.
Charles Royal Yacht, 1674, Scale 1:64, by Woody Joe (Japan)
Amen! Khorosha vidpovid! Or khoroshiy otvet. Or good answer. Or gute Antwort. Oder buena repuesta. Now I’m starting to get my languages mixed up. I must be müde.You shouldn't be too critical to yourself, Rich. How many people who know different languages can actually build the models? But you can, and for the most part, it doesn't require to be a polyglot. Leave the languages to Google Translate, and be proud to be American.
You led my compass heading to Google Translate and I was able to easily navigate my first passage using your "good answer" that came up in Russian with their translation. Muchas gracias which is coming across the southern boarders or better for my ancestors Tack so Mycket (not in the Swedish keyboard for proper letters.. RichAmen! Khorosha vidpovid! Or khoroshiy otvet. Or good answer. Or gute Antwort. Oder buena repuesta. Now I’m starting to get my languages mixed up. I must be müde.
This is what makes our forum unique and interesting. While we speak many different languages, we all understand each other with a sense of humor and personal attention. Isn't it great? ...and yet build the models. 
The models become a language of their own like music IMHO. RichThis is what makes our forum unique and interesting. While we speak many different languages, we all understand each other with a sense of humor and personal attention. Isn't it great? ...and yet build the models.
see, you are learning quick, you already use 'IMHO' more than few timesThe models become a language of their own like music IMHO. Rich

In my honorable opinion? Horrible opinion? Hedonistic opinion? Hillbilly? Or just humble? Sorry. I can’t help myself.
Just to stick to the facts (not wanting to hijack the thread) the Hungarian language is unique among surrounding Slavik and Germanic languages, with no relatives at all - and the same applies to the Hungarian people.It is the same 'Slovenian' group.
Otherwise I am still working on Sovereign...
János
Whatever acronym is appropriate ...use them interchangeably.In my honorable opinion? Horrible opinion? Hedonistic opinion? Hillbilly? Or just humble? Sorry. I can’t help myself.
Humorously honors each of those. RichWhatever acronym is appropriate ...use them interchangeably.
It is impossible to learn hungarian - definitely for me.Just to stick to the facts (not wanting to hijack the thread) the Hungarian language is unique among surrounding Slavik and Germanic languages, with no relatives at all - and the same applies to the Hungarian people.
Otherwise I am still working on Sovereign...
János
My wife is hungarian, mother in law (living with us) is hungarian, our daughters are half hungarian, even our cat is ungarian
So I hear nothing else than hungarian language and a little bit german - I am lost when they talk to each other
=> this is the time I leave and go into my workshop
- Joined
- Sep 26, 2018
- Messages
- 138
- Points
- 253

Uwek jonapot kivanok hodjvodj
Ivan, I was trying to translate... no luck. Did you mean: Uwe jo napot kivanok hodj vodj?Uwek jonapot kivanok hodjvodj
this translates to: Uwe have a good day hodj vodj
- Joined
- Sep 26, 2018
- Messages
- 138
- Points
- 253

Jimsky igen
P
János
Late, but probably not too late translation of Ivan's text: by hodj vodj he ment 'hogy vagy' which means 'how are you doing' in Hungarian.Ivan, I was trying to translate... no luck. Did you mean: Uwe jo napot kivanok hodj vodj?
this translates to: Uwe have a good day hodj vodj
János
Any more work done on your ship, Jim?
It is in a dry dock since I started a few new projects. but you are correct, Vic, I better finish her, and this should happen one of those days...Technically, it is only rigging left.Any more work done on your ship, Jim?
Well...well... well... I was trying to remove some dust accumulating at my Charles Royal Yacht was stored in the plastic bag (Dry Dock) when one of the guns disengaged from the deck and dropped in my hand... No, the guns were not glued permanently, they were just attached via brass ping in the middle of the front axletree. I wasn't disappointed, on the contrary, I was very happy! Why? Those guns were bothering my eyes every time I cleaned the model, something was not played nicely, and the gun in my hand was the exact proof of it! So..., I scream Re-DO it!!
Yes, I made a sharp turn and decided to redo the guns. I didn't like the kit's supplied carriages from the beginning. First, they represent the Continental (French) pattern of carriages, while the Charles Royal Yacht was a British one. Then, the square axletree for the tracks, really? Also, the barrel supplied in the kit was a bit small for the caliber. Check this out on your own.
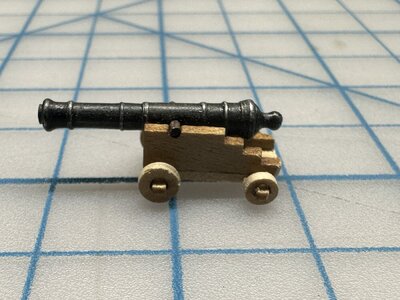
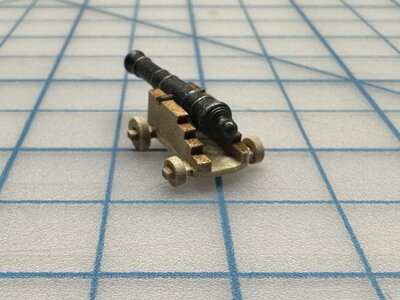
All this combined led me to make my carriages, just using the kit-supplied barrels. There is no need to repeat the process of making the carriages again, it was well described earlier in the log, Considering the small size of the entire canon, it turned out great, with additional details such as Linchpins, and Capsquare assembly (Capsquare Eyebolt, Capsquare joint bolt, and Capsquare key). It does look OK on the deck as well.
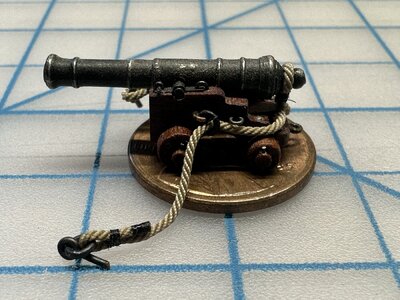
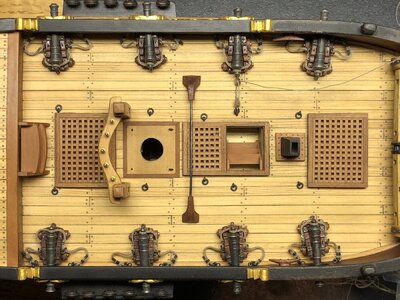
But...until the recent cleanup. Well, it happens...., I realized that the carriage looked out of scale (smaller), and the barrel's shape was a concern from the beginning. So unexpected event, made me reconsider, and I decided to redo the cannons.
First, I acquired new barrels. I couldn't find the exact size and bought a close match, but I mostly like the shape and how well they were CNC-turned: clean and accurate. The only drawback is the trunnion hole wasn't drilled off-center, but each barrel has its own turned trunnion (not the wire). The bore was the same size as the original barrels.
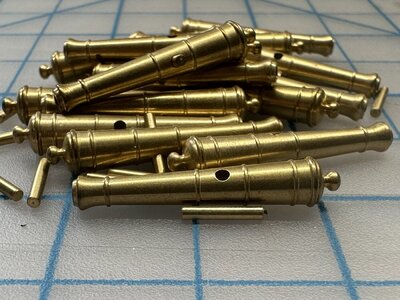
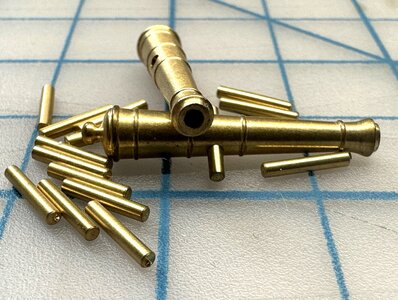
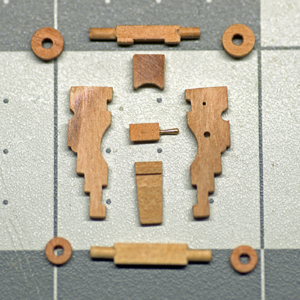
To avoid another mistake of creating the wrong size carriages, and make sure it will fit nicely, I made the model. By creating the model, I could learn and adjust the processes (if needed) for the rest of all 8 guns. The build process is divided into two parts: all wooden parts and metal parts. All parts made from wood are below. I tried to mimic all the parts the actual gun was made of.
To assemble everything, I made a simple jig. You guessed it right, I use my MF70 to mill the grooves for the front and hind axletrees. Also, the grooves for the tracks positioning. I must admit, the jig met all my expectations and served well at all stages, mostly drilling various holes...
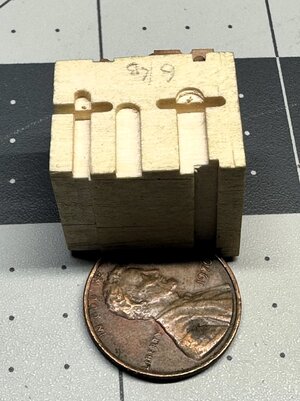
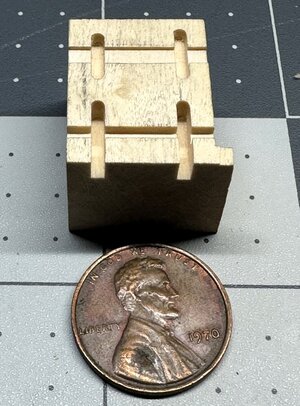
One of the tasks, using the jig, is to adjust the height of the transom.
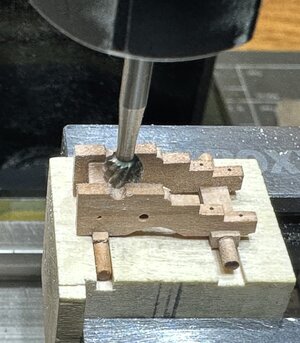
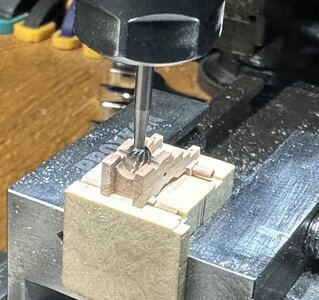
The process of making the tracks, I described in a different thread. Please click on the below link to find out.
The tracks were held to the milling wise using the double-stick tape, to make them all the same height.
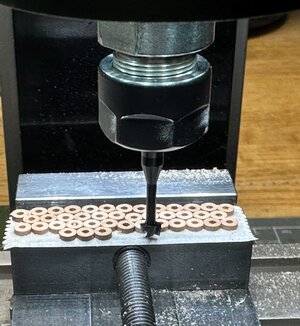
The wooden part has been completed, App parts are glued using PVA glue, the below images reflect how the carriage looks assembled and glued.
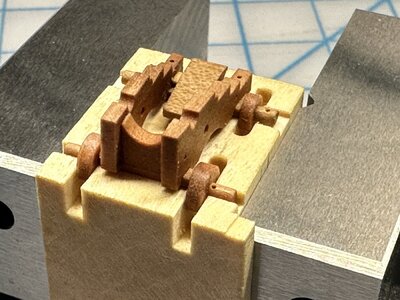
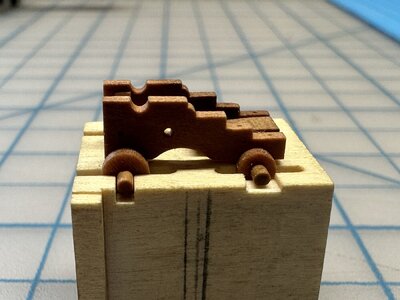
Will do the metal parts the next... Thank you for stopping by, to be continued...
Yes, I made a sharp turn and decided to redo the guns. I didn't like the kit's supplied carriages from the beginning. First, they represent the Continental (French) pattern of carriages, while the Charles Royal Yacht was a British one. Then, the square axletree for the tracks, really? Also, the barrel supplied in the kit was a bit small for the caliber. Check this out on your own.


All this combined led me to make my carriages, just using the kit-supplied barrels. There is no need to repeat the process of making the carriages again, it was well described earlier in the log, Considering the small size of the entire canon, it turned out great, with additional details such as Linchpins, and Capsquare assembly (Capsquare Eyebolt, Capsquare joint bolt, and Capsquare key). It does look OK on the deck as well.


But...until the recent cleanup. Well, it happens...., I realized that the carriage looked out of scale (smaller), and the barrel's shape was a concern from the beginning. So unexpected event, made me reconsider, and I decided to redo the cannons.
First, I acquired new barrels. I couldn't find the exact size and bought a close match, but I mostly like the shape and how well they were CNC-turned: clean and accurate. The only drawback is the trunnion hole wasn't drilled off-center, but each barrel has its own turned trunnion (not the wire). The bore was the same size as the original barrels.


To avoid another mistake of creating the wrong size carriages, and make sure it will fit nicely, I made the model. By creating the model, I could learn and adjust the processes (if needed) for the rest of all 8 guns. The build process is divided into two parts: all wooden parts and metal parts. All parts made from wood are below. I tried to mimic all the parts the actual gun was made of.

To assemble everything, I made a simple jig. You guessed it right, I use my MF70 to mill the grooves for the front and hind axletrees. Also, the grooves for the tracks positioning. I must admit, the jig met all my expectations and served well at all stages, mostly drilling various holes...


One of the tasks, using the jig, is to adjust the height of the transom.


The process of making the tracks, I described in a different thread. Please click on the below link to find out.
Tutorial - Making the cannon trucks (wheels) using Proxxon MF70
You heard it right, folks!! I am continuing the mini tutorials to fabricate parts utilizing the Proxon mill MF70. If you have not had a chance to read my previous articles, please take a look, you may find them useful for your next project. But...if you have other useful way\s of utilizing your...
shipsofscale.com
The tracks were held to the milling wise using the double-stick tape, to make them all the same height.

The wooden part has been completed, App parts are glued using PVA glue, the below images reflect how the carriage looks assembled and glued.


Will do the metal parts the next... Thank you for stopping by, to be continued...
G'day Jim, very good explanation and nice photos,
Best regards John,
Best regards John,
- Joined
- Apr 20, 2020
- Messages
- 6,255
- Points
- 738

Dear JimWell...well... well... I was trying to remove some dust accumulating at my Charles Royal Yacht was stored in the plastic bag (Dry Dock) when one of the guns disengaged from the deck and dropped in my hand... No, the guns were not glued permanently, they were just attached via brass ping in the middle of the front axletree. I wasn't disappointed, on the contrary, I was very happy! Why? Those guns were bothering my eyes every time I cleaned the model, something was not played nicely, and the gun in my hand was the exact proof of it! So..., I scream Re-DO it!!
Yes, I made a sharp turn and decided to redo the guns. I didn't like the kit's supplied carriages from the beginning. First, they represent the Continental (French) pattern of carriages, while the Charles Royal Yacht was a British one. Then, the square axletree for the tracks, really? Also, the barrel supplied in the kit was a bit small for the caliber. Check this out on your own.
View attachment 395042 View attachment 395043
All this combined led me to make my carriages, just using the kit-supplied barrels. There is no need to repeat the process of making the carriages again, it was well described earlier in the log, Considering the small size of the entire canon, it turned out great, with additional details such as Linchpins, and Capsquare assembly (Capsquare Eyebolt, Capsquare joint bolt, and Capsquare key). It does look OK on the deck as well.
View attachment 395055 View attachment 395056
But...until the recent cleanup. Well, it happens...., I realized that the carriage looked out of scale (smaller), and the barrel's shape was a concern from the beginning. So unexpected event, made me reconsider, and I decided to redo the cannons.
First, I acquired new barrels. I couldn't find the exact size and bought a close match, but I mostly like the shape and how well they were CNC-turned: clean and accurate. The only drawback is the trunnion hole wasn't drilled off-center, but each barrel has its own turned trunnion (not the wire). The bore was the same size as the original barrels.
View attachment 395064
View attachment 395065
To avoid another mistake of creating the wrong size carriages, and make sure it will fit nicely, I made the model. By creating the model, I could learn and adjust the processes (if needed) for the rest of all 8 guns. The build process is divided into two parts: all wooden parts and metal parts. All parts made from wood are below. I tried to mimic all the parts the actual gun was made of.
View attachment 395066
To assemble everything, I made a simple jig. You guessed it right, I use my MF70 to mill the grooves for the front and hind axletrees. Also, the grooves for the tracks positioning. I must admit, the jig met all my expectations and served well at all stages, mostly drilling various holes...
View attachment 395070 View attachment 395071
One of the tasks, using the jig, is to adjust the height of the transom.
View attachment 395080 View attachment 395081
The tracks were held to the milling wise using the double-stick tape, then I made them all the same rights.
View attachment 395090
The wooden part has been completed, this is how the carriage looks assembled.
View attachment 395094 View attachment 395095
Will do the metal parts the next... Thank you for stopping by, to be continued...
thanks for the information and the pictures, it's very helpful


