Kurt Konrath
Kurt Konrath
Another great lesson in brass work from the gun master! 
 |
As a way to introduce our brass coins to the community, we will raffle off a free coin during the month of August. Follow link ABOVE for instructions for entering. |
 |
 |
The beloved Ships in Scale Magazine is back and charting a new course for 2026! Discover new skills, new techniques, and new inspirations in every issue. NOTE THAT OUR FIRST ISSUE WILL BE JAN/FEB 2026 |
 |
Greetings mon ami,my dear friend
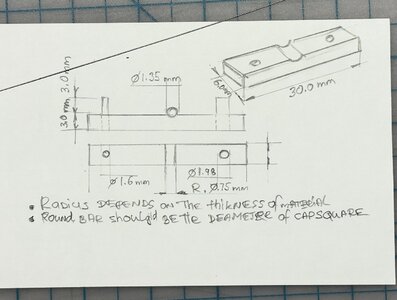
can you give us the bending jig dimensions. I will ask from a friend to Produce it for my personal use.
thanks


thanks my friend for the information, it will help me in the futureGreetings mon ami,
Here is the dimension of my jig. Remember this will make the capsquare for trunion size diameter 1.35mm, If your trunnion is larger diameter then you will need another jig. Also, the actual size should be calculated and adjusted based on the thickness of your material
View attachment 402211
Good morning Jim. Thank you for this lesson in cannon making. Brilliant and shows guys like me that even the tiniest details can be pulled off perfectly. Maybe one day when I have patience and skills my cannon will sort of resemble this. Cheers GrantGreetings fellow modelers. First, I'd like to express gratitude to all who show an interest in the build log, and your comments and reactions made.
Just to recall what we left off in our last session as part of the metalwork. We prepare the barrel by soldering the trunion and milling the touch hole. Here is the naval gun today.
View attachment 401937
Immediately, I wanted to see how the barrel would look under blackening and Royal emblem. I found that the blackening results greatly depend on how well you have cleaned the parts. If you look at the above image, you will see the barrel 'shines'... yes, it is because I use one of those abrasive brush nylon buffing/polishing wheels bought on Aliexpress. They come in various grits distinguished by colors. The 320 grit is great for cleaning oxidation and small imperfections, it will not 'eat' the pattern, while the 600 grit wheel is great for polishing.
View attachment 401938
Here is the link, in case someone considers using them
Back to the blackening barrel... After using the polishing wheel, I used the steel wool on those parts the wheel couldn't be reached. To finish with cleaning, I use Windex and the old toothbrush, following the rinse with clean water. To blacken, I use a Brasblack solution diluted with water. To finish with the barrel, I glued the Royal emblem and lightly brushed it with graphite powder. Below is the result.
View attachment 401939
The next logical step is to make the capsquare itself and all the parts to attach it. I use the brass strip from my stash 1.00mm wide and 0.3mm thick. It was obvious I would need a few more jigs to make the work easy. Let's start with drilling/milling jig. A scrap of pearwood is used to mill the grove exactly 1.00mm wide and 0.3mm deep (as the dimension of my strip) so the strip can just slide while in place. The top slides along the jig and the miniature bolt holds the brass plate while machining.
View attachment 401940
View attachment 401941
Here is the enlarged view. Please note the notches, the first two will be used later when we need to bend. The Third one is where we need to drill the hole and the last one is the length of the capsquare workpiece (blank).
View attachment 401943
Now we can do some machining. Originally, I planned to use just a hole to mimic Capsquare Joint Bolt, but lately, I have a decision to make it real. I used a 0.2mm endmill to mill the grove. Also, the hole was drilled using the same endmill and then enlarged with a 0.35mm drill bit. Below are photos to depict the process.
View attachment 401944
View attachment 401945
Milling was rather time-consuming because of the tiny endmill, I couldn't plunge too deep and move too fast. But...the results were fully satisfactory and I didn't regret spending time making them. While the blank in the jig, I made saw the mark notches, later, they will serve as the guide while bending.
View attachment 401948
The next is to make a bending jig. I have made those in the past, so this was not difficult just a different size. The image is self-explanatory. It will work like a press.
View attachment 401951
View attachment 401952 View attachment 401953
Here is the jig in 'action' The blanks are oriented exactly where the saw notches in the middle. In the image, they are on the bottom so you cannot see them.
View attachment 401954
Carefully close the jig (not to move the blank), and squeeze the entire jig in the wise. Ever wonder what happened? Check the next image. After some time you have some capsquares ready for blackening.
View attachment 401956
View attachment 401958
View attachment 401959
I have rather big fingers... To be continued... later today
That's why I asked.Likely (for me), she has only 8 cannons.
Thank you, my across-the-Hudson, friend!Hey Jim,
Super job. The scale and precision is really impressive! I do know in some cases the time it takes to make a jig can some times exceed the time it takes to make the pieces with the jig. Value of course is uniform quality.
A couple of questions on your capsquare jig.
1) Did you tap and thread the posts to the positive side? If not, how are they fixed?
2) Why different post diameters? Am I missing something? I don't see any directional dependency.
3) What material did you use for this jig?
Time consuming steps, but the results clearly justify the investment! Even more importantly, thanks for sharing your methods. It helps all of us become better modelers.
Cheers!

Thanks Jim. Like an engineer, concise and clear explanation. I will be using this myself in future tasks. Thanks again mate!Thank you, my across-the-Hudson, friend!
I will be glad to answer all those questions but in reverse order.
3. I use leftover steel from my previous order. Brass and plexiglass will do as well. However, if you want to make a reusable tool, low-carbon (regular not machine-use) steel will do.
2. The posts are used as direction guides and different diameters are used for easy identification left and right sides of the jig. Technically, if you mark the sides on your jig (L and R), the same diameter posts can be used.
1. The posts are not threaded, only tightly fit into the holes.
Here is how I do it: Both, blank sides are glued with a dob of CA glue on one of the edges. Drill both holes with the slightly smaller diameter of your posts. Then, the positive part was drilled on the left side hole using the same drill bit diameter as your post, but not entirely. I left some meat so I could press the post. No thread or glue is required. Same operation with the right side post. Those are just the direction guides, no physical pressure on them.
Thank you again for your questions.

I am here, like the majority of us, to learn and share my own knowledge with others.Thanks Jim. Like an engineer, concise and clear explanation. I will be using this myself in future tasks. Thanks again mate!
Thank you, Nigel. Yeah...the most valuable upgrade was the new spindle to support the ER11 Colet system. Massive varieties of endmills are based on 4.00mm shanks so upgrading to a new colet system allows me to use from 1.00mm to 8.00 (never used). The max shank diameter I ever use on MF70 is 6.00mm.Very impressive work Jim. Also impressed that you have tweaked the MF70 so well you can use 0.2mm milling cutters!
Mine is twelve? years old, screams like a banshee and has too much run out. Can't decide if to replace or strip it down and pimp it out. Only concern is the motor is past it's sell by date..
Much appreciated, Mon ami! I am also learning myself, and happy to know woodworking or metalsmith work to use in scale modeling from members like you. Members of our forum strive to help each other and happily share their knowledge. This is awesome! I am really proud to be a part of the team!Hello Jim my friend, thank you very much for sharing. For someone like me and probably some others who are at the very beginning of metalwork, this is very helpful. Really amazing work on the guns and the tiny details.
 Those are guilty of my New Year earlier present.
What a lovely gift of a lovely coupleTo a healthy, happy, and peaceful New Year.May your holiday celebrations sparkle with precious moments of laughter, love, and goodwill. I wish you a year full of contentment and joy, and I can't wait to hear from you in the New Year!
View attachment 416529Those are guilty of my New Year earlier present.
View attachment 416530
Mappy New Year and thank you for following my build log. !
