This is a very good job, Jimsky. Thanks for sharing this knowledge and work.Good evening, all.
Many thanks to all of you for your comments and 'likes'! I am happy you supported my decision to re-do and follow along with the log updates! I am also happy that some of you may use the techniques described here in your current or future builds.
I have a few hours in the evening so I can continue with the cannons re-do. A few days back, we completed the wooden part of the gun, and today, we will start the metal components part. We will make all the parts from scratch (except the barrels which I bought). So, let's begin with the barrels.
The barrels come with the trunnion also turned CNC (a nice touch). I will use the hard (easy) solder and torch to solder trunnion into the barrel. Using the cut-out dick to make a deep groove for a piece of solder. This way the solder will melt inside the barrel making the outside nice and clean. The spots you are seeing in the below (right) image are oxidation as a result of heat.
View attachment 395481 View attachment 395482
While the barrel was still hot, I gave it a bath of vinegar, to remove accumulated oxidation. Vinegar acts as the acid and cleans brass. One of the barrel enhancements is to make the Pan (touch hole or vent). The problem, however, is I would have to use 0.2mm endmil. I do have such a mill but only one and was afraid to break it. But... I succeeded without fail. I like the results. what about you?
View attachment 395483
Here is how the gun looks today after fitting the barrel on the carriage.
View attachment 395484
I couldn't resist trying out this gun (as is) on the model to make sure it fit on the deck and in harmony with the rest. I think it looks better...but we shall see once the gun is fully assembled.
View attachment 395485
That's all for this evening, folks. Yeah, the time flies... Thanks again, all to be continued...
P.S. The last image to answer the question of Yuri @Y.T. How I made multiple parts at once. The photo should explain.
View attachment 395486
-

Win a Free Custom Engraved Brass Coin!!!
As a way to introduce our brass coins to the community, we will raffle off a free coin during the month of August. Follow link ABOVE for instructions for entering.
-

PRE-ORDER SHIPS IN SCALE TODAY!
The beloved Ships in Scale Magazine is back and charting a new course for 2026!
Discover new skills, new techniques, and new inspirations in every issue.
NOTE THAT OUR FIRST ISSUE WILL BE JAN/FEB 2026
You are using an out of date browser. It may not display this or other websites correctly.
You should upgrade or use an alternative browser.
You should upgrade or use an alternative browser.
Charles Royal Yacht, 1674, Scale 1:64, by Woody Joe (Japan)
Thank you, Vic. Honestly, I was also afraid to mill such a tiny line on the metal. But, I feed extremely slowly and do not plunge the endmill too deep. The part is firmly held in the machine vise. I also use one of those magnifying lenses (below) to control the job. I don't know how much magnifying it does, but together with my overhead magnifying 2.0x it works OK.Nice job, Jim! I would be afraid to drill the touch hole. I’m finding it hard to find good tiny bits. I guard the one I have with my life! Where do you get your bits?

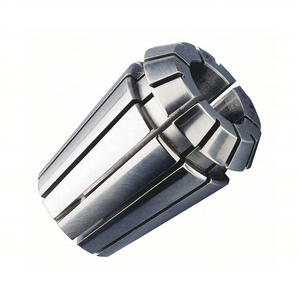
I should say that most (if not all) of my endmills, I buy from Aliexpress. They are an excellent quality to mill wood and non-ferrous metals (brass, copper), and they are much more affordable if sourced elsewhere. My biggest upgrade to the MF70 is the replacement of the spindle with an ER11 collet, this is not just a fancy name, it enables to use of a broad variety of endmills. For example, on a 4.0mm shank, you can have mills from 0.2 to 4.0mm. That means you can use all the bits in this range without changing the collet. And yes, they are a decent quality for our hobby. we recently had a discussion about where we purchase our still bits. I will try to find it...
Thanks again.
That must be a pretty amazing collet. Do you have a picture?Thank you, Vic. Honestly, I was also afraid to mill such a tiny line on the metal. But, I feed extremely slowly and do not plunge the endmill too deep. The part is firmly held in the machine vise. I also use one of those magnifying lenses (below) to control the job. I don't know how much magnifying it does, but together with my overhead magnifying 2.0x it works OK.
View attachment 395554
I should say that most (if not all) of my endmills, I buy from Aliexpress. They are an excellent quality to mill wood and non-ferrous metals (brass, copper), and they are much more affordable if sourced elsewhere. My biggest upgrade to the MF70 is the replacement of the spindle with an ER11 collet, this is not just a fancy name, it enables to use of a broad variety of endmills. For example, on a 4.0mm shank, you can have mills from 0.2 to 4.0mm. That means you can use all the bits in this range without changing the collet. And yes, they are a decent quality for our hobby. we recently had a discussion about where we purchase our still bits. I will try to find it...
Thanks again.
What a beautiful work Jimy, I look forward to further updates to learn a lot more. Oh yes, I am sitting next to Roger because he is not alone on the side he has chosen.
Thank you, mein Freund. There are plenty of seats today, as many members left this log due to long-time inactivity. and you are most welcome.What a beautiful work Jimy, I look forward to further updates to learn a lot more. Oh yes, I am sitting next to Roger because he is not alone on the side he has chosen.
Thank you, Mirek. I mentioned in my different posts that my Proxxon mill became my table tool, I mean it is always next to my right hand and ready to execute tasks. Definitely not a master, but I learn every day something new from other members who know the milling job better. Also, the lack having other mechanical tools, like a lathe, makes me sink a bit 'out of the box'Witaj
Piękna praca z lufami i wózkami . Jesteś mistrzem frezowani umiesz wykorzystać narzędzia którymi dysponujesz . Pozdrawiam Mirek
I am preparing some images for the next step in re-doing the naval guns and will post them in a few days... Stay tuned.
Greetings fellow modelers. First, I'd like to express gratitude to all who show an interest in the build log, and your comments and reactions made.
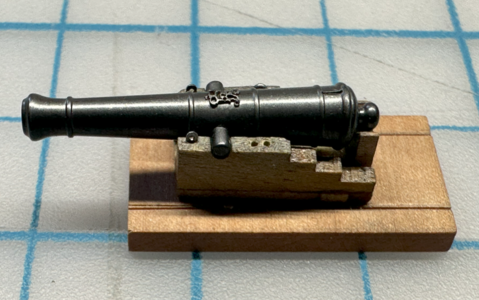
Just to recall what we left off in our last session as part of the metalwork. We prepare the barrel by soldering the trunion and milling the touch hole. Here is the naval gun today.

Immediately, I wanted to see how the barrel would look under blackening and Royal emblem. I found that the blackening results greatly depend on how well you have cleaned the parts. If you look at the above image, you will see the barrel 'shines'... yes, it is because I use one of those abrasive brush nylon buffing/polishing wheels bought on Aliexpress. They come in various grits distinguished by colors. The 320 grit is great for cleaning oxidation and small imperfections, it will not 'eat' the pattern, while the 600 grit wheel is great for polishing.
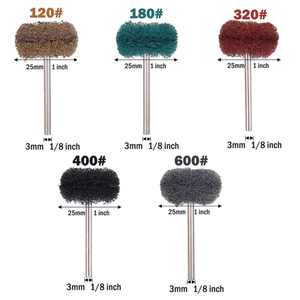
Here is the link, in case someone considers using them
Back to the blackening barrel... After using the polishing wheel, I used the steel wool on those parts the wheel couldn't be reached. To finish with cleaning, I use Windex and the old toothbrush, following the rinse with clean water. To blacken, I use a Brasblack solution diluted with water. To finish with the barrel, I glued the Royal emblem and lightly brushed it with graphite powder. Below is the result.
The next logical step is to make the capsquare itself and all the parts to attach it. I use the brass strip from my stash 1.00mm wide and 0.3mm thick. It was obvious I would need a few more jigs to make the work easy. Let's start with drilling/milling jig. A scrap of pearwood is used to mill the grove exactly 1.00mm wide and 0.3mm deep (as the dimension of my strip) so the strip can just slide while in place. The top slides along the jig and the miniature bolt holds the brass plate while machining.
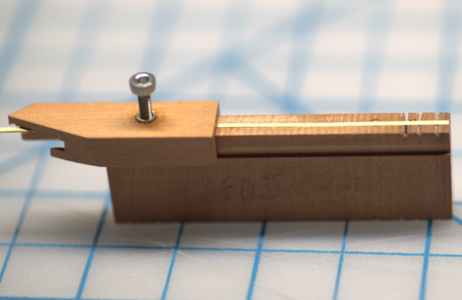
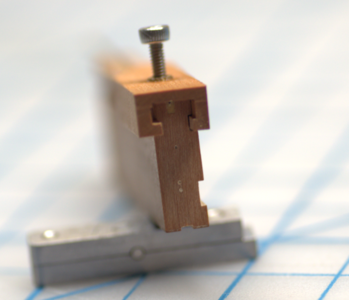
Here is the enlarged view. Please note the notches, the first two will be used later when we need to bend. The Third one is where we need to drill the hole and the last one is the length of the capsquare workpiece (blank).
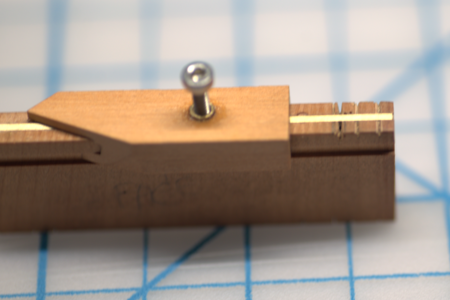
Now we can do some machining. Originally, I planned to use just a hole to mimic Capsquare Joint Bolt, but lately, I have a decision to make it real. I used a 0.2mm endmill to mill the grove. Also, the hole was drilled using the same endmill and then enlarged with a 0.35mm drill bit. Below are photos to depict the process.
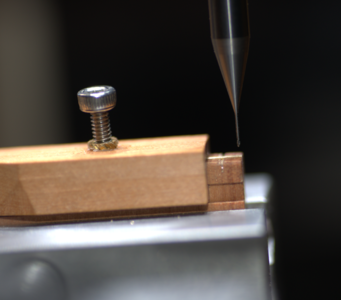
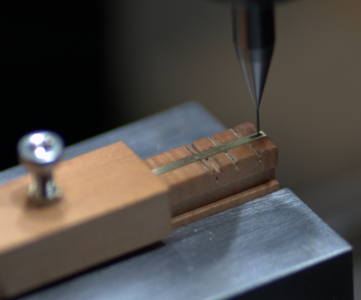
Milling was rather time-consuming because of the tiny endmill, I couldn't plunge too deep and move too fast. But...the results were fully satisfactory and I didn't regret spending time making them. While the blank in the jig, I made saw the mark notches, later, they will serve as the guide while bending.
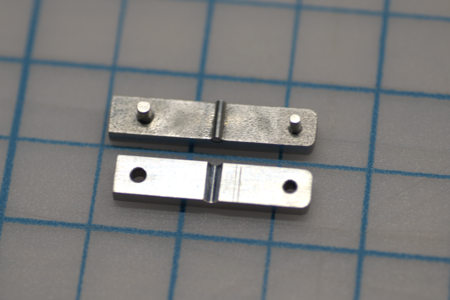
The next is to make a bending jig. I have made those in the past, so this was not difficult just a different size. The image is self-explanatory. It will work like a press.
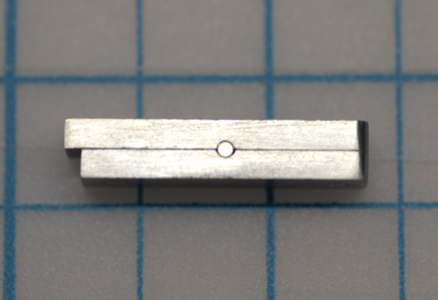
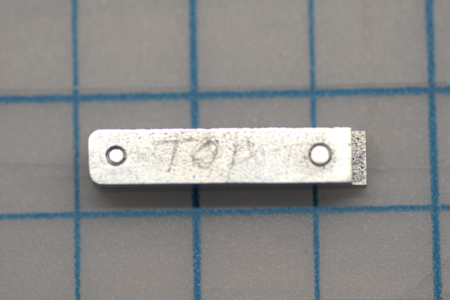
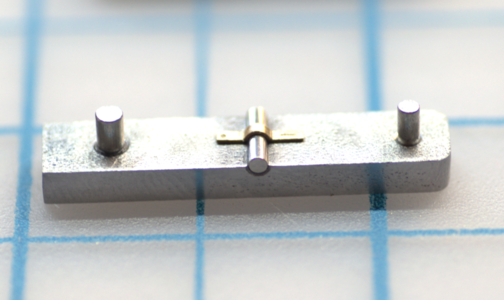
Here is the jig in 'action' The blanks are oriented exactly where the saw notches in the middle. In the image, they are on the bottom so you cannot see them.
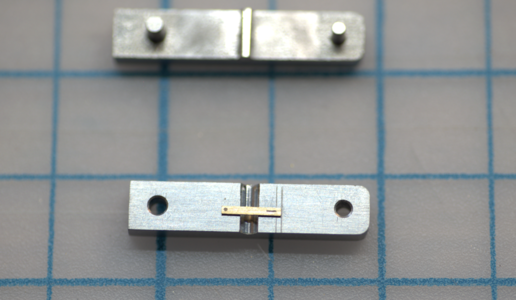
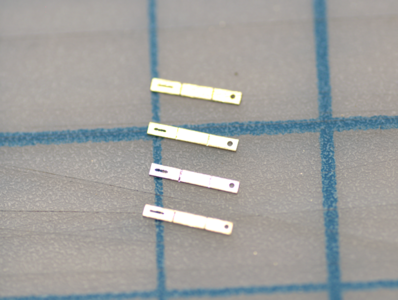
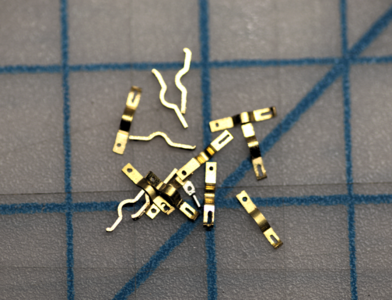
Carefully close the jig (not to move the blank), and squeeze the entire jig in the wise. Ever wonder what happened? Check the next image. After some time you have some capsquares ready for blackening.
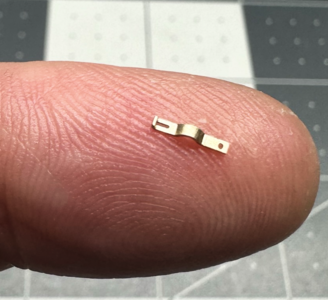
I have rather big fingers... To be continued... later today
Just to recall what we left off in our last session as part of the metalwork. We prepare the barrel by soldering the trunion and milling the touch hole. Here is the naval gun today.

Immediately, I wanted to see how the barrel would look under blackening and Royal emblem. I found that the blackening results greatly depend on how well you have cleaned the parts. If you look at the above image, you will see the barrel 'shines'... yes, it is because I use one of those abrasive brush nylon buffing/polishing wheels bought on Aliexpress. They come in various grits distinguished by colors. The 320 grit is great for cleaning oxidation and small imperfections, it will not 'eat' the pattern, while the 600 grit wheel is great for polishing.

Here is the link, in case someone considers using them
Back to the blackening barrel... After using the polishing wheel, I used the steel wool on those parts the wheel couldn't be reached. To finish with cleaning, I use Windex and the old toothbrush, following the rinse with clean water. To blacken, I use a Brasblack solution diluted with water. To finish with the barrel, I glued the Royal emblem and lightly brushed it with graphite powder. Below is the result.

The next logical step is to make the capsquare itself and all the parts to attach it. I use the brass strip from my stash 1.00mm wide and 0.3mm thick. It was obvious I would need a few more jigs to make the work easy. Let's start with drilling/milling jig. A scrap of pearwood is used to mill the grove exactly 1.00mm wide and 0.3mm deep (as the dimension of my strip) so the strip can just slide while in place. The top slides along the jig and the miniature bolt holds the brass plate while machining.


Here is the enlarged view. Please note the notches, the first two will be used later when we need to bend. The Third one is where we need to drill the hole and the last one is the length of the capsquare workpiece (blank).

Now we can do some machining. Originally, I planned to use just a hole to mimic Capsquare Joint Bolt, but lately, I have a decision to make it real. I used a 0.2mm endmill to mill the grove. Also, the hole was drilled using the same endmill and then enlarged with a 0.35mm drill bit. Below are photos to depict the process.


Milling was rather time-consuming because of the tiny endmill, I couldn't plunge too deep and move too fast. But...the results were fully satisfactory and I didn't regret spending time making them. While the blank in the jig, I made saw the mark notches, later, they will serve as the guide while bending.

The next is to make a bending jig. I have made those in the past, so this was not difficult just a different size. The image is self-explanatory. It will work like a press.


Here is the jig in 'action' The blanks are oriented exactly where the saw notches in the middle. In the image, they are on the bottom so you cannot see them.

Carefully close the jig (not to move the blank), and squeeze the entire jig in the wise. Ever wonder what happened? Check the next image. After some time you have some capsquares ready for blackening.


I have rather big fingers... To be continued... later today
Fantastic!
- Joined
- Apr 20, 2020
- Messages
- 6,255
- Points
- 738

my dear friend, thank you very much for the information and the pictures, it's very helpfulGreetings fellow modelers. First, I'd like to express gratitude to all who show an interest in the build log, and your comments and reactions made.
Just to recall what we left off in our last session as part of the metalwork. We prepare the barrel by soldering the trunion and milling the touch hole. Here is the naval gun today.
View attachment 401937
Immediately, I wanted to see how the barrel would look under blackening and Royal emblem. I found that the blackening results greatly depend on how well you have cleaned the parts. If you look at the above image, you will see the barrel 'shines'... yes, it is because I use one of those abrasive brush nylon buffing/polishing wheels bought on Aliexpress. They come in various grits distinguished by colors. The 320 grit is great for cleaning oxidation and small imperfections, it will not 'eat' the pattern, while the 600 grit wheel is great for polishing.
View attachment 401938
Here is the link, in case someone considers using them
Back to the blackening barrel... After using the polishing wheel, I used the steel wool on those parts the wheel couldn't be reached. To finish with cleaning, I use Windex and the old toothbrush, following the rinse with clean water. To blacken, I use a Brasblack solution diluted with water. To finish with the barrel, I glued the Royal emblem and lightly brushed it with graphite powder. Below is the result.
View attachment 401939
The next logical step is to make the capsquare itself and all the parts to attach it. I use the brass strip from my stash 1.00mm wide and 0.3mm thick. It was obvious I would need a few more jigs to make the work easy. Let's start with drilling\milling jig. A scrap of pearwood is used to mill the grove exactly 1.00mm wide and 0.3mm deep (as the dimension of my strip) so the strip can just slide while in place. The top slides along the jig and the miniature bolt holds the brass plate while machining.
View attachment 401940
View attachment 401941
Here is the enlarged view. Please note the notches, the first two will be used later when we need to bend. The Third one is where we need to drill the hole and the last one is the length of the capsquare workpiece (blank).
View attachment 401943
Now we can do some machining. Originally, I planned to use just a hole to mimic Capsquare Joint Bolt, but lately, I have a decision to make it real. I used a 0.2mm endmill to mill the grove. Also, the hole was drilled using the same endmill and then enlarged with a 0.35mm drill bit. Below are photos to depict the process.
View attachment 401944
View attachment 401945
Milling was rather time-consuming because of the tiny endmill, I couldn't plunge too deep and move too fast. But...the results were fully satisfactory and I didn't regret spending time making them. While the blank in the jig, I made saw the mark notches, later, they will serve as the guide while bending.
View attachment 401948
The next is to make a bending jig. I have made those in the past, so this was not difficult just a different size. The image is self-explanatory. It will work like a press.
View attachment 401951
View attachment 401952 View attachment 401953
Here is the jig in 'action' The blanks are oriented exactly where the saw notches in the middle. In the image, they are on the bottom so you cannot see them.
View attachment 401954
Carefully close the jig (not to move the blank), and squeeze the entire jig in the wise. Ever wonder what happened? Check the next image. After some time you have some capsquares ready for blackening.
View attachment 401956
View attachment 401958
View attachment 401959
I have a rather large finger... To be continued... later today
Jimsky, I am beginning to think you are the cannon master! Nobody makes cannon and carriage assemblies better than you! 
Beautiful workmanship Jimsky,Greetings fellow modelers. First, I'd like to express gratitude to all who show an interest in the build log, and your comments and reactions made.
Just to recall what we left off in our last session as part of the metalwork. We prepare the barrel by soldering the trunion and milling the touch hole. Here is the naval gun today.
View attachment 401937
Immediately, I wanted to see how the barrel would look under blackening and Royal emblem. I found that the blackening results greatly depend on how well you have cleaned the parts. If you look at the above image, you will see the barrel 'shines'... yes, it is because I use one of those abrasive brush nylon buffing/polishing wheels bought on Aliexpress. They come in various grits distinguished by colors. The 320 grit is great for cleaning oxidation and small imperfections, it will not 'eat' the pattern, while the 600 grit wheel is great for polishing.
View attachment 401938
Here is the link, in case someone considers using them
Back to the blackening barrel... After using the polishing wheel, I used the steel wool on those parts the wheel couldn't be reached. To finish with cleaning, I use Windex and the old toothbrush, following the rinse with clean water. To blacken, I use a Brasblack solution diluted with water. To finish with the barrel, I glued the Royal emblem and lightly brushed it with graphite powder. Below is the result.
View attachment 401939
The next logical step is to make the capsquare itself and all the parts to attach it. I use the brass strip from my stash 1.00mm wide and 0.3mm thick. It was obvious I would need a few more jigs to make the work easy. Let's start with drilling/milling jig. A scrap of pearwood is used to mill the grove exactly 1.00mm wide and 0.3mm deep (as the dimension of my strip) so the strip can just slide while in place. The top slides along the jig and the miniature bolt holds the brass plate while machining.
View attachment 401940
View attachment 401941
Here is the enlarged view. Please note the notches, the first two will be used later when we need to bend. The Third one is where we need to drill the hole and the last one is the length of the capsquare workpiece (blank).
View attachment 401943
Now we can do some machining. Originally, I planned to use just a hole to mimic Capsquare Joint Bolt, but lately, I have a decision to make it real. I used a 0.2mm endmill to mill the grove. Also, the hole was drilled using the same endmill and then enlarged with a 0.35mm drill bit. Below are photos to depict the process.
View attachment 401944
View attachment 401945
Milling was rather time-consuming because of the tiny endmill, I couldn't plunge too deep and move too fast. But...the results were fully satisfactory and I didn't regret spending time making them. While the blank in the jig, I made saw the mark notches, later, they will serve as the guide while bending.
View attachment 401948
The next is to make a bending jig. I have made those in the past, so this was not difficult just a different size. The image is self-explanatory. It will work like a press.
View attachment 401951
View attachment 401952 View attachment 401953
Here is the jig in 'action' The blanks are oriented exactly where the saw notches in the middle. In the image, they are on the bottom so you cannot see them.
View attachment 401954
Carefully close the jig (not to move the blank), and squeeze the entire jig in the wise. Ever wonder what happened? Check the next image. After some time you have some capsquares ready for blackening.
View attachment 401956
View attachment 401958
View attachment 401959
I have rather big fingers... To be continued... later today
Did you anneal the brass before you pressed it?
Cheers,
Stephen.
Amazing, Jimsky. Looks like a masterpiece. How many cannons she has?Greetings fellow modelers. First, I'd like to express gratitude to all who show an interest in the build log, and your comments and reactions made.
Just to recall what we left off in our last session as part of the metalwork. We prepare the barrel by soldering the trunion and milling the touch hole. Here is the naval gun today.
View attachment 401937
Immediately, I wanted to see how the barrel would look under blackening and Royal emblem. I found that the blackening results greatly depend on how well you have cleaned the parts. If you look at the above image, you will see the barrel 'shines'... yes, it is because I use one of those abrasive brush nylon buffing/polishing wheels bought on Aliexpress. They come in various grits distinguished by colors. The 320 grit is great for cleaning oxidation and small imperfections, it will not 'eat' the pattern, while the 600 grit wheel is great for polishing.
View attachment 401938
Here is the link, in case someone considers using them
Back to the blackening barrel... After using the polishing wheel, I used the steel wool on those parts the wheel couldn't be reached. To finish with cleaning, I use Windex and the old toothbrush, following the rinse with clean water. To blacken, I use a Brasblack solution diluted with water. To finish with the barrel, I glued the Royal emblem and lightly brushed it with graphite powder. Below is the result.
View attachment 401939
The next logical step is to make the capsquare itself and all the parts to attach it. I use the brass strip from my stash 1.00mm wide and 0.3mm thick. It was obvious I would need a few more jigs to make the work easy. Let's start with drilling/milling jig. A scrap of pearwood is used to mill the grove exactly 1.00mm wide and 0.3mm deep (as the dimension of my strip) so the strip can just slide while in place. The top slides along the jig and the miniature bolt holds the brass plate while machining.
View attachment 401940
View attachment 401941
Here is the enlarged view. Please note the notches, the first two will be used later when we need to bend. The Third one is where we need to drill the hole and the last one is the length of the capsquare workpiece (blank).
View attachment 401943
Now we can do some machining. Originally, I planned to use just a hole to mimic Capsquare Joint Bolt, but lately, I have a decision to make it real. I used a 0.2mm endmill to mill the grove. Also, the hole was drilled using the same endmill and then enlarged with a 0.35mm drill bit. Below are photos to depict the process.
View attachment 401944
View attachment 401945
Milling was rather time-consuming because of the tiny endmill, I couldn't plunge too deep and move too fast. But...the results were fully satisfactory and I didn't regret spending time making them. While the blank in the jig, I made saw the mark notches, later, they will serve as the guide while bending.
View attachment 401948
The next is to make a bending jig. I have made those in the past, so this was not difficult just a different size. The image is self-explanatory. It will work like a press.
View attachment 401951
View attachment 401952 View attachment 401953
Here is the jig in 'action' The blanks are oriented exactly where the saw notches in the middle. In the image, they are on the bottom so you cannot see them.
View attachment 401954
Carefully close the jig (not to move the blank), and squeeze the entire jig in the wise. Ever wonder what happened? Check the next image. After some time you have some capsquares ready for blackening.
View attachment 401956
View attachment 401958
View attachment 401959
I have rather big fingers... To be continued... later today
Last edited:
- Joined
- Apr 20, 2020
- Messages
- 6,255
- Points
- 738

my dear friendGreetings fellow modelers. First, I'd like to express gratitude to all who show an interest in the build log, and your comments and reactions made.
Just to recall what we left off in our last session as part of the metalwork. We prepare the barrel by soldering the trunion and milling the touch hole. Here is the naval gun today.
View attachment 401937
Immediately, I wanted to see how the barrel would look under blackening and Royal emblem. I found that the blackening results greatly depend on how well you have cleaned the parts. If you look at the above image, you will see the barrel 'shines'... yes, it is because I use one of those abrasive brush nylon buffing/polishing wheels bought on Aliexpress. They come in various grits distinguished by colors. The 320 grit is great for cleaning oxidation and small imperfections, it will not 'eat' the pattern, while the 600 grit wheel is great for polishing.
View attachment 401938
Here is the link, in case someone considers using them
Back to the blackening barrel... After using the polishing wheel, I used the steel wool on those parts the wheel couldn't be reached. To finish with cleaning, I use Windex and the old toothbrush, following the rinse with clean water. To blacken, I use a Brasblack solution diluted with water. To finish with the barrel, I glued the Royal emblem and lightly brushed it with graphite powder. Below is the result.
View attachment 401939
The next logical step is to make the capsquare itself and all the parts to attach it. I use the brass strip from my stash 1.00mm wide and 0.3mm thick. It was obvious I would need a few more jigs to make the work easy. Let's start with drilling/milling jig. A scrap of pearwood is used to mill the grove exactly 1.00mm wide and 0.3mm deep (as the dimension of my strip) so the strip can just slide while in place. The top slides along the jig and the miniature bolt holds the brass plate while machining.
View attachment 401940
View attachment 401941
Here is the enlarged view. Please note the notches, the first two will be used later when we need to bend. The Third one is where we need to drill the hole and the last one is the length of the capsquare workpiece (blank).
View attachment 401943
Now we can do some machining. Originally, I planned to use just a hole to mimic Capsquare Joint Bolt, but lately, I have a decision to make it real. I used a 0.2mm endmill to mill the grove. Also, the hole was drilled using the same endmill and then enlarged with a 0.35mm drill bit. Below are photos to depict the process.
View attachment 401944
View attachment 401945
Milling was rather time-consuming because of the tiny endmill, I couldn't plunge too deep and move too fast. But...the results were fully satisfactory and I didn't regret spending time making them. While the blank in the jig, I made saw the mark notches, later, they will serve as the guide while bending.
View attachment 401948
The next is to make a bending jig. I have made those in the past, so this was not difficult just a different size. The image is self-explanatory. It will work like a press.
View attachment 401951
View attachment 401952 View attachment 401953
Here is the jig in 'action' The blanks are oriented exactly where the saw notches in the middle. In the image, they are on the bottom so you cannot see them.
View attachment 401954
Carefully close the jig (not to move the blank), and squeeze the entire jig in the wise. Ever wonder what happened? Check the next image. After some time you have some capsquares ready for blackening.
View attachment 401956
View attachment 401958
View attachment 401959
I have rather big fingers... To be continued... later today
can you give us the bending jig dimensions. I will ask from a friend to Produce it for my personal use.
thanks
Thank you, Steve. No, I didn't anneal the brass. It is 0.3mm thick, Also, I have cut notches to ease the bents.Beautiful workmanship Jimsky,
Did you anneal the brass before you pressed it?
Cheers,
Stephen.
Likely (for me)Amazing, Jimsky. Looks like a masterpiece. How many cannons she has?
Greetings, Shota. I have no problem and will give you the dimensions for the jig. However, this jig can make capsquares only for the cannon size with a trunnion size of 1.4 mm~1.5 mm. For larger trunnion sizes, you will need another jig. I will post the sizes a bit later, today.my dear friend
can you give us the bending jig dimensions. I will ask from a friend to Produce it for my personal use.
thanks


