-

Win a Free Custom Engraved Brass Coin!!!
As a way to introduce our brass coins to the community, we will raffle off a free coin during the month of August. Follow link ABOVE for instructions for entering.
-

PRE-ORDER SHIPS IN SCALE TODAY!
The beloved Ships in Scale Magazine is back and charting a new course for 2026!
Discover new skills, new techniques, and new inspirations in every issue.
NOTE THAT OUR FIRST ISSUE WILL BE JAN/FEB 2026
You are using an out of date browser. It may not display this or other websites correctly.
You should upgrade or use an alternative browser.
You should upgrade or use an alternative browser.
Colonial Schooner Sultana
- Thread starter Dave Stevens (Lumberyard)
- Start date
- Watchers 19
-
- Tags
- 1:48 colonial schooner sultana
A quick note- when you have dents in your softwood, aslong as they are not super-compressed, you can raise that grain by wetting the wood then ironing it with some heat. Try it on a similar piece of scrap to see what you think....When the hull has been shaped it is time to add the stem and keel.
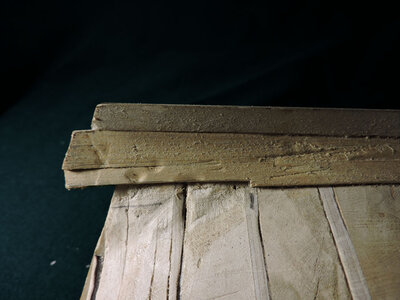
Before working on the keel a few words about the wood being used. Plank on frame model builders and scratch builders will select woods like Maple, Beech, Cherry, Pearwood, Boxwood and in general hardwoods. Softwood like Basswood, Cedar, Pine and softwoods are usually avoided. For one reason softwoods break easy and difficult to use clamps. As an example the picture shows what happens when you clamp a softwood like Basswood, it leaves a dent in the wood that does not come out. On the positive side softwoods are easy to cut by hand, sand and bend. Hardwood will take a nice finish softwoods do not. Softwood do not machine well and do not leave a sharp edge hardwood do. Harwoods are difficult to work with hand tools softwoods work well with hand tools.
View attachment 351351
there are work arounds when using softwood like rather than clamp the wood taping it works just as well.
View attachment 351348
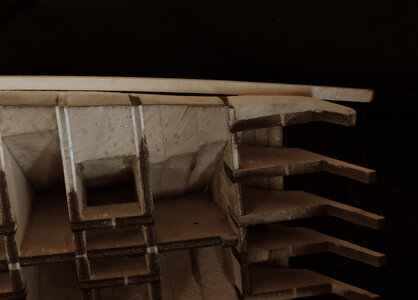
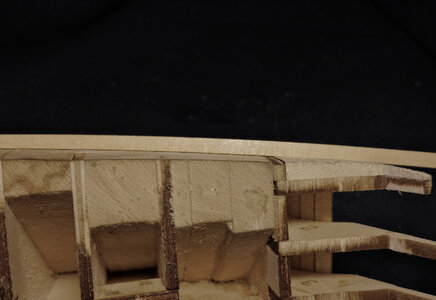
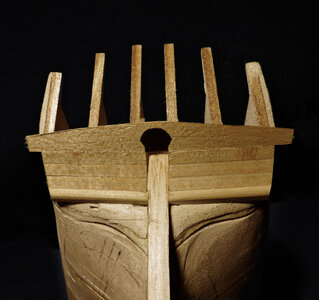
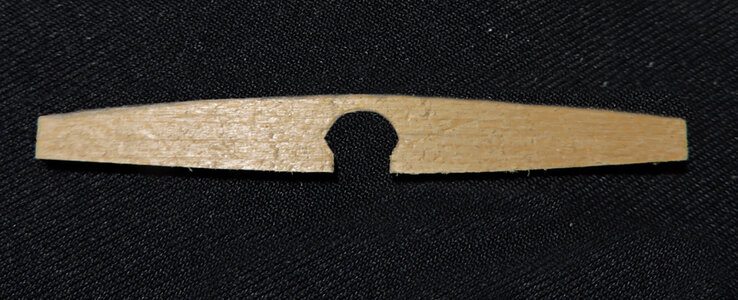
What is going on here is building up the stem and keel leaving off the stern post that will be added later in the build. A channel is cut into the sten and keel of a ship for the gardboard plank to fit into and the ends of the planks at the stem. Rather than trying to cut the rabbit into the keel a 1/16 square strip of wood is used and it runs down the center of the stem and keel creating a channel or rabbit for the planking.
View attachment 351347
the little sticks at the top of the stem are temporarily glued to the profile piece to center the stem. They will be removed later.
View attachment 351350
View attachment 351349
- Joined
- Dec 1, 2016
- Messages
- 6,383
- Points
- 728

what is needed to plank the Sultana hull are three sizes of planking wide planks for the gardboard, planks for the bottom planking and the upper hull planking. It is very common for kits to provide just one width of planking when actually for a proper planking job you need a wide plank to cut the shape of the gardboard then wide planks for the bottom of the hull to cut and shape then the upper part of the hull are the narrowest planks.
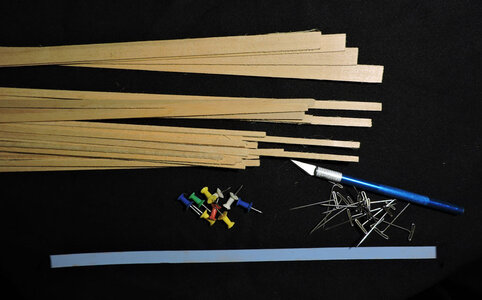
To begin you will need cardboard to cut out patterns. I use the card board boxes from dry cereal boxes, product packing, gift boxed or any thin cardboard. Also some push pins, T pins and a knife. For glue i will be using 5 minute epoxy and Super glue
f
Planking a hull from what i read on forums is the hard part of a build and i have seen some creative ways of planking
first rule of planking
On a vessel's hull, a strake is a longitudinal course of planking which runs from the boat's stem to the sternpost or transom, a strake does not stop short of the stem or stern posts nor does a strake end under the wales or the planking above it, a strake runs full length of the hull.
A common question i see is when planking a hull do you start from the keel and work up to the top of the hull or start at the top and work down to the keel? and the answer is both directions. What you are actually doing is working to a shutter plank which is a strake or two under the main wales or sheer molding.
over the years i have planked hulls in a number of different woods from soft to hard. One of the best hull planking wood i used is Poplar a common wood you can find in most home improvement stores or local lumber dealers. Poplar is at the softer end of the hardwoods but harder than softwoods. Other wood i found suitable are Basswood, Aspin, Willow and Alaskan Yellow Cedar which for some reason is just a trade name the wood is actually Cypress and not a Cedar.
pros and cons
hardwood make nice looking planked hulls Boxwood, Cherry, Walnut, Maple and others. When planking the hull every plank has to be tapered or cut and shaped to fit. Hardwoods are difficult to cut with a knife. Also hardwood give a hard and sharp edge so the joinery between planks have to be spot on or every little flaw shows. Hardwood are harder to bend some will not bend at all.
Softer wood will cut with a knife so much easier than hardwoods and because they are softer you can push a planks tighter together, the softer wood will give a little conforming to the edge. Most softwoods tend to be bendable a wood like Willow is strong and takes extreme bending.
Poplar has a stark contrast between the sapwood and heartwood, The sapwood is an off white and the heartwood can range from green to tan and streaks of color. The green heartwood will change from green to tan when exposed to sunlight. The wood is very workable with with small hand tools. You can plank with the lighter cream colored sapwood or the tan color heartwood.
Basswood bends and cuts nice with a knife the color is uniform, glues well and bends without much trouble, if the bending is not to extreme it can be bent dry. One problem with Basswood and all soft woods they tend to dent easy from clamping. As Phil mentioned if the dent is not to deep you can try to wet the wood and raise up the dent. Often the pressure need when clamping a plank it will crush the wood fibers and you will not be able to remove a dent other than sanding it out. This is a reason i use Super Glue it does not need clamps to hold a plank in place, you can hold it there for 15 seconds with just your fingers and that does not leave dents.
Alaskan yellow cedar (cypress) has a fine grain, cuts and finishes nice, test the glue because glued joints tends to come apart because of the natural oil in the wood it gives a waxy surface that glue does not like to stick to. The yellow color fades in time to light cream or gray, using a wood finish might help to hold the yellow color i have not tested that so i don't know for sure. i do know from older boards i have in the barn the yellow does fade away.
Alaskan yellow cedar is at the high end of the softwoods and Basswood is at the low end on the hardwoods and they are very similar
To begin you will need cardboard to cut out patterns. I use the card board boxes from dry cereal boxes, product packing, gift boxed or any thin cardboard. Also some push pins, T pins and a knife. For glue i will be using 5 minute epoxy and Super glue
f

Planking a hull from what i read on forums is the hard part of a build and i have seen some creative ways of planking
first rule of planking
On a vessel's hull, a strake is a longitudinal course of planking which runs from the boat's stem to the sternpost or transom, a strake does not stop short of the stem or stern posts nor does a strake end under the wales or the planking above it, a strake runs full length of the hull.
A common question i see is when planking a hull do you start from the keel and work up to the top of the hull or start at the top and work down to the keel? and the answer is both directions. What you are actually doing is working to a shutter plank which is a strake or two under the main wales or sheer molding.
over the years i have planked hulls in a number of different woods from soft to hard. One of the best hull planking wood i used is Poplar a common wood you can find in most home improvement stores or local lumber dealers. Poplar is at the softer end of the hardwoods but harder than softwoods. Other wood i found suitable are Basswood, Aspin, Willow and Alaskan Yellow Cedar which for some reason is just a trade name the wood is actually Cypress and not a Cedar.
pros and cons
hardwood make nice looking planked hulls Boxwood, Cherry, Walnut, Maple and others. When planking the hull every plank has to be tapered or cut and shaped to fit. Hardwoods are difficult to cut with a knife. Also hardwood give a hard and sharp edge so the joinery between planks have to be spot on or every little flaw shows. Hardwood are harder to bend some will not bend at all.
Softer wood will cut with a knife so much easier than hardwoods and because they are softer you can push a planks tighter together, the softer wood will give a little conforming to the edge. Most softwoods tend to be bendable a wood like Willow is strong and takes extreme bending.
Poplar has a stark contrast between the sapwood and heartwood, The sapwood is an off white and the heartwood can range from green to tan and streaks of color. The green heartwood will change from green to tan when exposed to sunlight. The wood is very workable with with small hand tools. You can plank with the lighter cream colored sapwood or the tan color heartwood.
Basswood bends and cuts nice with a knife the color is uniform, glues well and bends without much trouble, if the bending is not to extreme it can be bent dry. One problem with Basswood and all soft woods they tend to dent easy from clamping. As Phil mentioned if the dent is not to deep you can try to wet the wood and raise up the dent. Often the pressure need when clamping a plank it will crush the wood fibers and you will not be able to remove a dent other than sanding it out. This is a reason i use Super Glue it does not need clamps to hold a plank in place, you can hold it there for 15 seconds with just your fingers and that does not leave dents.
Alaskan yellow cedar (cypress) has a fine grain, cuts and finishes nice, test the glue because glued joints tends to come apart because of the natural oil in the wood it gives a waxy surface that glue does not like to stick to. The yellow color fades in time to light cream or gray, using a wood finish might help to hold the yellow color i have not tested that so i don't know for sure. i do know from older boards i have in the barn the yellow does fade away.
Alaskan yellow cedar is at the high end of the softwoods and Basswood is at the low end on the hardwoods and they are very similar
- Joined
- Dec 1, 2016
- Messages
- 6,383
- Points
- 728

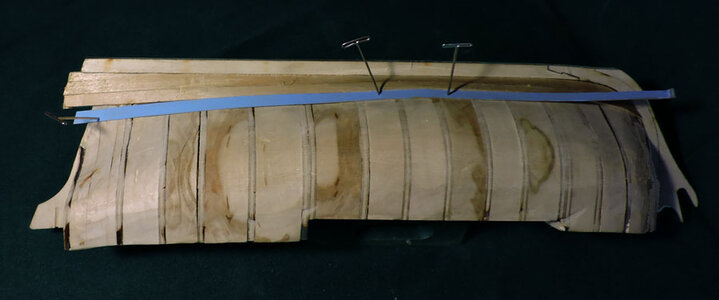
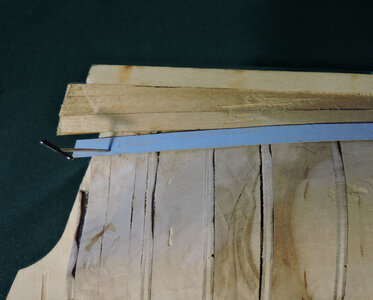
Starting with the garboard plank i will take planking the bottom of the hull one plank at a time because this will set the planking for the hull up to the wales, and the bottom planks require the most shaping.
using a piece of card board 1/2 inches wide i push it into the rabbit at the center of the hull and pin it in place to hold it against the keel. Next it is important to not to force the pattern just use your finger and let the card board strip follow the shape of the hull to the stem and to the stern.
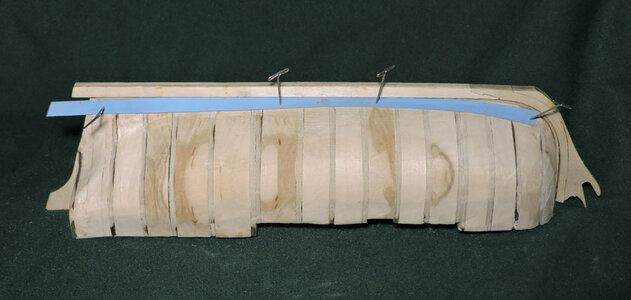
What happens is the card board plank will want to follow the natural shape of the hull and ride up at the bow and stern. What has to be done is shape the edge against the keel.
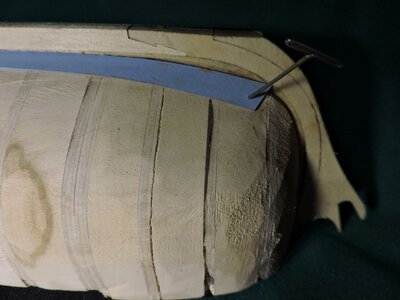
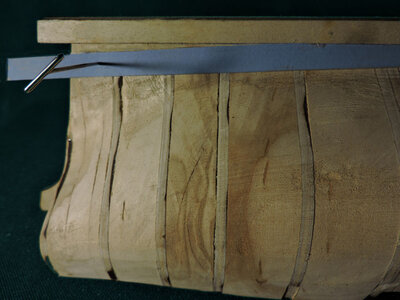
You can not force the plank down at the stem or stern because it will create a kink in the plank you have to shape it to fit. This is done by tapering the the edge of the pattern against the keel side. This reverse taper is taking more out of the center of the garboard and tapers to nothing as it reasches the ends. So in other words the gardboard has a bow in it from the center outward.
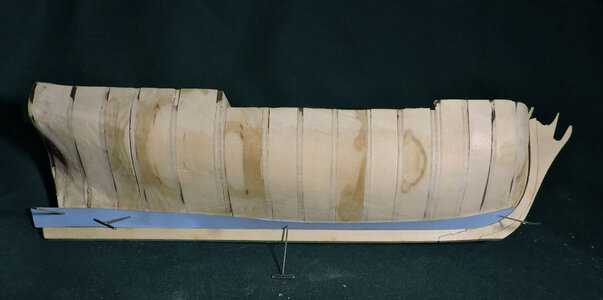
at the stem the end of the gardboard is called the hood and has a belly at the bottom. At the stern is the flare
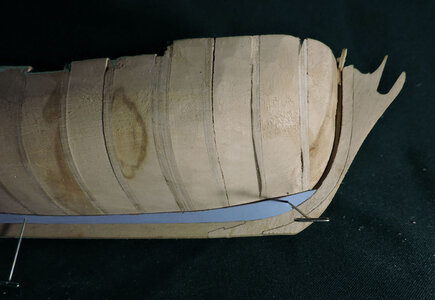
Now that you have the keel edge of the gardboard the pattern can be transferred to a plank
using a piece of card board 1/2 inches wide i push it into the rabbit at the center of the hull and pin it in place to hold it against the keel. Next it is important to not to force the pattern just use your finger and let the card board strip follow the shape of the hull to the stem and to the stern.

What happens is the card board plank will want to follow the natural shape of the hull and ride up at the bow and stern. What has to be done is shape the edge against the keel.


You can not force the plank down at the stem or stern because it will create a kink in the plank you have to shape it to fit. This is done by tapering the the edge of the pattern against the keel side. This reverse taper is taking more out of the center of the garboard and tapers to nothing as it reasches the ends. So in other words the gardboard has a bow in it from the center outward.

at the stem the end of the gardboard is called the hood and has a belly at the bottom. At the stern is the flare

Now that you have the keel edge of the gardboard the pattern can be transferred to a plank
Last edited:
- Joined
- Dec 1, 2016
- Messages
- 6,383
- Points
- 728

anyone who has planked a hull knows it takes more planking at the center than at the ends so before i transfer the gardboard to the plank i first run a taper along the length of the plank to conserve space at the stem.

now i use the pattern against the upper edge and cut the shape of the gardboard. The edge along the keel is not a straight edge it has a bow in it.

from making the pattern i know the gardboard plank will fit snug against the keel and stem. First i glued the center of the gardboard plank at the the center of the hull where it is sitting flat. Notice i am running the plank longer than the hull. I am doing this because to get an exact tight fit at the stem and at the stern post you have to be exact with the length of the plank and at the correct angle of the stern post. Also because i am using Basswood which is soft it will require pressure to clamp the planks at the stern. you will see as i add more planks how the planks will be clamped to one another. Once the planking is to the height of the stern post it is much easier to cut and sand the ends of the planks to match up with the stern post when it is installed.
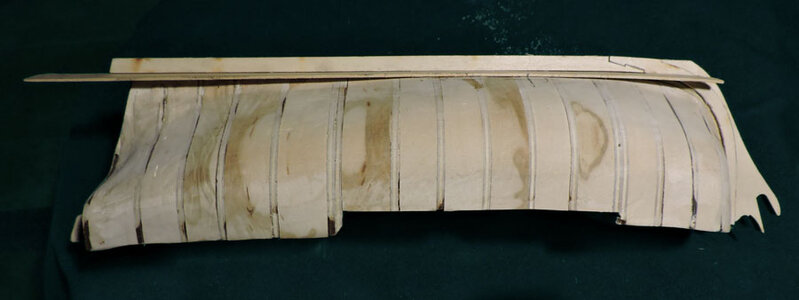
the gardboard is epoxied in place at the stem and stern. The Basswood plank bent easy without having to wet it or soak it, it bent dry.
the Epoxy takes longer to grab than super glue so push pins are used to hold the plank in place.
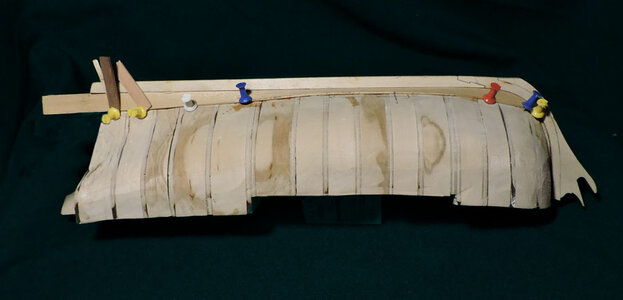
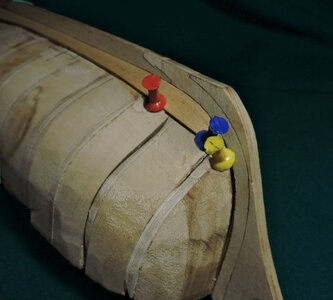
at the stern the plank takes an extreme twist from horizonal to vertical so using push pins will dent to edge thus the scrap pieces of wood.
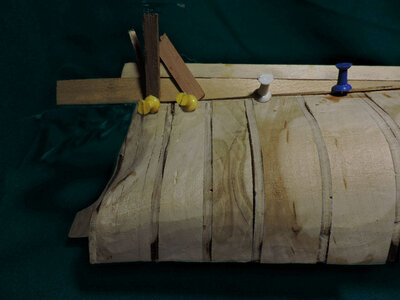
Now the gardboards are in place but it is not the final shape, only the edge along the keel was shaped the upper edge will have to be shaped so the first bottom plank will fit.
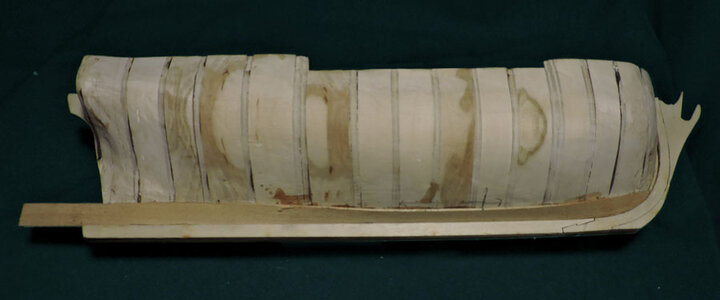

now i use the pattern against the upper edge and cut the shape of the gardboard. The edge along the keel is not a straight edge it has a bow in it.

from making the pattern i know the gardboard plank will fit snug against the keel and stem. First i glued the center of the gardboard plank at the the center of the hull where it is sitting flat. Notice i am running the plank longer than the hull. I am doing this because to get an exact tight fit at the stem and at the stern post you have to be exact with the length of the plank and at the correct angle of the stern post. Also because i am using Basswood which is soft it will require pressure to clamp the planks at the stern. you will see as i add more planks how the planks will be clamped to one another. Once the planking is to the height of the stern post it is much easier to cut and sand the ends of the planks to match up with the stern post when it is installed.

the gardboard is epoxied in place at the stem and stern. The Basswood plank bent easy without having to wet it or soak it, it bent dry.
the Epoxy takes longer to grab than super glue so push pins are used to hold the plank in place.


at the stern the plank takes an extreme twist from horizonal to vertical so using push pins will dent to edge thus the scrap pieces of wood.

Now the gardboards are in place but it is not the final shape, only the edge along the keel was shaped the upper edge will have to be shaped so the first bottom plank will fit.

- Joined
- Dec 1, 2016
- Messages
- 6,383
- Points
- 728

For the first bottom plank i took a strip of card board and set it against the gardboard at the middle of the hull and used 2 pins to hold it in place. By moving my finger along the strip i let it flow to the shape of the hull. What happens is the strip takes a big rise at the stern. The gap between the gardboard and first bottom plank can be filled in with a stealer piece. Planning ahead i need to plank more hull surface in the center of the hull than at the ends. So allowing the bottom plank to take such a large rise and adding a stealer uses up a lot of space at the sternpost.
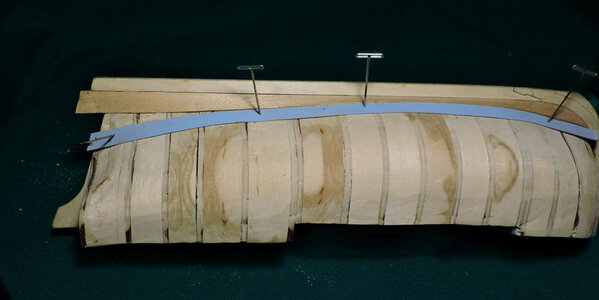
the logical thing would be to pull the plank to the gardboard but doing that the bottom plank kinks.
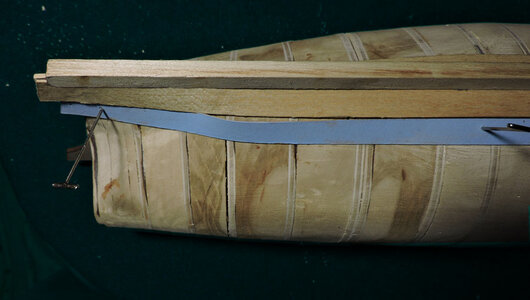
Rather than take up space with a stealer at the sternpost i overlapped the pattern. Now i will spile the upper edge of the gardboard so the first bottom plank will follow the hull shape and lay flat.
In boat building, spiling is the act or goal of using whatever you need to use in order to transfer or define a curve on a piece of wood to fit up against another piece of wood. Someone a couple of hundred years ago in a boat shop either didn't know what to call this act or got tounge tied while trying to say the word scribing and spit out the word spiling and it stuck.
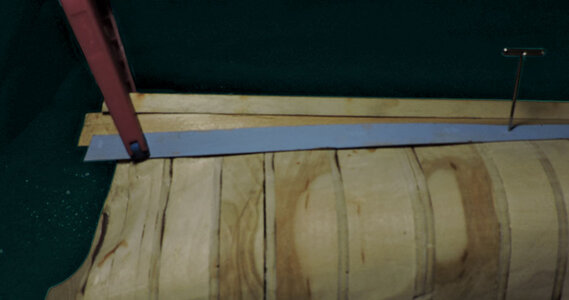
following the natural edge of the bottom plank a spile line is traced on the gardboard.
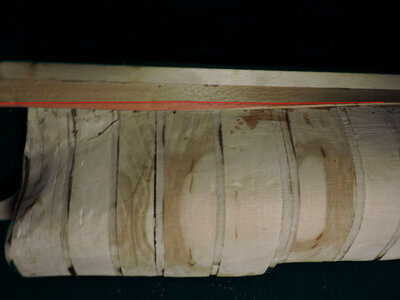
What is going on here is when the gardboard takes an extreme twist from horizontal to vertical the the top run of the plank creates a hump in the flow. When the bottom plank is running along this edge it will kick up at the stern.
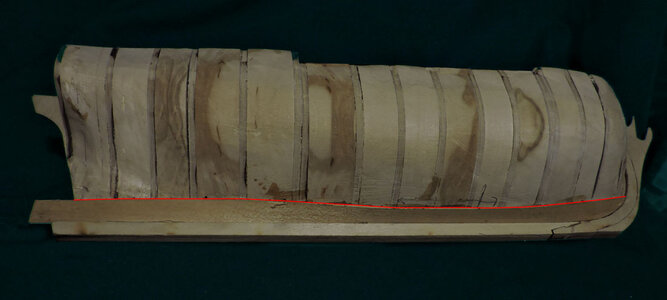
When the gardboard edge is trimmed the bottom plank takes a smooth run and fills in the gap at the stern post.
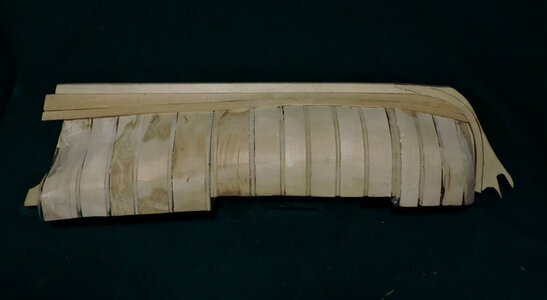
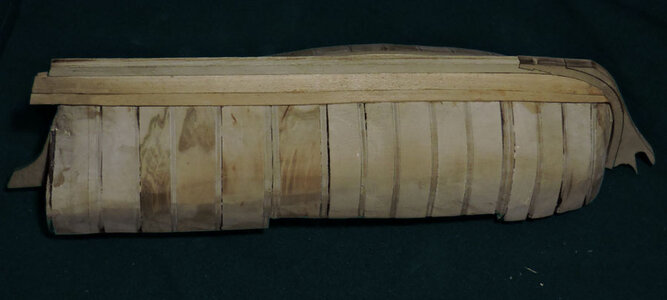

the logical thing would be to pull the plank to the gardboard but doing that the bottom plank kinks.

Rather than take up space with a stealer at the sternpost i overlapped the pattern. Now i will spile the upper edge of the gardboard so the first bottom plank will follow the hull shape and lay flat.
In boat building, spiling is the act or goal of using whatever you need to use in order to transfer or define a curve on a piece of wood to fit up against another piece of wood. Someone a couple of hundred years ago in a boat shop either didn't know what to call this act or got tounge tied while trying to say the word scribing and spit out the word spiling and it stuck.

following the natural edge of the bottom plank a spile line is traced on the gardboard.

What is going on here is when the gardboard takes an extreme twist from horizontal to vertical the the top run of the plank creates a hump in the flow. When the bottom plank is running along this edge it will kick up at the stern.

When the gardboard edge is trimmed the bottom plank takes a smooth run and fills in the gap at the stern post.


Last edited:
- Joined
- Dec 1, 2016
- Messages
- 6,383
- Points
- 728

moving on the bottom plank 2 it is done the same as the last 2 planks using the card board patterm pinned at the center and pressing it to the hull to take on the
natural curve.
once again the plattern wants to flow upward leaving a gap but the gap is much less than the first bottom plank.
The goal here is to keep an eye on the run of the planking, the space at the center of the hull and at the ends and making sure the planking strake is following the curves of the hull and laying naturally without kinks.
natural curve.

once again the plattern wants to flow upward leaving a gap but the gap is much less than the first bottom plank.
The goal here is to keep an eye on the run of the planking, the space at the center of the hull and at the ends and making sure the planking strake is following the curves of the hull and laying naturally without kinks.

Last edited:
- Joined
- Dec 1, 2016
- Messages
- 6,383
- Points
- 728

rather than trim the next bottom plank to fit a stealer is added, note the stealer is cut into both planks so it does not end with a sharp point which would be difficult to nail so it stops with a blunt end. The narrow end was first glued down and once the glue grabbed the stealer can be twisted in place and held with a spring clamp.
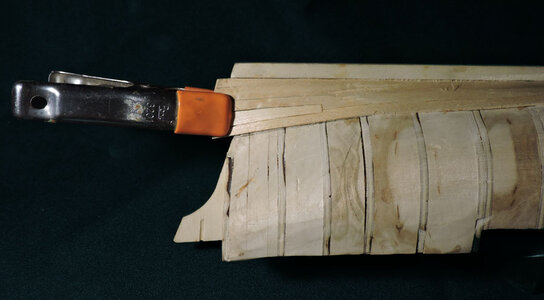
at the bow end of this plank it is tapered to conserve space at the stem. Basswood will bend without having to wet it so to avoid clamps the end is glued into the rabbit when set the plank can then be bent along the hull.
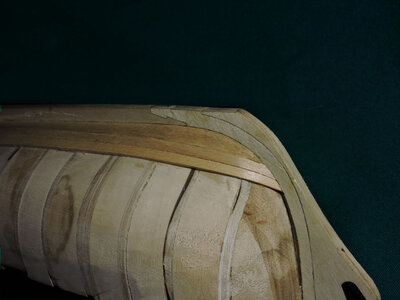
i found out early in the planking job using a soft wood has the disadvantage of showing every scratch and dent. This is the main reason for running the planking past the end of the hull as you can see in the first photo how the stealer was held in place with a clamp. In the picture you can see at the ends of the planks the vertical dent lines where a spring clamp was used. The ends will be trimmed away when the stern post is fitted to the hull. Above the cut for the stealer to the right were made just by my finger nails holding the plank in place. In the case of the Sultana using a single layer of Basswood the planking is twice + the thickness of using a double layer of planking. This gives enought thickness most of the dents and scratches will be sanded out and not to worry about sanding through the planking. The big advantage to a soft wood like Basswood it is easy to cut with just an Exacto knife and it bends easy. The rest of the planking job i will use Super Glue so i will not have to use any sort of clamp and just hold the plank in place for 15 seconds.
Soft woods like Basswood, Willow or Alaskan yellow cypress can be used but care must be taken because they are so soft they damage easy.
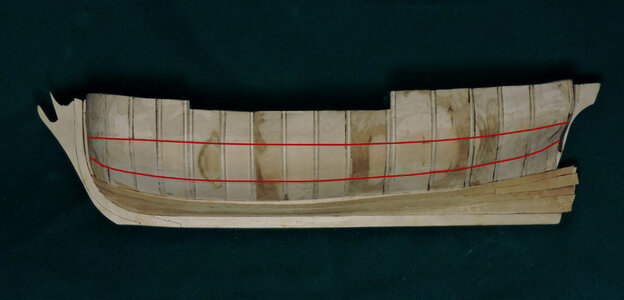
now that the bottom of the hull is planked and there is a smooth curve to work off, the wale location is taken from the plan and drawn on the hull. The area between the wale and the top of the botton plank is lined off to make it easier to taper the planks and maintain a smooth run from sten to stern.

at the bow end of this plank it is tapered to conserve space at the stem. Basswood will bend without having to wet it so to avoid clamps the end is glued into the rabbit when set the plank can then be bent along the hull.

i found out early in the planking job using a soft wood has the disadvantage of showing every scratch and dent. This is the main reason for running the planking past the end of the hull as you can see in the first photo how the stealer was held in place with a clamp. In the picture you can see at the ends of the planks the vertical dent lines where a spring clamp was used. The ends will be trimmed away when the stern post is fitted to the hull. Above the cut for the stealer to the right were made just by my finger nails holding the plank in place. In the case of the Sultana using a single layer of Basswood the planking is twice + the thickness of using a double layer of planking. This gives enought thickness most of the dents and scratches will be sanded out and not to worry about sanding through the planking. The big advantage to a soft wood like Basswood it is easy to cut with just an Exacto knife and it bends easy. The rest of the planking job i will use Super Glue so i will not have to use any sort of clamp and just hold the plank in place for 15 seconds.
Soft woods like Basswood, Willow or Alaskan yellow cypress can be used but care must be taken because they are so soft they damage easy.

now that the bottom of the hull is planked and there is a smooth curve to work off, the wale location is taken from the plan and drawn on the hull. The area between the wale and the top of the botton plank is lined off to make it easier to taper the planks and maintain a smooth run from sten to stern.

- Joined
- Dec 1, 2016
- Messages
- 6,383
- Points
- 728

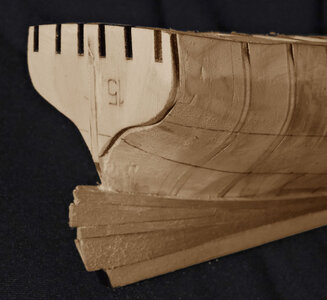
Taking a sideways direction from hull planking to building the stern. The reason for the change in progression of the build is because planking the bottom of the hull required handling the hull and the stern timbers are Basswood and prone like all softwoods to break easy, So once the bottom is planked the stern will need to be builtbecause the next belts of planking end at the stern so we have to know the shape of the stern and exactly where the planking ends.
to start
the stern end of the profile piece actually did not serve any purpose and it got in the way so i cut it off
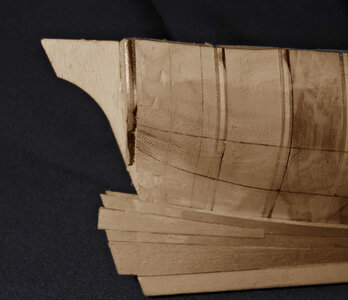
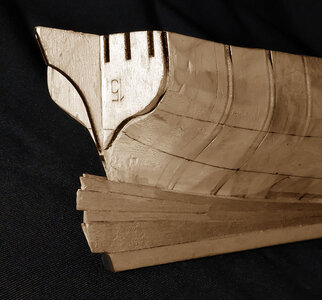
to start
the stern end of the profile piece actually did not serve any purpose and it got in the way so i cut it off


- Joined
- Dec 1, 2016
- Messages
- 6,383
- Points
- 728

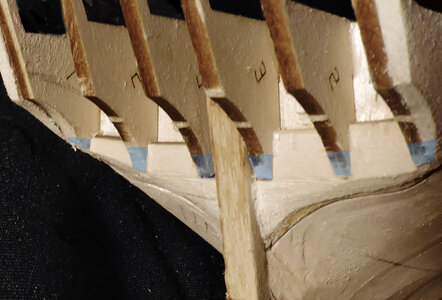
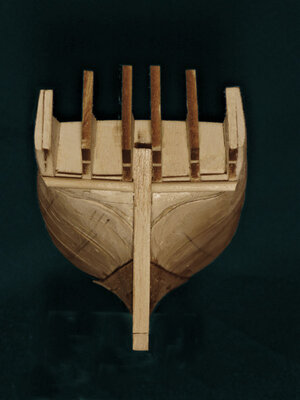
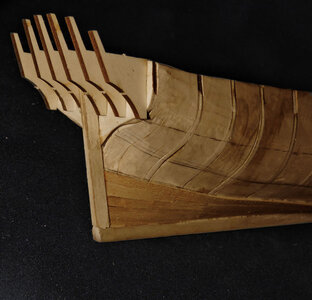
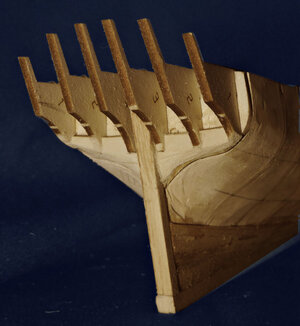
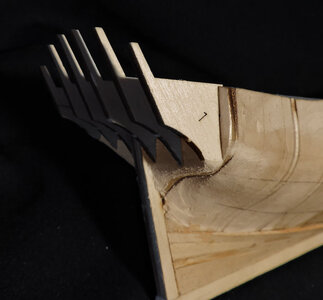
the first step is to glue in the stern timbers
Now you see why i did not add these when building the hull the top timbers are delicate and easy to break.
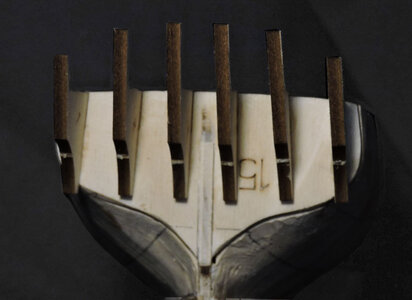
in framed hulls there would have been a wing transom that the stern timbers would be sitting on. The outer face of the transom would fill the hollow area below the stern pieces and this is where the ends of the hull planking rest against. Also the outer side of piece number 1 has to be filled in to match up with the hull.
The 6 stern pieces are pretty much just a skeleton of the stern
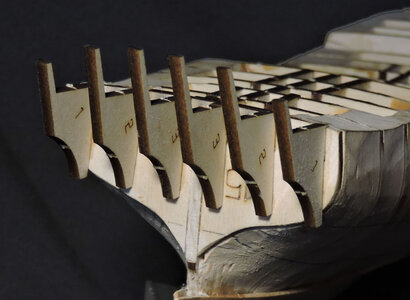
Now you see why i did not add these when building the hull the top timbers are delicate and easy to break.

in framed hulls there would have been a wing transom that the stern timbers would be sitting on. The outer face of the transom would fill the hollow area below the stern pieces and this is where the ends of the hull planking rest against. Also the outer side of piece number 1 has to be filled in to match up with the hull.
The 6 stern pieces are pretty much just a skeleton of the stern

- Joined
- Dec 1, 2016
- Messages
- 6,383
- Points
- 728

once the stern pieces were in place i used a scrap piece of 1/8 thick Basswood and cut notches in the pieces so it slides up into the stern pieces.
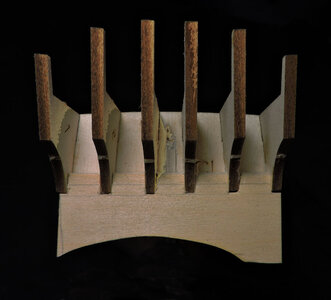
next i traced the shape of the last bulkhead and roughly trimmed the piece. The vertical lines are where the stern post goes and the horizontal lines are were the outer face of the transom is located.
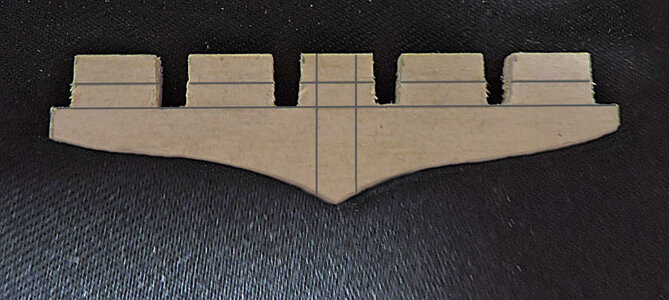
Using a block with sandpaper i sanded the ends of the bottom planks to a straight edge and glued in the stern post.
i cut out the middle of the transom piece out and glued each half on both sides of the stern post. Then continued sanding the lower edge to blend in with the hull shape
The idea here is to blend in the transom piece from the last bulkhead shape to the bottom of the stern pieces so you have a nice smooth transition.
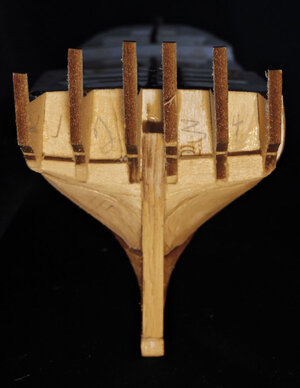

next i traced the shape of the last bulkhead and roughly trimmed the piece. The vertical lines are where the stern post goes and the horizontal lines are were the outer face of the transom is located.

Using a block with sandpaper i sanded the ends of the bottom planks to a straight edge and glued in the stern post.

i cut out the middle of the transom piece out and glued each half on both sides of the stern post. Then continued sanding the lower edge to blend in with the hull shape

The idea here is to blend in the transom piece from the last bulkhead shape to the bottom of the stern pieces so you have a nice smooth transition.

- Joined
- Dec 1, 2016
- Messages
- 6,383
- Points
- 728

next area to deal with is the outer side of stern piece 1 this area is where the planking will end so it has to blend in with the shape of the hull.
To fill the area i took a scrap of Basswood thick enough to cover the arched shape of the last bulkhead.
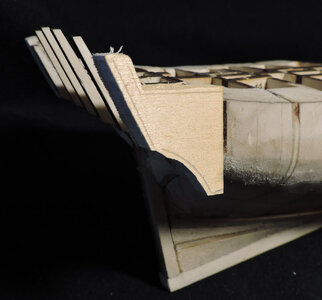
and once again using sandpaper the block is shaped and blended into the hull and the end of the transom.
There is a lot going on between bulkhead subtle changes in curved surfaces and transaction from one shape to another. A good planking job depends on what is underneath. If you have hard edges low and high spots they make planking more difficult and will show in the final planking job.
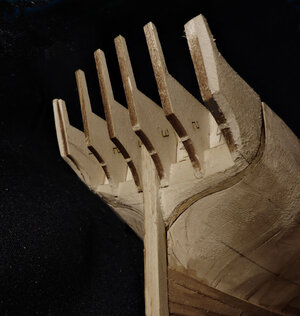

To fill the area i took a scrap of Basswood thick enough to cover the arched shape of the last bulkhead.

and once again using sandpaper the block is shaped and blended into the hull and the end of the transom.
There is a lot going on between bulkhead subtle changes in curved surfaces and transaction from one shape to another. A good planking job depends on what is underneath. If you have hard edges low and high spots they make planking more difficult and will show in the final planking job.

- Joined
- Dec 1, 2016
- Messages
- 6,383
- Points
- 728

- Joined
- Dec 1, 2016
- Messages
- 6,383
- Points
- 728

now for the stern
i tried two different way to build the stern i had the upper stern cut from a sheet of Basswood and the windows which i intended on placing them into the stern piece. Right off because i am using Basswood the piece broke off, The grain was running across the piece so the parts between the windowns were very weak. My thinking was the windows have to inset into the stern so they needed to be put in seperate.
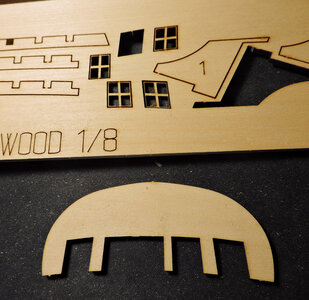
the next problem when i tried to remove a window from the sheet it just crumbled. Looking close around the window it is extremely thin and extremely delicate.
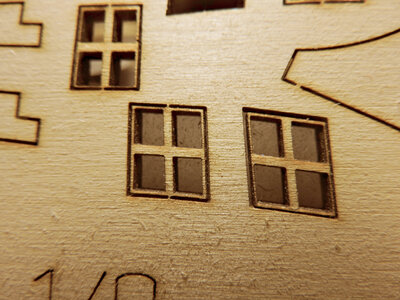
Scrapping that idea i went on to a second method and that is to laser etch the windown in place and cut the molding as a seperate piece.
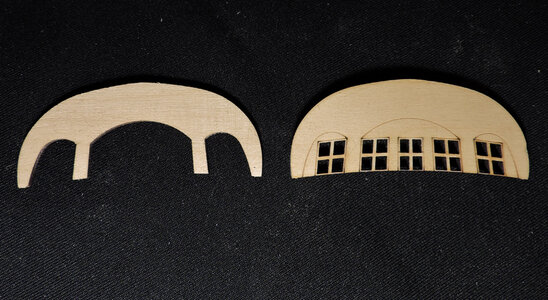
The windows actually sit into the stern like this
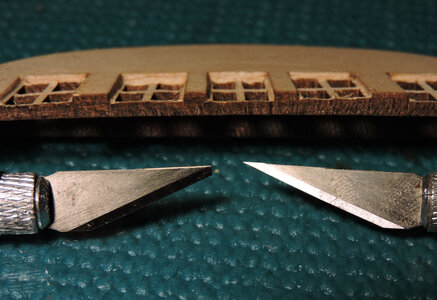
The windows were laser etched so i had a sharp line to work to, all i needed was a sharp Exacto knife one with a point and one with a broken point i could use to scrape with.
The job was delicate and if i broke the window frames it would be a tough job trying to fix them. So taking small cuts at a time i worked the windows down.
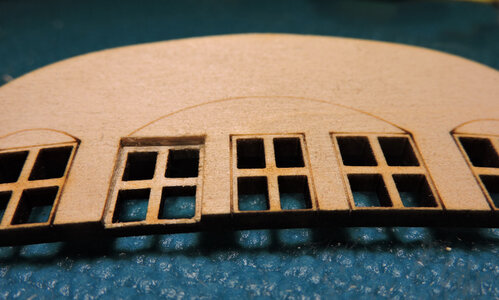
Working each window the job got done without breaking anything.
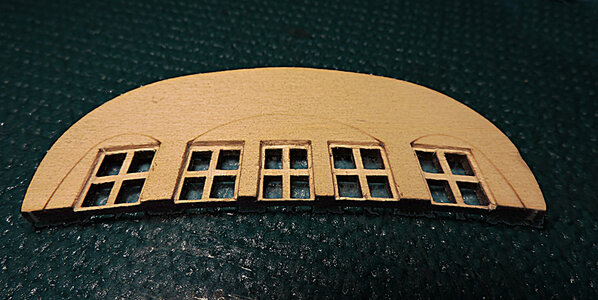
Next comes the molding piece and that was just a matter of gluing it on the stern piece.
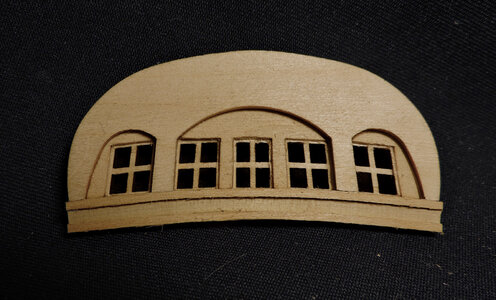
as for the lower molding that was made up of three pieces two pieces of 1/16 planking and a 1/8 square piece. First the top piece was glued to the bottom of the stern piece, no need to wet the wood or force it in place, it bent easy and no problem. Same wth the square piece and the final lower piece they all bent easy. Super glue was used and each piece was held in place for 10 seconds by hand.
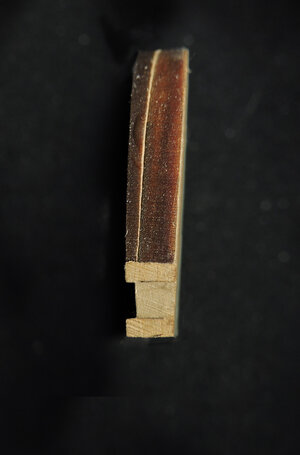
with the upper stern assembled off the model it is time to finish off the stern so planking can continue.
i tried two different way to build the stern i had the upper stern cut from a sheet of Basswood and the windows which i intended on placing them into the stern piece. Right off because i am using Basswood the piece broke off, The grain was running across the piece so the parts between the windowns were very weak. My thinking was the windows have to inset into the stern so they needed to be put in seperate.

the next problem when i tried to remove a window from the sheet it just crumbled. Looking close around the window it is extremely thin and extremely delicate.

Scrapping that idea i went on to a second method and that is to laser etch the windown in place and cut the molding as a seperate piece.

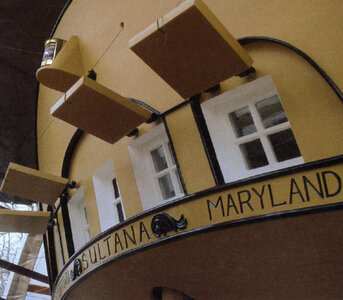
The windows actually sit into the stern like this

The windows were laser etched so i had a sharp line to work to, all i needed was a sharp Exacto knife one with a point and one with a broken point i could use to scrape with.

The job was delicate and if i broke the window frames it would be a tough job trying to fix them. So taking small cuts at a time i worked the windows down.

Working each window the job got done without breaking anything.

Next comes the molding piece and that was just a matter of gluing it on the stern piece.

as for the lower molding that was made up of three pieces two pieces of 1/16 planking and a 1/8 square piece. First the top piece was glued to the bottom of the stern piece, no need to wet the wood or force it in place, it bent easy and no problem. Same wth the square piece and the final lower piece they all bent easy. Super glue was used and each piece was held in place for 10 seconds by hand.

with the upper stern assembled off the model it is time to finish off the stern so planking can continue.
- Joined
- Dec 1, 2016
- Messages
- 6,383
- Points
- 728

Thanks so much, Dave for such a splendid tutorial.
and thank you for your interest in the build
- Joined
- Dec 1, 2016
- Messages
- 6,383
- Points
- 728

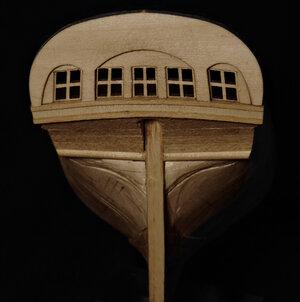
the upper part of the stern was built off the model because it was easier to do it that way. Now it is time to assemble the stern. Before building the stern it is a good idea to check the shape of the hull at the sides. Notice there is a gap between the hull and the plank this is because the block i added at the stern needs a bit more shaping.
sand the outer block on the end stern timber untl the plank sits flat against the hull.
That outer edge is what is giving the shape to the lower section of the transom so it has to be right. Go ahead and plank up the lower transom with 3 planks and you will have to cut and fit the top plank to match the planks below it and the arc of the molding.
It took 2 tries only because i broke the first one at the center so be careful when shaping this plank. A tip when cutting and shaping Basswood parts, use a new sharp blade because a dull blade tends to crush and rip the soft wood.
The stern is now finished and time to go back to planking up the hull. One other reason for stopping the planking and building the stern is because the hull planks lap over the ends of the lower stern planks and butt against the upper section.

sand the outer block on the end stern timber untl the plank sits flat against the hull.

That outer edge is what is giving the shape to the lower section of the transom so it has to be right. Go ahead and plank up the lower transom with 3 planks and you will have to cut and fit the top plank to match the planks below it and the arc of the molding.

It took 2 tries only because i broke the first one at the center so be careful when shaping this plank. A tip when cutting and shaping Basswood parts, use a new sharp blade because a dull blade tends to crush and rip the soft wood.

The stern is now finished and time to go back to planking up the hull. One other reason for stopping the planking and building the stern is because the hull planks lap over the ends of the lower stern planks and butt against the upper section.

- Joined
- Dec 1, 2016
- Messages
- 6,383
- Points
- 728

For the second belt of planking first take 4 planks and rubber band them to the hull.
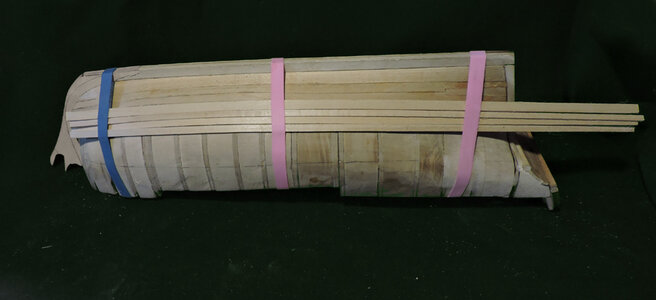
it takes 1 wider bottom plank and 3 narrower planks to fill tghe belt at the center of the hull
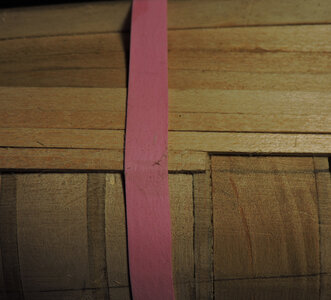
at the stern the last plank will come to a point as you can see the tapper from the pencil line, so each plank has to be tappered about 3/4 of its width.
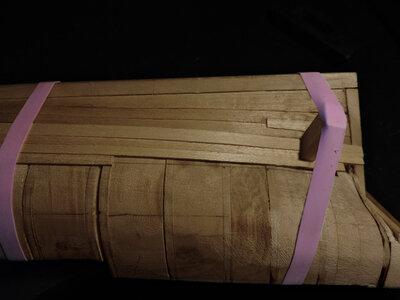
at the bow the planks are 1 and 1/2 to wide, so the planks have to be tappered to fit in the belt.
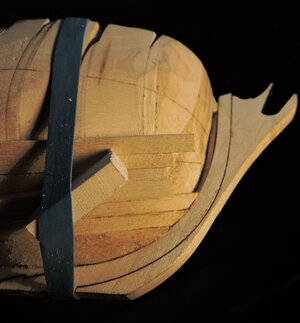
to hold planks to the hull i use the low tech method of a strong rubber band, a block of wood and a wedge to add pressure. The method works quite well for clamping planking. In this build i am using super glue so i do not need clamping. But if your using a wood glue or Epoxy this works good.
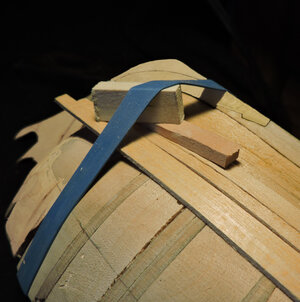

it takes 1 wider bottom plank and 3 narrower planks to fill tghe belt at the center of the hull

at the stern the last plank will come to a point as you can see the tapper from the pencil line, so each plank has to be tappered about 3/4 of its width.

at the bow the planks are 1 and 1/2 to wide, so the planks have to be tappered to fit in the belt.

to hold planks to the hull i use the low tech method of a strong rubber band, a block of wood and a wedge to add pressure. The method works quite well for clamping planking. In this build i am using super glue so i do not need clamping. But if your using a wood glue or Epoxy this works good.

Last edited:
- Joined
- Dec 1, 2016
- Messages
- 6,383
- Points
- 728

finished planking the first belt above the bottom planks
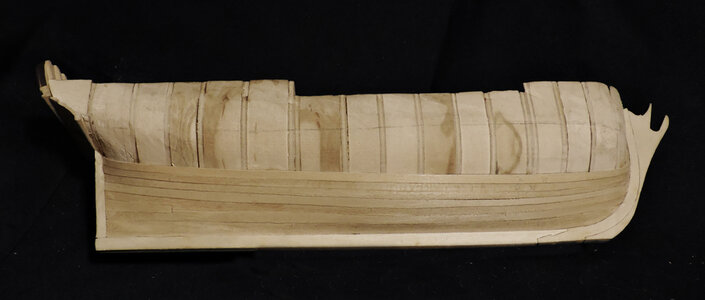
The planking started with tapering the bow ends of the planks and soaking them in water for about 10 minutes then rubber banding them to the hull. Once dry the bend will set and the planks will stay bent. The soft Basswood once wet will bend very easy.
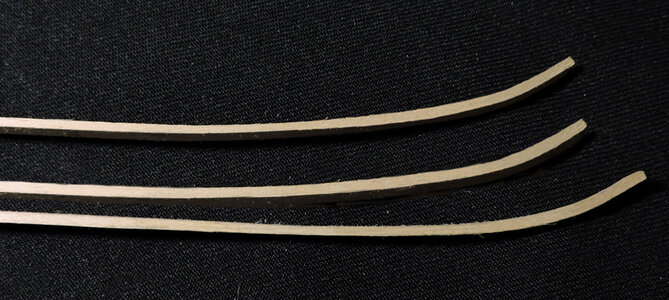
When the planks are dry i super glue the end into the stem rabbit making sure the plank fits snug in the rabbit and against the last plank.
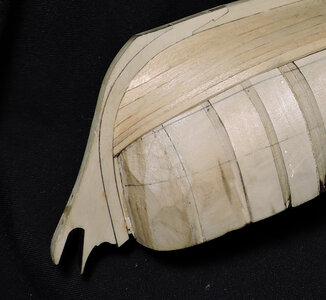
with the end secure in place i can now use a paint brush and slightly dampen the uderside of the plank. Then apply super glue to the hull a few inches at a time. The dampened plank once it touches the super glue will bond instantly. Doing the same thing all along the plank until i reach the the stern post where i had to cut, sand and fit the end against the stern post.
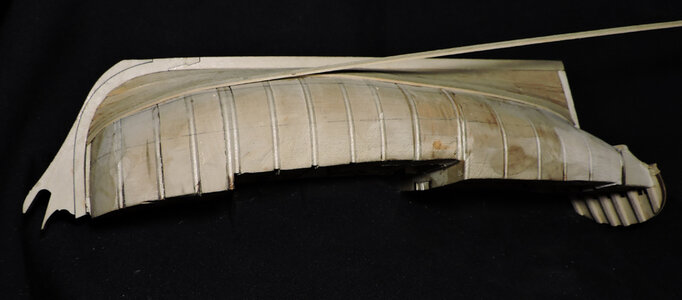
the idea behind planking a hull is keeping both sides as close to the same height as possible and making sure each run of planking ends at the stem.
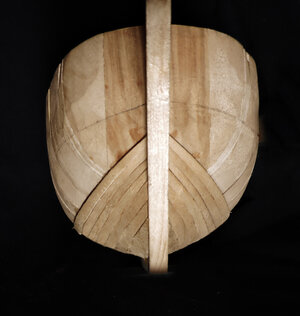
At this stage of planking the hull you may notice at the bow and stern the planks want to spring up along the lower edge,. You can twist and push the plank to fit and hold it in place with the rubber band and block method but because i am using Basswood the pressure tends to crush the plank. It takes more than just finger pressure to twist these ends in place, or as i found out you might super glue your fingers to the hull. Then you have to use Acetone to free your fingers.
The planking i am using is thick enough when the hull has been fully planked it can be sanded smooth without fear of sanding through the planking. The upward twist is quite small so sanding it smooth is no problem.
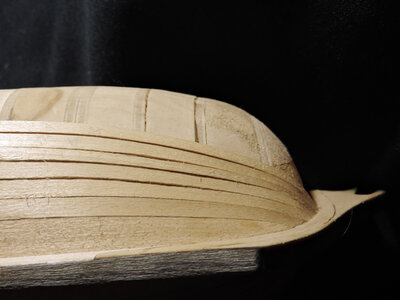
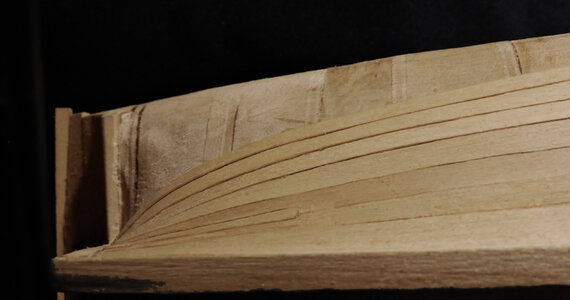

The planking started with tapering the bow ends of the planks and soaking them in water for about 10 minutes then rubber banding them to the hull. Once dry the bend will set and the planks will stay bent. The soft Basswood once wet will bend very easy.

When the planks are dry i super glue the end into the stem rabbit making sure the plank fits snug in the rabbit and against the last plank.

with the end secure in place i can now use a paint brush and slightly dampen the uderside of the plank. Then apply super glue to the hull a few inches at a time. The dampened plank once it touches the super glue will bond instantly. Doing the same thing all along the plank until i reach the the stern post where i had to cut, sand and fit the end against the stern post.

the idea behind planking a hull is keeping both sides as close to the same height as possible and making sure each run of planking ends at the stem.

At this stage of planking the hull you may notice at the bow and stern the planks want to spring up along the lower edge,. You can twist and push the plank to fit and hold it in place with the rubber band and block method but because i am using Basswood the pressure tends to crush the plank. It takes more than just finger pressure to twist these ends in place, or as i found out you might super glue your fingers to the hull. Then you have to use Acetone to free your fingers.
The planking i am using is thick enough when the hull has been fully planked it can be sanded smooth without fear of sanding through the planking. The upward twist is quite small so sanding it smooth is no problem.


Very interesting idea with the windows - and working very good with good resultnow for the stern
i tried two different way to build the stern i had the upper stern cut from a sheet of Basswood and the windows which i intended on placing them into the stern piece. Right off because i am using Basswood the piece broke off, The grain was running across the piece so the parts between the windowns were very weak. My thinking was the windows have to inset into the stern so they needed to be put in seperate.
View attachment 355432
the next problem when i tried to remove a window from the sheet it just crumbled. Looking close around the window it is extremely thin and extremely delicate.
View attachment 355433
Scrapping that idea i went on to a second method and that is to laser etch the windown in place and cut the molding as a seperate piece.
View attachment 355434
The windows actually sit into the stern like this
View attachment 355436
The windows were laser etched so i had a sharp line to work to, all i needed was a sharp Exacto knife one with a point and one with a broken point i could use to scrape with.
View attachment 355439
The job was delicate and if i broke the window frames it would be a tough job trying to fix them. So taking small cuts at a time i worked the windows down.
View attachment 355437
Working each window the job got done without breaking anything.
View attachment 355438
Next comes the molding piece and that was just a matter of gluing it on the stern piece.
View attachment 355441
as for the lower molding that was made up of three pieces two pieces of 1/16 planking and a 1/8 square piece. First the top piece was glued to the bottom of the stern piece, no need to wet the wood or force it in place, it bent easy and no problem. Same wth the square piece and the final lower piece they all bent easy. Super glue was used and each piece was held in place for 10 seconds by hand.
View attachment 355440
with the upper stern assembled off the model it is time to finish off the stern so planking can continue.


