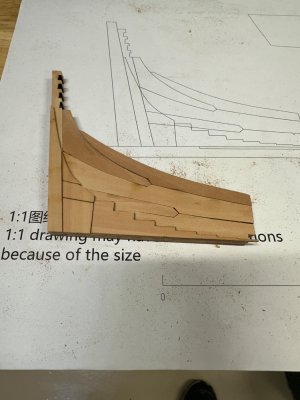
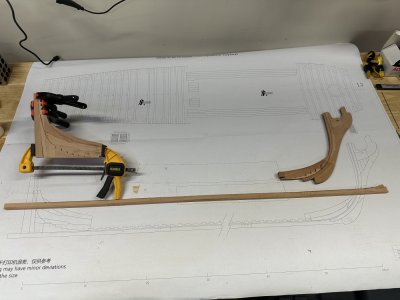
In steps 14C & D, 14C gives you the part numbers. But in 14D where it tells you to taper the deadwood again, it shows G1-11 in place as well. even though it was not a part listed in 14C. i went ahead and installed it as I was doing C.
-

Win a Free Custom Engraved Brass Coin!!!
As a way to introduce our brass coins to the community, we will raffle off a free coin during the month of August. Follow link ABOVE for instructions for entering.
-

PRE-ORDER SHIPS IN SCALE TODAY!
The beloved Ships in Scale Magazine is back and charting a new course for 2026!
Discover new skills, new techniques, and new inspirations in every issue.
NOTE THAT OUR FIRST ISSUE WILL BE JAN/FEB 2026
- Home
- Forums
- Ships of Scale Group Builds and Projects
- Modelship Dockyard PoF HMS Enterprize 1774 - 1/48
You are using an out of date browser. It may not display this or other websites correctly.
You should upgrade or use an alternative browser.
You should upgrade or use an alternative browser.
Hi Jeff,
I am enjoying your work very much and I also enjoy the interaction between you and the members of the group.
Bill
I am enjoying your work very much and I also enjoy the interaction between you and the members of the group.
Bill
Thanks Bill.Hi Jeff,
I am enjoying your work very much and I also enjoy the interaction between you and the members of the group.
Bill
wait until you see all the frames !i had no idea the depth of modeling

i don't know how to steady my hands...vodka ???wait until you see all the frames !
My dad used to call scotch a group tightener (shooting a long time ago).
- Joined
- Jan 10, 2022
- Messages
- 860
- Points
- 403

Perfect. l love the stern deadwood. It looks very accurate. Nicely done JeffSo, here is a picture of the 3 sub assemblies we have been working on.
The next picture you see from me of these parts, they will be one piece and shortly after that be in the assembly cradle.
View attachment 513279
Thanks Keef.Perfect. l love the stern deadwood. It looks very accurate. Nicely done Jeff
Nowhere in the instructions does it mention the installation of parts E1-1 and E1-2. These go on top of the keel and have the slots for the frames. There is 2 of each of the parts, so I would imagine these should be installed 2 thick into their respective locations. Also, I believe these should be installed right before the stern deadwood and the photo etch parts are installed.
@Modelship Dockyard Can you verify this please as well as answer the question that was posted on Alex R's build about fitting the stern post into the building cradle?
Thanks
@Modelship Dockyard Can you verify this please as well as answer the question that was posted on Alex R's build about fitting the stern post into the building cradle?
Thanks
- Joined
- Oct 14, 2020
- Messages
- 294
- Points
- 323

Hi Corsair, you shall glue two E1-1 and two E1-2 together, then glue them onto the keel, and then install the stern. This was indeed missed on the instructions, I will add them on and update it. I will answer the questions of Alex in his post.Nowhere in the instructions does it mention the installation of parts E1-1 and E1-2. These go on top of the keel and have the slots for the frames. There is 2 of each of the parts, so I would imagine these should be installed 2 thick into their respective locations. Also, I believe these should be installed right before the stern deadwood and the photo etch parts are installed.
@Modelship Dockyard Can you verify this please as well as answer the question that was posted on Alex R's build about fitting the stern post into the building cradle?
Thanks
Last edited:
Hi Keith and Jeff. The way MD has designed the deadwood at the aft and fore cant frames is wonderful. I’m feeling a tad jealous of you guysPerfect. l love the stern deadwood. It looks very accurate. Nicely done Jeff
 . Agreed Jeff is owning this. Cheers Grant
Thank you for your response and your continued support ! Having you able to comment in here is really helpful !Hi Corsair, you shall glue two E1-1 and two E1-2 together, then glue them onto the keel, and then install the stern. This was indeed missed on the instructions, I will add them on and update it. I will answer the questions of Alex in his post.
Thank you for the kind words.Hi Keith and Jeff. The way MD has designed the deadwood at the aft and fore cant frames is wonderful. I’m feeling a tad jealous of you guys. Nah not really , I’m building the “vintage” version
. Agreed Jeff is owning this. Cheers Grant
I've not forgotten you all.  I have been spending an amazing amount of time looking for the parts for the first frame and also aging the brass photoetch that goes on the keel.
  It's surprising how long it takes to find parts when you have dozens of sheets to look through. I suppose it will get easier as I use the parts up. LOL. I believe I have located all the parts for the first frame (I'm starting with frame #1. Each frame is a dual frame and there is a total of 37 frame pairs. For the first frame there is about 16 pieces for the first frame not including the pieces that go above the gun port (which will be added later).
 I have been spending an amazing amount of time looking for the parts for the first frame and also aging the brass photoetch that goes on the keel.
 Grant,Thank you for the kind words.
U are in good company building the °Admiralty° version. You will not have the interior decks and partitions and the framing is less complex, but it is a wonderful and demanding kit.... Unless you want to bash it ! You can follow the DM instructions and do the interior., It would be a great project..Ha Ha
Yet, the CAF model is challenge enough. and once you finish the framing and install wales, upper planks, etc., the ship will look the same. You will make a super model I am sure.
Alex R
Jeff,I've not forgotten you all.I have been spending an amazing amount of time looking for the parts for the first frame and also aging the brass photoetch that goes on the keel.
It's surprising how long it takes to find parts when you have dozens of sheets to look through. I suppose it will get easier as I use the parts up. LOL. I believe I have located all the parts for the first frame (I'm starting with frame #1. Each frame is a dual frame and there is a total of 37 frame pairs. For the first frame there is about 16 pieces for the first frame not including the pieces that go above the gun port (which will be added later).
You don't need to pull the top timbers that go above the gunports- they are put in a bit later.
If you pull them now, they will be loose and be lost ! I did just that, but found the lost piece.
Yes, it is like hunting pieces for a puzzle. My frame halves for # 37 are glued up. I just need to finish them. Took me a while to figure out the stagger..
I Plan to dry-fit them to the keel tonight or tomorrow.
Later today I'll start to pick pieces for frame # 36. I'll send pic later
Alex R
Thanks. Yes, I found them but left them in their sheets.Jeff,
You don't need to pull the top timbers that go above the gunports- they are put in a bit later.
If you pull them now, they will be loose and be lost ! I did just that, but found the lost piece.
Yes, it is like hunting pieces for a puzzle. My frame halves for # 37 are glued up. I just need to finish them. Took me a while to figure out the stagger..
I Plan to dry-fit them to the keel tonight or tomorrow.
Later today I'll start to pick pieces for frame # 36. I'll send pic later
Alex R


