Corsair H.M.S. Enterprize Build Log

Guys
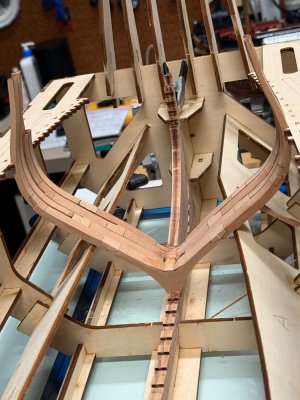
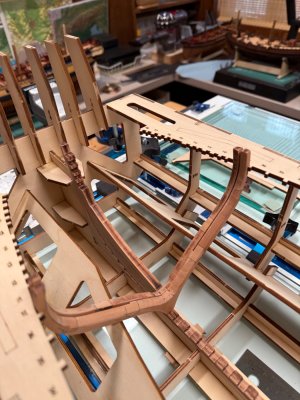
I finished, sanded and bevelled frame #37. Still needs finishing. Put it into jig then: Surprise: I found that I had switched two of the jigs' supports, A5 and B5, so that A5 was where B5 should have been and viceversa. No picture, sorry, I deleted it in disgust....So I had to spend a lot of frustrating, time de-bonding the parts, prying them out , cleaning, and finally replacing them in their intended position. - I started this work around 11:30 last PM. Finished at 1 AM-The parts were really tight and difficult to remove..lots of cursing...exhausted....Fortunately, no parts were broken, an now all fits together perfectly!!!
I realized just how well the jig was engineered by Victor...Thank you.
I may start fishing out frame # 36's pieces this afternoon after a nap.
Beware, don't make the same mistake...those pieces look similar, but they are not, and..Don't work when you are tired...mistakes happen.
IMG_1589.jpegIMG_1590.jpeg
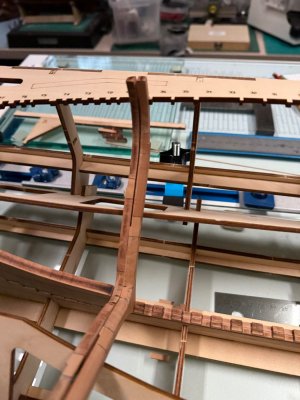
Frame 37 dry-fitted in jig....half-frames not glued together yet, need detail sanding.
Alex R
IMG_1591.jpeg

IMG_1589.jpeg
 
Guys
I finished, sanded and bevelled frame #37. Still needs finishing. Put it into jig then: Surprise: I found that I had switched two of the jigs' supports, A5 and B5, so that A5 was where B5 should have been and viceversa. No picture, sorry, I deleted it in disgust....So I had to spend a lot of frustrating, time de-bonding the parts, prying them out , cleaning, and finally replacing them in their intended position. - I started this work around 11:30 last PM. Finished at 1 AM-The parts were really tight and difficult to remove..lots of cursing...exhausted....Fortunately, no parts were broken, an now all fits together perfectly!!!
I realized just how well the jig was engineered by Victor...Thank you.
I may start fishing out frame # 36's pieces this afternoon after a nap.
Beware, don't make the same mistake...those pieces look similar, but they are not, and..Don't work when you are tired...mistakes happen.
View attachment 514255View attachment 514256
Frame 37 dry-fitted in jig....half-frames not glued together yet, need detail sanding.
Alex R
View attachment 514257

View attachment 514260
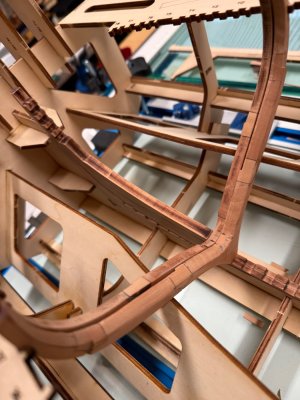
Hi Alex. Forgive me if I'm wrong. It may be the photo but it looks like you have beveled only the front of the frame inside (side A), should you have not sanded from the laser cut bevel line on side A to include up to the edge of side B as one continuous bevel. The same applies to the outside of the frame, only the other way round.
 
Hi Keef
I bevelled each half-frame separately. You are correct, the bevel is not continuous. I need to glue the half-frames together and finish the beveling, then do final sanding. Next frame I will bevel after both half-frames are glued to each other.
The half-frames for # 37 are still separate and only dry-fitted to the keel so it should be easy to do.
Thanks
AR
 
Guys
I finished, sanded and bevelled frame #37. Still needs finishing. Put it into jig then: Surprise: I found that I had switched two of the jigs' supports, A5 and B5, so that A5 was where B5 should have been and viceversa. No picture, sorry, I deleted it in disgust....So I had to spend a lot of frustrating, time de-bonding the parts, prying them out , cleaning, and finally replacing them in their intended position. - I started this work around 11:30 last PM. Finished at 1 AM-The parts were really tight and difficult to remove..lots of cursing...exhausted....Fortunately, no parts were broken, an now all fits together perfectly!!!
I realized just how well the jig was engineered by Victor...Thank you.
I may start fishing out frame # 36's pieces this afternoon after a nap.
Beware, don't make the same mistake...those pieces look similar, but they are not, and..Don't work when you are tired...mistakes happen.
View attachment 514255View attachment 514256
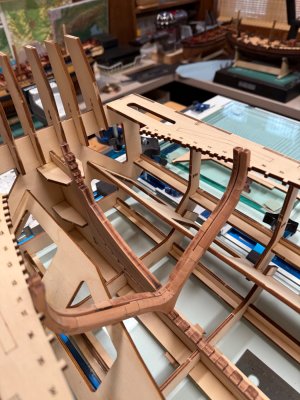
Frame 37 dry-fitted in jig....half-frames not glued together yet, need detail sanding.
Alex R
View attachment 514257

View attachment 514260
Very glad you got it worked out !
 
Thanks. Yes, I found them but left them in their sheets.
I have pulled several but labeled them in pencil. Did it mostly to trial fit port spacing of some frames to verify jig accuracy. So far pretty close.
I still am somewhat confused about their thickness relative to frames, might simply make some from stock a bit over sized to allow for final sanding....we'll see.
 
A word of caution: finished about a dozen frames, Hawse pieces.....good so far.
To mix it up a bit, pulled everything out to final finish keel and test fit transom assembly, lots of angles, bevels, etc. easier done out of jig, at least until double Y8 is fit.
One thing I realized quickly.....I would NOT blindly trim bottom of that frame, either 1/2 to the line, IMO, it must be trimmed slowly for proper angle.
I also, for the life of me, feel the short 1/2 of Y8 that fits under #5 transom piece seems to be modestly short to fit tightly to that piece.
I checked everything....don't think I screwed up, so I cut a couple scrap pieces from same tree to glue up and have more material to final fit.
Should be virtually invisible and ultimately covered by planks but still first curveball of any degree.
Anybody with any thoughts...I'm all ears.

Tim
 
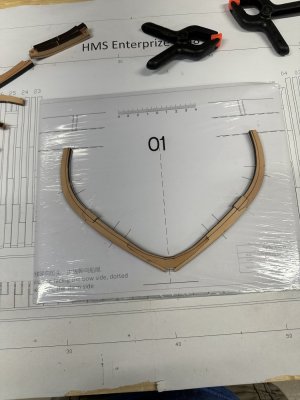
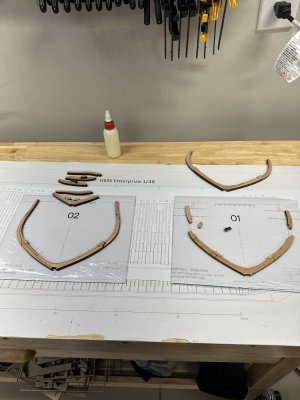
So I've started working on the frames (no, I still don't have the keel complete, but soon). Just because, I started at frame #1. As I believe I described in another thread, I'm building the frames by using a sheet of glass with the frame plan and then saran wrap over it. I've got 3 sheets of glass so I could conceivably work on 3 frames at a time. You can see in the pics that I have the first half of frame glued and set aside and am gluing up the second half of #1 and also I've started of the first half of frame 2. Due to the amount of sanding of where the parts attach, it is doubtful that I will ever work on a 3rd frame at a time. :)
IMG_1592.jpegIMG_1594.jpeg
 
So I've started working on the frames (no, I still don't have the keel complete, but soon). Just because, I started at frame #1. As I believe I described in another thread, I'm building the frames by using a sheet of glass with the frame plan and then saran wrap over it. I've got 3 sheets of glass so I could conceivably work on 3 frames at a time. You can see in the pics that I have the first half of frame glued and set aside and am gluing up the second half of #1 and also I've started of the first half of frame 2. Due to the amount of sanding of where the parts attach, it is doubtful that I will ever work on a 3rd frame at a time. :)
View attachment 514502View attachment 514503
Jeff,
Your frames look great. I've onely been working one one frame at the time. I am glueing the pieces directly on the paper plan with paper glue-(one plan copy per half-frame). I've only been putting small areas of cling under chocks and bigger joints.
I've discovered that the frames need to be completely bevelled before they are dry-fitted to the keel. they don't fit otherwise- and you are likely to break the upper futtocks and have to re-glue.. I did this a few times. So my process now is this:
After cleaning up laser char from the mating surfaces:
1) First I make the frame timbers of both half-frames, and make sure that dry fit well into their respective keel slots.
2) Glue up each half frame, using 1mm wood spacers for the stagger.
3) Glue the half frames together.
4) Cut and shape the chocks
5) Bevel the frame on the oscillating sander: I started using the 3/4" and 1" tubes with 120 grit sandpaper- really works much better than smaller diameters-only use these for really tight curves.

IMG_1596.jpeg
# 37 and 36

Alex R
 
Jeff,
Your frames look great. I've onely been working one one frame at the time. I am glueing the pieces directly on the paper plan with paper glue-(one plan copy per half-frame). I've only been putting small areas of cling under chocks and bigger joints.
I've discovered that the frames need to be completely bevelled before they are dry-fitted to the keel. they don't fit otherwise- and you are likely to break the upper futtocks and have to re-glue.. I did this a few times. So my process now is this:
After cleaning up laser char from the mating surfaces:
1) First I make the frame timbers of both half-frames, and make sure that dry fit well into their respective keel slots.
2) Glue up each half frame, using 1mm wood spacers for the stagger.
3) Glue the half frames together.
4) Cut and shape the chocks
5) Bevel the frame on the oscillating sander: I started using the 3/4" and 1" tubes with 120 grit sandpaper- really works much better than smaller diameters-only use these for really tight curves.

View attachment 514505
# 37 and 36

Alex R
Thanks for the heads up ! I figured they had to be beveled before fitted to the construction jig. At least the outside edge where it fits against the jig frames, since they have the taper built into them. :) Your ship is coming right along and looks great !
 
Jeff,
Your frames look great. I've onely been working one one frame at the time. I am glueing the pieces directly on the paper plan with paper glue-(one plan copy per half-frame). I've only been putting small areas of cling under chocks and bigger joints.
I've discovered that the frames need to be completely bevelled before they are dry-fitted to the keel. they don't fit otherwise- and you are likely to break the upper futtocks and have to re-glue.. I did this a few times. So my process nolw is this:
After cleaning up laser char from the mating surfaces:
1) First I make the frame timbers of both half-frames, and make sure that dry fit well into their respective keel slots.
2) Glue up each half frame, using 1mm wood spacers for the stagger.
3) Glue the half frames together.
4) Cut and shape the chocks
5) Bevel the frame on the oscillating sander: I started using the 3/4" and 1" tubes with 120 grit sandpaper- really works much better than smaller diameters-only use these for really tight curves.

View attachment 514505
# 37 and 36

Alex R
Looking great so far Alex
 
So I've started working on the frames (no, I still don't have the keel complete, but soon). Just because, I started at frame #1. As I believe I described in another thread, I'm building the frames by using a sheet of glass with the frame plan and then saran wrap over it. I've got 3 sheets of glass so I could conceivably work on 3 frames at a time. You can see in the pics that I have the first half of frame glued and set aside and am gluing up the second half of #1 and also I've started of the first half of frame 2. Due to the amount of sanding of where the parts attach, it is doubtful that I will ever work on a 3rd frame at a time. :)
View attachment 514502View attachment 514503
Also for you a big step: starting with the frames. It looks very promising, Jeff.
Regards, Peter
 
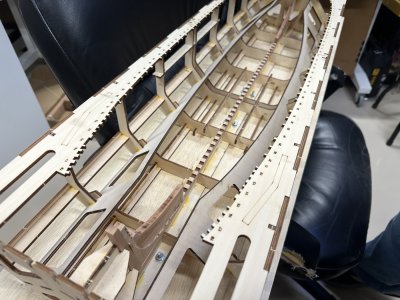
Well, I finally have the keel totally put together and in the construction jig. :)
Also worked on trimming down the parts of the chocks that should be. Had a glue joint break where I was cutting the chock and had to re-glue that half of the #1 frame and cleaned off the char on the second half of the #2 frame.
IMG_1595.jpeg
 
Jeff,
Your frames look great. I've onely been working one one frame at the time. I am glueing the pieces directly on the paper plan with paper glue-(one plan copy per half-frame). I've only been putting small areas of cling under chocks and bigger joints.
I've discovered that the frames need to be completely bevelled before they are dry-fitted to the keel. they don't fit otherwise- and you are likely to break the upper futtocks and have to re-glue.. I did this a few times. So my process now is this:
After cleaning up laser char from the mating surfaces:
1) First I make the frame timbers of both half-frames, and make sure that dry fit well into their respective keel slots.
2) Glue up each half frame, using 1mm wood spacers for the stagger.
3) Glue the half frames together.
4) Cut and shape the chocks
5) Bevel the frame on the oscillating sander: I started using the 3/4" and 1" tubes with 120 grit sandpaper- really works much better than smaller diameters-only use these for really tight curves.

View attachment 514505
# 37 and 36

Alex R
Looks very nice. I had found the "spacer" route can be a bit tricky unless frames are weighted. Slightly different approach... virtually all the frames that are offset have futtocks that are matched on one side or the other, as I build the frames I always glue the matched futtocks. Involves a lot of flipping to one side or the other with constant checking the plan, however, I only screwed up once after about 19 frames and so far they have all been dead flat and snap into jig nicely.
Still creeping up slowly on transom..... all the angles/bevels/ jig fit. a lot of my random frame building has been around gunport and so far the width seems to space out very close to plan. Still trying to decide as to fabricating my own, over wide sills for a trim to fit approach, especially the top angle fit ones. Test cut a couple of those with decent success. I saw Victor, in his thread, simply did the tops exactly like the bottoms, without angle cuts, especially since they'd all get planked over
 
Back
Top