Probably more a terminology thing, not a mistake.Yes, my mistake.
-

Win a Free Custom Engraved Brass Coin!!!
As a way to introduce our brass coins to the community, we will raffle off a free coin during the month of August. Follow link ABOVE for instructions for entering.
-

PRE-ORDER SHIPS IN SCALE TODAY!
The beloved Ships in Scale Magazine is back and charting a new course for 2026!
Discover new skills, new techniques, and new inspirations in every issue.
NOTE THAT OUR FIRST ISSUE WILL BE JAN/FEB 2026
- Home
- Forums
- Ships of Scale Group Builds and Projects
- Modelship Dockyard PoF HMS Enterprize 1774 - 1/48
You are using an out of date browser. It may not display this or other websites correctly.
You should upgrade or use an alternative browser.
You should upgrade or use an alternative browser.
I'm starting to feel like a shipwrights apprentice.Probably more a terminology thing, not a mistake.
That would be a step up for me.I'm starting to feel like a shipwrights apprentice.

Found out today that I made an error on frame pair #1. I got one of the halves backwards so the shift is going to wrong way. Got apart and only broke one of the glue joints. That glue joint is drying on the bench now and tomorrow I'll glue the halves together the correct way. I'm also hoping to start doing the bevels on the frames tomorrow. That's how I found out the one was backwards. The "sand to" line was on the inside of the half. Yes, I already checked the others and it is the only one. 
- Joined
- Jan 10, 2022
- Messages
- 860
- Points
- 403

Easily done. Hope it's ok now. Good luck with the sanding. Lots of dustFound out today that I made an error on frame pair #1. I got one of the halves backwards so the shift is going to wrong way. Got apart and only broke one of the glue joints. That glue joint is drying on the bench now and tomorrow I'll glue the halves together the correct way. I'm also hoping to start doing the bevels on the frames tomorrow. That's how I found out the one was backwards. The "sand to" line was on the inside of the half. Yes, I already checked the others and it is the only one.
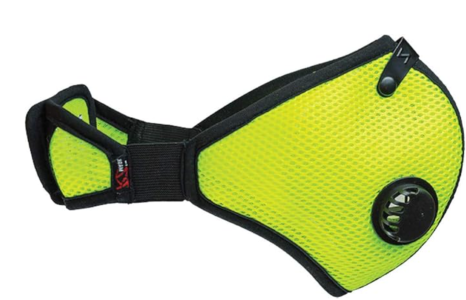
Thanks Keef. i finished up the gluing last night, including the 2 halves late last night. As far as a lot of dust, I have a oscillating spindle sander that has a monster dust collector attached to it, so that will help keep the room, the air, and my lungs clean. Don't worry, I'll still wear a filter mask.Easily done. Hope it's ok now. Good luck with the sanding. Lots of dust

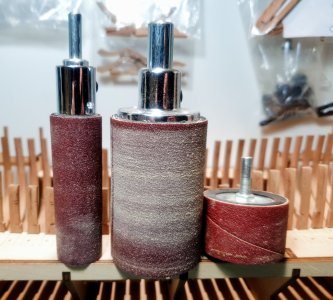
ok, I just finished sanding the bevels into frame #1. It went pretty decent using the oscillating spindle sander, but it's hard to see what your doing. For otheres, it might work better using a spindle sanding drum on a drill press. Just a thought. 
I have a small drill press I can set up. I'll have to look into what it will take to set up since I don't have room for a full time drill press. I'm already having to play musical power tools. LOL
I have a small drill press I can set up. I'll have to look into what it will take to set up since I don't have room for a full time drill press. I'm already having to play musical power tools. LOL
Kurt Konrath
Kurt Konrath
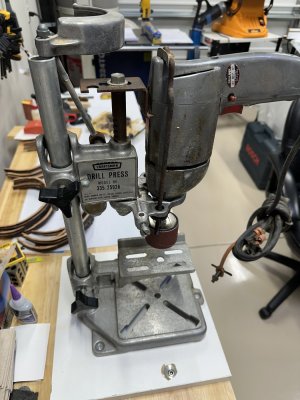
No your showing your age, or age of tools with that old beast of drill and press, you can't beat Craftsman for quality of the tools back then.Thought you guys might get a chuckle out of my vintage drill press. It was my grandfathers back in the 60's. Yes, it's an old Craftsman drill too. still solid.Variable speed and you can lock the trigger at any one of 3 different speeds. I think this will work perfectly for what I need.
View attachment 520379
Yes, have to agree.. I am blessed to have the Byrnes saw and thickness sander..I also have an old Craftsman joiner and planer..but I'm fond of an old 1940"s Dunlap ,( not Dunlop. they make tires..). cast iron table saw. It's a little larger than a Byrnes ..heavy old lump ..dangerous tilting table which I don't use, but quite nice to work with if you keep your digits out of the belt.. I see it as a step between the Byrnes and my full size table saw.. Nice to work with the old stuff, just have to be extra careful Those who are looking for a cheap alternative.. they are good, albeit expensive to ship,,
no progress today. Our air conditioner for the house failed yesterday and it was quite warm in the house last night. So, I only got about 4 hours of sleep and I didn't think running power tools and working on something that requires one to think would be a prudent course of action.  AC is fixed now, but have some meetings tomorrow and Wednesday. I'll try to sneak in a little time on her.
I feel your pain. It must be the season, ours had to be replaced two weeks ago. The joys of owning a house....Our air conditioner for the house failed yesterday
Looks like that will work. Only potential issue, some frames with considerable bevel need to be held at a pretty good angle to get correct. This is where the oscillating unit comes in handy. FWIW I use 150 grit which works great with low potential to go too far and gouge something, only takes 5 minutes to get inside/outside bevels done on paired frames, also take them down to where line is barely visible....finis up with final sanding.Thought you guys might get a chuckle out of my vintage drill press. It was my grandfathers back in the 60's. Yes, it's an old Craftsman drill too. still solid.Variable speed and you can lock the trigger at any one of 3 different speeds. I think this will work perfectly for what I need.
View attachment 520379
You really need to get them down well where frame settles on the lower, angled jig support or they will not seat properly.
Sanding drums are heaven sent and allows you to overcome the problem of varying the bevel which is dynamic from the floor to the top timber and is not always the same inboard as outboard for some frames far aft and far forward. I love printing the frames on label paper which is then stuck to the wood. I leave the drawing on the frame pieces until the entire frame is assembled. This then shows the bevel variation along the entire length and makes it a bit easier to control. When there are only plain paper drawings of the frames can be scanned then printed on label paper or copied on plain paper and glued onto the wood with white glue or matte medium, etc.some frames with considerable bevel need to be held at a pretty good angle to get correct.
Allan
An example of a half frame showing the bevel drawn by Wayne Kempson for the Euryalus books is attached.
Attachments
Jeff, all,
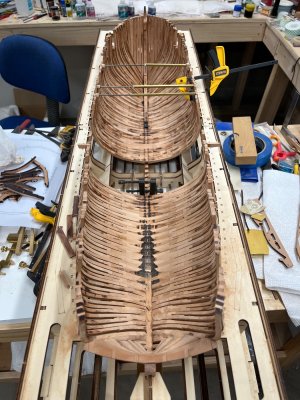
Coming down the home stretch, lots of final sanding ahead.
I should mention a mystery I discovered, probably unique to me.
As I progressed front to back I noticed a modest spacing issue as frames began to have a very slight mismatch with the top block on the keel and determined unless addressed there would ultimately result in a small gap between frames where they ultimately met.
When I started, everything measured out properly, frames seated dead on correct locations.......could not figure out what was up and with frames all glued in, no turning back.
After head scratching and colorful language my course correction was to source a thick piece of pear, measure everything and scratch build 8 new pieces that make up the first futtocks on both frames including chocks.
All told, this issue would have been, maybe 1/16" total gap.....but still.
The rest of the frames were built per instructions with upper futtocks spaced out well and everything finished up nicely, additional frames returned to perfect spacing and when viewed, unless you knew what I did, you'd never see it so we'll call it a "near miss".
Curve balls, part of the process.


A nice process although you really need not do it like that simply because, un like what we had to do for Euryalus [Which I have fully framed, tons of paper printing from there CD and scissor workSanding drums are heaven sent and allows you to overcome the problem of varying the bevel which is dynamic from the floor to the top timber and is not always the same inboard as outboard for some frames far aft and far forward. I love printing the frames on label paper which is then stuck to the wood. I leave the drawing on the frame pieces until the entire frame is assembled. This then shows the bevel variation along the entire length and makes it a bit easier to control. When there are only plain paper drawings of the frames can be scanned then printed on label paper or copied on plain paper and glued onto the wood with white glue or matte medium, etc.
Allan
An example of a half frame showing the bevel drawn by Wayne Kempson for the Euryalus books is attached.
Kurt Konrath
Kurt Konrath
Have you ever noticed, AC don't fail till beginning of summer and heaters don't fail until end of fall, and water heaters fail in the middle of hot shower!I feel your pain. It must be the season, ours had to be replaced two weeks ago. The joys of owning a house....
well, I snuck into the shop yesterday to try to get a frame beveled and tried to bevel the outside of a frame with the oscillating drum sander and I guess I was in too much of a hurry and managed to snap pieces (yes, that's plural) off of the frame. 
Today, I need to fix the frame I broke and finish getting the drum sander ready on the drill press by making a zero tolerance support around the drum to support the work while I'm sanding it.
Today, I need to fix the frame I broke and finish getting the drum sander ready on the drill press by making a zero tolerance support around the drum to support the work while I'm sanding it.
Last edited:
Wow ! That is really coming along ! You have been hard at work ! It sounds like you got your spacing issue worked out which I'm glad to hear ! I didn't totally understand your description of what was occurring, but I did catch that you have a solution and I'm very glad for that.Jeff, all,
Coming down the home stretch, lots of final sanding ahead.
I should mention a mystery I discovered, probably unique to me.
As I progressed front to back I noticed a modest spacing issue as frames began to have a very slight mismatch with the top block on the keel and determined unless addressed there would ultimately result in a small gap between frames where they ultimately met.
When I started, everything measured out properly, frames seated dead on correct locations.......could not figure out what was up and with frames all glued in, no turning back.
After head scratching and colorful language my course correction was to source a thick piece of pear, measure everything and scratch build 8 new pieces that make up the first futtocks on both frames including chocks.
All told, this issue would have been, maybe 1/16" total gap.....but still.
The rest of the frames were built per instructions with upper futtocks spaced out well and everything finished up nicely, additional frames returned to perfect spacing and when viewed, unless you knew what I did, you'd never see it so we'll call it a "near miss".
Curve balls, part of the process.
View attachment 521245


