Wicked good!
-

Win a Free Custom Engraved Brass Coin!!!
As a way to introduce our brass coins to the community, we will raffle off a free coin during the month of August. Follow link ABOVE for instructions for entering.
-

PRE-ORDER SHIPS IN SCALE TODAY!
The beloved Ships in Scale Magazine is back and charting a new course for 2026!
Discover new skills, new techniques, and new inspirations in every issue.
NOTE THAT OUR FIRST ISSUE WILL BE JAN/FEB 2026
You are using an out of date browser. It may not display this or other websites correctly.
You should upgrade or use an alternative browser.
You should upgrade or use an alternative browser.
Cutty Sark Semi Kit 1/40 Prototype
- Thread starter RichardHDunn
- Start date
- Watchers 31
Richard, I'm enjoying your build and your workshop! Nicely done! Magic Mike
- Joined
- Sep 23, 2021
- Messages
- 262
- Points
- 168

Hi Richard,
What a monster, at that scale it is really a small ship not a model! It looks amazing and being able to do all the detailing at the larger scale will make it absolutely stunning. I do not envy you tackling such a beast. I'm building the Billings 1:75 kit and that is big enough for me, just manoeuvring it around my desk is a task unto itself! I will look forward to following your build and will undoubtedly be asking you for advice that will help me along as well.
Dom
What a monster, at that scale it is really a small ship not a model! It looks amazing and being able to do all the detailing at the larger scale will make it absolutely stunning. I do not envy you tackling such a beast. I'm building the Billings 1:75 kit and that is big enough for me, just manoeuvring it around my desk is a task unto itself! I will look forward to following your build and will undoubtedly be asking you for advice that will help me along as well.

Dom
- Joined
- Oct 17, 2020
- Messages
- 1,691
- Points
- 488

Hi Richard , found on the net, might be of some help.FrankThanks guys
You are correct in that assumption Jim, there is absolutely nothing that needs to be soldered to them and those that do need fixing have enough area to CA on.
The only small fitting which needs to carry load are the boomkins and those can be pinned through.
Looks like I will be experimenting with milling aluminium on the CNC soon.
On another note I am playing with the idea of publishing this as a set of plans and templates that can be replicated at various scales to meet increasing demand for smaller scales.
What I am proposing will cost a little more than regular set of plans for the simple fact it will not be done on paper, the reason is paper moves.
I hope you all know this but you should never print on paper.
Plans should always be printed on drafting film, it is stable, semi transparent and heavy gauge making it tough and ideal for cutting with a knife and running a pencil around it.
View attachment 417112 The other huge advantage some of you may not realise is the ink used on film is almost like a wax and if ironed face down will transfer on to the wood
It can be shipped anywhere regardless of climate and it will not move.
The bonus of this is I don't have to limit you to my choices of timber although I am adamant of this personally, Anigre for decking as it looks identical to aged teak and American Cherry stained with golden yellow stain to replicate the golden brown of varnished teak.
But ultimately its up to you. Can I have some thoughts on this.
an example of this would be the frames and keel, I would provide each frame as a normal profile with the bevel also marked on it so it can be glued onto the ply cut out and bevelled with a file.
This was done in the same way before I owned a CNC and with care note the quality of the fits.
View attachment 417113View attachment 417114
The keel would be the same with the addition of 1:1sections at every frame and waterline, of the rabbet on a separate sheet that can be cut up.
rather than the frame notches being marked on keel I would mark the location of one side of the frame, to allow for users to supply a different thickness of frame, something along that line of approach
The accuracy of the model will not be compromised in any way, it's still as close as a shrunken version of the full size thing but users will just have to be good at scroll sawing and cleaning up to the very fine lines which will be very fine lines indeed .13mm or finer.
I would not think that anything smaller than 1/64 could be built to the proper level of detail, things would have to be dropped or scaled up to make it possible. though.
I would include plans for everything on the hull and masting, including the decking and planking and optional cast resin fittings.
Or am I stupid doing this and better off just doing proper plans of the ship at every level and letting you build your own and come up with you own construction method.
Can I have some thoughts on this from everyone?
Attachments
This is a prototype for a kit I have been asked to do, I may not take it beyond the planking stage, it depends if I get the bug.
But on the note of size its tiny compared to my main project.
I put the beer on the deck as most people can relate the scale from that.
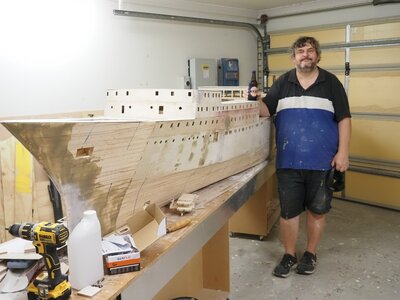
But on the note of size its tiny compared to my main project.
I put the beer on the deck as most people can relate the scale from that.

TEV Wahine 1/35 Large Scale RC build
I have been building this model for 2-3 years now and had a build on another site but due to requests I have decided to do a build of sorts on here as well but will spend some time just getting everyone up to speed as its a complex build and lots to grasp. This is not for the faint hearted...
shipsofscale.com
Hi Richard, congratulations on the models and projects.
What do you sink about making the Cutty Sark kit, also in 1:48 or 1:50 scale, were it would be very easy to find ready-made parts, on the market ?
What do you sink about making the Cutty Sark kit, also in 1:48 or 1:50 scale, were it would be very easy to find ready-made parts, on the market ?
An extremely interesting project Richard and something we have in common, I was also involved in the restoration.
I worked for the Steel contractor who fabricated the pressed faceted steel plates that reinforced the skeleton, the support struts and we were also responsible for jacking the ship up and installing the steel support struts as she now sits. I also solely made the walkway that runs through the ships hold
At that time, I worked on the tools and was one of those involved in the fabrication of these components and left that business in 2013. I have since moved back but I am now in charge of the workshop
Hello!An extremely interesting project Richard and something we have in common, I was also involved in the restoration.
I probably have you in a photo somewhere then....
Do you remember Claire or Shirley E?
Hello!
I probably have you in a photo somewhere then....
Do you remember Claire or Shirley E?
Hi, I was not on site, the fabrication was carried out in our factory based in Yorkshire so did not get to see the project in person.I did get to see plenty of pictures of the fire damage though.
Our Tekla 3D model of the structure used to detail the reinforcements required to suspend the vessel as she now sits was probably derived from your work!
Thanks Frank, she was barely recognisable at that stage of her career, looking very sad.Hi Richard , found on the net, might be of some help.Frank
This was around the time Longridge did his book I believe which partly explains the errors to.
Thanks for all the comments guys, its nice to get feedback.
Better go and have a new years eve, happy new year to everyone!.
Better go and have a new years eve, happy new year to everyone!.
SORRY for my writing error , I meant to say : THINK ( intend ) and not sink, about the 1:48 and 1"50 scales.Hi Richard, congratulations on the models and projects.
What do you sink about making the Cutty Sark kit, also in 1:48 or 1:50 scale, were it would be very easy to find ready-made parts, on the market ?
Happy New Year !
Sorry I missed this question. I will explain what's involved from my end first.What do you sink about making the Cutty Sark kit, also in 1:48 or 1:50 scale, were it would be very easy to find ready-made parts, on the market ?
Please keep in mind I did not go into this with the goal of a mass produced kit, if I did I would have gone to 1/48 I was asked to do this as a one off at 1/40 and am trying to see who else are happy to do it at this scale
However I will explain what's involved to do another scale.
The model creation in 3d takes 3-4 months as I can only do it part time, I spend all day modelling in 3d for my job and in the interest of losing weight I have to get off my butt after work to get moving so that is the first thing, the first rule of kits like this is identify your exact plywood thickness first, every different scale requires a large amount of re modeling as frames for 1/40 1/48 and 1/50 would probably be the same but 1/64 would be smaller, ,even so the other parts still have to be done, then there is the machining, it takes 5 full days to machine 1 kit with one day of that maintenance as the CNC requires full calibration and adjustments after every 20 hours.
The material alone for a 1/40 is about $400AU as I use Finnish aircraft ply which is very high quality, the 4mm is 8 ply..
I did ask a few questions back (post 18) how people would feel about a set of plans and patterns that can be scaled to what scale you want and printed on Mylar drafting film, I still think that is the best way to do this, Honestly this is a detailed kit and probably not for those who don't want to cut out parts as it has to be done regardless.
I have heard that most people with this kit in mind would not want to cut out frames but in all honesty that's the easy part, if the patterns are accurate and include all the info and are stable and don't shrink/contract in moisture which Drafting film doesn't.
I might even be able to get it with an adhesive backing.
I should add that the size of some of the elements at 1/48 is near impossible to create and you have to fake it or make the out of scale.
But if you have patterns you can do what ever scale you like I just need to tell the printer and he can print that version.
I don't think you would be able to get parts for this kit other than the obvious things like blocks and belaying pins, pumps winches and ironwork are all unique to the ship in most cases and if a builder wants to start deviating from this in the interest of finding a easy option then I would suggest this kit is probably not for you as its about accuracy and historical record, which is why I will be making all the fittings from resin as a separate pack, that I can do at different scales as I just need to print them
I built this ship at 1/48 when I was in high school in the 80,s and it was very hard to do the fine work, the gingerbread work and things is nearly impossible but at 1/40 its able to be done quite well in resin and gilded or painted, I would gild it as gold leaf is not that expensive and its an easy process.
The deck planking at 1/40 in only 3mm wide and laying and joggling a deck any smaller than that is tricky to do well. But again if somebody decides to do it smaller they can do a ply penned in deck if they wish though I can't stand them personally.
So I guess I really want to know if patterns is an option, in my mind the advantage to this kit or plans is not having the work done for you, it's having a really good construction design and an accurate exact scale representation of the ship.
As I said back in post 18 I could also just do a set of plans of the ship as built and sell those but I think the design of the structure is actually the hard part, until you see all the subtleties of her it will not seem like that but trust me it was not easy to resolve even at 1/40
If I just give plans of the model and patterns you can even decide to plank it a different way, such as double layer if that floats your boat.
This client wants it planked properly on one side and coppered on the other, at least that's what I think he has planned.
I have not priced it yet but at a guess I can't see it being cheap, like any other kits it would be above $1000.
Last edited:
Thanks for your answer. Certainly a change of scale in your project would be very laborious without practical results, since it is not your objective to produce the kit in large quantities. Best regardsSorry I missed this question. I will explain what's involved from my end first.
Please keep in mind I did not go into this with the goal of a mass produced kit, if I did I would have gone to 1/48 I was asked to do this as a one off at 1/40 and am trying to see who else are happy to do it at this scale
However I will explain what's involved to do another scale.
The model creation in 3d takes 3-4 months as I can only do it part time, I spend all day modelling in 3d for my job and in the interest of losing weight I have to get off my butt after work to get moving so that is the first thing, and because the first rule of kits like this is identify your exact plywood thickness first .
every different scale requires a large amount of re modeling as frames for 1/40 1/48 and 1/50 would probably be the same but 1/64 would be smaller, ,even so the other parts still have to be done, then there is the machining, it takes 5 full days to machine 1 kit with one day of that maintenance as the CNC requires full calibration and adjustments after every 20 hours.
The material alone for a 1/40 is about $400AU as I use Finnish aircraft ply which is very high quality, the 4mm is 8 ply..
I did ask a few questions back (post 18) how people would feel about a set of plans and patterns that can be scaled to what scale you want and printed on Mylar drafting film, I still think that is the best way to do this, Honestly this is a detailed kit and probably not for those who don't want to cut out parts as it has to be done regardless.
I have heard that most people with this kit in mind would not want to cut out frames but in all honesty that's the easy part, if the patterns are accurate and include all the info and are stable and don't shrink/contract in moisture which Drafting film doesn't.
I might even be able to get it with an adhesive backing.
I should add that the size of some of the elements at 1/48 is near impossible to create and you have to fake it or make the out of scale.
But if you have patterns you can do what ever scale you like I just need to tell the printer and he can print that version.
I don't think you would be able to get parts for this kit other than the obvious things like blocks and belaying pins.
I built this ship at 1/48 when I was in high school in the 80,s and it was very hard to do the fine work, the gingerbread work and things is nearly impossible but at 1/40 its able to be done quite well in resin and gilded or painted, I would gild it as gold leaf is not that expensive and its an easy process.
The deck planking at 1/40 in only 3mm wide and laying and joggling a deck any smaller than that is tricky to do well. But again if somebody decides to do it smaller they can do a ply penned in deck if they wish though I can't stand them personally.
So I guess I really want to know if patterns is an option, in my mind the advantage to this kit or plans is not having the work done for you, it's having a really good construction design and an accurate exact scale representation of the ship.
As I said back in post 18 I could also just do a set of plans of the ship as built and sell those but I think the design of the structure is actually the hard part, until you see all the subtleties of her it will not seem like that but trust me it was not easy to resolve even at 1/40
If I just give plans of the model and patterns you can even decide to plank it a different way, such as double layer if that floats your boat.
This client wants it planked properly on one side and coppered on the other, at least that's what I think he has planned.
I have not priced it yet but at a guess I can't see it being cheap, like any other kits it would be above $1000.
Richard how about bass wood for the bulwarks. It's strong but flexible in thin sizes and I'm assuming there are adequate frame tops to attach it to along the inside. Kind of hard to get a mental picture of what your doing but I sure am interested. Could you tell me the overall dimensions of the model and do you intend to offer any diagrams or instructions for the right rigging? Disappointing to find out that my current model of the Sergal Cutty Sark (1:78) may not look like the real thing. I'll finish it anyway but just saying. Sure hope you will continue to post pictures and descriptions of what your doing. This is excellent work on your part and I have a metal medallion key ring I bought from the CS people made from the foremast of the original ship. Love it. Norgale
I thought they only said that in South Boston. Ha!Wicked good!
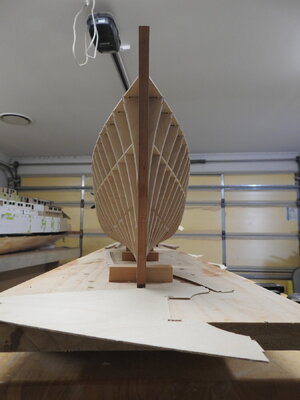
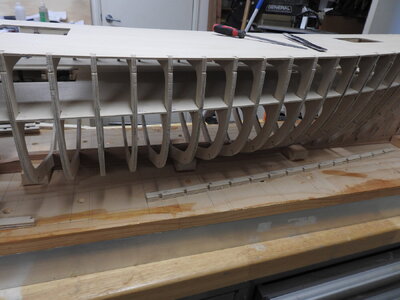
Some more progress today
The tween decks forward are dry fitted. luckily Cuttys Tween deck is parallel to the main deck and therefore the tween deck can be held down with lots of 37mm sticks wedged in under the main deck beams,
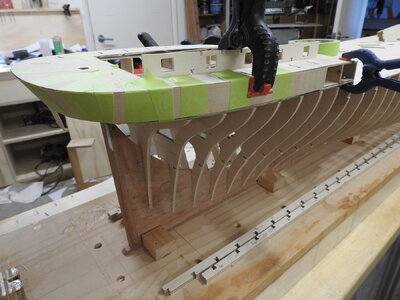
And just to demonstrate the plate development, the counter bulwark dry fitted and taped into position on the counter frames
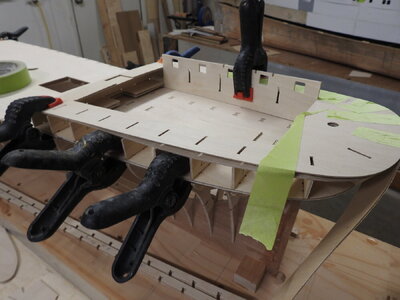
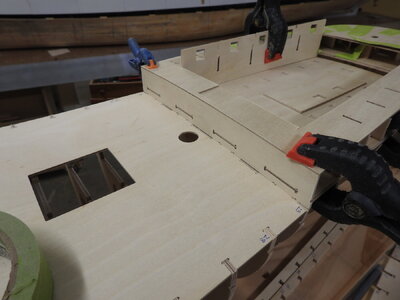
I have the rabbet on the Port side of the aft half of the keel/sternpost to do and the aft frames to bevel and its ready for final glued assembly
The tween decks forward are dry fitted. luckily Cuttys Tween deck is parallel to the main deck and therefore the tween deck can be held down with lots of 37mm sticks wedged in under the main deck beams,


And just to demonstrate the plate development, the counter bulwark dry fitted and taped into position on the counter frames


I have the rabbet on the Port side of the aft half of the keel/sternpost to do and the aft frames to bevel and its ready for final glued assembly
Rabbet carving video coming
Last edited:
- Joined
- Jun 13, 2022
- Messages
- 310
- Points
- 168

Great work Richard. My others half first comment was "And where exactly would you put a model that size?" ... I did respond "Mere detail".
I am from Maine…a common Maine saying…as in “That pizza is wicked good!” South Boston is a bunch of flat landers!I thought they only said that in South Boston. Ha!


