Really beautifull work, WONDERFULL CRAFTMENSHP. Don
-

Win a Free Custom Engraved Brass Coin!!!
As a way to introduce our brass coins to the community, we will raffle off a free coin during the month of August. Follow link ABOVE for instructions for entering.
-

PRE-ORDER SHIPS IN SCALE TODAY!
The beloved Ships in Scale Magazine is back and charting a new course for 2026!
Discover new skills, new techniques, and new inspirations in every issue.
NOTE THAT OUR FIRST ISSUE WILL BE JAN/FEB 2026
- Home
- Forums
- Ships of Scale Group Builds and Projects
- Group Build Archives
- Blandford Cross Section PoF Group Build
You are using an out of date browser. It may not display this or other websites correctly.
You should upgrade or use an alternative browser.
You should upgrade or use an alternative browser.
DocBlake's HMS Blandford Cross Section Build - 1/32 Scale - [COMPLETED BUILD]
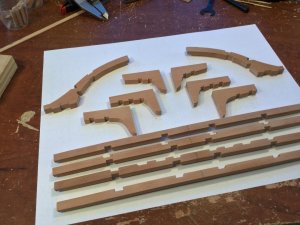
All the lower deck beams have been fitted into place and trimmed to size. I laid out and then cut out the mortises for the carlings. The lodging knees and arm beams were cut out and mortises made for the ledges. The hanging knees will be custom made as the deck is installed. The next task is to cut out the carlings. All the parts are swiss pear.

- Joined
- Dec 3, 2018
- Messages
- 2,450
- Points
- 538

Ahoy Dave,
I've been looking over your build log and I noticed you have some kind of blocks or a jig between all your frames. Are those separate blocks or a jig?
Nice work.
I've been looking over your build log and I noticed you have some kind of blocks or a jig between all your frames. Are those separate blocks or a jig?
Nice work.
Hi Mike!
Those are spacer blocks. They help maintain the proper allignmnt of the frames as the inboard planking proceeds. They also allow me to remove the spacer bars on each frame early on and make the model pretty rigid. Since Blandford will be planked down to the wales , both inboard and outboard, they won’t show on the finished model!
Those are spacer blocks. They help maintain the proper allignmnt of the frames as the inboard planking proceeds. They also allow me to remove the spacer bars on each frame early on and make the model pretty rigid. Since Blandford will be planked down to the wales , both inboard and outboard, they won’t show on the finished model!
Thanks Dave. I will do that for my Constitution model.
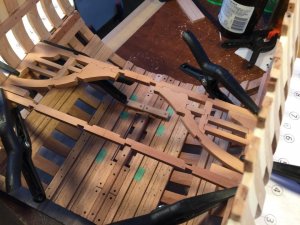
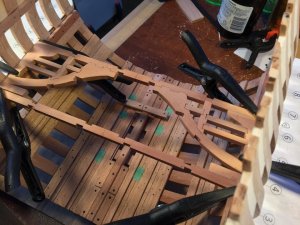
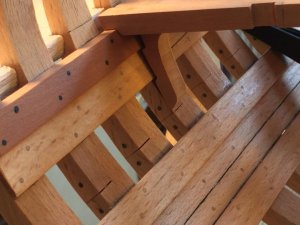
I started construction of the lower deck with beam #2. I made the arm beams a little thicker than necessary to allow for the camber of the deck. Because they are so long, stretching from the center of the beam to the clamps, they have to have some camber, and can't be flat. I'll sand that camber in when the deck is fully installed. I started adding carlings and ledges, and shaped the hanging knees for this part of the deck. For the sake of simplicity, I made the ledges just as thick as the carlings so I didn't have to cut those half-mortises in the carlings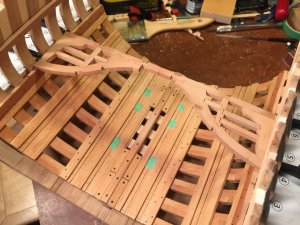
 .
.


 .
.Again Dave what supberb craftsmanship, how did you cut the notches, can not waite till you get to the main deck frameing witch is were I am hopefully my timber package will be in soon, i have done the ARMS, AND DECK KNEES and hand cut the notches so saved a little time there, when material arrieves I will do the beams I alread shaped a beam out of scrape material to see how it looks acording to comments it looks OK I was worried about the camber so I guess it turned out OK. Don
Thanks, Don!
I cut the notches 2 different ways. For notches in straight timber (carlings, for example) I marked the location on the timber, set my Byrnes table saw blade to 1/16" cut, then passed the timber over the blade with the miter gauge, nibbling away the wood. I used files, small chisels and the X-Acto knife to fine tune the fit. On the curved pieces, like the arm beams, I nibbled away the notch using my scroll saw, then files, chisels and X-Acto.
I cut the notches 2 different ways. For notches in straight timber (carlings, for example) I marked the location on the timber, set my Byrnes table saw blade to 1/16" cut, then passed the timber over the blade with the miter gauge, nibbling away the wood. I used files, small chisels and the X-Acto knife to fine tune the fit. On the curved pieces, like the arm beams, I nibbled away the notch using my scroll saw, then files, chisels and X-Acto.
Dave, WHAT I do is mark the cut then use my JAPENESE HAND SAW (THEY ARE EXCEPTIONAL) making several small cuts both vertically and diangnaly then use my exacto and peel the cuts away and finally use files and chisels to finish the notch, most of the time it works but sometimes to many times they do not turn out to good going to try my new X-Y table and following JOES EXCELLENT THREAD TRY THE NOTCHES USING THAT. THANKS Don
Really nice work Dave.

Thanks, Mike! How are your projects coming?
Ahoy Dave,
I'm back in the ship yard on Blandford. Doing a lot of catch up and repairing my boo-boo's. I was inspired by a sea cruise I took just before Christmas
How did you get your treenails to standout like that? Very nice touch.
I'm back in the ship yard on Blandford. Doing a lot of catch up and repairing my boo-boo's. I was inspired by a sea cruise I took just before Christmas
How did you get your treenails to standout like that? Very nice touch.
- Joined
- Dec 3, 2018
- Messages
- 2,450
- Points
- 538

DAVE, there has now come a new revised version of the drawings, you have come reasonably far in the Blandford building.
Questions:
I already have all the drawings and the scale is correct at all,do I need to be worried, maybe there are problems with just
plans on scale 1-48, I do not know.
You are very good at seeing such problems?
Questions:
I already have all the drawings and the scale is correct at all,do I need to be worried, maybe there are problems with just
plans on scale 1-48, I do not know.
You are very good at seeing such problems?
In deciding how to construct the lower deck, I decided to fit and install the beams first and then fit the carlings and ledges after. The first step was to glue the lodging knees and hanging knees in place and frame in the space between the 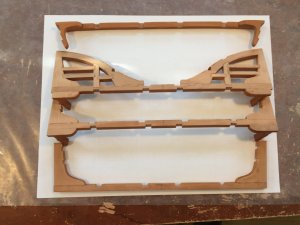 arm beams and beam 2. I then applied poly to the under surfaces and sides of the parts. One more coat and I'll glue them in place.
 arm beams and beam 2. I then applied poly to the under surfaces and sides of the parts. One more coat and I'll glue them in place.
Thanks Mike! And thanks again for all your hard work in designing and moderating this project. Very much appreciated.


