Will do Mike. THANKS DON
-

Win a Free Custom Engraved Brass Coin!!!
As a way to introduce our brass coins to the community, we will raffle off a free coin during the month of August. Follow link ABOVE for instructions for entering.
-

PRE-ORDER SHIPS IN SCALE TODAY!
The beloved Ships in Scale Magazine is back and charting a new course for 2026!
Discover new skills, new techniques, and new inspirations in every issue.
NOTE THAT OUR FIRST ISSUE WILL BE JAN/FEB 2026
- Home
- Forums
- Ships of Scale Group Builds and Projects
- Group Build Archives
- Blandford Cross Section PoF Group Build
You are using an out of date browser. It may not display this or other websites correctly.
You should upgrade or use an alternative browser.
You should upgrade or use an alternative browser.
Just srarted this project first framr partnally dome, showing development of dry fitted frame No.1, after dry fitting the fitst frame what you see there is a widen line on the paper pasrent, after satisfied will take theframe No. one apartuse wax paper to continue will glue the forewaed frame No. 1on top of FRAME No. ONE if all is wright will finish it up any critisims would be welcme. Don
Hi Don,
Looks like a great start. What kind of wood are you using?
Looks like a great start. What kind of wood are you using?
- Joined
- Aug 10, 2017
- Messages
- 1,706
- Points
- 538

Hi Don,
Looks like a good start, you want to be very careful with the butt joints between the parts. If you use a metal vise and small flat file you can get a nice flat and square surface and the joints will look better. It does not make any difference in the strength of a double frame but when you start making single frames the joints need to be close to perfect or they will be weak.
Before you glue the two sides together place a piece of scrap would the same thickness as the keel in the keel notch to hold the frame square.
Mike
Thank you Mike41, and Mike, Mike using Natural Pear for the frames, suprisingly to me the 1/4 in, is a hard cut using my old dremell scroll saw set at high speed, have a feeling will need a lot of blades, have a dremel mot-saw, but think it would not work on the 1/4in material, Mike 41 I will have a lot of questions before this one is finished,,,,I also used Boxwood for the keel. THANKS AGAIN Don
Good start,Don!
Hallo Don,
in addition to the tips Don already made.....please check your type of saw blades!
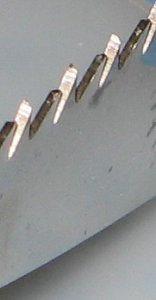
Also important is the tooth set — Bending of the teeth, right or left, to allow blade clearance through the cut (or kerf) - so the teeths should be bended alternate to the left and than to the right -> This is helping, that the blade is not getting stuck in the timber.

For cutting curved lines like for the frames, it is necessary, that the blade is not thick, so use something like the top one from the next photo.
In Europe the scrollsaw blades are defined by numbers, for your use should be blades between 2 to 3 with small preassure, for thicker timber you can go up.
Maybe you have to try different types to get the best results.

If you cut very thin timber, like the 5mm for the frames, you should be more careful with preasure, due to the fact, that the preassure between wood and blade is located on a small area of the blade. Also important than is to cut curves very slowely and fast, the blade needs the time to cut around the edge and if you force the blade too fast around the edge, the blade will be twisted and tilted -> the blade is damaged.....
Be aware, that the pear wood is relative hard wood, so you have to make slow cuts, means do not give preasure on the wood, so that the blade is making a curve during cutting.....the blade should be every time streight vertical und should not make a bow, no preassure against the blade, the blade should make the work.
And off course it is important, that the tension is high enough, when you fix the balde into the saw -> It has to make a nice "ping" when you test with finger the tension (with switched off saw!)
This is a good video I found on youtube
in addition to the tips Don already made.....please check your type of saw blades!
Also important is the tooth set — Bending of the teeth, right or left, to allow blade clearance through the cut (or kerf) - so the teeths should be bended alternate to the left and than to the right -> This is helping, that the blade is not getting stuck in the timber.

For cutting curved lines like for the frames, it is necessary, that the blade is not thick, so use something like the top one from the next photo.
In Europe the scrollsaw blades are defined by numbers, for your use should be blades between 2 to 3 with small preassure, for thicker timber you can go up.
Maybe you have to try different types to get the best results.

If you cut very thin timber, like the 5mm for the frames, you should be more careful with preasure, due to the fact, that the preassure between wood and blade is located on a small area of the blade. Also important than is to cut curves very slowely and fast, the blade needs the time to cut around the edge and if you force the blade too fast around the edge, the blade will be twisted and tilted -> the blade is damaged.....
Be aware, that the pear wood is relative hard wood, so you have to make slow cuts, means do not give preasure on the wood, so that the blade is making a curve during cutting.....the blade should be every time streight vertical und should not make a bow, no preassure against the blade, the blade should make the work.
And off course it is important, that the tension is high enough, when you fix the balde into the saw -> It has to make a nice "ping" when you test with finger the tension (with switched off saw!)
This is a good video I found on youtube
thank you Uwek for the information, will do it tell you the results. Don
Hi Don,
Looks like you're off to a great start.
Looks like you're off to a great start.
Looks good, Don!
progress pictures of completed frame No 1,,,,took considerable care in getting the deck clamps marked properly, know from bad experience better get them right the first time or a lot of problems latter on,,,,last picture is scribing the frame to the drawings to make sure I am OK in the layout, looks OK to me,,,now to figure out how to get drill to put hole in bottom of frame for wire to hold the frame to the keel,,,,any critisims or if you see something not looking right please do not hesitate to comment,,,only way to learn![20180415_194840[2979].jpg 20180415_194840[2979].jpg](https://shipsofscale.com/sosforums/data/attachments/24/24535-121d076f5d940b9eab145272e7a6ff79.jpg?hash=Eh0Hb12UC5)
![20180415_195117[2978].jpg 20180415_195117[2978].jpg](https://shipsofscale.com/sosforums/data/attachments/24/24536-29143a104d72eb05dc8d8d5f6b4d9586.jpg?hash=KRQ6EE1y6w)
![20180415_195237[2977].jpg 20180415_195237[2977].jpg](https://shipsofscale.com/sosforums/data/attachments/24/24537-1771d15d6add578bda197a7e8d2cd97c.jpg?hash=F3HRXWrdV4)
![20180415_195352[2976].jpg 20180415_195352[2976].jpg](https://shipsofscale.com/sosforums/data/attachments/24/24538-61765a998e306a3a5d719783463ee8a7.jpg?hash=YXZamY4waj)
![20180415_195641[2975].jpg 20180415_195641[2975].jpg](https://shipsofscale.com/sosforums/data/attachments/24/24539-105f6c2b5153f7c5f63fe92611d8c413.jpg?hash=EF9sK1FT98)
![20180415_201149[2974].jpg 20180415_201149[2974].jpg](https://shipsofscale.com/sosforums/data/attachments/24/24540-3a4e76e51e45c40e1dd8ab781160a9e2.jpg?hash=Ok525R5FxA)
![20180415_194840[2979].jpg 20180415_194840[2979].jpg](https://shipsofscale.com/sosforums/data/attachments/24/24535-121d076f5d940b9eab145272e7a6ff79.jpg?hash=Eh0Hb12UC5)
![20180415_195117[2978].jpg 20180415_195117[2978].jpg](https://shipsofscale.com/sosforums/data/attachments/24/24536-29143a104d72eb05dc8d8d5f6b4d9586.jpg?hash=KRQ6EE1y6w)
![20180415_195237[2977].jpg 20180415_195237[2977].jpg](https://shipsofscale.com/sosforums/data/attachments/24/24537-1771d15d6add578bda197a7e8d2cd97c.jpg?hash=F3HRXWrdV4)
![20180415_195352[2976].jpg 20180415_195352[2976].jpg](https://shipsofscale.com/sosforums/data/attachments/24/24538-61765a998e306a3a5d719783463ee8a7.jpg?hash=YXZamY4waj)
![20180415_195641[2975].jpg 20180415_195641[2975].jpg](https://shipsofscale.com/sosforums/data/attachments/24/24539-105f6c2b5153f7c5f63fe92611d8c413.jpg?hash=EF9sK1FT98)
![20180415_201149[2974].jpg 20180415_201149[2974].jpg](https://shipsofscale.com/sosforums/data/attachments/24/24540-3a4e76e51e45c40e1dd8ab781160a9e2.jpg?hash=Ok525R5FxA)
Last edited by a moderator:
- Joined
- Aug 10, 2017
- Messages
- 1,706
- Points
- 538

Hi Don.
The first frame looks great, the first one is always the most difficult, but they do get easier as you go along. You might want to wait until you finish building all the frames before you start attaching them to the keel that way if one needs a little trimming you can remove it from the jig for adjustments.
When all the frames are glued in place on the keel you can drill through the top of the frame into the keel for the wire, this way the hole does not have to be exactly perpendicular to the keel. It will be a while before you get to this point. Keep up the good work.
Mike
In can fully confirm mikeś words about the first frame.......I produced shortly ago 44 frames for my Salamandre. With every frame it is getting easier, faster and also the quality is rising.....good work
Good start Don!!
Zoltan
Zoltan
Thank you one and all, this is to Mike 41,, after reading Dave post on the placement of thr frames on to the keel I too have to much of a gap, but as I explained before MY SON-IN-LAW and Daughter will not let me use the big tools, so if I need something done on them I have to ask my Son-In-Law to do it and he is just to busy right now so stay up quite late(4:00AM) last night I think I have come up with a solution that will work without redoing either the KEEL OR JIG, I will show you step by step what I think will work and await comments. Don,,,,,,yes the first frame is the hardest it will get easier as I go along
Hi Every one,Need help PLEASE, ever since Dave posted on the frame fit on the keel I to have to much of a gap, but for various reasons can not do over,,,, so I came up with this idea tha would both line up the keel and jig with the frames in proper location here it is both words and pictures,,,,, first I went to the jig plan and used the center line mark for the frames,,,marked location on the keel, finding proper location, then drilled hole in frame and into keel, in theroy this should work, here are the pictures please anybody help or coment


![20180408_223542[2900].jpg 20180408_223542[2900].jpg](https://shipsofscale.com/sosforums/data/attachments/24/24058-410763d5575385e3ef1a524616686834.jpg?hash=QQdj1VdThe)
![20180409_004813[2898].jpg 20180409_004813[2898].jpg](https://shipsofscale.com/sosforums/data/attachments/24/24059-30b1ee94fd9e3727e5e30af3bae9654e.jpg?hash=MLHulP2eNy)
![20180408_224851[2899].jpg 20180408_224851[2899].jpg](https://shipsofscale.com/sosforums/data/attachments/24/24061-a3853595a79790b61444628e0674a789.jpg?hash=o4U1laeXkL)


![20180413_003114[2933].jpg 20180413_003114[2933].jpg](https://shipsofscale.com/sosforums/data/attachments/24/24462-b52a7d8a867267b38b1eedcebfc961d3.jpg?hash=tSp9ioZyZ7)
![20180413_012650[2932].jpg 20180413_012650[2932].jpg](https://shipsofscale.com/sosforums/data/attachments/24/24463-80e9cb14c820be6d06ca54e9f909f07a.jpg?hash=gOnLFMggvm)
![20180413_013019[2938].jpg 20180413_013019[2938].jpg](https://shipsofscale.com/sosforums/data/attachments/24/24464-b125ebf6c7dbf94b136f05ea09e60caf.jpg?hash=sSXr9sfb-U)
![20180417_012810[2993].jpg 20180417_012810[2993].jpg](https://shipsofscale.com/sosforums/data/attachments/24/24646-548a000c512c6f04b356c8664ce198ab.jpg?hash=VIoADFEsbw)
![20180417_013119[2992].jpg 20180417_013119[2992].jpg](https://shipsofscale.com/sosforums/data/attachments/24/24647-c98d78243c9e1775130f08a75b851bc7.jpg?hash=yY14JDyeF3)
![20180417_013503[2990].jpg 20180417_013503[2990].jpg](https://shipsofscale.com/sosforums/data/attachments/24/24648-5d121bc56615b8d5a156fa9c140d1839.jpg?hash=XRIbxWYVuN)
![20180417_013956[2989].jpg 20180417_013956[2989].jpg](https://shipsofscale.com/sosforums/data/attachments/24/24649-eace342abe6cf62d4c5147e3a3fd63aa.jpg?hash=6s40Kr5s9i)
![20180417_023501[2988].jpg 20180417_023501[2988].jpg](https://shipsofscale.com/sosforums/data/attachments/24/24650-b4e89251bc01a818ab5e7d6347923a27.jpg?hash=tOiSUbwBqB)
![20180417_023631[2987].jpg 20180417_023631[2987].jpg](https://shipsofscale.com/sosforums/data/attachments/24/24651-41c5b55a61919172e653f181a087c382.jpg?hash=QcW1WmGRkX)
![20180417_025239[2986].jpg 20180417_025239[2986].jpg](https://shipsofscale.com/sosforums/data/attachments/24/24652-042e08def1b03930ff13c7a5b653ed30.jpg?hash=BC4I3vGwOT)