I like the effort you are putting into this ship. Taking your time and trying to do the best job you know how to do will really reap big rewards and when you finally get it completed, you will be able to enjoy a job well done. The pride you will have will make you hold your head up so high that you may need a giraffe's neck to hold it. :lol:
-

Win a Free Custom Engraved Brass Coin!!!
As a way to introduce our brass coins to the community, we will raffle off a free coin during the month of August. Follow link ABOVE for instructions for entering.
-

PRE-ORDER SHIPS IN SCALE TODAY!
The beloved Ships in Scale Magazine is back and charting a new course for 2026!
Discover new skills, new techniques, and new inspirations in every issue.
NOTE THAT OUR FIRST ISSUE WILL BE JAN/FEB 2026
You are using an out of date browser. It may not display this or other websites correctly.
You should upgrade or use an alternative browser.
You should upgrade or use an alternative browser.
Don's Santisima Trinidad by OcCre
- Thread starter donlong
- Start date
- Watchers 16
-
- Tags
- occre santisima trinidad
Gary,
Thanks for the comments. I am actually kinda proud of what I have done so far. Maybe not giraffe neck proud but pretty satisfied with the outcome.
There were a few times when I thought I bit off more than I could chew but surprisingly I was able to work my way through it. That makes me happy.
Beyond that, I hope what I am doing might help others that are just starting out. I know there are a few that are watching this scratch build of the ST stern.
Thanks again Gary.
Don
Section 3 – Gallery
You know every single attempt I have made to create a removable gallery cover has failed. It is not that the making of the cover fails or even cutting out the windows. It is after I leave them alone for the evening, they change shape on me. They bow in the wrong direction or they do not hold the curvature to the ship correctly. It is easy enough to correct… a little spray of water and I can get the shape back. The only problem is they change back again overnight. It is not the paper backing causing the problem. Each cover I have made seems to have a mind of its own and does what it wants. This is something I had not anticipated.
The whole purpose of the removable covers was to allow me to work on the cabins and the transition between the cabins and the galleries. Perhaps I didn’t think this through correctly. Perhaps I am doing this in the wrong sequence. Perhaps my lack of experience on this hobby is showing through again. Whatever it is, I will not fail on this aspect of the project.
One thing I have learned is to keep extra pieces of wood around. I have various thicknesses of birch plywood and various widths and thicknesses of limewood strips. These woods are easy to obtain and very easy to work with.
Last night I decided to make the covers out of birch plywood. The plywood bends very easily with the grain and does not delaminate when you get it wet. I guess if it got too wet it would come apart but with a little discretion it works fine. I took one of the covers I had made from the strips of ramin and soaked it. Maybe 5 minutes. Then I took it and smashed it flat with a clamp. I let it dry for about an hour and then used it as a pattern. I traced it on a 1/32” thick piece of birch plywood. Then cut it out and sanded the edges until I got a perfect fit. Then I soaked the plywood for about 15 minutes and made the bend required for the transition from the cover to the hull of the ship.
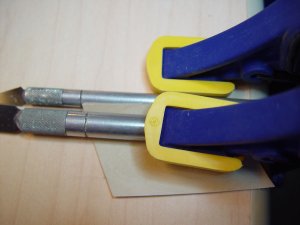
I used two Quick-Grip clamps and two x-acto knife handles to form the bend. I let it dry over night.
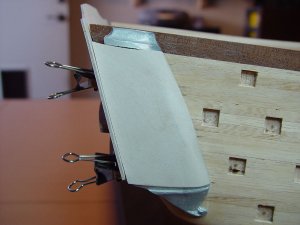
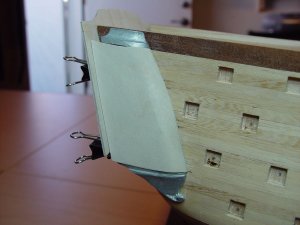
This morning, I had the perfect cover. It fits. It holds its shape. The only thing left is to cut out the windows AGAIN. But even this is not a problem. After cutting out 50 or 60 of them, it is just quiet time for me now.
I really think this is the answer to my problem. If it is still holding its shape by this afternoon then I am golden. The fact that it is plywood should help it hold its shape. My father use to use plywood when he needed some shape and it always seem to work for him.
Anyway I thought I would share this experience with you. It might be useful information in some project you are working on.
Later,
Don
You know every single attempt I have made to create a removable gallery cover has failed. It is not that the making of the cover fails or even cutting out the windows. It is after I leave them alone for the evening, they change shape on me. They bow in the wrong direction or they do not hold the curvature to the ship correctly. It is easy enough to correct… a little spray of water and I can get the shape back. The only problem is they change back again overnight. It is not the paper backing causing the problem. Each cover I have made seems to have a mind of its own and does what it wants. This is something I had not anticipated.
The whole purpose of the removable covers was to allow me to work on the cabins and the transition between the cabins and the galleries. Perhaps I didn’t think this through correctly. Perhaps I am doing this in the wrong sequence. Perhaps my lack of experience on this hobby is showing through again. Whatever it is, I will not fail on this aspect of the project.
One thing I have learned is to keep extra pieces of wood around. I have various thicknesses of birch plywood and various widths and thicknesses of limewood strips. These woods are easy to obtain and very easy to work with.
Last night I decided to make the covers out of birch plywood. The plywood bends very easily with the grain and does not delaminate when you get it wet. I guess if it got too wet it would come apart but with a little discretion it works fine. I took one of the covers I had made from the strips of ramin and soaked it. Maybe 5 minutes. Then I took it and smashed it flat with a clamp. I let it dry for about an hour and then used it as a pattern. I traced it on a 1/32” thick piece of birch plywood. Then cut it out and sanded the edges until I got a perfect fit. Then I soaked the plywood for about 15 minutes and made the bend required for the transition from the cover to the hull of the ship.

I used two Quick-Grip clamps and two x-acto knife handles to form the bend. I let it dry over night.


This morning, I had the perfect cover. It fits. It holds its shape. The only thing left is to cut out the windows AGAIN. But even this is not a problem. After cutting out 50 or 60 of them, it is just quiet time for me now.
I really think this is the answer to my problem. If it is still holding its shape by this afternoon then I am golden. The fact that it is plywood should help it hold its shape. My father use to use plywood when he needed some shape and it always seem to work for him.
Anyway I thought I would share this experience with you. It might be useful information in some project you are working on.
Later,
Don
Last edited:
It is OK to soak but the wood molecules stretch and do not relocate when bent. Heat the item and the molecules are realigned rather than stretching. I use the Amati heated plank bender to do this. Water allows the item to bend easily. Adding heat to dry it afterwards gets the best of both world.
Thanks for the input Gary. I will order one shortly. My plywood plan worked. It has kept its shape all day.
Later,
Don
Later,
Don
Hi all.
For anyone that is following the scratch ST stern build, I wanted to let you know the plywood worked. This morning the removable gallery cover has retained its shape.
In hind sight, I guess there is no reason for it not to retain its new shape. It is multiple pieces of wood that have been glued together. I am sure the layers of wood shifted a bit when being shaped while wet. Once dry, it had no choice but to hold its new shape.
For me, this is a valuable lesson in wooden model building. It could have saved me a few weeks of work plus the materials I wasted making the other covers. There is not much left to say.
Later,
Don
Section 3 – Gallery
Hello to all,
Sorry I have not been posting lately. We (my wife and I) found a German shepherd puppy on the street a few months ago. She looked like she had been roaming the streets for awhile (could see her ribs) but was very friendly. So we decided to take her home. We have a dog, Jake, a pit-bull boxer mix and thought he would enjoy a playmate. We had two dogs but one died about two years ago. So we named the little pup Daisy and gave her a good home.
After about two months, Daisy discovered she had teeth and claws. She began chewing up things and digging up anything she could. So I spent time putting fencing around the plants and moving chewable items out reach. It worked for awhile but every morning lately, it seems she has found a new thing to get into. I have been spending each morning fixing or correcting the problems.
I had decided enough of this and was going to take her to the animal shelter but my wife has fallen in love with the little creature. There were times when I thought of making her (Daisy) ‘walk the plank’ but I think she even ate the plank in one of her ventures. Anyway, the yard has been fortified and things are moving back to normal. Now I have time for the ST again.
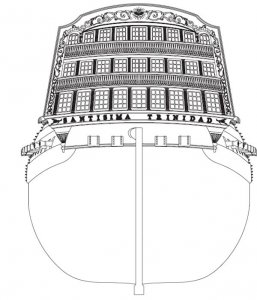
If you recall, I wanted the stern of the ST to look something like the 1778 version of the Crespo drawing. I would blend that with some of the features of the OcCre kit.
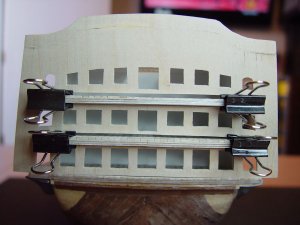
Minus the clips this is where I am at. The 1st battery deck has been cut flush with the stern plate. The balconies now protrude through the stern plate. There will be a slight amount of fill-in required below the windows of the 2nd and 3rd battery decks but this is a minor thing.
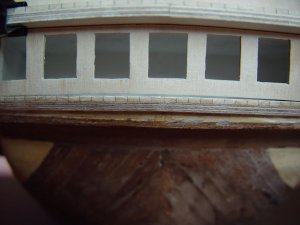
As you can see in the Crespo drawing, the ST has a name plate below the 1st battery deck. It will be very easy to add the plate based on how the 1st battery deck turn out after shaping it to the plate.
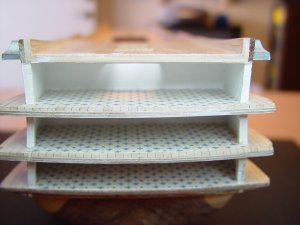
I painted the cabins titanium white. Not sure why other than the Victory showed part of the cabin painted white. I also added the floor covering to each of the cabins. Once again, I found a picture of the Victory with this pattern. I know they also used checkerboard for a cabin floor covering but I liked this better.
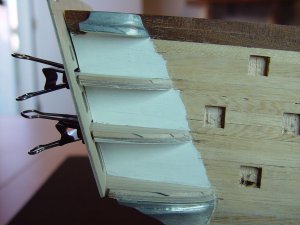
I painted the inner walls of the galleries titanium white.
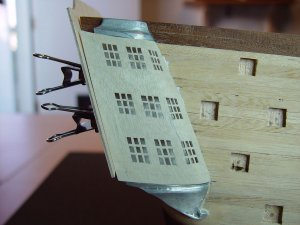
In this shot, I cut out the windows on the gallery shell. I have to tell you the birch plywood is a dream to work with. The window panes are cut directly into the plywood. I am not 100% sure I will leave the panes this way. They are a little rough when you are close up. I do have other options to install the panes. One is cut out the window opening and create the frame and panes with 1/32 square brass bar. The bar I found is by K & S Precision Metals. You can get this on-line or at Hobby Lobby if you have on nearby. Another way is to use white polystyrene that is 1/32 square. I found this at HobbyLinc on-line. This may be the way to go because it can be glued together easily. One other way is to either buy or make 1/32 square strips of wood and then build the windows and panes.
The reason for the 1/32 number is it is about the correct size for the scale. Anything smaller might be too difficult to work with. The current window panes I did with a #11 x-acto and a micro 3 square needle file. The birch has a fine grain and is not fuzzy like basswood.
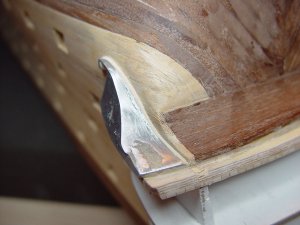
I was able to save the lead decorative top and bottom pieces of the galleries. With a little filling, sanding and filing, I ended up with a decent looking part.
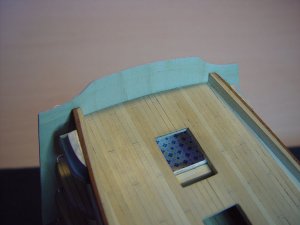
Through this process, I found a way to make the stern plate so I did not have to extend the plate mounting area of the ship. If you recall there was interference between the deck railing and the stern plate end trim. By the way, the stern plate has not been painted blue. It is shadowing.
I am now at a point for the detail work, painting, etc. As I think about it, there is a lot of it. There is the furniture for the cabins, all the trim for the stern plate and galleries. It is my plan to add the doors to the cabins and even some hanging lights (none functional). With the windows the size they are now, one could get a sense these were functional cabins. I have to say however, it would have been much better to do the cabin work up front instead of after the fact. It was very difficult to do some of this work in these very small and tight spaces.
Somewhere in this process I still need to cut the four stern cannon ports. Anyway, this is where I am with the ship. It is going too slow for me but at the same time it has been over 100°F for the last few months. The only place I have to work on the ST is in my garage and it has no AC. While I like the heat, I am limited on how long I can stay in it due to my lung problem. Breathing is not so easy when it is very hot… even with fans.
Later,
Don
Hello to all,
Sorry I have not been posting lately. We (my wife and I) found a German shepherd puppy on the street a few months ago. She looked like she had been roaming the streets for awhile (could see her ribs) but was very friendly. So we decided to take her home. We have a dog, Jake, a pit-bull boxer mix and thought he would enjoy a playmate. We had two dogs but one died about two years ago. So we named the little pup Daisy and gave her a good home.
After about two months, Daisy discovered she had teeth and claws. She began chewing up things and digging up anything she could. So I spent time putting fencing around the plants and moving chewable items out reach. It worked for awhile but every morning lately, it seems she has found a new thing to get into. I have been spending each morning fixing or correcting the problems.
I had decided enough of this and was going to take her to the animal shelter but my wife has fallen in love with the little creature. There were times when I thought of making her (Daisy) ‘walk the plank’ but I think she even ate the plank in one of her ventures. Anyway, the yard has been fortified and things are moving back to normal. Now I have time for the ST again.

If you recall, I wanted the stern of the ST to look something like the 1778 version of the Crespo drawing. I would blend that with some of the features of the OcCre kit.

Minus the clips this is where I am at. The 1st battery deck has been cut flush with the stern plate. The balconies now protrude through the stern plate. There will be a slight amount of fill-in required below the windows of the 2nd and 3rd battery decks but this is a minor thing.

As you can see in the Crespo drawing, the ST has a name plate below the 1st battery deck. It will be very easy to add the plate based on how the 1st battery deck turn out after shaping it to the plate.

I painted the cabins titanium white. Not sure why other than the Victory showed part of the cabin painted white. I also added the floor covering to each of the cabins. Once again, I found a picture of the Victory with this pattern. I know they also used checkerboard for a cabin floor covering but I liked this better.

I painted the inner walls of the galleries titanium white.

In this shot, I cut out the windows on the gallery shell. I have to tell you the birch plywood is a dream to work with. The window panes are cut directly into the plywood. I am not 100% sure I will leave the panes this way. They are a little rough when you are close up. I do have other options to install the panes. One is cut out the window opening and create the frame and panes with 1/32 square brass bar. The bar I found is by K & S Precision Metals. You can get this on-line or at Hobby Lobby if you have on nearby. Another way is to use white polystyrene that is 1/32 square. I found this at HobbyLinc on-line. This may be the way to go because it can be glued together easily. One other way is to either buy or make 1/32 square strips of wood and then build the windows and panes.
The reason for the 1/32 number is it is about the correct size for the scale. Anything smaller might be too difficult to work with. The current window panes I did with a #11 x-acto and a micro 3 square needle file. The birch has a fine grain and is not fuzzy like basswood.

I was able to save the lead decorative top and bottom pieces of the galleries. With a little filling, sanding and filing, I ended up with a decent looking part.

Through this process, I found a way to make the stern plate so I did not have to extend the plate mounting area of the ship. If you recall there was interference between the deck railing and the stern plate end trim. By the way, the stern plate has not been painted blue. It is shadowing.
I am now at a point for the detail work, painting, etc. As I think about it, there is a lot of it. There is the furniture for the cabins, all the trim for the stern plate and galleries. It is my plan to add the doors to the cabins and even some hanging lights (none functional). With the windows the size they are now, one could get a sense these were functional cabins. I have to say however, it would have been much better to do the cabin work up front instead of after the fact. It was very difficult to do some of this work in these very small and tight spaces.
Somewhere in this process I still need to cut the four stern cannon ports. Anyway, this is where I am with the ship. It is going too slow for me but at the same time it has been over 100°F for the last few months. The only place I have to work on the ST is in my garage and it has no AC. While I like the heat, I am limited on how long I can stay in it due to my lung problem. Breathing is not so easy when it is very hot… even with fans.
Later,
Don
Last edited:
Very nice, impressive work
JCT,
Thanks,
Don
Thanks,
Don
Popeye,
Thanks for your support and ideas. As for the doors, there are nine of them. 6 for the galleries (2 per deck) and 3 for the exit or entrance to or from the ship (1 per deck). Originally, I had thought of cutting out the gallery doors. It would not take too long to do. Then I thought of not cutting them out but putting in the appearance of a door on the cabin and gallery sides. This would add 6 more doors to make. I have some extremely thin birch plywood (1/64 thick). My thought was to make the doors out of this material. They would be thin enough when glued to the ship they would look like they belong there. Make them look exactly like the ones that come with the kit. Stain them walnut to give some contrast to the look.
I had even thought of cutting out one door per side on different decks to give some sense of activity on the ship. If I do the fake doors and it doesn’t look right, it would be easy enough to remove the fakes and cut the openings.
It is funny, I thought the building of the ship would be hard but it turns out that part is fairly easy. At least for me. It is trying to figure out these departures from the kit that is hard.
I mis-spoke when I used the term ‘filler’. I was definitely going to use thin wood to fill the gap. I am aware of the Plastruct products. I have the square and round stock in various sizes. I have been thinking about the ¼ round but have not ordered any to date.
As always thanks for your inputs.
Later,
Don
Section 3 – Gallery
Hey guys,
I have to tell you I am not a model aficionado by any stretch of the imagination BUT I think in time I could be. I needed cabin doors for the stern build on the ST. After some thought, I decided to use the style of door that is used in the kit. I guess one could probably buy these things on the net but it could take upwards to two to three weeks to get them. So I decided to make them. I made them slightly smaller than the original because of the space I had to put them in the cabins. Oddly enough, it wasn’t that hard to do and took little time to make.
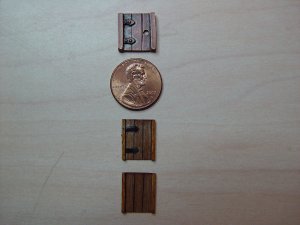
So here we have the original (top), a penny (middle), the door I made with hinges and one without hinges (bottom). Since I choose not to cut out the door openings, the door material needed to very thin to give the illusion of being set in the wall. I cut a strip of 1/64” birch plywood. I cut this strip to the scale height of the door. Next, I cut the individual doors from the strip. Since the kit door shows it was made from three boards, I scribed two lines in each door to simulate the boards. I used the reverse side of a #11 x-acto knife so I would not cut though the plywood. I then darkened the fake board seams with a .3mm lead pencil. Next I split a 1x3mm ramin strip to simulate the door frame. These pieces were glued to each door. After this dried, I stained each door with ‘antique walnut’ from Minwax. I used their Polyshades which is a stain and polyurethane mixed together.
Next I needed hinges. I know one can buy the Spanish style hinges on the net but once again, I didn’t want to wait for them. This is why the penny is in the picture. Do you know how small those hinges are? In another life I did some mechanical drawing (pre-CAD). To me, looking at the hinge on the kit door, it looked like a square with one corner cut off and a strap glued to it. Almost like an arrow. So once again, I split up some 1x3mm ramin, sanded it and cut a square. I then cut the corner off and finally gluing a short strip to the cut end of the square. I did not add the bolts to them. The doors with the hinges will be in the cabins and you would never be able to see that amount of detail. To be honest, these things are really small. I was happy I made something that came as close to the hinge in the kit as these did.
After this was done, I painted them flat black. Next, I glued the hinges to the doors. Since I was not cutting the door opening to the gallery, I decided to glue a door on each side of the gallery wall. The inside door with a hinge and the outside door without the hinge. Before I glued these doors in place, I held the two doors back-to-back and drilled a small hole for the door pull or handle. Then I glued the outside door in place, drilled a hole through the gallery wall for the pull or handle then glued the inside door in place using a wire to align the two doors. Lastly, I fashioned and installed the door pull or handle.
It took longer for the paint and stain to dry then it did to make these doors. I am satisfied with this so I can now can move on and permanently install the gallery covers in place. I will post pictures of the doors installed on the ST shortly.
Later,
Don
Hey guys,
I have to tell you I am not a model aficionado by any stretch of the imagination BUT I think in time I could be. I needed cabin doors for the stern build on the ST. After some thought, I decided to use the style of door that is used in the kit. I guess one could probably buy these things on the net but it could take upwards to two to three weeks to get them. So I decided to make them. I made them slightly smaller than the original because of the space I had to put them in the cabins. Oddly enough, it wasn’t that hard to do and took little time to make.

So here we have the original (top), a penny (middle), the door I made with hinges and one without hinges (bottom). Since I choose not to cut out the door openings, the door material needed to very thin to give the illusion of being set in the wall. I cut a strip of 1/64” birch plywood. I cut this strip to the scale height of the door. Next, I cut the individual doors from the strip. Since the kit door shows it was made from three boards, I scribed two lines in each door to simulate the boards. I used the reverse side of a #11 x-acto knife so I would not cut though the plywood. I then darkened the fake board seams with a .3mm lead pencil. Next I split a 1x3mm ramin strip to simulate the door frame. These pieces were glued to each door. After this dried, I stained each door with ‘antique walnut’ from Minwax. I used their Polyshades which is a stain and polyurethane mixed together.
Next I needed hinges. I know one can buy the Spanish style hinges on the net but once again, I didn’t want to wait for them. This is why the penny is in the picture. Do you know how small those hinges are? In another life I did some mechanical drawing (pre-CAD). To me, looking at the hinge on the kit door, it looked like a square with one corner cut off and a strap glued to it. Almost like an arrow. So once again, I split up some 1x3mm ramin, sanded it and cut a square. I then cut the corner off and finally gluing a short strip to the cut end of the square. I did not add the bolts to them. The doors with the hinges will be in the cabins and you would never be able to see that amount of detail. To be honest, these things are really small. I was happy I made something that came as close to the hinge in the kit as these did.
After this was done, I painted them flat black. Next, I glued the hinges to the doors. Since I was not cutting the door opening to the gallery, I decided to glue a door on each side of the gallery wall. The inside door with a hinge and the outside door without the hinge. Before I glued these doors in place, I held the two doors back-to-back and drilled a small hole for the door pull or handle. Then I glued the outside door in place, drilled a hole through the gallery wall for the pull or handle then glued the inside door in place using a wire to align the two doors. Lastly, I fashioned and installed the door pull or handle.
It took longer for the paint and stain to dry then it did to make these doors. I am satisfied with this so I can now can move on and permanently install the gallery covers in place. I will post pictures of the doors installed on the ST shortly.
Later,
Don
Last edited:
C
CharlesEdward
Guest
Those doors are very nicely done. I am finding that more and more I try to replace metal molded parts with wood, when it better fits the characteristic of the model being built, plus more so than not, manufacturers metal molded parts turn out looking terrible.
I am not a rabid scratch builder yet, I prefer to build kits still as most everything needed is included in the kit, however, with my Montanes build, log in this forum, I decided quite early on to replace the badly molded metal gun carriages include with the OcCre kit, with scratch build wooden ones.
I did use the brass axles and wheels included and those carriages turned out to be much better looking. Although no one will see ten of those wooden carriages as they are below the main deck, I know that I did them from scratch and that knowledge gives me a proud feeling of accomplishing a better looking model.
JohnK,
I could not agree with you more. My only regret is my lack of experience in doing these things. It never occured to me to do this cabin work until after the fact. Doing this scratch build on the stern has certainly given these tired old fingers a run for their money. But I must say if you have the talent and the dexterity, these modifications do enhance the look of the build. Think I will check out the Montanes you are building and perhap I can learn a few things from your build.
It is funny, for awhile I thought looking at only the ST builds would help me, but I found any build will help because they are truly all built the same way. Once I can figure out the mechanics of this hobby, I will be a lot more comfortable building these marvelous ships.
Thanks for your comments.
Later,
Don
I really like what you have done with the doors. You are really getting good at seeing what can be improved without going to excess. Keep it up.
You can learn something from almost everyone here so reading through all the logs can help when you have a problem or do not like something and want to change it. You will say, I remember seeing someone else doing something that I could use in this instance.
You can learn something from almost everyone here so reading through all the logs can help when you have a problem or do not like something and want to change it. You will say, I remember seeing someone else doing something that I could use in this instance.
Thanks Gary.
I actually surprised myself. Especially with the hinges. That was some tiny pieces to work with. But as I said, I am happy with the results. The one thing is to know when to quit. I found myself wanting to make this and that for the cabins. Then it finally hit me, why. For me I want the illusion of a functional cabin. The fact that you would be looking into windows that were 1/8 by 1/8 or less in size never occurred to me. As it were, I ended up making 15 doors. 6 sets for the gallery walls and 3 for the cabin to deck portal. 9 of those little suckers required hinges... two per door; so 18 hinges. It is amazing how quickly the numbers of something can add up.
Then I finally started getting on the right side of things. So now I am doing the things that would give the appearance I am looking for. If the scale was larger, then it would make sense to add more.
You are correct on reading as many builds as possible. There are many, many ideas and ways of doing things that can be applied to your own build. I see that now.
Later,
Don
Wow Popeye!!! Thanks for the very kind words. I have always had the 'vision'. I can look at a blank room and see it furnished. Look at some object and find many uses for it other than what it was intended for. I also have the ability to look at something and decompose into its parts.
My shortcoming has been to create it. Over the years, I have learned how to make things out of wood, plastic and metal. My issue now is size. Some of these things are freakishly small. Even if you blow them up with the aid of glasses, you still have to learn how to move your hands or fingers 1/32 of an inch and not a foot. Sometimes I feel like I am arming a bomb. One slip and that piece is done. I don't know how many of those little squares I made for the hinges before I had enough to do the job.
I look at my ST and then I look at some of the other logs and I fit in. There are parts of the ST I don't like but these areas are repairable before I put the finishing touchs on it. So I am happy with that. It is incredible what you can learn from this hobby. It is like watching the History Channel. Those guys trying to figure out how something was made thousands of years ago with inferior tools. Or even better when they try to build one themselves. They seem to always end up using modern tools at some point in the process.
I truly love this hobby. It has allowed me to relax and heal from the surgery I had a year ago and it has lightened the burden of some of the troubles I have had over that year. So it is a lot more than gluing wood together. It makes you think. You get the satisfaction of saying, I did that. It gives you the challenge to figure out how to fix something when saying I did that is not so satisfying.
I must also admit, comments from you guys; either positive or negative helps a great deal in wanting to succeed with a build. It is a win-win all the way around.
Thanks again Popeye.
Later,
Don
Hear hear...Don I, for one, think you've taken to this hobby like a duck to water...Your Trinidad build shows alot of expertize and good decision making. Your skills and forethought show through
J
J
JCT,
What is said to Popeye, I echo to you. It is a great feeling to know the pros of this hobby like what you do or suggest, perhaps a better approach. I am always egar to work on the ST but at the same time temper what I want to do to her. I have other ships I want to build now so I want to complete the ST. I have a scratch build in mind that I have been thinking about that would be beyond fun... at least for me. But I still have a lot of work ahead of me on the ST. Each time I do something I want to share it in the hopes it just might help a fellow hobbyist with an issue. I am beginning to see the task is not as difficult as the experience necessary to do it. Once you know how to do a thing, it becomes easier.
Thanks again JCT
Don
Section 4 – Furniture
Ahoy Mates,
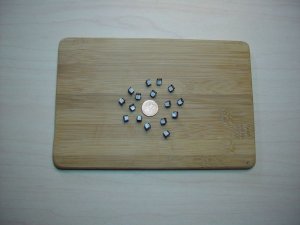
I feel like I returned from the ‘Land of the Giants’ since my last post. What I have been doing is furniture. I did furniture for all three cabins. My finger dexterity has increased 3 fold and at times I thought I would pass out from lack of breathing while building these things. They are really tiny. I made chairs, tables and desks. I want to make some hanging lanterns but need a break for a few days.
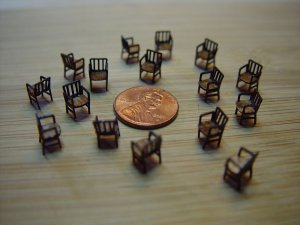
Here I made lots of chairs. These are actually HO scale chairs from HobbyLinc but you have to put them together. HO is considered 1:87 and the ST is 1:90… close enough for me.
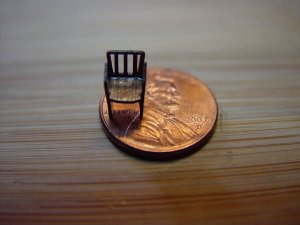
There are four pieces to each chair. The back, seat and the sides that include the arms and legs.
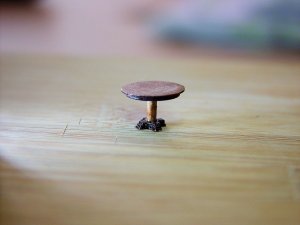
Next are some tables. Once again these are from HobbyLinc and are HO scale. There are six parts that comprise each table.
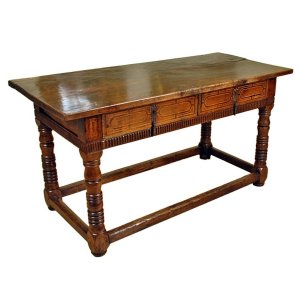
Finally I wanted to have a desk for each of the cabins. I am making the assumption there would be an officer in each cabin. For these I was on my own. I went on the web and searched for 18th century Spanish desks. This picture is one that I found, liked and thought I could scratch build.
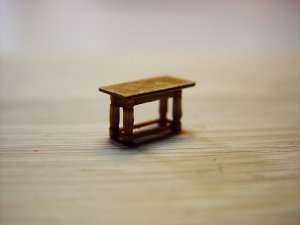
This is what I came up with. It is by no means perfect but it is close enough to make my day. This one will go in the 3rd level cabin.
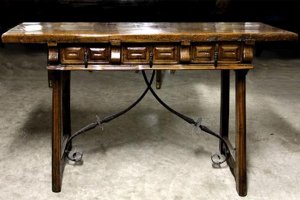
This is another picture of a period desk that I liked and thought I could make.
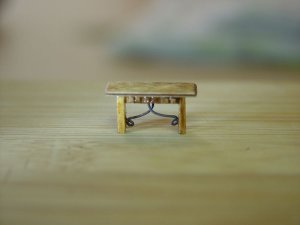
Here is what I came up with. I made two of these to go into the 1st and 2nd level cabins. All were stained with Minwax Polyshades, antique walnut. I will need to add another coat of stain to darken it but this works for me.
As I said, I want to make some hanging lanterns for the cabins. So that is next. Once completed, I will install the furniture, lanterns and take a few pictures. Then I will be ready to put on the gallery covers and the stern plate. I need to complete the windows, and inside painting before installing the covers and plate.
When that is done, I will do the décor of the covers and plate.
Later,
Don
Ahoy Mates,

I feel like I returned from the ‘Land of the Giants’ since my last post. What I have been doing is furniture. I did furniture for all three cabins. My finger dexterity has increased 3 fold and at times I thought I would pass out from lack of breathing while building these things. They are really tiny. I made chairs, tables and desks. I want to make some hanging lanterns but need a break for a few days.

Here I made lots of chairs. These are actually HO scale chairs from HobbyLinc but you have to put them together. HO is considered 1:87 and the ST is 1:90… close enough for me.

There are four pieces to each chair. The back, seat and the sides that include the arms and legs.

Next are some tables. Once again these are from HobbyLinc and are HO scale. There are six parts that comprise each table.

Finally I wanted to have a desk for each of the cabins. I am making the assumption there would be an officer in each cabin. For these I was on my own. I went on the web and searched for 18th century Spanish desks. This picture is one that I found, liked and thought I could scratch build.

This is what I came up with. It is by no means perfect but it is close enough to make my day. This one will go in the 3rd level cabin.

This is another picture of a period desk that I liked and thought I could make.

Here is what I came up with. I made two of these to go into the 1st and 2nd level cabins. All were stained with Minwax Polyshades, antique walnut. I will need to add another coat of stain to darken it but this works for me.
As I said, I want to make some hanging lanterns for the cabins. So that is next. Once completed, I will install the furniture, lanterns and take a few pictures. Then I will be ready to put on the gallery covers and the stern plate. I need to complete the windows, and inside painting before installing the covers and plate.
When that is done, I will do the décor of the covers and plate.
Later,
Don
Last edited:
Sweet. Another idea that adds to your skill set.


