Duyfken 1/50 scale - Kolderstock

Normally there weren't any canons in the stern. The ports where carved and functional, but only used for canons as the ship was chased by an enemy. In such a case one or two canons from the sides were rolled to the back and fired to give the chasing ship a warning ( if necessary) that the "prey" was armed.

Hans
Hi Hans,

Thank you for the response. That makes a lot of sense. I think I will go with just the doors to hint what might be behind them. I don't fancy cutting into the frame or into the planking that I just finished.

Jan
 
Hi Heinrich,

I’ll try to find the glue, if you recommend it then it must be a good product . Alas, somewhere in my little workshops lurks the plank bender head. It’s like the the other bits that fall and bounce once and then disappear forever.

Jan
Woo, woo, I'm back in business I found the plank bender head :p:p:p:p:p

Jan
 
Todays progress:

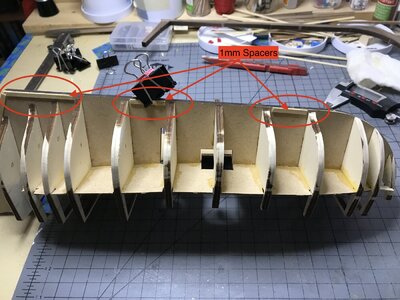
I'm starting on build step #4 and the first part is to add the extra keel parts. Having learned from Uwe, " look at the plans, read the instructions, think about it and continue". Well, the keel is 6mm thick, the extra keel pieces are 8mms thick. For that piece to be centered there needs to be a 1mm space on each side. Had to put on the thinking hat.

Jan step one:

00C00E02-63AA-4D3D-ACC8-52BC4D41866D_1_201_a.jpeg

1mm spacers on each side of the keel temporarily attach with 3M glue stick glue.

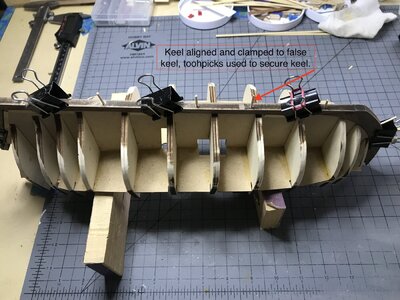
Jan step two.

6AE27171-D234-4262-96A1-0A5DEDDC338B_1_201_a.jpeg

Hold the extra keel pieces in place with the clamps, make sure the pieces are aligned over and even with the 1mm spacers, drill holes and add toothpick dowels.

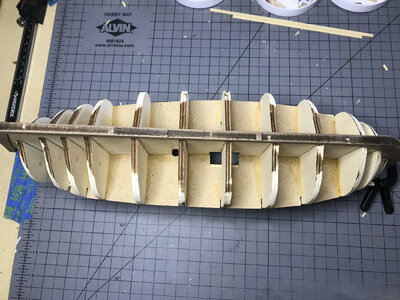
Jan step three.

A0F9F1DA-1612-4C71-A74B-CB58F6BEEEE4_1_201_a.jpeg

Not quite done yet but I'm happy with the result.

Jan
 
Last edited:
Todays progress:

I'm starting on build step #4 and the first part is to add the extra keel parts. Having learned from Uwe, " look at the plans, read the instructions, think about it and continue". Well, the keel is 6mm thick, the extra keel pieces are 8mms thick. For that piece to be centered there needs to be a 1mm space on each side. Had put on the thinking hat.

Jan step one:

View attachment 206971

1mm spacers on each side of the keel temporarily attach with 3M glue stick glue.

Jan step two.

View attachment 206973

Hold the extra keel pieces in place with the clamps, make sure the pieces are aligned over and even with the 1mm spacers, drill holes and add toothpick dowels.

Jan step three.

View attachment 206974

Not quite done yet but I'm happy with the result.

Jan
Sure is a lot of thinking going on... ;)
 
Sure is a lot of thinking going on... ;)
Hi Paul

Yes indeed that is true. Took a bit to figure out how to do that little step. I don't have a clue how other Duyfken kit builders did that step, but it worked out great for me.

I've been following your build and I'm positive that your thinking cap gets used a lot also.

Jan
 
Hi Paul

Yes indeed that is true. Took a bit to figure out how to do that little step. I don't have a clue how other Duyfken kit builders did that step, but it worked out great for me.

I've been following your build and I'm positive that your thinking cap gets used a lot also.

Jan
Yup. Thinking, then rethinking, then thinking about how I'm going to fix the results of my first thinking...
Keep up your excellent work - it's coming along nicely!
 
Yup. Thinking, then rethinking, then thinking about how I'm going to fix the results of my first thinking...
Keep up your excellent work - it's coming along nicely!
Yep sounds like me on my current build still not thinking enough, think I know what needs to be done next only to find once its done a few steps later it should have been done differently, doh!
 
Good work, Jan! Just be very careful when shaping the bow filler block that you don't inadvertently sand down your bow section of the keel as well (like I did).
 
Good work, Jan! Just be very careful when shaping the bow filler block that you don't inadvertently sand down your bow section of the keel as well (like I did).
I'm temporarily on hold for that process, I ordered balsa blocks couple of weeks ago to use as the filler block in the bow and I'm still awaiting their delivery. I also ordered another soldering iron from Walmart so I can have one iron for plank bending and the other for plank ironing. I didn't want to continuously have to change between the plank bending head or the ironing tip.

So it will be back to the "Alert build" in the meantime.

Jan
 
Are you sure there are no balsa strips supplied with the kit?
 
Are you sure there are no balsa strips supplied with the kit?
Hi Heinrich,

Geez, I never thought to look in the kit box, I just followed my normal routine . I had ordered balsa block remnants to use for my Lobster boat, the Seguin Tug, and the Krick build, but had not replaced them.

Jan
 
The Batavia does have balsa as filler blocks, but the Duyfken not. The gap at the bow is quite small, and you could do it without balsa.
Hi Hans,

I just looked at the tiny space between the stem and frame #1 and see it is indeed very very small. I thought it was much more until after I added the extra keel pieces. So I’ll not worry about it and will continue bumbling along.

DF7A1129-8556-4251-8CFB-9380E49E878E.jpeg

It’s hard to see in this image but there definitely is not much space.

Jan
 
Need an opinion:

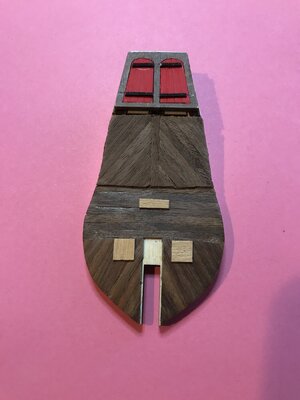
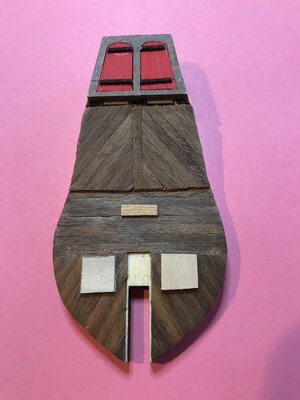
The gunport are a question.

Below I've placed 8mm blanks for the gun port doors.


8F4546B8-D082-4AC7-A3D5-0AFFD4DFDF57.jpeg

This photo is with 11mm blanks for the gunport doors.

2D961E7C-E5FB-41BE-99C4-C2E2639B5981.jpeg

I like the smaller doors because they look aesthetically better.

So it's vote for #1 or #2.

Jan
 
#1 by a wide margin :)
Hi Paul, Hi Hans,

That's three votes for #1, yours, Hans and mine. The main gun port openings on the deck are 11 X 11m. I did the above exercise just to see how the bigger ports would look. Back in post #86 Hans thought the were 8 or 9 mm as per his build plan. It's fun to speculate and get other options before one starts the surgery.

Jan
 
Back
Top