-

Win a Free Custom Engraved Brass Coin!!!
As a way to introduce our brass coins to the community, we will raffle off a free coin during the month of August. Follow link ABOVE for instructions for entering.
-

PRE-ORDER SHIPS IN SCALE TODAY!
The beloved Ships in Scale Magazine is back and charting a new course for 2026!
Discover new skills, new techniques, and new inspirations in every issue.
NOTE THAT OUR FIRST ISSUE WILL BE JAN/FEB 2026
You are using an out of date browser. It may not display this or other websites correctly.
You should upgrade or use an alternative browser.
You should upgrade or use an alternative browser.
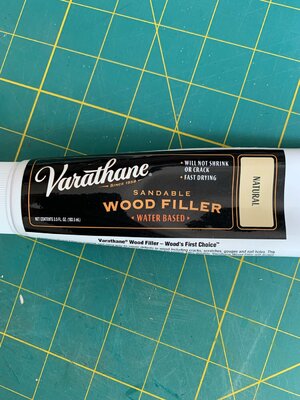
Kramer, neither Lowes or Home Depot had this product! Glad I checked back with you. I just ordered two tubes from Amazon for delivery on Wednesday. Thanks again, Magic Mike
You're welcome! Can't wait to see your progress.Kramer, neither Lowes or Home Depot had this product! Glad I checked back with you. I just ordered two tubes from Amazon for delivery on Wednesday. Thanks again, Magic Mike
Wow, I can't wait to see this when you're finished. That is one beautiful ship.
After too long of a hiatus, I'm back working on my Endurance! Just started the second layer of planking. This time around I wanted to avoid CA as much as possible. Had to work on a way to replace the quick drying properties of CA with a wood glue PVA. When I took a break from the Endurance and built John Smith's Shallop, Olha used Weld Bond or something like it and an iron. Since I'm on the second layer and can't use tacks to hold the planks in place while the glue dries, and Olha' use of the hot iron on the planks to mount them worked on the Shallop, I thought I'd give it a try on the thin veneers for the second planking. So far so good, with minimal burn marks on the veneers. Burn marks were my biggest concern, but I'm getting better at it as I go, and it's all going to be painted over anyway. I guess if I didn't want any burn marks at all I could use another plank as a buffer between the plank and the iron.
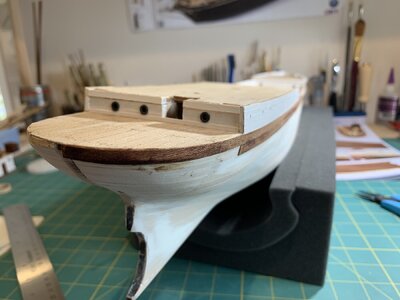
After some trial and error on the first side (I almost need an experimental side, and a show side), I was able to bend the plank slightly by soaking it for about 10 minutes, glueing and ironing.
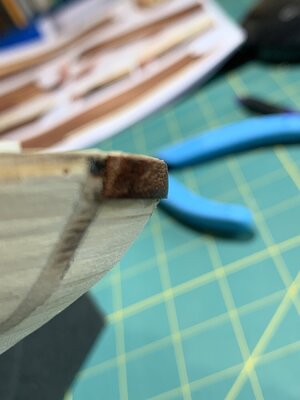
Great to be back at it!
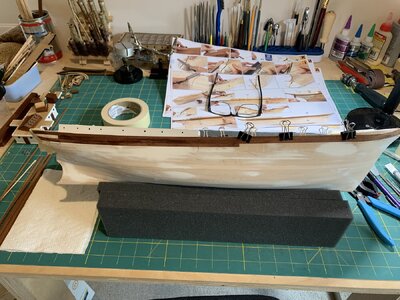

After some trial and error on the first side (I almost need an experimental side, and a show side), I was able to bend the plank slightly by soaking it for about 10 minutes, glueing and ironing.

Great to be back at it!

After too long of a hiatus, I'm back working on my Endurance! Just started the second layer of planking. This time around I wanted to avoid CA as much as possible. Had to work on a way to replace the quick drying properties of CA with a wood glue PVA. When I took a break from the Endurance and built John Smith's Shallop, Olha used Weld Bond or something like it and an iron. Since I'm on the second layer and can't use tacks to hold the planks in place while the glue dries, and Olha' use of the hot iron on the planks to mount them worked on the Shallop, I thought I'd give it a try on the thin veneers for the second planking. So far so good, with minimal burn marks on the veneers. Burn marks were my biggest concern, but I'm getting better at it as I go, and it's all going to be painted over anyway. I guess if I didn't want any burn marks at all I could use another plank as a buffer between the plank and the iron.
View attachment 434163
After some trial and error on the first side (I almost need an experimental side, and a show side), I was able to bend the plank slightly by soaking it for about 10 minutes, glueing and ironing.
View attachment 434164
Great to be back at it!
View attachment 434165
Looking good.
I used PVA and, where I needed quicker drying for hold, contact glue on both surfaces. That way I was able to position the plank over the majority of the length then fix the ends almost immediately.
I have never used Weld Bond, not sure what it is or if it is available here but yours seems like a good solution. The results look good anyway.
I loved building my Endurance, fascinating story with plenty of original photos to give ample opportunity for a bit of kit bashing.
Looking forward to seeing your progress. Enjoy!
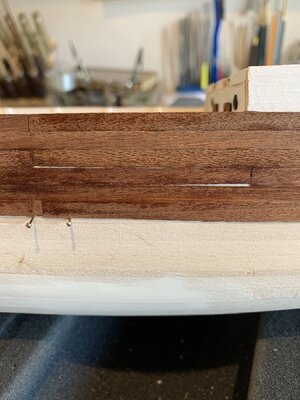
Chipping away at the second layer of planking. I feel like I'm doing a good job of gluing the planks down using WeldBond and an iron, no CA, and getting them to conform to the curvature of the hull. But, there are gaps. The planks aren't completely uniform. I don't think I can expect them to be. I'm not concerned too much because I can fill in the gaps after I'm done, then paint the hull. I think it'll totally blend well. I'm thinking of future projects where I won't be painting the hull and the second layer is what you'll see. My second planking skills need to improve.


Bonjour de Belgique, magnifique travail, félicitations !
J'ai commencé le même il y a déjà quelques temps, mais j'ai mis de côté et attend de retrouver la motivation et le temps !
Mais refait tout votre fil de montage et trouve des conseils, et mes mains me picotes

 , je pense que je vais m'y remettre bientôt
Bravo et merci pour tout
Tanguy
J'ai commencé le même il y a déjà quelques temps, mais j'ai mis de côté et attend de retrouver la motivation et le temps !
Mais refait tout votre fil de montage et trouve des conseils, et mes mains me picotes


 , je pense que je vais m'y remettre bientôt
Bravo et merci pour tout
Tanguy
Impressed with the tidiness of your work bench - mine is a tip by comparison!!. Had the same problem with gaps in the second planking as you had - unfortunate it will be varnished so will have to live with a few small holes
Call the gaps character and patinaImpressed with the tidiness of your work bench - mine is a tip by comparison!!. Had the same problem with gaps in the second planking as you had - unfortunate it will be varnished so will have to live with a few small holes
Are the planks not straight on the long edge? That is a problem. Have you tried to sand the edges lightly to at least reduce the uneveness? That's a serious problem there I would think.Impressed with the tidiness of your work bench - mine is a tip by comparison!!. Had the same problem with gaps in the second planking as you had - unfortunate it will be varnished so will have to live with a few small holes
The planks aren't entirely straight, but that hasn't been a problem. I can get them tight up against the previously laid plank when I glue them down. But they're not completely uniform in the width of the cut. When I have to do a ship where the hull won't be painted, I can definitely see investing in ripping my own planks to ensure they're all perfectly uniform.Are the planks not straight on the long edge? That is a problem. Have you tried to sand the edges lightly to at least reduce the uneveness? That's a serious problem there I would think.
Looking at the pictures above I see that the narrow parts are close to the ends of the planks. Can you cut that narrow part off and just use the good parts? Is there enough lumber with the kit to do that? The planking looks really nice except for the tiny thin slits in the mahogany. Gonna be a nice looking sailer when it's finished.The planks aren't entirely straight, but that hasn't been a problem. I can get them tight up against the previously laid plank when I glue them down. But they're not completely uniform in the width of the cut. When I have to do a ship where the hull won't be painted, I can definitely see investing in ripping my own planks to ensure they're all perfectly uniform.
Thanks Norgale! That's a good idea, but I think since I'm painting it I'm just going to keep going. After I'm done planking I'll fill in any big gaps, prime it, then paint it and seal it. But you're right, if I was real worried at this point about the ends of the planks I'd trim them like you say.Looking at the pictures above I see that the narrow parts are close to the ends of the planks. Can you cut that narrow part off and just use the good parts? Is there enough lumber with the kit to do that? The planking looks really nice except for the tiny thin slits in the mahogany. Gonna be a nice looking sailer when it's finished.
Just started watching your build. Lovely tidy work. Fantastic
I forgot you were going to paint it. I get carried away with dark wood like mahogany or walnut and I just have to stain it or put clear over it. Love that shinny wood.
Good morning. I had a similar issue with my Occre veneer. The wood is not even in its thickness. I sorted the wood before starting into piles where they matched. Kept the uneven strips for the lower part where tapering and whisky planks would be used. I agree with you, as this is a painted hull not an issue so looking great right now. Cheers GrantChipping away at the second layer of planking. I feel like I'm doing a good job of gluing the planks down using WeldBond and an iron, no CA, and getting them to conform to the curvature of the hull. But, there are gaps. The planks aren't completely uniform. I don't think I can expect them to be. I'm not concerned too much because I can fill in the gaps after I'm done, then paint the hull. I think it'll totally blend well. I'm thinking of future projects where I won't be painting the hull and the second layer is what you'll see. My second planking skills need to improve.
View attachment 435674
View attachment 435675
I should have checked the planks, but once I got started I just kept going. I need to be more patient. But paint helps with lack of patienceGood morning. I had a similar issue with my Occre veneer. The wood is not even in its thickness. I sorted the wood before starting into piles where they matched. Kept the uneven strips for the lower part where tapering and whisky planks would be used. I agree with you, as this is a painted hull not an issue so looking great right now. Cheers Grant


