• LUCZORAMA SHIPWRECK SCAVENGER HUNT GIVEAWAY. 4 Weeks of Fun • 1 Legendary Prize ((OcCre’s Fram Ship)) • Global Crew Welcome!
    **VIEW THREAD HERE**

Fair American 1:48 by Model Expo

Initially I did not intend to do a build log for my latest project, Model Expo’s Revolutionary War Brig Fair American, for several reasons. The first is that my skills are not developed to a point as to attract much interest.

I felt the same way when I joined and started posting my own build. Honestly, with my skill level, I sometimes wonder if it’s alright I even maintain an account on here, let alone a log. Although I may not be raking in the views, there does seem to be room and appreciation for all skill levels here.

I look forward to seeing your progress.
Thank you and Agreed. While it’s the big, spectacular builds by highly accomplished experts that get the most attention, it’s the neophytes such as us that benefit the most from having build logs. Both in terms of encouragement and practical advice.
 
Last edited:
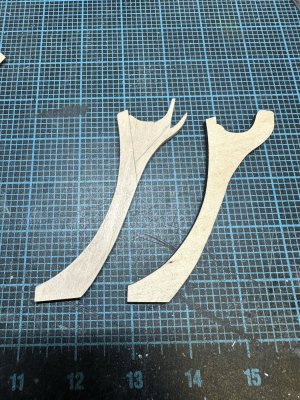
In keeping with Nama’s corollary to Murphy’s law—that is anything I can break, I will break—I have remade the stem to align the wood grain better. New stem is on the left (notched for the figurehead)
IMG_5864.jpeg
Yes, I know the shape of the timbers is not an accurate depiction of ship construction, but it’s going to be painted so the joins won’t be visible.

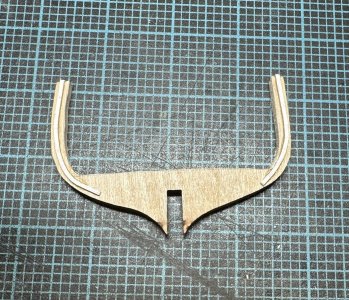
The other tip to Nama’s corollary is the addition of some reinforcing timbers on the four bulkheads I cut down IAW Bob Hunt’s practicum for the great cabin:

IMG_5865.jpeg
The grain of the middle ply of the plywood is running transversely so without the stiffeners, the only thing holding the stanchions together is the veneer. :(
 
Also pleased to report that as I dug through my parts to see if the window frames from the old kit could used as the basis for a skylight a la @The Gavel Chuck’s Lovely Renee, I discovered that I still had not only the original brass ship’s bell, which has been replaced with a brittania bell in the newer kits, but also, the nicely-made pintles and gudgeons that I thought had long ago been sacrificed to another build. The downside to that is it means I have to wait to try the @dockattner method for constructing rudder hinges.
 
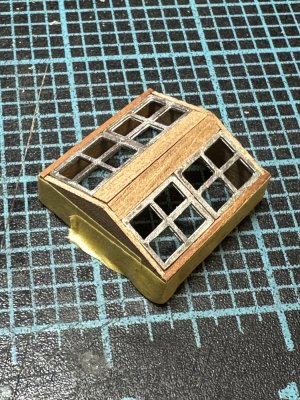
Finally got the right combination of weather and not having to go to work or shopping in order to haul the tools out to the front porch. Here’s my skylight inspired by @The Gavel Chuck. Just dry fit for now.
IMG_5866.jpeg
The proportions look a bit off to me, but it’s the result of using the old window frames. It also looks a bit tall, but it will be set into the deck and won’t be quite so tall once installed.

Quite chuffed about how well this came together.
 
Last edited:
In keeping with Nama’s corollary to Murphy’s law—that is anything I can break, I will break—I have remade the stem to align the wood grain better. New stem is on the left (notched for the figurehead)
View attachment 532960
Yes, I know the shape of the timbers is not an accurate depiction of ship construction, but it’s going to be painted so the joins won’t be visible.

The other tip to Nama’s corollary is the addition of some reinforcing timbers on the four bulkheads I cut down IAW Bob Hunt’s practicum for the great cabin:

View attachment 532961
The grain of the middle ply of the plywood is running transversely so without the stiffeners, the only thing holding the stanchions together is the veneer. :(
Namabiiru! That's some nice work on the new stem! I look forward to seeing your progress on the framing. Looks like you're not having any trouble shaping the plywood frames. What are you using to do the work?

Blessings.
Chuck
 
Finally got the right combination of weather and not having to go to work or shopping in order to haul the tools out to the front porch. Here’s my skylight inspired by @The Gavel Chuck. Just dry fit for now.
View attachment 533113
The proportions look a bit off to me, but it’s the result of using the old window frames. It also looks a bit tall, but it will be set into the deck and won’t be quite so tall once installed.

Quite chuffed about how well this came together.
NICE! I really didn't think about the inteior spaces of the cabin, just the fact that the door to the cabin was very short. I imagined a step or two down. Could that be right? I also thought that the head room was kind of limited, like the captain's cabin of Jack Aubery's first command Sopie. In my mind the height of the skylight was a compensation - a tall captain would be able to stand at full height underneath it.

Keep up the great work!

Blessings,
Chuck
 
Thank you and Agreed. While it’s the big, spectacular builds by highly accomplished experts that get the most attention, it’s the neophytes such as us that benefit the most from having build logs. Both in terms of encouragement and practical advice.
I get the hesitancy to post a log from a skill perspective. There are so many master builders making glorious works of art. Sometimes, after I've looked at Paul's work, for example, I think, why am I posting anything? Then my right mind returns. I overcome the impusle to compare and go with the feeling of inspiration I get from seeing the wonderful demonstrations of skill. It takes audacity to make the next step, jump or leap in skill. So, be audacious:D regardless of the numbers of followers. My experience here has been that audacity attracts interest and the benefits of the expertise, comments and questions from all of our shipmates regardless of skill level. Namabiiru, I see you doing that here. Excellent!

Just some thoughts.

Blessings. Peace. Gratitude.
Chuck
 
Namabiiru! That's some nice work on the new stem! I look forward to seeing your progress on the framing. Looks like you're not having any trouble shaping the plywood frames. What are you using to do the work?

Blessings.
Chuck
Bob’s practicum has you shape the frames in situ. Still working out the best tool for that job. The great cabin work was done with Proxxon jigsaw.
 
NICE! I really didn't think about the inteior spaces of the cabin, just the fact that the door to the cabin was very short. I imagined a step or two down. Could that be right? I also thought that the head room was kind of limited, like the captain's cabin of Jack Aubery's first command Sopie. In my mind the height of the skylight was a compensation - a tall captain would be able to stand at full height underneath it.

Keep up the great work!

Blessings,
Chuck
I think you are spot on. Going to be some steps needing to be built for sure!
 
Namabiiru, I regularly see you checking in on Chucks' and other build logs.
I, too, have built a MS "Fair American" years ago, now, and ended up selling it to a US Navy vet living in Boca Raton FLA. I used a different practicum by one the Nautical Research Guild officials, whose name escapes me at present, but I'm sure you can find it through that organization. It included that and several other 18thc. craft.
I was a vol. model shipwright at the USNA museum workshop for many years and know the Roger's collection F.A. model and the curator, Don Preul, very well.
Perhaps you've seen my two steps forward, one step back log on "Flying Cloud". I know that my F.A. is on here somewhere, but I can't nail down where. I'll PM you pics so as not to hijack your log. I will be following your log with great interest. Thumbsup :D

Pete
 
Aha! I really need to think about upgrading my tools. Shaping the frames in situ - meaning your doing it with the frames already secured to false keel?

Blessings.
Chuck
Correct. Right now, I’m on the hunt for materials I can repurpose to make sanding pads for the Dremel, per @Dave Stevens (Lumberyard) in the School for Shipmodel Building.
 
Namabiiru, I regularly see you checking in on Chucks' and other build logs.
I, too, have built a MS "Fair American" years ago, now, and ended up selling it to a US Navy vet living in Boca Raton FLA. I used a different practicum by one the Nautical Research Guild officials, whose name escapes me at present, but I'm sure you can find it through that organization. It included that and several other 18thc. craft.
I was a vol. model shipwright at the USNA museum workshop for many years and know the Roger's collection F.A. model and the curator, Don Preul, very well.
Perhaps you've seen my two steps forward, one step back log on "Flying Cloud". I know that my F.A. is on here somewhere, but I can't nail down where. I'll PM you pics so as not to hijack your log. I will be following your log with great interest. Thumbsup :D

Pete
Here's Pete's build - lovely all wood no paint! https://shipsofscale.com/sosforums/threads/model-shipways-fair-american.11900/

Blessings.
Chuck
 
Namabiiru, I regularly see you checking in on Chucks' and other build logs.
I, too, have built a MS "Fair American" years ago, now, and ended up selling it to a US Navy vet living in Boca Raton FLA. I used a different practicum by one the Nautical Research Guild officials, whose name escapes me at present, but I'm sure you can find it through that organization. It included that and several other 18thc. craft.
I was a vol. model shipwright at the USNA museum workshop for many years and know the Roger's collection F.A. model and the curator, Don Preul, very well.
Perhaps you've seen my two steps forward, one step back log on "Flying Cloud". I know that my F.A. is on here somewhere, but I can't nail down where. I'll PM you pics so as not to hijack your log. I will be following your log with great interest. Thumbsup :D

Pete
Thanks for that! I also recently discovered that it was my VPN that was keeping me from accessing MSW, and I have found a nicely documented FA log there.
 
Wow. I would think it would be easier to shape the frames off the keel. Interesting. I'll have to look at the practicum. Good luck with your hunt!

Blessings.
Chuck
Ultimately, you would have to do some both to get it right, but you’re correct. That’s how I did it on my first unfinished build, but I’m putting my trust in Lauck Street Shipyard this time.
 
Here's Pete's build - lovely all wood no paint! https://shipsofscale.com/sosforums/threads/model-shipways-fair-american.11900/

Blessings.
Chuck
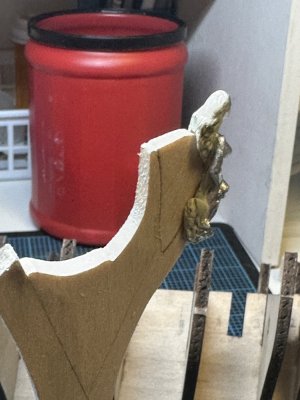
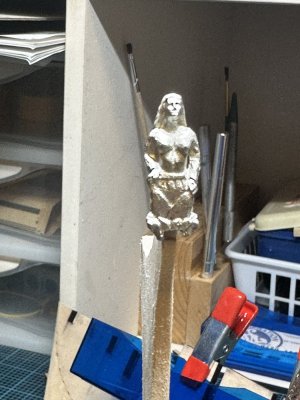
Haha! Too bad I didn’t find that yesterday, or else I might not have gone to all the trouble of filling in the notch for the figurehead. I had been unable to find any good close-up shots of the FA figurehead. I fiddled with a variety of ideas for positioning the figurehead and looked at a bunch of photos of other figureheads, and eventually decided the way the plans suggest didn’t work for me.

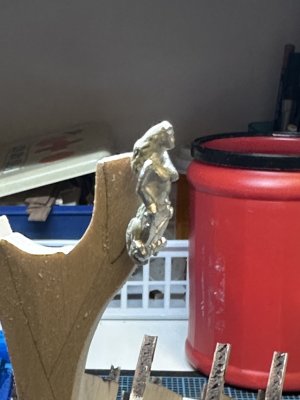
So I used some Tamiya epoxy to add some more hair and billowing fabric and I notched the stem a bit differently:
IMG_5869.jpeg
IMG_5870.jpeg

I may still bulk up the relatively flat lower front of the figurehead, but since I’m still not quite sure what that’s meant to represent I haven’t decided yet
IMG_5871.jpeg
Anyone have any thoughts on what they think that is, I’d love to hear them. Currently leaning towards painting them as a pair of shields: one red and white striped and the other blue (possibly with a star).
 
Haha! Too bad I didn’t find that yesterday, or else I might not have gone to all the trouble of filling in the notch for the figurehead. I had been unable to find any good close-up shots of the FA figurehead. I fiddled with a variety of ideas for positioning the figurehead and looked at a bunch of photos of other figureheads, and eventually decided the way the plans suggest didn’t work for me.

So I used some Tamiya epoxy to add some more hair and billowing fabric and I notched the stem a bit differently:
View attachment 533272
View attachment 533273

I may still bulk up the relatively flat lower front of the figurehead, but since I’m still not quite sure what that’s meant to represent I haven’t decided yet
View attachment 533274
Anyone have any thoughts on what they think that is, I’d love to hear them. Currently leaning towards painting them as a pair of shields: one red and white striped and the other blue (possibly with a star).
LOVE IT! I wanted to add hair because the real Lovely Renee has awesome hair, but I coouldn't think how to do it. You did a brilliant job! I don't know what the flat lower front is meant to be. I know I filed it down so it would fit in the given notch rather than on the front of the stem so they were largely obscured and I did the whole figurehead in gold. I'll check my references for the Rogers' collection model. If there is any thing interesting, I'll share it with you.

Perhaps your decision about where to mount her is a bit unorthodox, but - go for it! She's lovely!

Blessings.
Chuck
 
I think I did stars over red and white stripes on a single shield. Not realizing at the time that the Fair American herself probably pre-dated the Stars and Stripes motif! I can't, for the life of me remember what's on the original.:oops:
Pete
 
Back
Top