• LUCZORAMA SHIPWRECK SCAVENGER HUNT GIVEAWAY. 4 Weeks of Fun • 1 Legendary Prize ((OcCre’s Fram Ship)) • Global Crew Welcome!
    **VIEW THREAD HERE**

Fair American 1:48 by Model Expo

LOVE IT! I wanted to add hair because the real Lovely Renee has awesome hair, but I coouldn't think how to do it. You did a brilliant job! I don't know what the flat lower front is meant to be. I know I filed it down so it would fit in the given notch rather than on the front of the stem so they were largely obscured and I did the whole figurehead in gold. I'll check my references for the Rogers' collection model. If there is any thing interesting, I'll share it with you.

Perhaps your decision about where to mount her is a bit unorthodox, but - go for it! She's lovely!

Blessings.
Chuck
So, I figured the kit must depict the figurehead that way for a reason, which is undoubtedly reflective of the Rogers Collection, but nearly every figurehead I have seen was either entirely below/forward of the stem or straddling it.

I had found this depiction of the figurehead in the plans, which is clearly more robust than that provided in the kit and obviously and a better fit for the notch
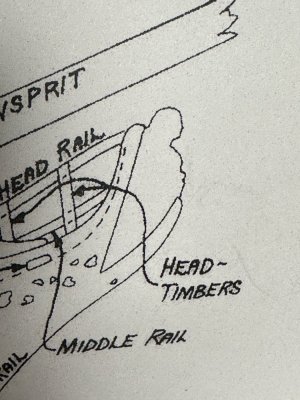
IMG_5873.jpeg

After the mod I found this depiction of the figurehead, which seems to show it as straddling the stem
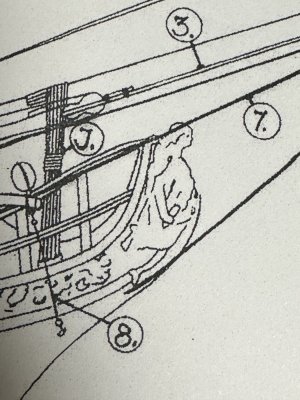
IMG_5872.jpeg
Unfortunately, pretty much everything below the waistline is missing and beyond my ability to replicate.

All that is to say that, yes, in relation to other FA builds, mine is certainly an unorthodox approach; but I think in light of what the kit provides for a figurehead, my depiction is pretty consistent with prevailing practice. At least that’s what I keep telling myself! ROTF

Anyway, I provide all this mansplaining for the benefit of some future builder. Considering what a puzzle it’s presented for me, I haven’t seen any other build logs that make any mention of it.

Anyway, I’m awfully glad I got it sorted (one way or the other) before mounting the stem :D
 
Last edited:
I think I did stars over red and white stripes on a single shield. Not realizing at the time that the Fair American herself probably pre-dated the Stars and Stripes motif! I can't, for the life of me remember what's on the original.:oops:
Pete
I thought about doing her in gold as I have seen on many builds, but I’m currently leaning more toward going full color. Considering that the MSFA is a model of a model of a ship that changed hands multiple times I am not sure anyone could say that any given approach is not correct.

Hopefully nobody will be offended if I depict her in a topless state, which is how she appears to me in her unpainted condition, not to mention it’s how sailors of the day would have wanted her depicted ROTF ROTF
 
Last edited:
Been having to stay late at work for pretty much the entire month, but as soon as I can get a break I plan to make more progress on FA.

As the hull slowly takes shape I also want to get going on painting the figurehead. Having sucked at figure painting growing up and never investing the time and effort to get good at it as an adult, this is going to be a gamble, but I'm going to have a go at a full-color figurehead. I figure if its a failure I'll just strip it and repaint it in solid gilt.

First thig will be to prime it well, for which I normally use standard automotive primer. Next up I think will be to address the shields--multiple decisions to make here. First is whether to create some decals to do the shields, or to mask and paint them. Inkjet decal paper is pretty thick stuff so that may not work here. The other question is what to put on the shields. One of them will be red and white striped. The other will be either solid blue, blue with stars (or a representation of stars), or a union jack. Why a union jack? A quick check on line indicates ships of this period could have been flying either the stars and stripes ensign (became the official ensign of the union in 1777) or the Grand Union Flag, which preceded the stars and stripes but remained in use well past 1777.

For painting, I'll be using model acrylics, mostly Vallejo, and a wet palette. For those not familiar with a wet palette, it consists of a shallow flat-bottomed container (I use the bottom of an old plastic first aid kit), with a piece of paper towel cut to size with just enough water added to saturate the paper towel. Over this is laid a piece of parchment paper. You can add small dabs of acrylic paint to the parchment and they will stay liquid much longer than on a dry palette, which gives you a lot more working time.

Hope to be able to start posting progress photos soon!
 
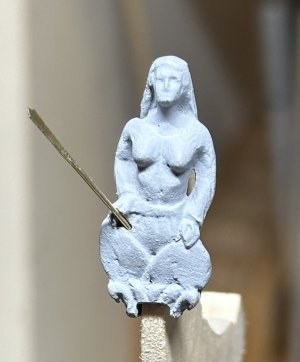
I got a coat of primer on Nancy (actually, her name is Magill, but she calls herself Lill).
IMG_5878.jpeg
Primed, it is now clear she has sleeves and a hint of a neckline so, alas, she will not be protecting the ship in a topless state. (I just heard the groans from the foc’s’le).

The position of her right hand suggested she was holding something, which I have decided will be a gold (brass) spear. The sharp-eyed among you will also have noticed that I used more putty to round out the shields, which appeared strangely truncated as originally cast.
 
So, I figured the kit must depict the figurehead that way for a reason, which is undoubtedly reflective of the Rogers Collection, but nearly every figurehead I have seen was either entirely below/forward of the stem or straddling it.

I had found this depiction of the figurehead in the plans, which is clearly more robust than that provided in the kit and obviously and a better fit for the notch
View attachment 533333

After the mod I found this depiction of the figurehead, which seems to show it as straddling the stem
View attachment 533334
Unfortunately, pretty much everything below the waistline is missing and beyond my ability to replicate.

All that is to say that, yes, in relation to other FA builds, mine is certainly an unorthodox approach; but I think in light of what the kit provides for a figurehead, my depiction is pretty consistent with prevailing practice. At least that’s what I keep telling myself! ROTF

Anyway, I provide all this mansplaining for the benefit of some future builder. Considering what a puzzle it’s presented for me, I haven’t seen any other build logs that make any mention of it.

Anyway, I’m awfully glad I got it sorted (one way or the other) before mounting the stem :D
Namabiiru! Excellent! I went with the straddling option without giving it much thought. Glad you went to the trouble to think about this and give the next builder some guidance. On that note, I wish you had posted about your method of using epoxy to augment your figurehead. Perhaps you have pictures of this?

Blessings.
Chuck
 
I got a coat of primer on Nancy (actually, her name is Magill, but she calls herself Lill).
View attachment 533691
Primed, it is now clear she has sleeves and a hint of a neckline so, alas, she will not be protecting the ship in a topless state. (I just heard the groans from the foc’s’le).

The position of her right hand suggested she was holding something, which I have decided will be a gold (brass) spear. The sharp-eyed among you will also have noticed that I used more putty to round out the shields, which appeared strangely truncated as originally cast.
Namabiiru! Never too late to remove a top, if you ask nicely ROTF. In fact, I can see what appear to be a belly button among other things:cool: But, it would require you to get to work removing the sleeves and revealing her arms and that is a lot of material to remove.

Well done!

Blessings.
Chuck
 
Namabiiru! Excellent! I went with the straddling option without giving it much thought. Glad you went to the trouble to think about this and give the next builder some guidance. On that note, I wish you had posted about your method of using epoxy to augment your figurehead. Perhaps you have pictures of this?

Blessings.
Chuck
There wasn’t much to it, really. I used Tamiya two-part epoxy putty. Just cut a small sliver off each component and knead together thoroughly. Last step is to stick on tiny pieces in the right places and then use a needle mounted in a pin vice to work things into shape. It’s so small that perfect sculpting is not needed—close is good enough.
 
Namabiiru! Never too late to remove a top, if you ask nicely ROTF. In fact, I can see what appear to be a belly button among other things:cool: But, it would require you to get to work removing the sleeves and revealing her arms and that is a lot of material to remove.

Well done!

Blessings.
Chuck
I’m tempted to make a comment about at least not having to remove other articles of clothing, but I’ll try to keep it PG-13.

I haven’t ruled out the possibility of more modifications. Her front side is so anatomically accurate that I’m quite convinced that some prude in Model Shipways upper management saw the original rendering and insisted the she be modeled with a bodice. The sculptor appears to have done the minimum necessary to comply. ROTF

Have to think on this some more. Fortunately, I’ve got lots of time to work on her while the rest of the ship progresses. The crucial part, of making sure her backside (is it zaftig?) conforms to the stem, is done.
 
Last edited:
I’m tempted to make a comment about at least not having to remove other articles of clothing, but I’ll try to keep it PG-13.

I haven’t ruled out the possibility of more modifications. Her front side is so anatomically accurate that I’m quite convinced that some prude in Model Shipways upper management saw the original rendering and insisted the she be modeled with a bodice. The sculptor appears to have done the minimum necessary to comply. ROTF

Have to think on this some more. Fortunately, I’ve got lots of time to work in her while the rest of the ship progresses. The crucial part, of making sure her backside (is it zaftig?) conforms to the stem, is done.
LOVE IT!!!
 
At Chuck's urging, the men before the mast asked nicely, and in finest revolutionary spirit Nancy has agreed to burn her brassiere and bare all (Are we talking 1770s or 1970s?).*

However, as Chuck pointed out, it's going to be some delicate work to get that shirt off (some of you may have experienced this in your mis-spent or well-spent youths). Since I have no idea what became of the figurehead from my original FA kit, I only get one shot to do this convincingly. I gave some thought to casting a resin replacement so I would have the original to fall back on if things didn't go well, but I don't think I'm going to try to climb that learning curve with such a complex shape. Fingers crossed all goes well!

*Did I say I would try to keep things PG-13? Epic fail! :rolleyes:ROTF
 
Last edited:
Hey Namabiiru,

That doesn't look so bad after all. The lady can be seen. Perhaps a tip from me: use a very thin brush. I know someone who paints watch dials with a brush that only has two hairs. The madness.

Priming is always important, otherwise the colour won't hold properly and will run quickly. Have you ever thought about using water-soluble film for printing the drawings? It's like modelling, there are also decals included. Surely they would fit?

Best regards

Günther Ship-1
 
A cursory overview of clipper ship figureheads will reveal evidence that the sculptors during the Victorian age, employed even during this most "proper" of "proper" minded eras, that eschewed revealing even the most modest examples of female flesh (Ankles!? "Heaven forbid!! Oh my God!") these artist-craftsmen did not shy away from revealing either naked or gauzily covered comely and shapely boobies without the least shame or hesitation. See "Flying Cloud", " Glory of the Seas" and "Cutty Sark among others. :p
 
Hey Namabiiru,

That doesn't look so bad after all. The lady can be seen. Perhaps a tip from me: use a very thin brush. I know someone who paints watch dials with a brush that only has two hairs. The madness.

Priming is always important, otherwise the colour won't hold properly and will run quickly. Have you ever thought about using water-soluble film for printing the drawings? It's like modelling, there are also decals included. Surely they would fit?

Best regards

Günther Ship-1
Günther,
Everything you say is correct. I will be using many of the same techniques I use for plastic models to finish Nancy, but as I said, figure painting has never been my strong point. Luckily, I don’t have to create a realistic-looking human; I just need to create a realistic-looking carving of a human. Big difference! ROTF
 
A cursory overview of clipper ship figureheads will reveal evidence that the sculptors during the Victorian age, employed even during this most "proper" of "proper" minded eras, that eschewed revealing even the most modest examples of female flesh (Ankles!? "Heaven forbid!! Oh my God!") these artist-craftsmen did not shy away from revealing either naked or gauzily covered comely and shapely boobies without the least shame or hesitation. See "Flying Cloud", " Glory of the Seas" and "Cutty Sark among others. :p
My thinking exactly! Yet to be seen what SWMBO has to say when it’s all over but the crying :rolleyes:
 
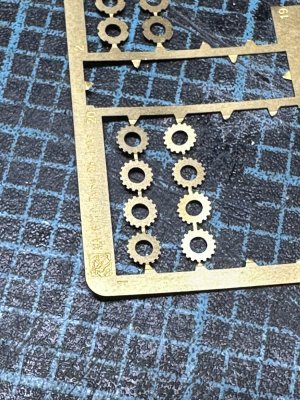
I came across these in my photo-etch stash:
IMG_5879.jpeg

Are you thinking what I’m thinking?

If you’re thinking TIARA! you are!

Of course that’s going to require me to go all Stephen Maturin on her noggin.

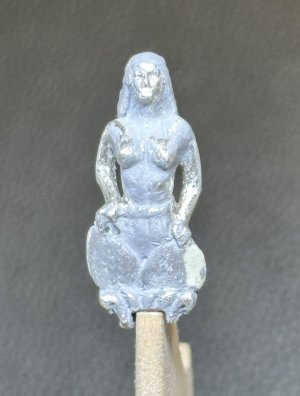
Here she is in her current state of glory:
IMG_5880.jpeg
She’s still got the arms of a stevedore, but I don’t know if I can get them much closer. I have to go into the office this morning so I’m going to think on it a bit.

The neckline was filled in with Mr Surfacer 500 and came out quite nice after some light sanding.

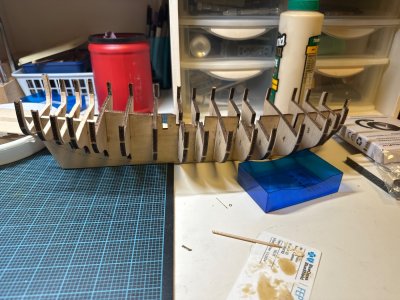
Nancy is turning into a project in her own right, but fear not; progress on the bulkheads continues.
 
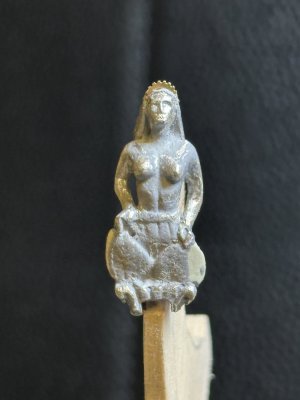
Does it look like a tiara, or a saw blade embedded in her skull?
IMG_5881.jpeg
My finest razor saw is actually thinner than the photo etch and my next bigger saw was comparatively huge so this ended up being more challenging than expected. Luckily, Mr Surfacer is a cure for many ills…to include the inconveniently placed casting hole to which Chuck alluded earlier right about where she would straddle whatever she is astride. In the words of Pink Floyd, “This will not do”

Oh, and for those uninterested in female anatomy:
image.jpg

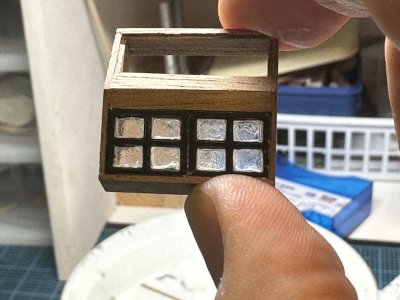
Is this a reasonable facsimile of colonial glass, or too rough?
IMG_5882.jpeg
 
Last edited:
Namabiiru! Looking great!

I see what you are saying about a saw blade. I think this is because of the contrast in metal colors and knowledge of the origin of the tiara. Perhaps if it were curved a bit? As to Lill herself, you did a great job getting her top off. Although her arms appear a little thick, I think you can cure the proportion problem by shading. Dark shadows where you want to reduce and highlight the line of the arms - this will keep the eye on the thin line of highlighting and make her arms appear slender and supple. You say you're not a figure painter. You have also claimed lack of skills. One of these things, IMHO, is not quite true :) So, I'm confident that Lill will be a stunner once you've painted her, either because you have the skill or will have the skill when the time comes.

Hey, framing complete! I see that the cabin space is nicely open. I look forward to seeing what you make there! As to the glass - I think it looks very convincing, nicely translucent. My question would be whether translucent is enough? Since you are going to the effort of building out the main cabin I'm thinking you're wanting to be able to see what's in there? Maybe transparent is the way to go? This means that you might have to abandon the idea of representing colonial era glass and cutting individual panes.

Just some thoughts! I'm really enjoying your work, my friend!

Blessings. Peace. Gratitude.
Chuck
 
Back
Top