• Win a Free Custom Engraved Brass Coin!!!
    As a way to introduce our brass coins to the community, we will raffle off a free coin during the month of August. Follow link ABOVE for instructions for entering.

Fair American 1:48 by Model Expo

Oh now I will have to go back and read it haha
Ashamed to say you did catch that I had skipped a bit. - 7 whole pages is alot to read. I do plan to go back at some point if for nothing else than to enjoy the pictures of the details. Looking forward to better following the winds this time.
 
Hey Namabiiru,

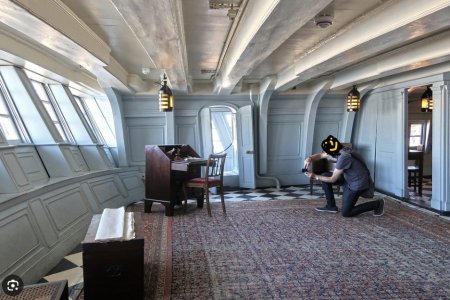
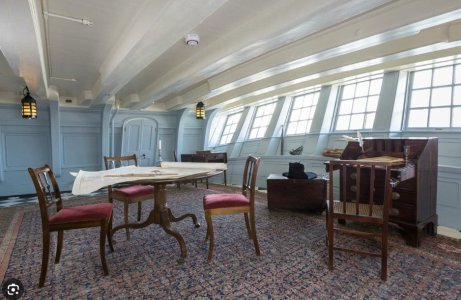
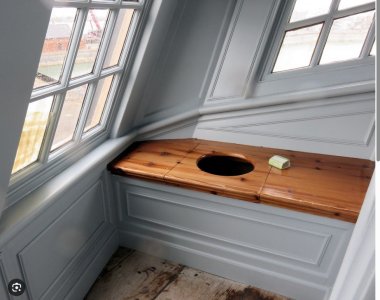
looks great!!! I've sent you a few pictures so you can see how best to link the plinth to the room. I've also attached a picture of the toilet ...ROTF

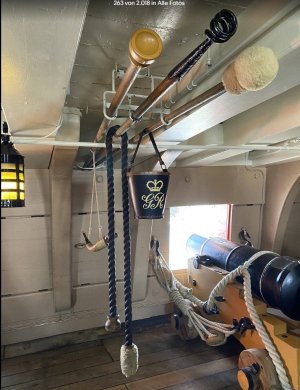
I hope these pictures can inspire you.

Best regards
GüntherShip-1

The rooms are from the HMS Victory. Captain Hardy ...
Captain Hardy.jpg HMS Victory Captainsroom.jpg

Zubehör HMS Victory.jpgToilette HMS Victory Captain Hardy.jpg
 
While work continues with the wales, I’m also making progress on the transom. Eventually I decided to revisit a technique I used for the tailboards on my lobster smack.
IMG_6055.jpeg
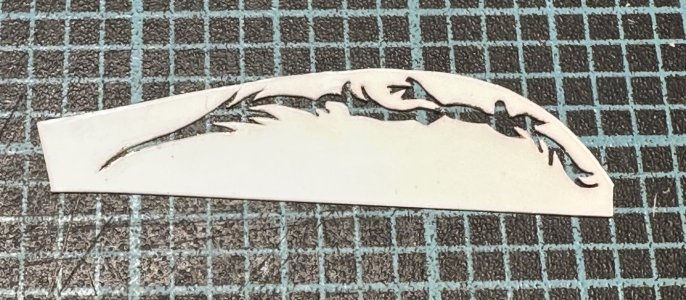
Using a very sharp exacto blade, I cut a stencil from thin styrene sheet.
IMG_6058.jpeg
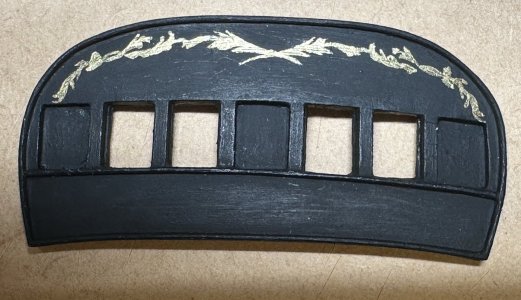
With a fine point brush I painted the left side, then flipped the stencil over to do the right side.

IMG_6059.jpeg
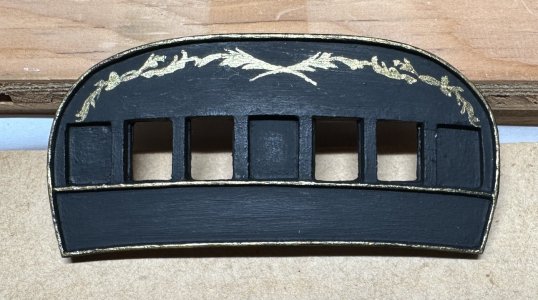
And with the edge trim picked out.

Not perfect, but it’s as good as I think I’ll be able to get. Next, the name board.
 
Last edited:
While work continues with the wales, I’m also making progress on the transom. Eventually I decided to revisit a technique I used for the tailboards on my lobster smack.
View attachment 542509
Using a very sharp exacto blade, I cut a stencil from thin styrene sheet.
View attachment 542511
With a fine point brush I painted the left side, then flipped the stencil over to do the right side.

View attachment 542525
And with the edge trim picked out.

Not perfect, but it’s as good as I think I’ll be able to get. Next, the name board.
Just curious, have you thought about painting the part you actually cut out and glueing it on the transom as a 3D piece? Of course you would need two each one being a mirror image.
 
Just curious, have you thought about painting the part you actually cut out and glueing it on the transom as a 3D piece? Of course you would need two each one being a mirror image.
That would, of course, be much better, but there isn’t actually any “part I cut out”. Producing the stencil was more of a process of slowly carving away tiny slivers to achieve the right shape. I also used very small drill bits to make holes for the parts that didn’t end with a sharp point. It’s a good suggestion though, and I agree with you that something sculptured would look much better.
 
I see what you're saying. If you still have the stencils, maybe they could be used to trace an outline on a thin piece of wood, then cut the outline on the wood and you'd have it unless I have this all wrong in my mind. Anyway, the painted design looks good too.
 
Channeling my @GrantTyler inner Ricochet Rabbit, I set aside transom and wales (sounds like a quiet parish in the English countryside, doesn’t it?—Transom and Wales ROTF ) to work on cannon carriages.

Why? You ask. Well, in Bob Hunt’s practicum (and confirmed as I recall in @The Gavel ’s build log), it was noted the bulwarks were too low for the cannon muzzles. This checks because, as I noted earlier in this log, the carriages in the current kit are huge compared to what was in the 1990s-era kit. With that said, my research indicates the original carriages are too small for the supplied cannon barrels so I’m making my own.

So I need to verify how high above deck the cannon muzzles will sit so I can determine whether I need to add another run of bulwark planks, which means I need to put some cannons together.

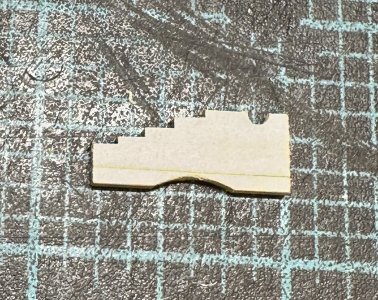
After running some basswood strip from the local DIY store through an improvised thickness sander, I cut the pieces to length and sanded the curve in the bottom on the milling machine.
IMG_6063.jpeg
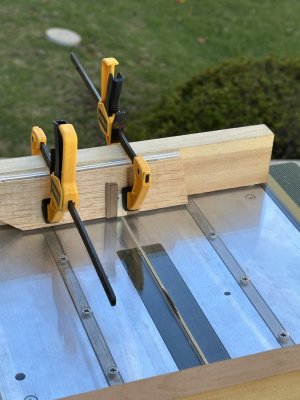
I swapped a 290 tooth blade onto the Proxxon saw and clamped a jig to the crosscut sled. This allowed me to safely make ~128 cuts on the tiny pieces and still finish with 10 fingers.
IMG_6064.jpeg
Cannon carriage as it currently stands
 
Last edited:
Hey Namabiiru,

your colouring looks really nice. I would probably have done it the same way if I didn't have such fat fingers and a steady hand. ROTF
But my tactic is to use water-soluble decals like I do for aeroplane modelling. I have to create these images in Photoshop, paint them and then print them. Doesn't look bad.....

Your gun carriages turned out really well.Thumbsup How long did you sit on one of those walls or how long does it take you to finish?

Best regards
GüntherShip-1
Thanks, Günther! I’ve used home-made decals before, which I could have done in this case, but there were a few limiting factors that pushed me away from that. The first is that you can’t really replicate gold very well on an inkjet printer. Another is that having never found clear decal film, I would have had to cut this down to an extremely delicate shape that I would not have been able to do cleanly. The other option would have had to do one big decal with a black background, but I didn’t think that was going to look right.

The carriage sides didn’t take too long. Once I got the holder/jig set up, it only took about 20-30 seconds to cut and swap in the next piece. Once I got the first step cut on each piece, it took less the 5 minutes to shift the jig and adjust the blade height to cut the next step. I had considered a few different ideas on how to do those (such as clamping them in one big stack and cutting each step on all of them in one pass), but this seemed like the most effective, even though more tedious.

Still lots to do, but so far I am pleased with the result. I need to figure out how I’m going to make the trucks (wheels) next.
 
Last edited:
Thanks, Günther! I’ve used home-made decals before, which I could have done in this case, but there were a few limiting factors that pushed me away from that. The first is that you can’t really replicate gold very well on an inkjet printer. Another is that having never found clear decal film, I would have had to cut this down to an extremely delicate shape that I would not have been able to do cleanly. The other option would have had to do one big decal with a black background, but I didn’t think that was going to look right.

The carriages sides didn’t take too long. Once I got the holder/jig set up, it only took about 20-30 seconds to cut and swap in the next piece. Once I got the first step cut on each piece, it took less the 5 minutes to shift the jig and adjust the blade height to cut the next step. I had considered a few different ideas on how to do those (such as clamping them in one big stack and cutting each step on all of them in one pass), but this seemed like the most effective, even though more tedious.

Still lots to do, but so far I am pleased with the result. I need to figure out how I’m going to make the trucks (wheels) next.
Hey Namabiiru,

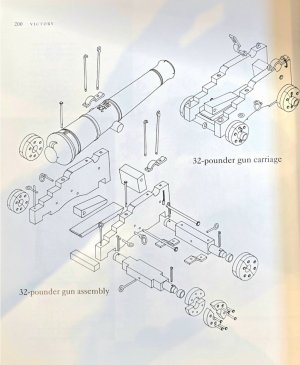
the labour involved should not be underestimated. It takes a lot of effort to make a gun carriage. That's why I decided to commission my gun carriage according to McGowan's plan. I'm so pleased with my gun carriage and cannons. I still have to paint and upgrade them. I have attached the gun carriage parts from McGowan's book "The HMS Victory - Her Construction, Career and Restoration" so that you can see what you still have to do. I would cut the axles from a piece of rectangular wood. This way you have the wooden axle and the wheel hub for the wheels in one piece.

Best regards

Günther
Lafette McGowan HMS Victzory.jpg
 
Hey Namabiiru,

the labour involved should not be underestimated. It takes a lot of effort to make a gun carriage. That's why I decided to commission my gun carriage according to McGowan's plan. I'm so pleased with my gun carriage and cannons. I still have to paint and upgrade them. I have attached the gun carriage parts from McGowan's book "The HMS Victory - Her Construction, Career and Restoration" so that you can see what you still have to do. I would cut the axles from a piece of rectangular wood. This way you have the wooden axle and the wheel hub for the wheels in one piece.

Best regards

Günther
View attachment 542932
Thanks for sharing that. I anticipate mine will be somewhat simplified, especially considering that the barrels themselves are not highly accurate. I think there is a certain satisfaction from scratch building my own, and I can fall back on resin printed if this doesn’t work out.
 
@GIG1810 and @Namabiiru I wonder if one of those cutting printers would help for when we become unable to detail ourselves - like the cricut ? Has this been tried? Or does that take the fun out of it as it's too close to using a laser cutter? Ha
 
@GIG1810 and @Namabiiru I wonder if one of those cutting printers would help for when we become unable to detail ourselves - like the cricut ? Has this been tried? Or does that take the fun out of it as it's too close to using a laser cutter? Ha
DD, that’s a great idea. My daughter-in-law has one of those and I asked her about it. She said I could design it on their free software and she could cut it. Then two things happened: I found out how many add-ons I would have pay extra for in order in order to unlock the various shapes, etc.; and I realized I was too impatient to work through the whole process with her 13 time zones away. ROTF

But it was the cri-cut idea that led me back to the solution of hand-making my own stencil. ;)
 
Last edited:
Back
Top