Good idea.I'm no chemist Namabiiru, it sounds like your Japanese fuel alcohol is a more powerful solvent. Glue a couple scraps together and test its solvent power, it may be way better than isopropyl, who knows?
-

Win a Free Custom Engraved Brass Coin!!!
As a way to introduce our brass coins to the community, we will raffle off a free coin during the month of August. Follow link ABOVE for instructions for entering.
-

PRE-ORDER SHIPS IN SCALE TODAY!
The beloved Ships in Scale Magazine is back and charting a new course for 2026!
Discover new skills, new techniques, and new inspirations in every issue.
NOTE THAT OUR FIRST ISSUE WILL BE JAN/FEB 2026
You are using an out of date browser. It may not display this or other websites correctly.
You should upgrade or use an alternative browser.
You should upgrade or use an alternative browser.
- Joined
- Jun 17, 2021
- Messages
- 3,199
- Points
- 588

I made the mistake of thinking alcohol is alcohol. The denatured version was a complete failure and may actually mess things up when mixed with the rubbing alcohol. The rubbing alcohol is a sure thing by itself.
I grabbed a bottle of rubbing alcohol during my lunch break today, so I'll see how that works. I've also read that a 1:1:1 blend of acetone, water, and vinegar works on Titebond.
EDIT
The rubbing alcohol did the trick. After I got home from work, I used equal parts patience and isopropanol (maybe more of the latter...) to gently pry away the offending planks. The whole process was not as easy as I had hoped, but definitely not as difficult as I had feared. No appreciable damage to the rest of the ship, but the planks won't be good for much other than chopping up into clamp pads. I still have a mountain of work to clean off the remaining glue residue, but that will be much easier since I will be able to apply the alcohol directly to the glue, rather than trying to soak it through the wood into the joint.
Thank you, Gentlemen, for your input on this.
EDIT
The rubbing alcohol did the trick.
Thank you, Gentlemen, for your input on this.
Last edited:
- Joined
- Jun 17, 2021
- Messages
- 3,199
- Points
- 588

Yellow carpenters' glue is a different animal than white glues. Formulated for carpentry, it has a very limited set time after which it is strong and stubborn as hell.
I have no idea as to its' reversibility. it also has a limited shelf life. For these reasons I abandoned it early on for furniture restoration, and ultimately model building.
Others I've seen here like it for their own reasons.
I have no idea as to its' reversibility. it also has a limited shelf life. For these reasons I abandoned it early on for furniture restoration, and ultimately model building.
Others I've seen here like it for their own reasons.
I have been using Titebond III on this build because it's what I had on hand. For that reason, I thought it was going to require a judicious application of high explosives to get the bulwark planking off, but you were spot on about the rubbing alcohol.Yellow carpenters' glue is a different animal than white glues. Formulated for carpentry, it has a very limited set time after which it is strong and stubborn as hell.
I have no idea as to its' reversibility. it also has a limited shelf life. For these reasons I abandoned it early on for furniture restoration, and ultimately model building.
Others I've seen here like it for their own reasons.
Haven’t had an update in a while so forgive me if I wax a bit verbose on this one.
As I contemplated the task of planking the bulwarks for a second time, I realized that I really needed to make some progress on the transom and counter so I could start visualizing how I want to complete the great cabin.
Because the great cabin would be so visible through all the windows, the method for framing out the transom and counter shown in the instructions wouldn’t work, and I was not a fan of Bob Hunt’s very simplified transom. Thus I framed out my own, but kept coming back to the question of how the curved bottom edge of the transom would blend into the straight edge of the counter. I finally hit on the idea that if the transom were cambered (rather than flat, as depicted in the instructions and practicum) then it should solve the problem. Further research indicated the transom actually should be cambered. However, I had already framed up my transom flat.
The solution was to soak the whole thing in water, then clamp it to a piece of glass with a strip of wood underneath the center. That worked surprisingly well.
Next step would be to sand the transom to its final shape. For that, a disc sander would be ideal.
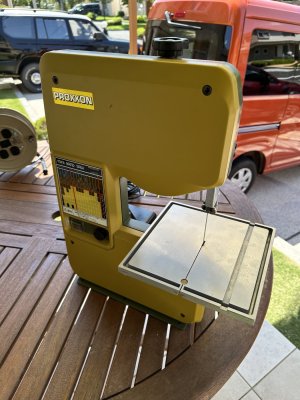
Luckily, I stumbled on this little gem yesterday in a second-hand store (Hard-Off is the name ) for about half of what it would have cost new and with no shipping charges.
“Wait, that’s not a disc sander,” I hear you say. No, but it did prove useful making this:
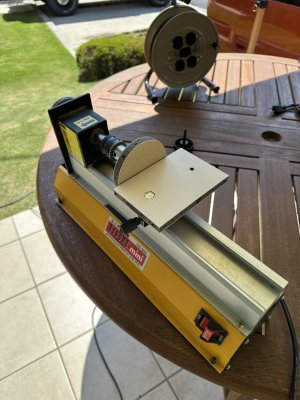
It’s a disc sander attachment for my hobby lathe. It made quick work of getting the transom to its final shape.
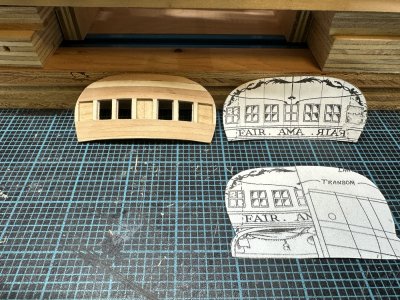
Here’s the transom ready for adding trim and moldings. Don't worry, those apparent gaps between the planks are filled. they'll disappear when painted.
That’s all for now. Thanks for bearing with my loquaciousness.
As I contemplated the task of planking the bulwarks for a second time, I realized that I really needed to make some progress on the transom and counter so I could start visualizing how I want to complete the great cabin.
Because the great cabin would be so visible through all the windows, the method for framing out the transom and counter shown in the instructions wouldn’t work, and I was not a fan of Bob Hunt’s very simplified transom. Thus I framed out my own, but kept coming back to the question of how the curved bottom edge of the transom would blend into the straight edge of the counter. I finally hit on the idea that if the transom were cambered (rather than flat, as depicted in the instructions and practicum) then it should solve the problem. Further research indicated the transom actually should be cambered. However, I had already framed up my transom flat.
The solution was to soak the whole thing in water, then clamp it to a piece of glass with a strip of wood underneath the center. That worked surprisingly well.
Next step would be to sand the transom to its final shape. For that, a disc sander would be ideal.

Luckily, I stumbled on this little gem yesterday in a second-hand store (Hard-Off is the name
 ) for about half of what it would have cost new and with no shipping charges.
“Wait, that’s not a disc sander,” I hear you say. No, but it did prove useful making this:

It’s a disc sander attachment for my hobby lathe. It made quick work of getting the transom to its final shape.

Here’s the transom ready for adding trim and moldings. Don't worry, those apparent gaps between the planks are filled. they'll disappear when painted.
That’s all for now. Thanks for bearing with my loquaciousness.
Last edited:
Excellent sleuthing. I've been staring at a transom for a while now as well. I'll hope for your same level of insight...
Paul, thank you for your very kind words, but I can tell you put 20 parts of research and 20 parts of thought into it before you do 1 part of building. I just dive in and make it up as I go along. Sometimes the TLAR method works, sometimes not…Excellent sleuthing. I've been staring at a transom for a while now as well. I'll hope for your same level of insight...
- Joined
- Nov 27, 2024
- Messages
- 102
- Points
- 88

Looking great so far! But I'm a little jealous of your find.
Thank you, Günther. I don’t know how much there is to learn here, except what NOT to do, but thank you for coming along.Hey Namabiiru,
I am so curious about your construction of the Fair American .
I'll definitely stay loyal and learn from you! It all looks very good so far.
Cheers, Günther
Thank you very much. I foresee that band saw getting lots of use.Looking great so far! But I'm a little jealous of your find.
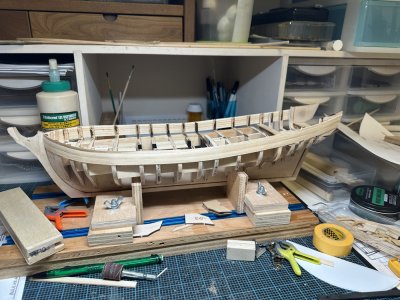
Second go at bulwark planking is done, this time with (I hope!) the correct timber. Rough sanded, coat of sanding sealer (actually art sealer; haven’t been able to find actual sanding sealer), and another light sanding. Very far from perfect, but reasonably good, considering what the kit gave me to work with.
Next comes the black strake and wales.
What follows is mainly for folks like myself who are still learning the craft and may find this instructional. If you’re a skilled master, feel free to skip this post.
I have been concerned about how to drill a 1/4” hole at an angle through the counter without make a right old mess of things. I decided I would start with a solid block beveled on each end to fit snugly between stern frames 1 & 2. Next, I marked on the bottom of the block where I wanted the hole to be centered. I knew the angle between the rudder post and wing transom is 108deg so on the end of a scrap block I marked a line 18deg from one face.
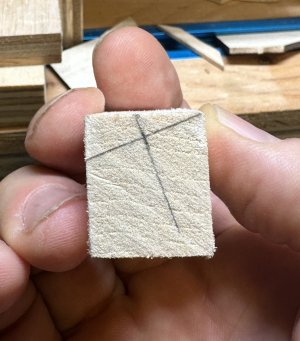
Measuring the distance from the edge of my counter block to the center of the hole, I marked off this distance on the angled line and then drew another line at a right angle at the point I marked. Where the second line meets the top face of the block, I marked a line running lengthwise along that face. Mark a line perpendicular to that, and drill a 1/4” hole through the scrap block on the drill press.
Next I went to the table saw with the blade set for 18deg and ripped a bevel on the scrap block to match the first I drew on the end. Flip it over to rip the opposite face to get a parallelogram
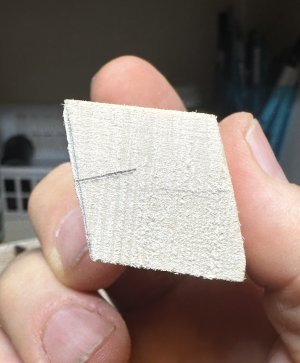
As you can see, my blade was a little off, but it shouldn’t make a lot of difference here.
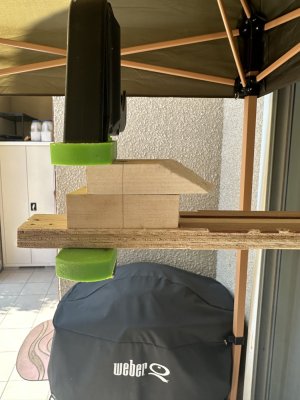
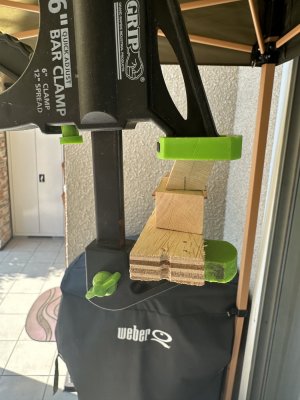
Now clamp the counter block between the drilled scrap block and another piece of scrap with the hole center lines lined up and the edges from which you measured aligned. Now it’s just a simple job of using a hand drill to drill the counter block.
I have been concerned about how to drill a 1/4” hole at an angle through the counter without make a right old mess of things. I decided I would start with a solid block beveled on each end to fit snugly between stern frames 1 & 2. Next, I marked on the bottom of the block where I wanted the hole to be centered. I knew the angle between the rudder post and wing transom is 108deg so on the end of a scrap block I marked a line 18deg from one face.

Measuring the distance from the edge of my counter block to the center of the hole, I marked off this distance on the angled line and then drew another line at a right angle at the point I marked. Where the second line meets the top face of the block, I marked a line running lengthwise along that face. Mark a line perpendicular to that, and drill a 1/4” hole through the scrap block on the drill press.
Next I went to the table saw with the blade set for 18deg and ripped a bevel on the scrap block to match the first I drew on the end. Flip it over to rip the opposite face to get a parallelogram

As you can see, my blade was a little off, but it shouldn’t make a lot of difference here.


Now clamp the counter block between the drilled scrap block and another piece of scrap with the hole center lines lined up and the edges from which you measured aligned. Now it’s just a simple job of using a hand drill to drill the counter block.
Last edited:
Once I had the hole for the rudder post drilled, I needed to cut the back of the block to mate with the cambered transom. I transferred the shape of the transom to the top of my block and set the table of my bandsaw to 18deg and was done in two minutes. They say fortune favors the bold. Sometimes it favors the poor slob who happens to be in the right place at the right time. I could not have easily done this job without the bandsaw I just happened to stumble upon yesterday.
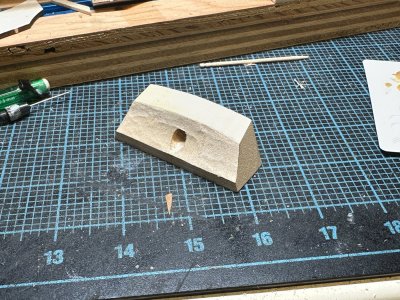
The counter has been roughed out with the dremel. Almost ready to install. But first, another decision to be made.
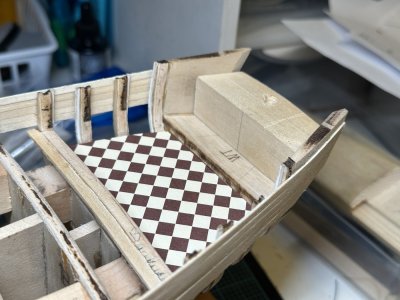
Here’s the block in place. The bottoms of the transom windows come to just above the top of the block. The question:
Without any idea of the actual layout of the 1:1 great cabin, do I cut away the bulk of the counter block to give more space and a better view, or simply build a bunk on one side and a water closet on the other in order to disguise the block? Opinions welcome.

The counter has been roughed out with the dremel. Almost ready to install. But first, another decision to be made.

Here’s the block in place. The bottoms of the transom windows come to just above the top of the block. The question:
Without any idea of the actual layout of the 1:1 great cabin, do I cut away the bulk of the counter block to give more space and a better view, or simply build a bunk on one side and a water closet on the other in order to disguise the block? Opinions welcome.
Last edited:
- Joined
- Jun 17, 2021
- Messages
- 3,199
- Points
- 588

Bunk and water closet if they look believable and solve the problem. 
Some nice craftsmanship and wood working!
Some nice craftsmanship and wood working!

Many thanks, Peter! Coming from you, that is high praise, indeed!Bunk and water closet if they look believable and solve the problem.
Some nice craftsmanship and wood working!
There will certainly be a bunk and WC, but I want to minimize obstructions around the windows, so still need to think about this some more.
It also occurred to me that I will need replicate the tiller since it would be running under the skylight. I don’t think I need all the steering tackle because I don’t think there will be any angle from which it will be visible.
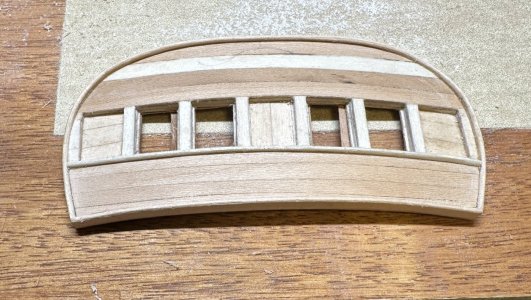
The transom is trimmed up. No small feat trying to simultaneously bend the trim in three dimensions, but I managed it reasonably well. The top edge is unfortunately beveled in the wrong direction (tilted down rather than parallel to the deck), but I don’t think it will be terribly noticeable in the end. Best I could do.
Still need to figure out how I’m going to manage the decorations. I’m not enough of an artist to free hand them. I think the lettering can be done with fingernail decals (saw them in a local store) if I can find a set with an appropriate font and size.
Last edited:
- Joined
- Apr 15, 2025
- Messages
- 151
- Points
- 103

Kaaa these look so cool!!! I love seeing the transoms come together. They look so detailed and pretty
Thank you so much! I’m pleased with how it is turning out so far.Kaaa these look so cool!!! I love seeing the transoms come together. They look so detailed and pretty
I hope you skipped over the part of this log covering the figure head. Devolved into a bunch of old men acting like teenagers.


