HI HEINRICH, AS USUAL AM A LITTLE CONFUSED, THERE ARE 2 DECKS INCLUDED IN THE KIT ONE WITH TREENAILS WHY IS THIS, AND DO YOU HAVE PICTURES OF THE SECOND JIG BEING INSTALLKED, I WILL RESTART MY BUILD WHEN I RECEIVE THE ITEMS THAT I ORDERED SOLDERING IRON AND FITTINGS FOR PLANKING. GOD BLESS STAY SAFE YOU AND YOURS DON
-

Win a Free Custom Engraved Brass Coin!!!
As a way to introduce our brass coins to the community, we will raffle off a free coin during the month of August. Follow link ABOVE for instructions for entering.
-

PRE-ORDER SHIPS IN SCALE TODAY!
The beloved Ships in Scale Magazine is back and charting a new course for 2026!
Discover new skills, new techniques, and new inspirations in every issue.
NOTE THAT OUR FIRST ISSUE WILL BE JAN/FEB 2026
You are using an out of date browser. It may not display this or other websites correctly.
You should upgrade or use an alternative browser.
You should upgrade or use an alternative browser.
FALKONET LEUDO VINACCERI 1:48
- Thread starter Heinrich
- Start date
- Watchers 24
-
- Tags
- falconet leudo vinaino
That’s slick! Great job!And then just as a quick update. The first layer of Tung Oil is applied - 60% Turpentine; 40% Tung Oil.
View attachment 182497
View attachment 182498
View attachment 182499
Everything of the best until next time.
Kind regards - Heinrich & Anna
- Joined
- Jan 9, 2020
- Messages
- 10,566
- Points
- 938

Hi Don. The deck without the treenails is the real deck that goes onto the model. The sheet with the treenailing on is for planking the deck. I have already dry-assembled the second jig and will start fairing the bulkheads tomorrow. Then I will post pictures.
Oh...when Pear married to oil\s - magic happened!!!! Very good!And then just as a quick update. The first layer of Tung Oil is applied - 60% Turpentine; 40% Tung Oil.
beautiful appearance - wood can be sooo beautiful -> this is one reason, why I love to work with this material
The tung oil and planking look great. Very nice job
- Joined
- Jan 9, 2020
- Messages
- 10,566
- Points
- 938

- Joined
- Jan 9, 2020
- Messages
- 10,566
- Points
- 938

@Dematosdg Thank you for the kind words Daniel. The deck that you see just has the indicated lines where the actual deck planking needs to go. As I post this, Anna is busy with the deck planking.
- Joined
- Jan 9, 2020
- Messages
- 10,566
- Points
- 938

@DonRobinson Thank you Don. I cant wait for you to get started on this as well. You are going to enjoy it thoroughly!
HI HEINRICH, I STILL CAN NOT GET 2 THINGS SET IN MY HEAD, 1 DECK DOES IT GET PLANKED, OR IS THE SECOND DECK LIKE A PATTEREN TO SCORE THE PLANKING, AND 2 THE TOP MEMBERS GOING ONTO THE SECOND JIG HOW DO THEY GO ON THE PART BELOW THE WATERLINE, WITH THE DECK ON CAN NOT FIGURE THIS OUT. GOD BLESS STAY SAFE YOU AND YOURS DON
@Dematosdg Thank you for the kind words Daniel. The deck that you see just has the indicated lines where the actual deck planking needs to go. As I post this, Anna is busy with the deck planking.
Ok, then here goes my next questions. And these questions are to learn how Anna is doing it.
On the Marmara, the instructions claimed to place the deck before planking it. As your kit. When I started to plank the deck I found a BIG issue, at least for me, to do a clean and good finishing at the borders. The deck borders where now against the ribs and the internal wall of the boat (don't remember the name of that "wall", but I am sure you understand what I am talking about). At that point I regretted not doing the planking before allowing me to do a fine, well shaped, finishing at the borders. The deck had pre-cut notchs to fit the deck inside with the ribs fitting inside those notchs. It would have been very easy to shape them again outside of the boat. And then fit the planked deck. The decks on the Marmara had a small curvature. But the planks were so thin that I didn't expect that will affect fitting my decks after planking. Nevertheless I do not know the answer to that because I didn't do job in that way.
So Heinrich (sorry for all the Bla Bla)
a) I am really curious if you have the same issue. Unless the deck isn't glued yet and you can take out for planking.
B) if deck is glued already, I would like to see how Anna is doing the borders of the planks with the deck on place.
I can only imaging shaping each plank border to perfection before gluing it.
Thanks
Daniel
Ps: another idea i just have will be by using a template (cardboard) done from the deck and use it then to shape all the planks borders before gluing to the real deck.
I didn't see that issue on the Marmara, and it was to late.
Last edited:
- Joined
- Jan 9, 2020
- Messages
- 10,566
- Points
- 938

@Dematosdg Daniel give me 5 minutes.
Heinrich,
Just catching up on your log, what a great job. I think the oil on the hull makes for a super finish.
Jan
Just catching up on your log, what a great job. I think the oil on the hull makes for a super finish.
Jan
- Joined
- Jan 9, 2020
- Messages
- 10,566
- Points
- 938

Hi Don and Daniel: So here goes. The kit supplies two "decks" .
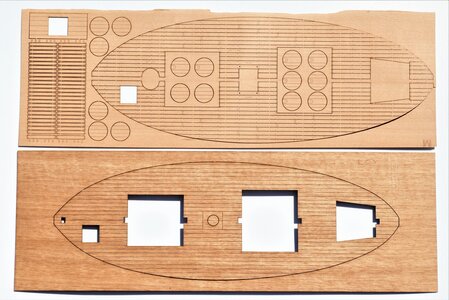
The top one just contains the Pear Wood for the actual planking. The deck at the bottom is the deck that gets installed on the ship.
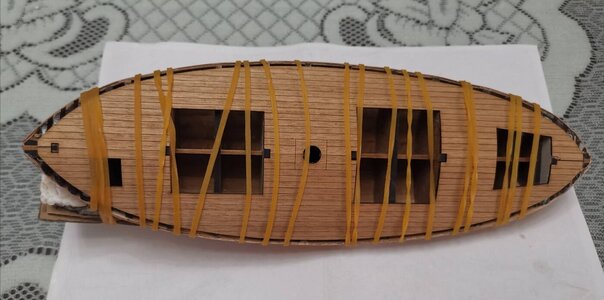
The bottom deck gets installed. As you can see it is already glued and the elastic bands keep it in position until the glue has dried.
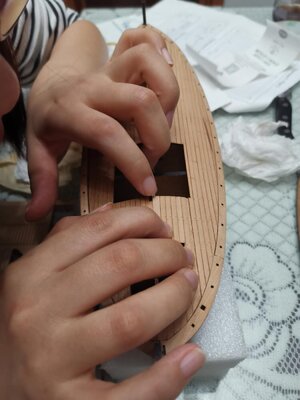
Planking starts. As you can see the pre-cut planks line up PERFECTLY with the waterways - and I mean PERFECTLY!
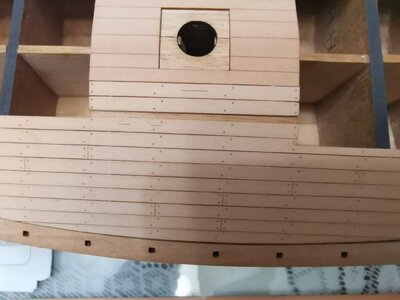
Close-up of the alignment of the deck planks.
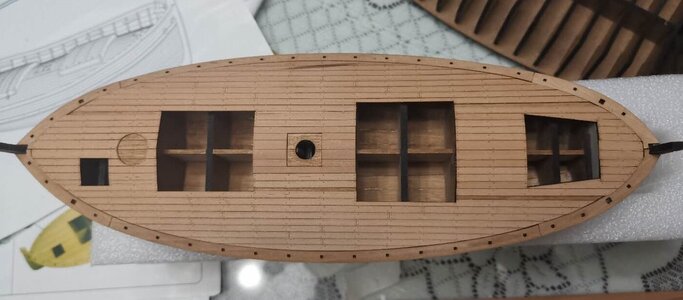
Not yet finished, but I interrupted quickly. There are still 4 planks to go.
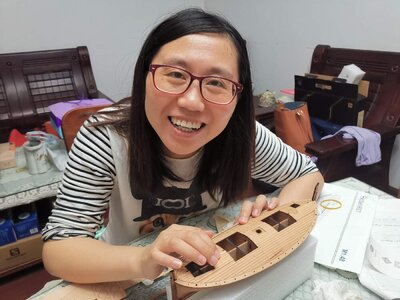
And as a treat you get to see the Master Planker.
I hope this helps. - Heinrich and Anna

The top one just contains the Pear Wood for the actual planking. The deck at the bottom is the deck that gets installed on the ship.

The bottom deck gets installed. As you can see it is already glued and the elastic bands keep it in position until the glue has dried.

Planking starts. As you can see the pre-cut planks line up PERFECTLY with the waterways - and I mean PERFECTLY!

Close-up of the alignment of the deck planks.

Not yet finished, but I interrupted quickly. There are still 4 planks to go.

And as a treat you get to see the Master Planker.
I hope this helps. - Heinrich and Anna
Ok..
This answered all. Planks are precut and shaped already. Then there isn't any issue at all to fit them.
Thanks
Daniel
And CONGRATS to ANNA !!! for such well done and clean job !!!!
Daniel
Hello Anna,
You’ve done an awesome job. Congratulations on you’re fine work.
Jan
You’ve done an awesome job. Congratulations on you’re fine work.
Jan


 I'm also happy with the result.
