
You are doing a fantastic job on this ship. You make working with PE and small parts look so easy. Very precise and clean work so far. Looks great!

-

SUBSCRIBE TO SHIPS IN SCALE TODAY!
The beloved Ships in Scale Magazine is back and charting a new course for 2026!
Discover new skills, new techniques, and new inspirations in every issue.
NOTE THAT OUR NEXT ISSUE WILL BE July/August 2026 -

Win a Free Custom Engraved Brass Coin!!!
As a way to introduce our brass coins to the community, we will raffle off a free coin during the month of August. Follow link ABOVE for instructions for entering.
You are using an out of date browser. It may not display this or other websites correctly.
You should upgrade or use an alternative browser.
You should upgrade or use an alternative browser.
Hey thanks. Believe me those small parts have caused a lot of cussing!You are doing a fantastic job on this ship. You make working with PE and small parts look so easy. Very precise and clean work so far. Looks great!
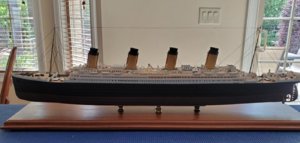
I permanently installed the forecastle and forward mast. The spacers I made up to adjust the mast seem to have worked out well. I have them epoxied to a wood block under the deck. One more mast, 2 lifeboats, forecastle railing, and rigging and I should be done. I'm in the homestretch now. I just would like it finished now that the mast is on there because I'm concerned I'm going to forget it's there and bend it while doing the rest.


Great work! You’re in the home stretch for sure. I have the same mast kit in 1/400 and was also concerned as how it will hold up to rigging. I planned to use fly tying thread. I think your choice of ez-line is a better move. Once you get the line taught the stretch in the give in the line will be better then rigid thread I think. As for masts, I built a 1/570 Titanic years ago and the plastic masts kept snapping off which is why I went with brass this time. They do bend though but look great and are true to scale
Thanks. Yes they are much thinner than the plastic masts. It takes a little customization to get them to mount but I think they look better. Plus the plastic masts don't look very durable at the top. The parts are tiny and I lost one of the bells as it shot into neverland when I had it in the tweezers. So far I'm liking the EZ Line a lot. It was really nice doing the funnels with it as I could stretch it a good amount out of the top to give me some room to glue the inside of the funnel. They also keep things taught without putting too much stress on the attachment points. I don't know about EZ Line longevity but I'm hoping it doesn't dry out like a rubber band. Time will tell.Great work! You’re in the home stretch for sure. I have the same mast kit in 1/400 and was also concerned as how it will hold up to rigging. I planned to use fly tying thread. I think your choice of ez-line is a better move. Once you get the line taught the stretch in the give in the line will be better then rigid thread I think. As for masts, I built a 1/570 Titanic years ago and the plastic masts kept snapping off which is why I went with brass this time. They do bend though but look great and are true to scale
Good point, I never thought about the lines possible decaying though I’ve never heard of that happening and EZ-line has been around for some time now and gets accolades from so many modelers. I’d like to know your final thoughts on it when the project is complete. Ed’s Hobby Shop is the only “show in town” here, I know they carry quite a bit, but did not stock e-z line,So I used what I had in my worship. Based on your recommendations, I may will go with easy line for my next I Titanic build.
I against my better judgement put the little pulleys on the lifeboats and hung the first two in each row. In my opinion the whole lifeboat situation has been my biggest disappointment. Well maybe the crooked docking bridge can give them a run for the money! The whole photo etch davits deal were well beyond my ability at this time. The front davits should have been assembled in the deployed position to accommodate hanging the first boat above the one underneath. I didn't do that so I needed a way to hang it. I tried a bunch of things but they all looked worse than what I eventually did. I wound up having to bend some wire and hook it over the davit arms. The arms are not in the right position and twisted so the whole assembly looks amateurish. There are globs of glue and wire painted with a brush. I guess that's what happens when an armature does something like this lol. All the davits look pretty bad upon close inspection. In the end I didn't learn how to make and space photo etch davits but I did learn how not to do it!!! I need to find a better way to bend the davit arms. The instructions said to bend them around an X-Acto knife handle. That just wound up making them all twisted and of different bends. Next time I will try another way.
I also added the front railings, ratlines and the screws. Today I may mess with the main/rear mast (which I had to cut down slightly) and maybe some rigging. The rear mast was a little over 1/4 inch taller than the front when seated. I believe the rear should be slightly taller but not that much. Over a quarter inch at 1/350 scale must be an awful lot in real life. It may be a result of the wood decks and glue building up height as they are stacked on top of each other. I also may have drilled the hole in the block of wood at the wrong depth and angle. Anyway I ground some off the bottom of the mast to have it about 1/8 inch taller than the front which looks better to my eye. It is only dry fit at this time, today I will epoxy it into final position.
I also added the front railings, ratlines and the screws. Today I may mess with the main/rear mast (which I had to cut down slightly) and maybe some rigging. The rear mast was a little over 1/4 inch taller than the front when seated. I believe the rear should be slightly taller but not that much. Over a quarter inch at 1/350 scale must be an awful lot in real life. It may be a result of the wood decks and glue building up height as they are stacked on top of each other. I also may have drilled the hole in the block of wood at the wrong depth and angle. Anyway I ground some off the bottom of the mast to have it about 1/8 inch taller than the front which looks better to my eye. It is only dry fit at this time, today I will epoxy it into final position.
I epoxied the rear mast into place and attached the ratlines. The masts are now done.
Got the front rigged.

I do not see amateur anywhere in your work. Your work has been impressive on all points. As I understand this is your first attempt at a ship in some time, as well as photoetch and a wooden deck, assumedly for the first time. Fantastic work Chris!
I only wish my project was coming along as well a d expeditiously as yours.
Incidentally, regarding ideas for the davits and lifeboats, check our the “lifeboats and davits” section of Art Braunsweiger’s website. He explains how he manufactured and installed the boats, falls and davits in fair detail. What surprised me After I bent all of my photoetch lifeboat chocks are they are inaccurate and should be cut in half. the lifeboats were held up by the ropes and the chocks did not hold them on the deck. I have no extras and am nervous about cutting them down for accuracy. For the balance of my build I plan to create a jig for bending multiple items such as benches and davits.
As for your current project, What you’ve gleaned from from this build will make your next Titanic all the more impressive.
Thanks AER3393. The lifeboats caused me the most issues and concern. I totally understand being nervous about modifying parts that you may run out of if it doesn't work. I skipped quite a few things on this model just because I didn't feel confident enough in doing them. I tried to strike a balance of getting out of my comfort zone to try and learn how to do new things while at the same time trying not to totally ruin two months of my time and effort. I wound up modifying the plastic chocks that came with the kit to sit the lifeboats on. I tried making my own chocks out of cut down plastic benches but they really didn't look good. There were no PE chocks at all with the davit set i bought.
I needed to pay more attention to the instructions also. For instance as I went along the instructions always told me how long a piece of rigging should be and to make sure you had it put through the holes in the decks before you glued them down. So today I get to the final rigging and on the last page of instructions it shows all these steadying lines that are needed to keep the rigging between the masts straight. I had everything glued down already so I couldn't finish the proper rigging. The only way I would have know about that would have been to read the entire instructions to the last page before I began to assemble the model. I made the mistake of assuming you didn't have to jump ahead in the instructions. Another lesson learned. Next time I'll read to the end before I start.
As far as jigs go that would make life so much easier with these PE parts. Again, next time I will take the time to make them up and avoid the inconsistencies I ran into on a lot of parts that needed to match exactly. A jig would have made the benches and davits look so much better. I'm glad I learned how to do a lot of stuff without totally messing the model up! I put it in a case now where I don't have to worry anymore about breaking stuff off of it lol! Good luck with yours.

Guess what @Booboisie we also anxious to get you started!!!I just received my MiniCraft 1/350 Titanic and am anxious to get started.
") We are hoping you present the model assembly in your own build log! What do you think??
We are hoping you present the model assembly in your own build log! What do you think??...and BTW, Welcome aboard SOS! We are happy you found us! Enjoy and happy modeling.
Thank You, sure no problem. I used the latest Minicraft 1/350 kit (#11320). I used all Tamiya paints, their bottles of acrylic for airbrushing and their TS For Plastics spray cans. I also used Tamiya Fine Surface Primers. I used Vallejo Model Color paint for anything I painted with a brush. I also mostly used Tamiya masking tape in various sizes.Your build is truly an inspiration! I just received my MiniCraft 1/350 Titanic and am anxious to get started. Would it be possible for you to list the after market upgrades that you used?
https://www.tamiyausa.com/
For the wood decks I used Scaledecks
https://smile.amazon.com/gp/product/B07916D53V/ref=ppx_yo_dt_b_search_asin_title?ie=UTF8&psc=1
To glue the decks down I used Gators Grip Acrylic Hobby Glue
M&Models
www.mmodelstore.com
For photo etch I used both Toms model Works and Gold Medal products
http://www.tomsmodelworks.com/catal...ucts_id=490&osCsid=u3014hv4plj675ogma9h9pk7c3
http://goldmm.com/
I used a brass mast set from Master Model
https://www.ebay.com/itm/Master-1-3...TwAAOSwDwNeYspA:sc:USPSFirstClass!29576!US!-1
For rigging I used a product called EZ Line in both fine and heavy gauge
https://smile.amazon.com/gp/product/B07TCR6YKG/ref=ppx_yo_dt_b_search_asin_title?ie=UTF8&psc=1
https://smile.amazon.com/gp/product/B00P2QVMJ0/ref=ppx_yo_dt_b_search_asin_title?ie=UTF8&psc=1
I used Mahogany board for the display base
https://smile.amazon.com/gp/product/B07RBS7KCK/ref=ppx_yo_dt_b_asin_title_o08_s00?ie=UTF8&psc=1
I used these pedestals for the display base
https://www.ebay.com/itm/Model-Ship-Display-Pedestals-Brass/172436699265?ssPageName=STRK:MEBIDX:IT&_trksid=p2057872.m2749.l2649
I think that’s about it. I wound up buying multiple sets of photo etch from both Toms and Gold Medal but didn’t list each set here. If there’s anything else you would like to know feel free to ask. Good luck with your model,
Chris
Last edited:
I did the same thing, I bought the whole Toms set. I have a Lusitania too so I bought the set from Gold Medal that has both Titanic and Lusitania parts. Gold Medal also has a Merchant Ship set that is really nice but expensive. I bought both companies lifeboat davit sets because I wanted to do whichever one looked easier. They are both hard lol.Thanks for the info. I already bought the Tom's photo etch set. they had a bundle price for six sets i think. Good to know where you got the decking, rigging and masts especially
The decks are a bit of a pain because the Scaledecks have everything sit on top of them instead of having the deck cut around things like bulkheads. This caused me height issues in getting the decks to fit correctly in the slot molded in the side pieces with the windows. I had to make the groove a bit wider with a file and cut the edges of the wood deck back from where it fits in the slot. Test fit that area and give it attention before you try and glue it on. I guess you could also sand down the bulkheads a bit too. I really like the Scaledecks, I like that they don't have adhesive and you can choose your own but I wish they didn't tuck under the bulkheads. Also, don't get anything wet on the decks or they will smudge as they are actually thin pieces of wood with the pattern and colors printed on them. I got a little glue on one and when I wiped it off with my finger I took the printing with it. You can spray them with a clear coat to help that issue but it has to be a VERY light coat at a time. If you drench them with a heavy coat of clear they will get messed up.
The tops of the masts are also really delicate. Check them good when they arrive as for some reason they ship them in a plastic zip lock bag that has the tops of the masts sticking out of it.
One more thing on that Minicraft kit, test fit the main deck as I found if you use the round locating tabs molded in the hull they are off a bit and the bridge area doesn't line up. I ground them off and positioned the deck in a better spot.
- Joined
- Aug 1, 2020
- Messages
- 108
- Points
- 88

I can give it a go. Hopefully if I do a build log it will help keep me going thru completion!Guess what @Booboisie we also anxious to get you started!!!
...and BTW, Welcome aboard SOS! We are happy you found us! Enjoy and happy modeling.

You did an amazing job on this. I now have a better idea of what to expect when I start one of these builds.
It looks like you used the Gold Medal Models Lifeboat davits. Are they more accurate or easier to build then the Tom's Modelworks Lifeboat davits?
It looks like you used the Gold Medal Models Lifeboat davits. Are they more accurate or easier to build then the Tom's Modelworks Lifeboat davits?
Perfectly outstanding. Congratulations on a beautiful Titanic !!!
Thanks Michael and Donnie. I find the Gold Medal PE is more sturdy than Toms. I do use Toms stuff for lots of other areas though. I have actually bought this whole model and all its accessories again and plan on doing another. Since this was my first model there were a lot of things I didn't do, or didn't know how to do. What sticks out the most to me is the lack of the gold sheer line and the wireless spreaders. The davits I found pretty difficult to do.