BUILDING THE HULL 2A

The bow deck is attached with 1 mm thick and 3 mm wide cypress. And the front wall of the bow tower
is made of the same material as the deck, and the lower part is stuck and drying.

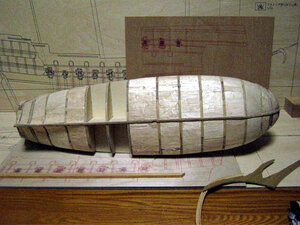
The red arrow and prismatic material are temporarily attached to the keel part of the foreclosure.

Also on the poop keel part. I'm temporarily adhering a prismatic material to the red arrow.

This is so that the aviation veneer on the side will not be damaged if turned upside down.
Remove the outer plate after attaching it.

Since the cypress wood stuck on the front wall of the foreclosure is not yet dry,
I will stick the garboard strike.

It's easy to paste because there is a filler in the bottom of the ship.
This is the bow side.

This is the stern side.

While waiting for the Garboard Strake to dry, use a baby food bottle to soak the front wall
of the foreclosure in water, put it on the bottle, fix it with masking tape, and dry.

When the cypress is dried, remove the masking tape and the material will be finished along
the curved surface of the glass bottle.
Stick this on the front wall of the foreclosure.

It looks like this! It's messy with the tight bonds protruding, but it's beautiful when
sandpaper is applied!

I cut off both ends of the wall material and applied sandpaper to clean it, but this is the Flying Dutchman,
so I immediately put in grain of grain.

I also attached a second skin from Garboard Strike.
Once this is dry, sandpaper it and glue the keel.

Since the tight bond has dried, I pierce the step with a plane and sandpaper to make
a hole for screwing the keel.

It is a screw for screwing the keel, but the diameter of the head part is about 4 mm.
I used a grinder to cut it to a diameter of about 3 mm.

Align the screw with the keel and try temporary assembly.

Since the temporary assembly looked good, I used a tight bond to bond it and tightened the screws.

Continue to tighten the screws. The screw was a little too long...
I'm tired.

It looks like this when you finish tightening the screws.
I will cover it with a wooden plug later.

Make sure you have an accurate baseline before applying the skins to the hull.
Since the side view printed on a flat surface is directly attached to the side surface
of the three-dimensional hull, the line naturally goes crazy.
Then, I will make a dedicated stand and draw accurate lines with a pencil.