-

Win a Free Custom Engraved Brass Coin!!!
As a way to introduce our brass coins to the community, we will raffle off a free coin during the month of August. Follow link ABOVE for instructions for entering.
You are using an out of date browser. It may not display this or other websites correctly.
You should upgrade or use an alternative browser.
You should upgrade or use an alternative browser.
New kit Galleon "San Bartolome - 2"
- Thread starter Pavel Nikitin
- Start date
- Watchers 42
- Joined
- Jul 18, 2019
- Messages
- 409
- Points
- 323

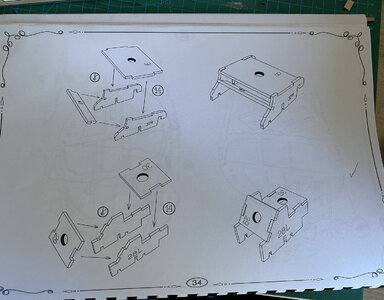
Greetings .Hello everyone, hello Pavel, these are my boards, the details of the joints with the nailing are all misaligned. How you do it? A manufacturing error? Can you get the right ones?
View attachment 357299
Yes, it is obvious that you got boards from different versions of the set in the set, I apologize for this. According to the deck boards themselves, or rather, you will have no problems installing them. The only problem is that the markings of the transverse joints do not match. After painting and installing all deck filling elements, you will not see this discrepancy with a probability of 90%. But if you decide that this symmetry is important for you, then of course I will send you a new #20 board. I'm waiting for your decision. Paul.
Hmm My bad. I showed 40 vs #44. Sorry about that.
- Joined
- Nov 30, 2022
- Messages
- 132
- Points
- 113

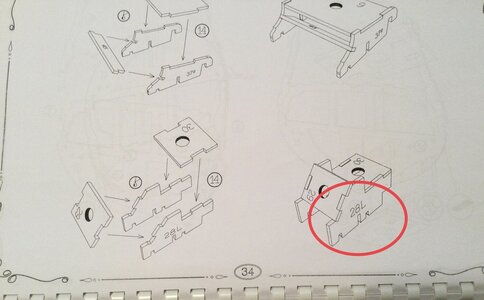
Thanks Pavel, then it would be appropriate to update the instructions because as you can see from the photo there is no trace of this piece. If you can also tell me about part 63.
Excuse me if I took the liberty of making this observation but it is for the benefit of whoever purchases the kit. In any case, the manual lacks all the instructions relating to the rigging and rigging.

- Joined
- Nov 30, 2022
- Messages
- 132
- Points
- 113

Nothing, maybe it's just to keep all the support in placeRight or wrong I glued the assembly as shown on the build plan that came with the kit.
View attachment 357479
View attachment 357478
Other than add more stability to the assembly what does that part #44 do.
Who among you have purchased the optional walnut option? I have it with Kit 47 and am confused as I begin to lay the deck planking.
Below is the main deck. Please note the walnut strips on the port and starboard sides of the grate. Those are the only supplied planks for that deck which are walnut. The remainder of the deck planks are not walnut. I glued the walnut planks in place but upon realizing the mismatch have stopped and not glued any others in place, The five short pieces seen here are not glued and are only in the picture to illustrate the color of all the remaining deck planks.

The photo below is a temporary assembly to illustrate the color mismatch in the deck planking meant to go by the bowsprit.

Do any of you with the walnut option have a similar situation?
Respectfully,
John
Below is the main deck. Please note the walnut strips on the port and starboard sides of the grate. Those are the only supplied planks for that deck which are walnut. The remainder of the deck planks are not walnut. I glued the walnut planks in place but upon realizing the mismatch have stopped and not glued any others in place, The five short pieces seen here are not glued and are only in the picture to illustrate the color of all the remaining deck planks.

The photo below is a temporary assembly to illustrate the color mismatch in the deck planking meant to go by the bowsprit.

Do any of you with the walnut option have a similar situation?
Respectfully,
John
- Joined
- Jul 18, 2019
- Messages
- 409
- Points
- 323

This is exactly how everything is conceived in the set, which is made of walnut. Once you've sanded all the boards and oiled them, the two walnut planks will start to stand out in color. This effect is implemented on all four decksWho among you have purchased the optional walnut option? I have it with Kit 47 and am confused as I begin to lay the deck planking.
Below is the main deck. Please note the walnut strips on the port and starboard sides of the grate. Those are the only supplied planks for that deck which are walnut. The remainder of the deck planks are not walnut. I glued the walnut planks in place but upon realizing the mismatch have stopped and not glued any others in place, The five short pieces seen here are not glued and are only in the picture to illustrate the color of all the remaining deck planks.
View attachment 357939
The photo below is a temporary assembly to illustrate the color mismatch in the deck planking meant to go by the bowsprit.
View attachment 357940
Do any of you with the walnut option have a similar situation?
Respectfully,
John
- Joined
- Jul 18, 2019
- Messages
- 409
- Points
- 323

This is how everything will look on your ship.Who among you have purchased the optional walnut option? I have it with Kit 47 and am confused as I begin to lay the deck planking.
Below is the main deck. Please note the walnut strips on the port and starboard sides of the grate. Those are the only supplied planks for that deck which are walnut. The remainder of the deck planks are not walnut. I glued the walnut planks in place but upon realizing the mismatch have stopped and not glued any others in place, The five short pieces seen here are not glued and are only in the picture to illustrate the color of all the remaining deck planks.
View attachment 357939
The photo below is a temporary assembly to illustrate the color mismatch in the deck planking meant to go by the bowsprit.
View attachment 357940
Do any of you with the walnut option have a similar situation?
Respectfully,
John


Thank you for that information, Pavel. I clearly see the shade emphasis in these photos. As many times as I have looked at the collection of photos I have never noticed that feature. i Am pleased that you pointed it out. The ship is going together well. The instructions are clear and the videos are superb. You may well be setting a new trend that will increasingly be expected of other kit designers.
- Joined
- Jul 18, 2019
- Messages
- 409
- Points
- 323

Thanks for the kind words about our work.Thank you for that information, Pavel. I clearly see the shade emphasis in these photos. As many times as I have looked at the collection of photos I have never noticed that feature. i Am pleased that you pointed it out. The ship is going together well. The instructions are clear and the videos are superb. You may well be setting a new trend that will increasingly be expected of other kit designers.
- Joined
- Nov 30, 2022
- Messages
- 132
- Points
- 113

Hi Pavel, the kit is great, despite some mistakes with inserting badly lasered plates and missing directions in the manual. I also bought the paint kit. Since there is no explanation, is it possible to have an explanation of the various codes and how they are used? Thank you, also for everything you do despite the difficulties known to all


- Joined
- Jul 18, 2019
- Messages
- 409
- Points
- 323

Number - PN 3362 this oil is used as a top coat, applied in three coats with intermediate sanding with abrasive number - 320. For painting decks I usually use lighter colors, this is number - 705. All other colors are used for the outer sides of the ship. PN 1\900 is a black patina, used to create the effect of old wood, and is applied at the very beginning. Color combinations must be selected independently on the samples and guided by your taste. The very technique of applying color coating and oil can be viewed on the YouTube channels below. There are also subtitles. The main thing in this process is applying both patinas and tones in very small quantities and in many passes, and a professional skill will appear only with some practiceHi Pavel, the kit is great, despite some mistakes with inserting badly lasered plates and missing directions in the manual. I also bought the paint kit. Since there is no explanation, is it possible to have an explanation of the various codes and how they are used? Thank you, also for everything you do despite the difficulties known to all
View attachment 358198
Last edited:
Pavel, thank you for that post. Excellent information . I also had the same questions on the use of the various colors in the paint kit.
- Joined
- Nov 30, 2022
- Messages
- 132
- Points
- 113

Thanks Pavel, could you tell me, also as advice based on your experience, how and where to use the colors of the other issues? I use an Infinity CR Plus airbrush, what number of needles do you recommend to use? thansNumber - PN 3362 this oil is used as a top coat, applied in three coats with intermediate sanding with abrasive number - 320. For painting decks I usually use lighter colors, this is number - 705. All other colors are used for the outer sides of the ship. PN 1\900 is a black patina, used to create the effect of old wood, and is applied at the very beginning. Color combinations must be selected independently on the samples and guided by your taste. The very technique of applying color coating and oil can be viewed on the YouTube channels below. There are also subtitles. The main thing in this process is applying both patinas and tones in very small quantities and in many passes, and a professional skill will appear only with some practice
- Joined
- Jul 18, 2019
- Messages
- 409
- Points
- 323

The instructions show one of the possible ways that is used to bend the boards of the ship's side plating. And it is shown how you can make the necessary equipment for this operation. For example, I use a different method, which is shown in video instruction # 39. Plate number 43 is not in the set, it is an arbitrary number, and is shown only as an example of making a tool.Pavel, the manual shows a piece to be built using parts from plate 43 which is not in the kit. Why? How can it be done?
View attachment 358332


