Turned out great! This ship has some beautiful lines!
-

Win a Free Custom Engraved Brass Coin!!!
As a way to introduce our brass coins to the community, we will raffle off a free coin during the month of August. Follow link ABOVE for instructions for entering.
-

PRE-ORDER SHIPS IN SCALE TODAY!
The beloved Ships in Scale Magazine is back and charting a new course for 2026!
Discover new skills, new techniques, and new inspirations in every issue.
NOTE THAT OUR FIRST ISSUE WILL BE JAN/FEB 2026
You are using an out of date browser. It may not display this or other websites correctly.
You should upgrade or use an alternative browser.
You should upgrade or use an alternative browser.
Grants Xebec 1:60 (using Jabeque Cazador Occre1:60 kit) [COMPLETED BUILD]
- Thread starter GrantTyler
- Start date
- Watchers 85
Smart work Grant. I agree with Daniel; the vertical support on the transom does appear to be parallel with its neighbouring planks, and therefore okay? Maybe the ship hit a sandbank and tilted at the very moment that you took the snap 
Looks very good Grant! I like it. 
Well thought out, well executed transom piece Grant. Not sure about that verticle piece, it does look off a little but its parallel with the planking and they look good??
Good morning Daniel and Mark. Thanks for the compliments. Luckily this time around it was the parallax. Mark the only sandbank this Xebec hits is the the one in Melkbosstrand- Grants treacherous bank.Smart work Grant. I agree with Daniel; the vertical support on the transom does appear to be parallel with its neighbouring planks, and therefore okay? Maybe the ship hit a sandbank and tilted at the very moment that you took the snap

It must be camera parallax. That's always my excuse.
 . Good morning Vic. Thankfully this time around I didn’t need the excuse. Did give an “OH No “ (putting it politely) moment tho.
A very nice custom piece with a fabulous outcome!
Good morning Paul and Shota. Thank you for the compliment. I did have many swear jar moments fitting this stern “transom” (I’m not sure if this is called a transom - can’t find correct terminology-“ suspended transom”magnificent transom


Thank you kindly Dean.Looks very good Grant! I like it.
Cheers Grant
Good morning. Double checked - it is at 90• and the extended deck and “suspended transom” are all symmetrical to the rest of the ship. (Whew) .I cut the two identical support strakes for the boom rest. I’m still trying to work out what this boom is used for with the lanteen sails. Number 145??
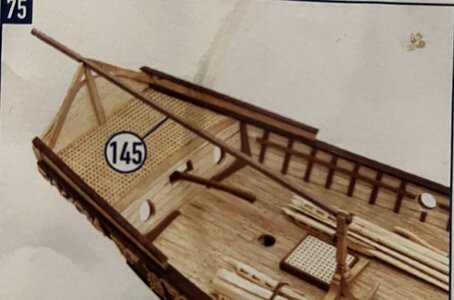
I changed the layout from the Cazador and Ancre Le Requin (shown in above photo)as my “suspended transom” is lower and it just didn’t work for me.
Here it is:
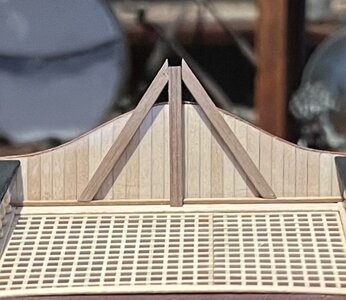
Again I thought what up as the SB strake does not equal the PS relative to the planking lines? Everything is spot on when I measure. I know the deck plans are irregular in width so I’m putting it down to that . There again Grants measuring……
Cheers Grant

I changed the layout from the Cazador and Ancre Le Requin (shown in above photo)as my “suspended transom” is lower and it just didn’t work for me.
Here it is:

Again I thought what up as the SB strake does not equal the PS relative to the planking lines? Everything is spot on when I measure. I know the deck plans are irregular in width so I’m putting it down to that

Cheers Grant
I believe it's called the "Grant Factor", it's a mathematical mystery, only found on the most superb builds!Good morning. Double checked - it is at 90• and the extended deck and “suspended transom” are all symmetrical to the rest of the ship. (Whew) .I cut the two identical support strakes for the boom rest. I’m still trying to work out what this boom is used for with the lanteen sails. Number 145??
View attachment 379385
I changed the layout from the Cazador and Ancre Le Requin (shown in above photo)as my “suspended transom” is lower and it just didn’t work for me.
Here it is:
View attachment 379386
Again I thought what up as the SB strake does not equal the PS relative to the planking lines? Everything is spot on when I measure. I know the deck plans are irregular in width so I’m putting it down to that. There again Grants measuring……
Cheers Grant
It's the Grant anomally!I believe it's called the "Grant Factor", it's a mathematical mystery, only found on the most superb builds!

Too many people sitting on the starboard side during the inaugural tennis matchIt's the Grant anomally!

I believe it's called the "Grant Factor", it's a mathematical mystery, only found on the most superb builds!
It's the Grant anomally!
Good morning Dean, Daniel and Bill. I now have another “cliche “ to add to the many from all the SOS guys - “Grants anomaly”Too many people sitting on the starboard side during the inaugural tennis match
 . This Xebec is an anomaly….so many times I view it and an aspect appear that the symmetry is out. Look from another angle and it those same parts move the other way. It just wants to mess with my mind…
 Cheers Grant
Good morning. Consequences….that lesson taught to my kids over and over.
Well the main deck rails were like a hangover after a night of no consequence. As you know I changed the bulwark shape and angle and this created some pain.
Step 1.
The walnut Strip above the green ( Grants creation) had to be shaped in to a wedge or the angle of the railing was too acute and the railing slopes downwards.
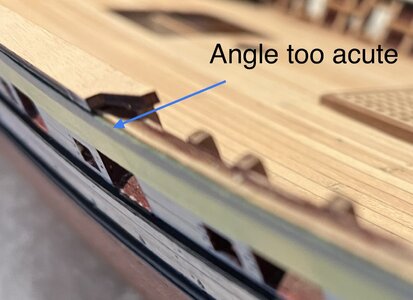
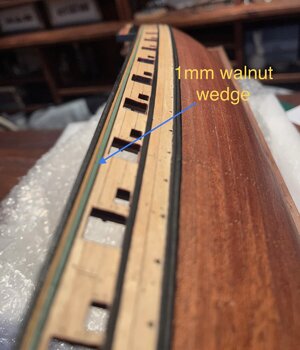
Step 2.
The pre cut kit railings had to be curved more aggressively….
 .Being laminated the heat and water separated the laminate. When I just attempted heat only it snapped. Swear jar full by now :
I eventually went for wood filler and sandpaper. ( luckily these are painted or I would have problems)
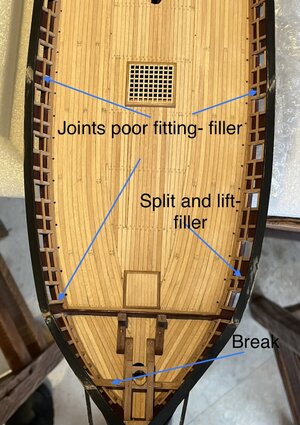
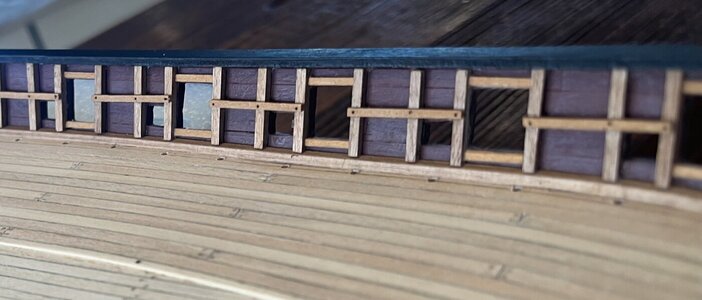
On the inside it was important for me to get the railing flush with the Bulwark “frames”/supports. Mostly achieved:
Step 3 : measured…(eish) the cuts for the cat Davit and sawed/hacked. Again variant from the kit I wanted this flush with the rails and a sexier curve.
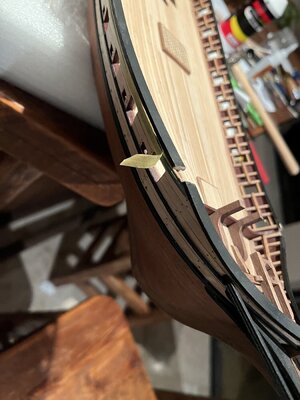
Here they are : with the sexy curve
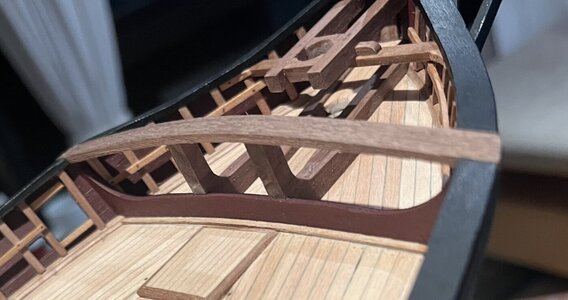
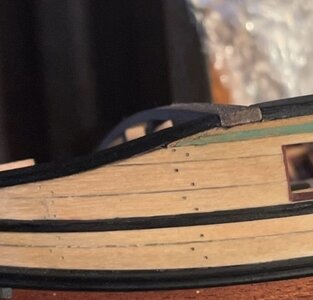
Not the greatest fit - SB side better but need to show the not so pleasant as well.
After 3 mornings and many full swear jars :
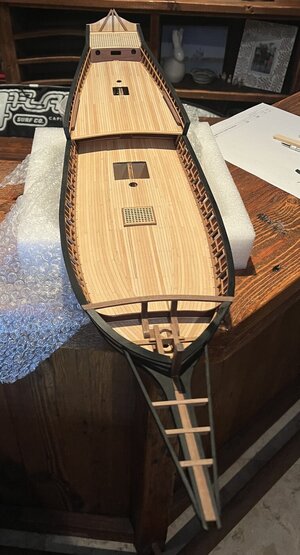
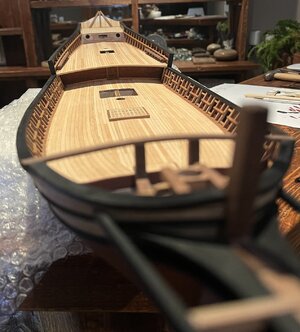
It is time to stop building and spend time fettling : Paint, filler, sand and wood finish on all the work so far. Going to have to fill each “nailing hole” with polyurethane (this takes a while) as well. Whew.
So little progress logs in the near future as up to this point is been full throttle build. Been fun .
.
Cheers Grant
Well the main deck rails were like a hangover after a night of no consequence. As you know I changed the bulwark shape and angle and this created some pain.
Step 1.
The walnut Strip above the green ( Grants creation) had to be shaped in to a wedge or the angle of the railing was too acute and the railing slopes downwards.


Step 2.
The pre cut kit railings had to be curved more aggressively….

 .Being laminated the heat and water separated the laminate. When I just attempted heat only it snapped. Swear jar full by now :
I eventually went for wood filler and sandpaper. ( luckily these are painted or I would have problems)

On the inside it was important for me to get the railing flush with the Bulwark “frames”/supports. Mostly achieved:

Step 3 : measured…(eish) the cuts for the cat Davit and sawed/hacked. Again variant from the kit I wanted this flush with the rails and a sexier curve.

Here they are : with the sexy curve


Not the greatest fit - SB side better but need to show the not so pleasant as well.
After 3 mornings and many full swear jars :


It is time to stop building and spend time fettling : Paint, filler, sand and wood finish on all the work so far. Going to have to fill each “nailing hole” with polyurethane (this takes a while) as well. Whew.
So little progress logs in the near future as up to this point is been full throttle build. Been fun
Cheers Grant
Keep going Grant, you can do it son! Just grind through the pain, empty and re-fill the swear jar as appropriate, reap the rewards. I have to take your word on the minor issues you are experiencing because from this angle it all looks pretty good to me?The pre cut kit railings had to be curved more aggressively…. Being laminated the heat and water separated the laminate. When I just attempted heat only it snapped. Swear jar full by now
- Joined
- Sep 28, 2020
- Messages
- 287
- Points
- 168

W
Wow, these are sexy lines!Good morning. Consequences….that lesson taught to my kids over and over.
Well the main deck rails were like a hangover after a night of no consequence. As you know I changed the bulwark shape and angle and this created some pain.
Step 1.
The walnut Strip above the green ( Grants creation) had to be shaped in to a wedge or the angle of the railing was too acute and the railing slopes downwards.
View attachment 379766View attachment 379767
Step 2.
The pre cut kit railings had to be curved more aggressively…..Being laminated the heat and water separated the laminate. When I just attempted heat only it snapped. Swear jar full by now :
I eventually went for wood filler and sandpaper. ( luckily these are painted or I would have problems)
View attachment 379768
On the inside it was important for me to get the railing flush with the Bulwark “frames”/supports. Mostly achieved:
View attachment 379777
Step 3 : measured…(eish) the cuts for the cat Davit and sawed/hacked. Again variant from the kit I wanted this flush with the rails and a sexier curve.
View attachment 379769
Here they are : with the sexy curve
View attachment 379771View attachment 379770
Not the greatest fit - SB side better but need to show the not so pleasant as well.
After 3 mornings and many full swear jars :
View attachment 379772View attachment 379773
It is time to stop building and spend time fettling : Paint, filler, sand and wood finish on all the work so far. Going to have to fill each “nailing hole” with polyurethane (this takes a while) as well. Whew.
So little progress logs in the near future as up to this point is been full throttle build. Been fun.
Cheers Grant
- Joined
- Aug 14, 2018
- Messages
- 829
- Points
- 403

Grant, that decking of yours is the best I have ever seen, never tire of looking at your pics.. Chapeau bas. Cheers JJ..
Grant, hi. A very worthy resultGood morning. Consequences….that lesson taught to my kids over and over.
Well the main deck rails were like a hangover after a night of no consequence. As you know I changed the bulwark shape and angle and this created some pain.
Step 1.
The walnut Strip above the green ( Grants creation) had to be shaped in to a wedge or the angle of the railing was too acute and the railing slopes downwards.
View attachment 379766View attachment 379767
Step 2.
The pre cut kit railings had to be curved more aggressively…..Being laminated the heat and water separated the laminate. When I just attempted heat only it snapped. Swear jar full by now :
I eventually went for wood filler and sandpaper. ( luckily these are painted or I would have problems)
View attachment 379768
On the inside it was important for me to get the railing flush with the Bulwark “frames”/supports. Mostly achieved:
View attachment 379777
Step 3 : measured…(eish) the cuts for the cat Davit and sawed/hacked. Again variant from the kit I wanted this flush with the rails and a sexier curve.
View attachment 379769
Here they are : with the sexy curve
View attachment 379771View attachment 379770
Not the greatest fit - SB side better but need to show the not so pleasant as well.
After 3 mornings and many full swear jars :
View attachment 379772View attachment 379773
It is time to stop building and spend time fettling : Paint, filler, sand and wood finish on all the work so far. Going to have to fill each “nailing hole” with polyurethane (this takes a while) as well. Whew.
So little progress logs in the near future as up to this point is been full throttle build. Been fun.
Cheers Grant
 . Did you manage the railings
 - Joined
- Apr 20, 2020
- Messages
- 6,257
- Points
- 738

Dear GrantGood morning. Consequences….that lesson taught to my kids over and over.
Well the main deck rails were like a hangover after a night of no consequence. As you know I changed the bulwark shape and angle and this created some pain.
Step 1.
The walnut Strip above the green ( Grants creation) had to be shaped in to a wedge or the angle of the railing was too acute and the railing slopes downwards.
View attachment 379766View attachment 379767
Step 2.
The pre cut kit railings had to be curved more aggressively…..Being laminated the heat and water separated the laminate. When I just attempted heat only it snapped. Swear jar full by now :
I eventually went for wood filler and sandpaper. ( luckily these are painted or I would have problems)
View attachment 379768
On the inside it was important for me to get the railing flush with the Bulwark “frames”/supports. Mostly achieved:
View attachment 379777
Step 3 : measured…(eish) the cuts for the cat Davit and sawed/hacked. Again variant from the kit I wanted this flush with the rails and a sexier curve.
View attachment 379769
Here they are : with the sexy curve
View attachment 379771View attachment 379770
Not the greatest fit - SB side better but need to show the not so pleasant as well.
After 3 mornings and many full swear jars :
View attachment 379772View attachment 379773
It is time to stop building and spend time fettling : Paint, filler, sand and wood finish on all the work so far. Going to have to fill each “nailing hole” with polyurethane (this takes a while) as well. Whew.
So little progress logs in the near future as up to this point is been full throttle build. Been fun.
Cheers Grant
magnificent dek, and the main deck rails looks great!! a result of excellent work, well done my friend
Grant, you might see flaws. but what i see, are pictures of a work of art, this is becomming a beautiful XebecGood morning. Consequences….that lesson taught to my kids over and over.
Way to work through a tough situation! Your results are beautiful. I can't get over the lines of this vessel. May have to add this to my list!
You're an overcomer Grant! With that result I'd say: mission accomplished!
Great outcome Grant, bending a luminant horizontally, WOW not easy but it looks awesome!


