Good morning. Another HMS Fly. Seeing the other guys build this it looks like a super fun ship to build. Enjoy. Cheers GrantStarted with dry-fitting the bulkheads, lower deck, quarterdeck and forecastle deck.
View attachment 385724
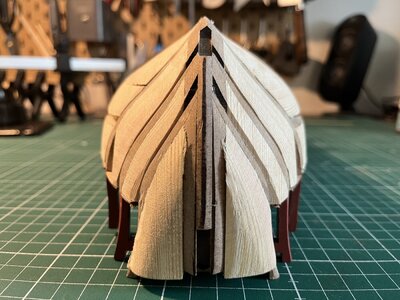
Fits snuggly, so I moved on to gluing the parts together with the help of the deck to line the bulkheads up correctly. Added the filler blocks at the bow, these aren't very large so I decided to do some initial rough sanding before putting on additional balsa blocks. That is, if I can find balsa wood in my town. Seems to be mostly a hobby material and not available in any of the large store chains here. Maybe pine wood works too?
View attachment 385726
Started with sanding one side, then moving on to the other. The skeleton is made of this heavy and sturdy feeling fiber wood. Pretty easy to sand down, but damn it eats through sand paper like no other wood I've worked with. At least there shouldn't be any issues with the skeleton bending with this material.
View attachment 385737
I fastened some sand paper onto this ruler to sand the length of the hull and used these foam blocks to get around the bow and stern. For the keel I used a file
View attachment 385740
View attachment 385746
View attachment 385747
View attachment 385749
That was the rough sanding, will go at it again when I have placed the filler blocks. I went pretty aggressively with tapering the keel area for the rabbet line, figuring it won't hurt. After all, I need to fit the first planking which is 1,5 mm thick and the second layer with 1 mm on both sides of the keel which itself is only 5 mm in thickness.
I went on with placing the main deck. It is split in two halves which Amati suggests planking before placing on the ship. Though I want to have a center (king's?) plank over the gap between the two halves, so decided to place it first and do the planking after. Ran into this issue which you can see in the below picture. A long stretch of the center of the main deck is not supported and is quite wobbly:
View attachment 385769
Fixed that with the leftover parts of the sheet the bulkheads came with and now it does not wobble anywhere:
View attachment 385782
Glued and clamped down the main deck and now it is ready for planking:
View attachment 385794
-

Win a Free Custom Engraved Brass Coin!!!
As a way to introduce our brass coins to the community, we will raffle off a free coin during the month of August. Follow link ABOVE for instructions for entering.
-

PRE-ORDER SHIPS IN SCALE TODAY!
The beloved Ships in Scale Magazine is back and charting a new course for 2026!
Discover new skills, new techniques, and new inspirations in every issue.
NOTE THAT OUR FIRST ISSUE WILL BE JAN/FEB 2026
You are using an out of date browser. It may not display this or other websites correctly.
You should upgrade or use an alternative browser.
You should upgrade or use an alternative browser.
H.M.S. Fly by Amati 1:65 - Build log by Jcob
- Thread starter Jcob
- Start date
- Watchers 21
-
- Tags
- amati fly victory models
- Joined
- Jan 1, 2023
- Messages
- 74
- Points
- 88

I see so you plan to make the gallery windows see-through, good choice but I'm guessing you will have to replace the kit badges with your own with transparent windows. Will look really nice for sure. I didn't know bathroom sealant was used for that, you learn something new every dayThe great cabin and ready room will be visible through the gallery windows, the doors will be open so there should be a stern view of the whole length. I intend putting furniture in also! I'll add a hatch over for extra light. It should be possible to see under the quarterdeck and fo'c'sl. There'll be a marine on guard duty. There is also detail on the lower deck below the gun deck, which will be difficult, only parts will be visible, the louvred cabin that houses the pump chains and hopefully a bit of the bulkhead and panelled doors to the gun room and minor cabins!? The ship will be displayed under sail on a perspex based sea, waves formed with Clearfix bathroom sealant. It's acrylic, can be stained with alc. inks and quick drying. Because it's under sail I'll need a lot of crew in the rigging, which I'll probably have to make from scratch.
The colour is Humbrol wine red matt enamel. These are the only paints I will touch! They coat well with a watercolour flat brush and when they've fully hardened can be polished lightly with 0000 steel wool.
There are a number of sloops in the class, 'Cherub' (no thank you!) So far I'm between Lynx or Hornet.
I've ordered rigging line from Syren today. Add another $110! With cannons, carriages, deadeyes and blocks from Drydock it's certainly not a cheap build. Back to cutters, schooners and luggers after this I think!
It will really start to accumulate when you decide to go with non-kit accessories. I am trying to compile everything I wanna replace before ordering more things. I realised after I received the upgrade kit for cannons from Amati that I should've ordered their broader 5 mm Tanganyika strips for the hooked deck planking these Swan class ships should have. Also just got slapped with an additional 370 krona (∼28 pounds) customs fee on top of the 25 pound shipping when getting my colours from the UK. The parts themselves are often fairly priced, but it's the shipping and customs that annoys me.
- Joined
- Jan 1, 2023
- Messages
- 74
- Points
- 88

Indeed, it was reading the other build logs that got me to go with this kit. So far so good, been shifting between working on the deck and filler blocks to the hull and will post an update pretty soon.Good morning. Another HMS Fly. Seeing the other guys build this it looks like a super fun ship to build. Enjoy. Cheers Grant
- Joined
- Feb 15, 2019
- Messages
- 394
- Points
- 168

I see so you plan to make the gallery windows see-through, good choice but I'm guessing you will have to replace the kit badges with your own with transparent windows. Will look really nice for sure. I didn't know bathroom sealant was used for that, you learn something new every day. I use pretty much only acrylic paints myself, just a personal preference. Will be getting the Caldercraft Red Ochre soon so will have to wait and see if what it looks like in real life, but it looks about similar on the screen.
It will really start to accumulate when you decide to go with non-kit accessories. I am trying to compile everything I wanna replace before ordering more things. I realised after I received the upgrade kit for cannons from Amati that I should've ordered their broader 5 mm Tanganyika strips for the hooked deck planking these Swan class ships should have. Also just got slapped with an additional 370 krona (∼28 pounds) customs fee on top of the 25 pound shipping when getting my colours from the UK. The parts themselves are often fairly priced, but it's the shipping and customs that annoys me.
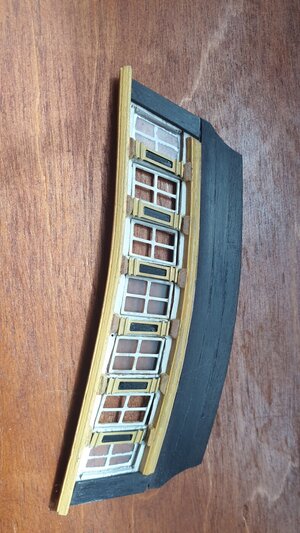
So far on the gallery. I have a feeling the acrylic red ochre will be a lot brighter than the (very dull) Humbrol paint. I'd definitely use a test piece.
I use enamels because the finish is so much better. I don't touch acrylics for anything, including my marine paintings. After a lifetime painting I know how traditional paint works!
Clearfix is acrylic however, Completely different to silicone! It comes in a tube like bathroom sealant to fit into a gun, but I only know it from a modellers point of view, I'm only assuming it's also for plumbing?
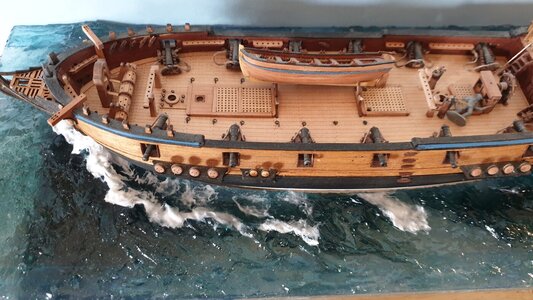
This is the best method I've found to leave the underside of the hull below the waterline visible. I have ideas about a case.
- Joined
- Jan 1, 2023
- Messages
- 74
- Points
- 88

Gallery windows look great, very detailed. Not knowing much about paint, I googled enamel and it seems it is made for durability and has a glossy finish. Not really what I am after with this build. What is it you don't like with acrylics?View attachment 386777
So far on the gallery. I have a feeling the acrylic red ochre will be a lot brighter than the (very dull) Humbrol paint. I'd definitely use a test piece.
I use enamels because the finish is so much better. I don't touch acrylics for anything, including my marine paintings. After a lifetime painting I know how traditional paint works!
Clearfix is acrylic however, Completely different to silicone! It comes in a tube like bathroom sealant to fit into a gun, but I only know it from a modellers point of view, I'm only assuming it's also for plumbing?
View attachment 386778
This is the best method I've found to leave the underside of the hull below the waterline visible. I have ideas about a case.
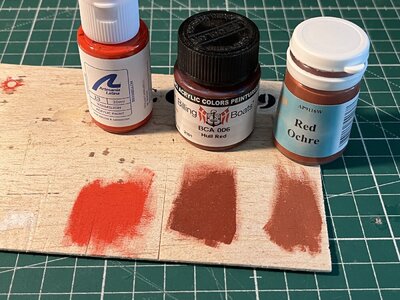
Just got the Red Ochre delivered, here it is compared to the two other red colours I have. Looks pretty good, I didn't want the deck bits to be as dark as the hull red in the middle and definitely not as bright as the vermillion to the left. Gonna use a "flat matt varnish" from the same supplier for the deck parts to make it as dull as possible. Then perhaps something shinier for the hull. All subject to change of course
- Joined
- Feb 19, 2023
- Messages
- 168
- Points
- 103

Hello! looks great .... you will make a beautiful ship !!! I wish you success!!!Started with dry-fitting the bulkheads, lower deck, quarterdeck and forecastle deck.
View attachment 385724
Fits snuggly, so I moved on to gluing the parts together with the help of the deck to line the bulkheads up correctly. Added the filler blocks at the bow, these aren't very large so I decided to do some initial rough sanding before putting on additional balsa blocks. That is, if I can find balsa wood in my town. Seems to be mostly a hobby material and not available in any of the large store chains here. Maybe pine wood works too?
View attachment 385726
Started with sanding one side, then moving on to the other. The skeleton is made of this heavy and sturdy feeling fiber wood. Pretty easy to sand down, but damn it eats through sand paper like no other wood I've worked with. At least there shouldn't be any issues with the skeleton bending with this material.
View attachment 385737
I fastened some sand paper onto this ruler to sand the length of the hull and used these foam blocks to get around the bow and stern. For the keel I used a file
View attachment 385740
View attachment 385746
View attachment 385747
View attachment 385749
That was the rough sanding, will go at it again when I have placed the filler blocks. I went pretty aggressively with tapering the keel area for the rabbet line, figuring it won't hurt. After all, I need to fit the first planking which is 1,5 mm thick and the second layer with 1 mm on both sides of the keel which itself is only 5 mm in thickness.
I went on with placing the main deck. It is split in two halves which Amati suggests planking before placing on the ship. Though I want to have a center (king's?) plank over the gap between the two halves, so decided to place it first and do the planking after. Ran into this issue which you can see in the below picture. A long stretch of the center of the main deck is not supported and is quite wobbly:
View attachment 385769
Fixed that with the leftover parts of the sheet the bulkheads came with and now it does not wobble anywhere:
View attachment 385782
Glued and clamped down the main deck and now it is ready for planking:
View attachment 385794
- Joined
- Jan 1, 2023
- Messages
- 74
- Points
- 88

Been working some different things while I've been waiting for the paints to arrive. I don't plan to make this anything special in terms of historical accuracy, but still thought it would be fun to use the original plans of the HMS Fly since we have them available. Put down the planking lines using the deck beams from the old plans:
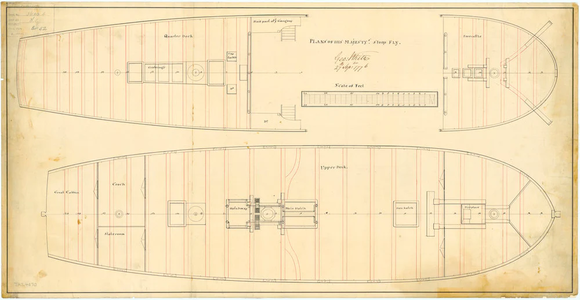
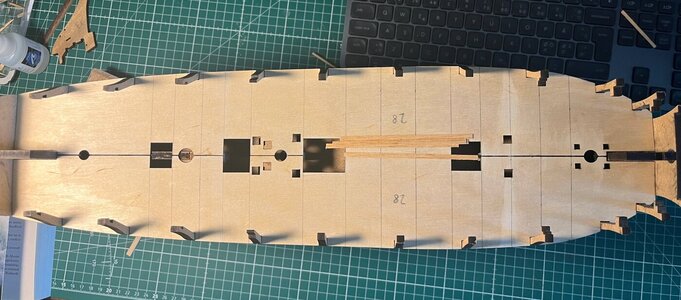
Because the fore and aft of the main deck will be covered by forecastle and quarterdeck, I didn't bother with them and let the planks run out their full length. Used this 3 butt pattern found in The Fully Framed Model by David Antscherl. The book also suggests a wider margin plank and hooked ends. I ordered some 5 mm in width Tanganyika strips to place a margin plank, but don't think I will bother will hooking the main deck planks as they won't be visible.
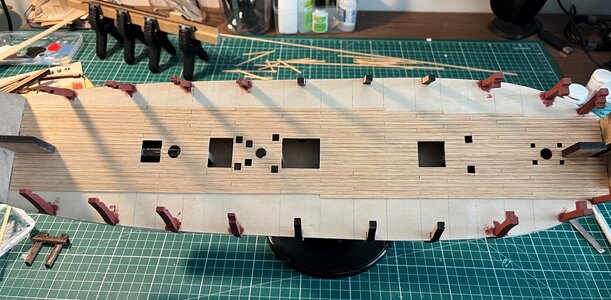
Some lessons learnt with the width of the 3 mm strips. They weren't uniformly 3 mm, varying between 2,5-3,5 mm and I probably should've tried to keep them to one size to avoid the asymmetry which is starting to show up.
I've been working on the filler blocks while waiting for the wide strips. Couldn't find any balsa wood in my town with the only hobby store being closed for summer, so I went with pinewood from the local Bauhaus instead. Makes the boat quite a lot heavier:
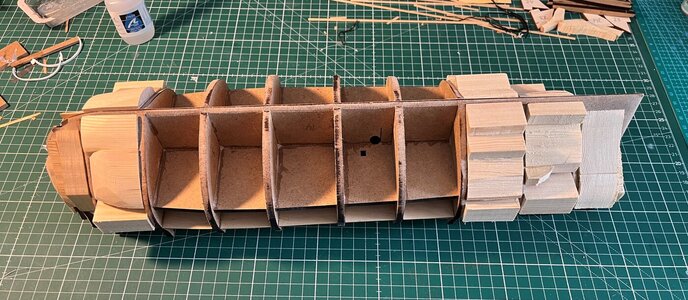
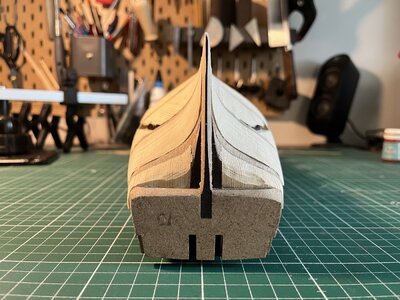


Because the fore and aft of the main deck will be covered by forecastle and quarterdeck, I didn't bother with them and let the planks run out their full length. Used this 3 butt pattern found in The Fully Framed Model by David Antscherl. The book also suggests a wider margin plank and hooked ends. I ordered some 5 mm in width Tanganyika strips to place a margin plank, but don't think I will bother will hooking the main deck planks as they won't be visible.

Some lessons learnt with the width of the 3 mm strips. They weren't uniformly 3 mm, varying between 2,5-3,5 mm and I probably should've tried to keep them to one size to avoid the asymmetry which is starting to show up.
I've been working on the filler blocks while waiting for the wide strips. Couldn't find any balsa wood in my town with the only hobby store being closed for summer, so I went with pinewood from the local Bauhaus instead. Makes the boat quite a lot heavier:


- Joined
- Jan 1, 2023
- Messages
- 74
- Points
- 88

Thanks! So far a lot of fun with the build.Hello! looks great .... you will make a beautiful ship !!! I wish you success!!!
Very good way to use the original plan with the shown deck beams - so you know where the butt joints and maybe also your rows of treenailing have to be

- Joined
- Feb 15, 2019
- Messages
- 394
- Points
- 168

You get gloss or matt enamels. I can only speak for Humbrol, they are specifically mixed for modellers. Gloss paint and varnish is never used on ship modelling (some do make the mistake) because it doesn't 'scale'. Even if a real ship was painted gloss on a model it can be suggested with satin. When Humbrol matt has hardened it can be lightly polished to a dull satin. It's difficult to describe the difference with acrylic, you'll know as soon as you make your first brushstroke!!! I have dozens of acrylic paints which I never use. I can see that a model has been painted with them from a distance, they lack realism. Of the three colours you show the oxide is definitely a better choice. Remember that ship's colours were a lot duller than today's (that's one reason they'll never get the colour of Victory right!) The oils mixed with the pigments would have added it's own tint. The blacks and bright yellows some use in builds will never be realistic.Gallery windows look great, very detailed. Not knowing much about paint, I googled enamel and it seems it is made for durability and has a glossy finish. Not really what I am after with this build. What is it you don't like with acrylics?
Just got the Red Ochre delivered, here it is compared to the two other red colours I have. Looks pretty good, I didn't want the deck bits to be as dark as the hull red in the middle and definitely not as bright as the vermillion to the left. Gonna use a "flat matt varnish" from the same supplier for the deck parts to make it as dull as possible. Then perhaps something shinier for the hull. All subject to change of course.
View attachment 387223
Are you using the supplied 3mm planking? I've never seen such poor quality timber supplied with a kit. I wouldn't use it on the q'deck and fo'c'sl. I'd replace it. I've milled yellow cedar for the upper planking but the gun deck is stained maple, so there's going to be a difference. I'll just have to live with that. Also RN decks were holystoned every day until they were almost white. Maple is a good choice, very pale and supplied timber is usually pretty uniform. Use 1mm thickness! 0.5mm isn't a usable thickness.
- Joined
- Jan 1, 2023
- Messages
- 74
- Points
- 88

That is the plan for the treenailingVery good way to use the original plan with the shown deck beams - so you know where the butt joints and maybe also your rows of treenailing have to be

- Joined
- Feb 15, 2019
- Messages
- 394
- Points
- 168

The treenails in reality don't show up much, they are a similar coloured timber. It's easy to overdo them.That is the plan for the treenailing. Not sure how to approach it though, I think using a drill (0,5 mm being the smallest I have) will make the deck look overwhelmed with dark spots. Gonna test a few things out, but I was happy with the effect of using the pointy side of the tweezers to make shallow holes with my last build.
- Joined
- Jan 1, 2023
- Messages
- 74
- Points
- 88

I might try Humbrol to see if it's to my taste, the only oil paint I've used was Revell's "Email color" which I didn't like due to it being too shiny and a bit clumpy which didn't leave a smooth surface.You get gloss or matt enamels. I can only speak for Humbrol, they are specifically mixed for modellers. Gloss paint and varnish is never used on ship modelling (some do make the mistake) because it doesn't 'scale'. Even if a real ship was painted gloss on a model it can be suggested with satin. When Humbrol matt has hardened it can be lightly polished to a dull satin. It's difficult to describe the difference with acrylic, you'll know as soon as you make your first brushstroke!!! I have dozens of acrylic paints which I never use. I can see that a model has been painted with them from a distance, they lack realism. Of the three colours you show the oxide is definitely a better choice. Remember that ship's colours were a lot duller than today's (that's one reason they'll never get the colour of Victory right!) The oils mixed with the pigments would have added it's own tint. The blacks and bright yellows some use in builds will never be realistic.
Are you using the supplied 3mm planking? I've never seen such poor quality timber supplied with a kit. I wouldn't use it on the q'deck and fo'c'sl. I'd replace it. I've milled yellow cedar for the upper planking but the gun deck is stained maple, so there's going to be a difference. I'll just have to live with that. Also RN decks were holystoned every day until they were almost white. Maple is a good choice, very pale and supplied timber is usually pretty uniform. Use 1mm thickness! 0.5mm isn't a usable thickness.
Yes, those are the planks supplied in the kit. I thought the uneven colour of the wood would bring some patina to show a worn deck. But what you mentioned with the holystone makes me think it would not be very accurate and I would need a uniform, brighter surface... However not very keen on ripping off the planking or having different wood types on the forecastle/quarterdeck so I will have to think about what to do here.
- Joined
- Feb 15, 2019
- Messages
- 394
- Points
- 168

We're talking about the gun deck? To add another mm it might place the guns a bit high? Then you'd have to raise the preformed sides with the cannon port cut outs by a mm. I was thinking whether you could plank over the veneer? It's certainly possible, You'd still have all the parts in the right position, it just means there's an extra mm depth in the hull below the wale. You might have to add a mm of plank to the top of the beak head to make sure it lines up with the hole for the bowsprit.I might try Humbrol to see if it's to my taste, the only oil paint I've used was Revell's "Email color" which I didn't like due to it being too shiny and a bit clumpy which didn't leave a smooth surface.
Yes, those are the planks supplied in the kit. I thought the uneven colour of the wood would bring some patina to show a worn deck. But what you mentioned with the holystone makes me think it would not be very accurate and I would need a uniform, brighter surface... However not very keen on ripping off the planking or having different wood types on the forecastle/quarterdeck so I will have to think about what to do here.
You always have to consider as many things as possible when you start changing things. What affects what! All my builds are like this, constant obstacles and working out solutions. I reckon it's the best way of keeping dementia from setting in!!
- Joined
- Jan 1, 2023
- Messages
- 74
- Points
- 88

Yes, the plank supplied by Amati are only 0,5 mm thin. So if I went with a 1 mm plank, we would see the gun deck raised with 0,5 mm from the plans. But I feel this is all in the margins - the 1 mm block will be sanded down a bit and I got the cannon upgrade kit which will surely not be the exact same dimensions as the original?We're talking about the gun deck? To add another mm it might place the guns a bit high? Then you'd have to raise the preformed sides with the cannon port cut outs by a mm. I was thinking whether you could plank over the veneer? It's certainly possible, You'd still have all the parts in the right position, it just means there's an extra mm depth in the hull below the wale. You might have to add a mm of plank to the top of the beak head to make sure it lines up with the hole for the bowsprit.
You always have to consider as many things as possible when you start changing things. What affects what! All my builds are like this, constant obstacles and working out solutions. I reckon it's the best way of keeping dementia from setting in!!
Not sure I understand what you mean with the veneer and wale (not familiar with the words), do you mean removing or lowering the "false deck" to make room for a thicker deck plank?
I've been looking at aliluke's build log over on modelshipworld for inspiration (https://modelshipworld.com/topic/34180-hms-fly-by-aliluke-victory-models-164/) and he used American Holly for planking which looks good. Lots of good inspiration there, I might not try his copper ageing technique though
Last edited:
- Joined
- Feb 15, 2019
- Messages
- 394
- Points
- 168

Regarding changing the levels I was racing a bit! Apologies. The point being that when one level is altered it affects everything else. So if you add 1mm of planking to the gundeck the height of the cannon ports will be affected etc.Yes, the plank supplied by Amati are only 0,5 mm thin. So if I went with a 1 mm plank, we would see the gun deck raised with 0,5 mm from the plans. But I feel this is all in the margins - the 1 mm block will be sanded down a bit and I got the cannon upgrade kit which will surely not be the exact same dimensions as the original?
Not sure I understand what you mean with the veneer and wale (not familiar with the words), do you mean removing or lowering the "false deck" to make room for a thicker deck plank?
I've been looking at aliluke's build log over on modelshipworld for inspiration (https://modelshipworld.com/topic/34180-hms-fly-by-aliluke-victory-models-164/) and he used American Holly for planking which looks good. Lots of good inspiration there, I might not try his copper ageing technique though. You can imagine the frustration from trying to google "holly wood", but I found a tip on this forum of a mill in Estonia (hobbymill.eu) which has American Holly and they cut it into the dimensions you want. The original 3 mm Tanganyika are too narrow for a ship from this time, so I was thinking about getting 5 mm in width and 0,8 mm in thickness which can be sanded down a bit.
I got 1:64 cannon carriage kits from Vanguard, they are about the same dimensions as the kit fittings (I had wondered about this, if they were different it might have been necessary to raise or lower the cannon ports anyway, I wanted to avoid that. Although it could have been done by raising the plywood preformed sides by 1mm. But the point I was making before is that by raising the ply sides by 1mm will mean the beakhead on the keel is 1mm too low! Which in turn will affect the angle of the bowsprit! So some correction is needed. (I made a whole new stem and beakhead)
The positioning of the wale (the black hull stripe of thicker timber) I think follows the lower edge of the plywood pieces? I cut down the ply so I had to calculate the height of the wale. Can't remember why I did that now!!! It seems unnecessary? You will have saved yourself from some extra work there, your wale position is provided for you.
I had started to change the deck levels, starting with the lower deck, because I intended adding crew and details visible from the hatchways. The kit hull main pieces in 5mm MDF didn't even leave enough headroom for a 1:72 crew figure. I used 1mm ply for the lower deck level and dispensed with the MDF supplied deck.
My entire idea and plan for the ship was as a diorama, under sail, with the ship looking busy with crew. This is why I have decided on all the extra works. And why I had to adjust levels etc.
Hobbymill also provide yellow cedar. This has a linear grain so it look more 'plank like.' Red cedar would be better but it's less convincing at smaller scales because of the grain size/width. I buy timber boards of various types from Vahur at Hobbymill. The postage is the killer since we left the EU. I needed more timbers, so more postage. I decided the get a Byrnes table saw to mill my own! It cost £1000 to get it into the UK, but it makes milling easy and a pleasure. The Proxxon FET (made in China!) cannot do the job.
I see Aliluke has planked his hull with expensive boxwood then covered it up with copper sheeting. He may as well have used a cheaper wood like maple! It's personal taste but most contemporary models didn't copper, the model was a visual aid to build a real ship, coppering would have hidden the construction details. I like the look of my planking, the last thing I want is to hide it!
I think 5mm planking for the decks scales ok, it's what I used, say 4mm at the most but 3mm I think could look too 'busy'. I used 5, and the cedar I milled ready for the upper decking is 5.
Amati really have to do something about that rubbish waste wood they supply, or exercise better quality control. We should check it carefully and post it back to them, they might get the message.
Jcob, this build is going to be so much fun to watch. Have fun, Magic Mike
- Joined
- Jan 1, 2023
- Messages
- 74
- Points
- 88

Ah I see, But perhaps I can sand the 0,8 mm plank down a bit and use a cannon for reference, no need for altering the position of the cannon ports? I can't see that a <0,5 mm difference in height from getting thicker planks could alter too much, it would just be the cannons that I would need to watch out with so that they stay in the center of the cannon ports. You might have some extra items to worry about as you have the crew on your ship. Of course, I could just order the 0,5 mm planks from Hobbymill, but I have a suspicion that the uneven quality of Amati's Tanganyika planks came from them being so thin.Regarding changing the levels I was racing a bit! Apologies. The point being that when one level is altered it affects everything else. So if you add 1mm of planking to the gundeck the height of the cannon ports will be affected etc.
I got 1:64 cannon carriage kits from Vanguard, they are about the same dimensions as the kit fittings (I had wondered about this, if they were different it might have been necessary to raise or lower the cannon ports anyway, I wanted to avoid that. Although it could have been done by raising the plywood preformed sides by 1mm. But the point I was making before is that by raising the ply sides by 1mm will mean the beakhead on the keel is 1mm too low! Which in turn will affect the angle of the bowsprit! So some correction is needed. (I made a whole new stem and beakhead)
The positioning of the wale (the black hull stripe of thicker timber) I think follows the lower edge of the plywood pieces? I cut down the ply so I had to calculate the height of the wale. Can't remember why I did that now!!! It seems unnecessary? You will have saved yourself from some extra work there, your wale position is provided for you.
I had started to change the deck levels, starting with the lower deck, because I intended adding crew and details visible from the hatchways. The kit hull main pieces in 5mm MDF didn't even leave enough headroom for a 1:72 crew figure. I used 1mm ply for the lower deck level and dispensed with the MDF supplied deck.
My entire idea and plan for the ship was as a diorama, under sail, with the ship looking busy with crew. This is why I have decided on all the extra works. And why I had to adjust levels etc.
Hobbymill also provide yellow cedar. This has a linear grain so it look more 'plank like.' Red cedar would be better but it's less convincing at smaller scales because of the grain size/width. I buy timber boards of various types from Vahur at Hobbymill. The postage is the killer since we left the EU. I needed more timbers, so more postage. I decided the get a Byrnes table saw to mill my own! It cost £1000 to get it into the UK, but it makes milling easy and a pleasure. The Proxxon FET (made in China!) cannot do the job.
I see Aliluke has planked his hull with expensive boxwood then covered it up with copper sheeting. He may as well have used a cheaper wood like maple! It's personal taste but most contemporary models didn't copper, the model was a visual aid to build a real ship, coppering would have hidden the construction details. I like the look of my planking, the last thing I want is to hide it!
I think 5mm planking for the decks scales ok, it's what I used, say 4mm at the most but 3mm I think could look too 'busy'. I used 5, and the cedar I milled ready for the upper decking is 5.
Amati really have to do something about that rubbish waste wood they supply, or exercise better quality control. We should check it carefully and post it back to them, they might get the message.
It looks like Hobbymill's yellow cedar is more yellow than American Holly and I don't really like the yellow looking woods. Though you have a good point with the grains.
I can tell you I feel the same thing about ordering from the UK, shipping and customs cost more than the paints! The Fly was retrofitted with copper a few years after being commissioned, in 1779 if I'm not mistaken, so there is a case for it if you want
I was looking at the deck in The Fully Framed Model by Antscherl and measured out roughly 5 mm using other shapes on deck to get a rough estimation. You can also see the hooked planking and also the much wider planks that have an interlocking pattern towards the edges. Would probably require some 8 mm in width planks to imitate this.
Credit to Olha Batchvarov who was showing the books on her Youtube channel:

- Joined
- Jan 1, 2023
- Messages
- 74
- Points
- 88

Welcome Mike! Seems to be a pretty fun build indeed.Jcob, this build is going to be so much fun to watch. Have fun, Magic Mike
- Joined
- Feb 15, 2019
- Messages
- 394
- Points
- 168

Yes, assemble your chosen cannon and use it as a guide (In reality I suspect Fly would have been armed with carronades). The tanganyika is definitely not from Hobbymill!! All their stuff is perfectly milled, and tanganyika is a low grade timber, it's not what they do!Ah I see, But perhaps I can sand the 0,8 mm plank down a bit and use a cannon for reference, no need for altering the position of the cannon ports? I can't see that a <0,5 mm difference in height from getting thicker planks could alter too much, it would just be the cannons that I would need to watch out with so that they stay in the center of the cannon ports. You might have some extra items to worry about as you have the crew on your ship. Of course, I could just order the 0,5 mm planks from Hobbymill, but I have a suspicion that the uneven quality of Amati's Tanganyika planks came from them being so thin.
It looks like Hobbymill's yellow cedar is more yellow than American Holly and I don't really like the yellow looking woods. Though you have a good point with the grains.
I can tell you I feel the same thing about ordering from the UK, shipping and customs cost more than the paints! The Fly was retrofitted with copper a few years after being commissioned, in 1779 if I'm not mistaken, so there is a case for it if you want. I see in the "upgrade" kit from Amati they include instructions on coppering, but not the actual copper sheets.
I was looking at the deck in The Fully Framed Model by Antscherl and measured out roughly 5 mm using other shapes on deck to get a rough estimation. You can also see the hooked planking and also the much wider planks that have an interlocking pattern towards the edges. Would probably require some 8 mm in width planks to imitate this.
Credit to Olha Batchvarov who was showing the books on her Youtube channel:
View attachment 387598
I don't copper my hulls, I like the look of the planking (I spend a lot of time getting it as tight and tidy as possible, I'm definitely not going to cover it up!!) And it's more in keeping with contemporary Napoleonic models. (I can't think of any model in the Greenwich collection of that era that has been coppered)


