• Ships of Scale has incorportated an extra level of security when you log In. Please follow on-screen prompts to acknowledge that you are not a robot via a "Check Box" or a "Pictorial Check Box Puzzle". This is needed due to higher level of AI Activity Security.
  • SUBSCRIBE TO SHIPS IN SCALE TODAY!

    The beloved Ships in Scale Magazine is back and charting a new course for 2026!
    Discover new skills, new techniques, and new inspirations in every issue.

    NOTE THAT OUR NEXT ISSUE WILL BE July/August 2026
  • Win a Free Custom Engraved Brass Coin!!!
    As a way to introduce our brass coins to the community, we will raffle off a free coin during the month of August. Follow link ABOVE for instructions for entering.

H.M.S. Victory by Caldercraft - Build Log

Chris thats some journey you have been on and your rigging has scared the pants off me:)
I'm looking at some after market ropes but the only ones I can find are in Canada and the post is expensive to the UK how many and what size did you use?
Brian
Bri,
Ropes of scale (out of Canada) are ecellent quality and I definitely would recommend.
You can also try this German store: https://www.rigging-ropes.com/. But I have not used them. Probably cheaper in terms of shipment.
 
Hi Brian!
Thanks for the comments. So I used a lot of the line that Caldercraft supplied, but sought custom lines for all of the cannon rigging, the shrouds and the main fore and back stays.

I used Rope of Scale for any of my after market line and their products are just wonderful and fairly priced.


I used Syren for their kit rope maker and after market blocks that are way better than the kits

Being from the US, I didn't have any tariff or duty issues, but that was a year ago...times have changed here, sad to say!

As for the rigging, I was terrified. I had relied HEAVILY on the following:

Nepean Longridge: The Anatomy of Nelson's Ships (the pull out plates are the best and provides the ability to actually build the ship from scratch)
John McKay: 100 Gun Ship - Victory (great detailed pictures in the back for rigging issues)
Allan McGowan: Victory: Her Construction, Career & Restoration (more about her actual history, but a good supplement to KcKay and Longridge)

BUT...the best book to buy for rigging is Thomas Gropp's Rigging First Rate Ships.
It will take you step by step for all of the rigging you will want to add.
Starting with the shrouds, when to serve them, what order they go, etc.
Then on to the fore and back stays, the mouses..mices?
Then on to the running back stays, breast stays and more.
Finally the sheets, tacks, halyards, clews of each and every yard.

This is the ONLY book you'll need after getting the hull done!

 
Thanks for that Gilbert will have a look but they only do dark brown?
Chris I totally understand your feelings towards the rigging I have bought Thomas Gropp's Rigging First Rate Ships. last month so I'm all set there as for the ropes I will have to butter up the better half :) and see if she minds me shelling out for the ropes of scale ropes. (not happy with the kit ropes although some seem reasonable quality.
Brian
 
Thank you guys for taking the time to look at my latest posts and comment. Means a lot!!!!

A couple of errors....putting the back stays up BEFORE installing the upper shrouds is wrong. The lay out of the shrouds requires (or at least that is what the directions and various books state) that the shrouds are laid in pairs starboard/port and then the various back stays, breast stays etc.

Since I put up the stays BEFORE doing the upper shrouds, I am forced to lay the shrouds ABOVE the stays at the mast heads. It's just not technically correct and will cost me points when i submit my finished model at the Westminster Ship Modelers Show next year....sigh.

Also, I think that the stays do get in the way a bit when working on the upper shrouds. I don't know just how much the completed shrouds, futtocks and catharpins would get in the way of stays...only someone who has done it both ways will know!

I started with the foremast catharpins. It's a learning curve once again and after doing these, I know I'll make them a bit shorter and work harder to make them look consistent. I'll have to add some watered down white glue to keep them straight after I'm done. The directions state that catharpins are installed on shrouds 4-9. But the books state that it should only be shrouds 9, 7, 5 & 4. Which is what I did....

After I laid the futtock shrouds. The books show that these shrouds are wrapped under the futtock and back over so that the bitter end lays against the lower shroud.
View attachment 502343

Since you can't pre-wrap seizing, you have to tie off these shrouds and then add additional hitches.

I opted to drill out the PE hook a bit and seize the .75mm rope through the hook. The hooks are a bit fatter than the holes for the deadeye holders, so a little finagling is required to get them to hook on.

Once done, I started with the upper shrouds. This was when I realized my sequence error. After getting all of the deadeyes attached to the shrouds, I started installing the deadeye lanyards. This was when I noticed that I was using the wrong size deadeyes! It was late and I just cut them off and this morning I replaced them. Thankfully, I was able to pry off the larger deadeyes and then add additional seizing to accommodate the smaller deadeyes.

View attachment 502345View attachment 502346

Once done, I was not happy with the way I'd rigged the blocking for the forestays that run through the bow.
My issue was how I terminated the rigging. In all of my double block setups, I would tie off the end around the lashing. It gave it an hour glass look that I didn't like. This is how I did all the cannons, but at such a small scale it isn't as bad. I did this based on the fact that real life lashings are sometimes wound around the setup...it just doesn't look good at small scale, which I assume is why you see a lot of flemmish loops.

Anyways, I ended up just tying the bitter ends to the base of the blocks. This at least keeps the look of the rigging clean.
View attachment 502340View attachment 502341

More to come!

View attachment 502342

View attachment 502344

View attachment 502347

View attachment 502348
Hi there Chris. Firstly, thanks soooo much for sharing the pics. I am learning a ton from you. Pardon my ignorance, but I see that you have first installed the shrouds and then the backstays. In my Constructo plans, they advise following the numbering on the drawings. If I follow the drawings, the spliced rope around the masts at the various intervals (lower and upper masts), will be looping UNDER the shrouds. With the 1:94 scale, I worry that, if I do the shrouds first, that I will have very limited space to install the backstays, effectively then working the backstay ropes in between the shrouds. What would you suggest?
Thanks for the abundant sharing!
 
Hi there Chris. Firstly, thanks soooo much for sharing the pics. I am learning a ton from you. Pardon my ignorance, but I see that you have first installed the shrouds and then the backstays. In my Constructo plans, they advise following the numbering on the drawings. If I follow the drawings, the spliced rope around the masts at the various intervals (lower and upper masts), will be looping UNDER the shrouds. With the 1:94 scale, I worry that, if I do the shrouds first, that I will have very limited space to install the backstays, effectively then working the backstay ropes in between the shrouds. What would you suggest?
Thanks for the abundant sharing!
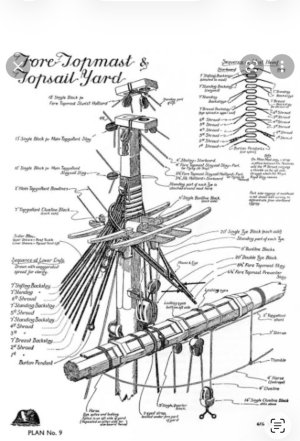
Good morning Ryk. I would definitely do the shrouds first. It is the correct order to have these installed prior to the any stays.
IMG_9207.jpeg
In the top right you can see the order. This also makes doing the ratlines easier as the stays can get in the way. Another advantage is the mast will be perfectly tensioned so when doing the stays there will be no flexibility- also easier. Finally doing them in this order the stays will not be touching the shrouds in anyway which is correct. I hope this helps my fellow SAF’ER. Cheers Grant
 
Hi Brian!
Thanks for the comments. So I used a lot of the line that Caldercraft supplied, but sought custom lines for all of the cannon rigging, the shrouds and the main fore and back stays.

I used Rope of Scale for any of my after market line and their products are just wonderful and fairly priced.


I used Syren for their kit rope maker and after market blocks that are way better than the kits

Being from the US, I didn't have any tariff or duty issues, but that was a year ago...times have changed here, sad to say!

As for the rigging, I was terrified. I had relied HEAVILY on the following:

Nepean Longridge: The Anatomy of Nelson's Ships (the pull out plates are the best and provides the ability to actually build the ship from scratch)
John McKay: 100 Gun Ship - Victory (great detailed pictures in the back for rigging issues)
Allan McGowan: Victory: Her Construction, Career & Restoration (more about her actual history, but a good supplement to KcKay and Longridge)

BUT...the best book to buy for rigging is Thomas Gropp's Rigging First Rate Ships.
It will take you step by step for all of the rigging you will want to add.
Starting with the shrouds, when to serve them, what order they go, etc.
Then on to the fore and back stays, the mouses..mices?
Then on to the running back stays, breast stays and more.
Finally the sheets, tacks, halyards, clews of each and every yard.

This is the ONLY book you'll need after getting the hull done!


Hi Chris,
I noticed in your photos that the rigging lines look a bit fuzzy.
Is there a specific reason why you chose not to wax them?
From what I understand, that's exactly why lines are usually treated with beeswax, as it helps to flatten the fuzz and makes the rigging look much cleaner.
 
Good morning,

Consider that stays take the load and establish the mast position. Shrouds just hang off the mast.
Install all the stays loosely then tighten incrementally, get the rake where you want it, then center vertically.

Specific instructions may have a variation, but this is the basic principle.

Good luck with it.

-Rich
 
Chris,

Just catching up - SO like following your log. I would images that in regard to ship models the Victory might be (is) the most complicated to fully rig?

Your work is so nice to look at, learn from and follow..

Regards,
 
In my Constructo plans, they advise following the numbering on the drawings.
For the masts and yards It is easiest for the most part to use the same order of dressing of the actual ship. Perhaps the Constructo plans follow the same or similar order. This is explained in detail in James Lees' The Masting and Rigging of English Ships of War on page 158. I would love to post it, but it is copyright protected.

Allan
 
Good morning Ryk. I would definitely do the shrouds first. It is the correct order to have these installed prior to the any stays.
View attachment 612123
In the top right you can see the order. This also makes doing the ratlines easier as the stays can get in the way. Another advantage is the mast will be perfectly tensioned so when doing the stays there will be no flexibility- also easier. Finally doing them in this order the stays will not be touching the shrouds in anyway which is correct. I hope this helps my fellow SAF’ER. Cheers Grant
Thanks Grant- this helps a lot. To progress, I assume starting with the foremast and run the shrouds from fore to aft, in alternative port and starboard sequences. Or is it best to start with the main mast?
 
I assume starting with the foremast and run the shrouds from fore to aft, in alternative port and starboard sequences.

From Lees Masting and Rigging, page 40

Shrouds were put on the masthead in pairs, the first pair being the forward starboard one, the next the forward port one, then starboard and port alternately, seized together allowing the bight round the mast to be between one and a quarter and one and a sixth the circumference of the mast head. The bight was served to a distance of about 8 feet either side of the middle. The foremost shroud was wormed and served all the way down. Shrouds were mostly made of shroud laid rope rather than cable laid.

Note that if there is an odd number of shrouds, the aft most, the swifter has a served eye at the top as it cannot be paired.

David Steel gives some great details in the following link of his writing, The Elements and Practice of Rigging and Seamanship https://maritime.org/doc/steel/
Allan
 
From Lees Masting and Rigging, page 40

Shrouds were put on the masthead in pairs, the first pair being the forward starboard one, the next the forward port one, then starboard and port alternately, seized together allowing the bight round the mast to be between one and a quarter and one and a sixth the circumference of the mast head. The bight was served to a distance of about 8 feet either side of the middle. The foremost shroud was wormed and served all the way down. Shrouds were mostly made of shroud laid rope rather than cable laid.

Note that if there is an odd number of shrouds, the aft most, the swifter has a served eye at the top as it cannot be paired.

David Steel gives some great details in the following link of his writing, The Elements and Practice of Rigging and Seamanship https://maritime.org/doc/steel/
Allan
Hi Allan,
Thanks for your tip.
When my build reaches that point, I’ll certainly look into it and put it to good use.
 
From Lees Masting and Rigging, page 40

Shrouds were put on the masthead in pairs, the first pair being the forward starboard one, the next the forward port one, then starboard and port alternately, seized together allowing the bight round the mast to be between one and a quarter and one and a sixth the circumference of the mast head. The bight was served to a distance of about 8 feet either side of the middle. The foremost shroud was wormed and served all the way down. Shrouds were mostly made of shroud laid rope rather than cable laid.

Note that if there is an odd number of shrouds, the aft most, the swifter has a served eye at the top as it cannot be paired.

David Steel gives some great details in the following link of his writing, The Elements and Practice of Rigging and Seamanship https://maritime.org/doc/steel/
Allan
Thanks Allen!
 
For the masts and yards It is easiest for the most part to use the same order of dressing of the actual ship. Perhaps the Constructo plans follow the same or similar order. This is explained in detail in James Lees' The Masting and Rigging of English Ships of War on page 158. I would love to post it, but it is copyright protected.

Allan
Thanks Allan. I have taken your advice and it is helping me tremendously.
 
Hi Guys;
Sorry, haven't looked at the log all summer, but the leaves are starting to change.

Certainly there are some better and more detailed logs out there from more experienced builders.

To John (Oldflyer), this was my first wooden ship model that I have ever done. My only previous experience was two years completed Trumpeter's Titanic.
I would say that Caldercraft's HMS Victory might not be the most difficult model out there, I am sure there are others that are just as detailed. But it is a struggle. It has been two years (I think...) and it's hard to remember that at one point I was struggling how to apply planking, fixing mistakes and more.

This site and the Model Ship World site (which I'm not sure even exists in its former state anymore) have been a tremendous help. Obviously the books I have listed earlier in my log have been a great help and the by far the best has been my recently purchased T. Gropp book on rigging. I wish I had that book earlier. I think some of my earlier rigging would have looked better.

I don't have much more to do. I have one of the launches done and the other about half way. I only plan to build two of them and hang them from the davits. I also have to add or create the...well right now as I type I can't think of that they are, but they are the booms that are placed in the holders off the chainplate platforms. I think there are two other smaller booms that would be stowed on deck.

I also have to fix one of the studsail booms that I broke off and then do one more run through of all the rigging to be sure I haven't missed anything major.

I also bought figures for the boat and I'll spend the pre-winter painting these and adding them to the deck. I think they will give some character and depth. Oh!!! I also have to create a bunch of rope coils to hang off the various cleats to add detail. I may even look at buying some scale sized barrels and stuff to add to the deck. Finally, I did purchase some light gray fabric and may look to see if it's worth the time to cut out tiny hammocks, then roll them up as I think they would be and add them to the hammock racks on deck....maybe!

And I really want to create a box/cover for the boat. I have been twisting this around in my mind as to how I would do it. I think I can route out the corners, use acrylic (glass would be too heavy and scary to size right). I thought I'd add magnets to the back panel so I could completely remove it to get access to the boat. Again, that's all just twirling around in my brain right now.

So, summer weather is almost over....see you soon!
Chris


...thank you so much for all of the comments over the summer and the help answering other questions!
 
Back
Top