Excellent primer on hull fairing!
-

Win a Free Custom Engraved Brass Coin!!!
As a way to introduce our brass coins to the community, we will raffle off a free coin during the month of August. Follow link ABOVE for instructions for entering.
-

PRE-ORDER SHIPS IN SCALE TODAY!
The beloved Ships in Scale Magazine is back and charting a new course for 2026!
Discover new skills, new techniques, and new inspirations in every issue.
NOTE THAT OUR FIRST ISSUE WILL BE JAN/FEB 2026
You are using an out of date browser. It may not display this or other websites correctly.
You should upgrade or use an alternative browser.
You should upgrade or use an alternative browser.
HIGH HOPES, WILD MEN AND THE DEVIL’S JAW - Willem Barentsz Kolderstok 1:50
I'd like to add a short extra to this (very good) tutorial. Sometimes, when the bulkheads are a bit too small, and you might in this case remove too much of the bulkheads at both sides of the too small one, you can glue a small strip of wood (often not much more than one mm thickness) on the bulkhead which is "wrong". By adding some extra material to this bulkhead you have some extra flesh to sand away.
- Joined
- Jan 9, 2020
- Messages
- 10,566
- Points
- 938

Thanks Ron. One can never take too much time with this part of the process. I finished the fairing today, but I now leave it until tomorrow morning for another look - before I start adding the fillers. Then I will also show pictures.Excellent primer on hull fairing!
- Joined
- Sep 3, 2021
- Messages
- 5,199
- Points
- 738

Might this post be suitable for a separate topic for "general topics help with models"?When @pietsan Piet and I discussed the fairing of the hull, he advised that I take a good look at his "tutorial" on fairing a hull while he was building the sloop of the Bounty. So, just as a starting point, let me show you some pictures of his finished sloop. (All the pictures in this posting are courtesy of Piet.
View attachment 274009
View attachment 274010
So with that as an example of the finished product, I listened to GOOD advice.
Piet's Advice on Fairing a Hull:
It goes without saying that one of the main pre-requisites for a good planking job is the fairing of the hull. Not only will it ensure a smooth line of hull planking without bumps, kinks or indentations, but it will also ensure the maximum surface for the glue to adhere to. Successful fairing of the hull serves a dual purpose. It will make the actual planking process a lot easier and will aid greatly to the radiance that the model exudes in the end.
To most modelers, fairing means grabbing a sanding block and merrily (or not so merrily) sanding away at the bulkheads from bow to stern according to an imaginary visual line. No doubt this is better than no fairing at all, but at the same time, this is not really what we want to be doing. Ideally, we should first determine where and how much and at what angle we need to sand. That will ensure that we do not sand too little- and more importantly - that we do not remove too much material from the bulkheads.
Before you start the sanding process pre-bend a strake (just as you would do if you were planking the hull already) to use as a guide.
View attachment 274012
Here you can see that the pre-bent strake can be pinned to the bow and then held against the bulkheads to examine the contact areas between the plank and the individual bulkheads. The white arrow indicates that the plank is in contact with the full width of the bulkhead – in principle thus, no material needs to be sanded away here. I say in principle, because the situation might change after the other bulkheads have been sanded.
The yellow arrow indicates a slight misalignment which means that only little material needs to be removed towards the bow. The situation changes at the three red arrows where the misalignment angle is considerably bigger, thus indicating that much more material needs to be removed – again towards the bow. The blue arrow shows a severe kink in our strake. This is caused by a filler block at the bow which has not yet been sanded to shape.
We can, of course not only check for alignment in one particular place and then think that if if that looks good, we are finished. Multiple checks have to be carried out because as we get closer to the keel for instance, the angles start getting smaller and it is not necessary to remove as much material as higher up on the hull.
View attachment 274013
At the stern adjustments are also generally smaller, but we still need to check. On the picture above, the blue arrow indicates a very slight angle, so very little fairing is required there. The red arrows however, show a much greater angle and obviously we need to address that. Pay attention though that the problem does not lie with the two bulkheads indicated by the two red arrows, but with the stern frame itself. Because the stern frame is mounted square to the keel, it has to be faired in the same curvature as the rest of the hull line. That will automatically bring the plank into full contact with the frames indicated by the red arrows.
View attachment 274014
Here is another example (this time viewed directly from above) where the gap indicated by the blue arrows is caused by the stern frame. The stern frame, in this instance needs to be faired until the gap at the blue arrows disappears. The frame demarcated by the white arrow, shows that very little material needs to be removed there.
Our ideal scenario is thus depicted by the last three pictures. Here we can see that our hull planks are in full contact with all the frames without any bumps, indentations/ hollows or gaps.
View attachment 274015
View attachment 274016
View attachment 274017
Taking the time to fair the hull properly, may be time consuming, but in the end. you will reap the benefits. Not only will your planking be much easier accomplished, but the finished product will be something that you can be proud of.
Thank you very much Piet.
An excellent tutorial on hull fairing Heinrich,
- Joined
- Jan 9, 2020
- Messages
- 10,566
- Points
- 938

You are spot on Hans. In this picture by @pietsan Piet, you can clearly see what Hans means.I'd like to add a short extra to this (very good) tutorial. Sometimes, when the bulkheads are a bit too small, and you might in this case remove too much of the bulkheads at both sides of the too small one, you can glue a small strip of wood (often not much more than one mm thickness) on the bulkhead which is "wrong". By adding some extra material to this bulkhead you have some extra flesh to sand away.
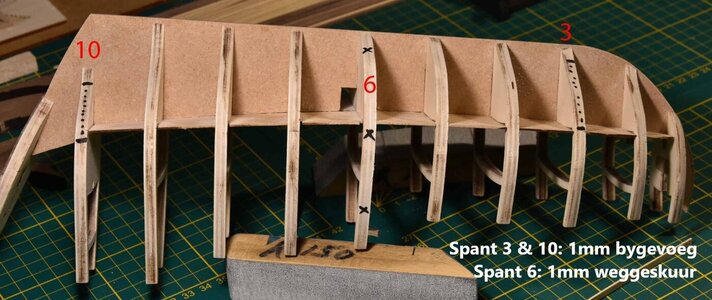
On Frame #3 and #10, Piet has added the 1mm strip that Hans has mentioned, whereas he removed a full 1mm from Frame #6. I will only make this type of decision once I have added the filler pieces and sanded them to shape. Then I can see where I have possibly taken away too much or where I still need to remove material.
Which just again shows - you cannot hurry this step.
- Joined
- Jan 9, 2020
- Messages
- 10,566
- Points
- 938

Hi Johan. I can post it there if there is enough interest. What do you think?Might this post be suitable for a separate topic for "general topics help with models"?
- Joined
- Jan 9, 2020
- Messages
- 10,566
- Points
- 938

Agreed Peter. It may be old news to all the old hands and experienced builders, but it is always good just to take note of it now and then.An excellent tutorial on hull fairing Heinrich,
- Joined
- Sep 3, 2021
- Messages
- 5,199
- Points
- 738

From past experience I know how easy it is to go wrong with fairing a hull; especially if a hull has both concave and convex surfaces (and which hull doesn't have those) and the transitions between the two types. So I think for those new to modeling, but also as a kind of a refresher, it might be worth it.Hi Johan. I can post it there if there is enough interest. What do you think?
I know for sure, as soon as I enter that stage with my Bluenose build, I will be looking for just that kind of information.
Last edited:
- Joined
- Sep 3, 2021
- Messages
- 5,199
- Points
- 738

And may be adding Kolderstok Hans' addendum as well?Good suggestion. I will discuss it with Piet.
- Joined
- Jan 9, 2020
- Messages
- 10,566
- Points
- 938

Ok I will tell you what I will do. This part only deals with the fairing. Piet has another tutorial on the way that he planks. So, when I am ready to start planking - and it should be soon -I will combine the two tutorials and place them under one heading in the General Topics Help with Models section!And may be adding Kolderstok Hans' addendum as well?
Thank you for the suggestion.
When a new Kolderstok model is entering the world of model builders I am always a bit in doubt if the model is correct on all sides. So I often decide to ask an experienced builder to make the model and inform me if there are any "things" in it. Piet is a very well skilled "plankaneer" and he informed me about the small dents and bulbs in the bulkheads. This I could then correct in the laser cut sheets.You are spot on Hans. In this picture by @pietsan Piet, you can clearly see what Hans means.
View attachment 274034
On Frame #3 and #10, Piet has added the 1mm strip that Hans has mentioned, whereas he removed a full 1mm from Frame #6. I will only make this type of decision once I have added the filler pieces and sanded them to shape. Then I can see where I have possibly taken away too much or where I still need to remove material.
Which just again shows - you cannot hurry this step.
Which I did, of course
- Joined
- Jan 9, 2020
- Messages
- 10,566
- Points
- 938

@Kolderstok This I could pick up Hans. This kit is going together exceptionally well - I have no doubt that is as well designed and executed as a kit could possibly be. But ... and this is what makes this model building story so fascinating ... there is still the human element to contend with, so one has to take one's time and do every little thing as well as you possibly can.
You have my vote.Hi Johan. I can post it there if there is enough interest. What do you think?
When I started model building of wooden kits I could only afford a well known Danish brand. Back in the 70's the amount of work you had to do to put a wooden kit together (other than the usual plastic models) made what this hobby hooked me up to today. And you know how it goes: you start with plastic, proceed with wood and go on up until the moment that even the most advanced model is quite easy to make. The next step is scratch, with only some drawings and a bunch of wood, and as a final step only an image of a model and some basic measurements. But this final step was not final for me. I wondered why there weren't that many Dutch ship model kits on the market, and I started to make them myself. But this is a piece of recent history many people know in the mean time.@Kolderstok This I could pick up Hans. This kit is going together exceptionally well - I have no doubt that is as well designed and executed as a kit could possibly be. But ... and this is what makes this model building story so fascinating ... there is still the human element to contend with, so one has to take one's time and do every little thing as well as you possibly can.
My goal is to create a kit at which a builder can find much more pleasure than just putting things together and adding some pre-made elements to complete it. You have to work your way through the instructions, have to look up things, and at the same time learn something about a skill which is forgotten by a lot of people: making something out of nothing, with only plans, some tools and wood and a lot of enthousiasm. This is how the Kolderstok kits are made. We deliver the materials, you add the enthousiasm, and the result is a lot of new learned skills - and a nice model.
Hans
- Joined
- Jan 9, 2020
- Messages
- 10,566
- Points
- 938

@Kolderstok And that is exactly the philosophy that I enjoy so much Hans. Yes, of course it is a kit, but there are so many elements where the builder is required to think, to be a little bit of an architect, carpenter and - dare I say it - artist. When a phase is completed it is very satisfactory to me, because it really feels like I have built something, not just put pieces together. I still look at the Haarlem and wonder how on earth did I get that far! 
- Joined
- Jan 9, 2020
- Messages
- 10,566
- Points
- 938

Now it is time to show you the fairing of the hull that is in process. I sometimes find it bemusing to look at all the perfectly manicured and articulated photographs that my model building colleagues post of a finished step of the construction, but never pictures of how we actually get there.  However, since I am trying to show aspirant builders of the Willem Barentsz the nitty gritty of how it all goes together, be prepared to get a bit dirty and dusty while reading my log.
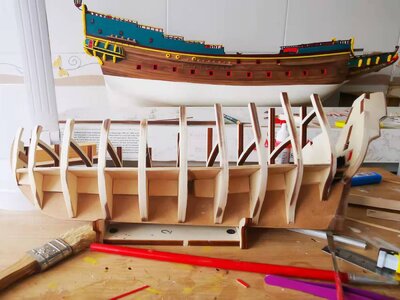
Here you can see the "first stage" of the fairing on the Port Side completed. First phase means that I now have a smooth and equal fit of my pre-bent plank on all the bulkheads, but since the filler pieces had not yet been added, it can still not be regarded as a final fairing. This picture was obviously taken to focus on the WB, but upon downloading it, I feel sorry for her, because the Haarlem in the background just owns this picture. I just LOVE that big ship.
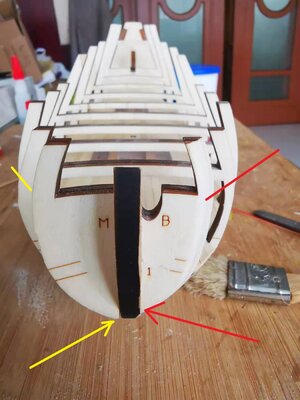
From the front, you can clearly see the differences in the shape and curvature of the bulkheads of the faired port side (indicated by the red arrows) as opposed to the unfaired starboard side (indicated by the yellow arrows).
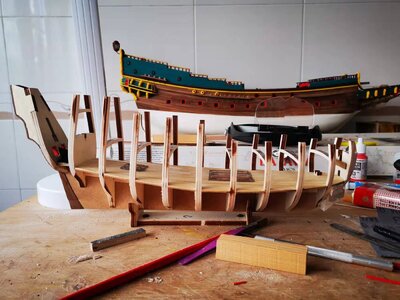
First phase fairing on the starboard side (I forgot to take a picture of this side yesterday, so this picture already shows some of the filler blocks at the bow.
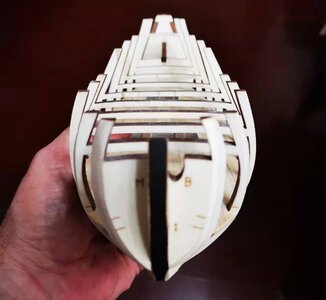
This shows both sides faired viewed from the front. This picture was taken last night - hence no filler blocks yet. Pay attention to the double-scribed lines on Bulkhead #1 which serves as a planking indication for the first plank.
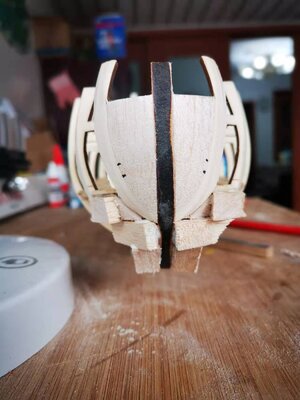
This picture shows the two filler pieces at the bow installed and sanded to shape. Now obviously the problem with this is that we "lose" the scribed lines. Don't fear though. As you are just about to finish the final shaping, you will see very feint indications where the lines start to reappear. When that happens, you can just mark them clearly like I have done in this picture. The filler pieces between the first and second bulkheads have also been added and I am waiting for the glue to dry so that I can start shaping them. Those unfinished filler pieces may look like a mess, but I can assure you that each one has been very strategically placed.
Until a little bit later when I can show you the finally shaped bow section.

Here you can see the "first stage" of the fairing on the Port Side completed. First phase means that I now have a smooth and equal fit of my pre-bent plank on all the bulkheads, but since the filler pieces had not yet been added, it can still not be regarded as a final fairing. This picture was obviously taken to focus on the WB, but upon downloading it, I feel sorry for her, because the Haarlem in the background just owns this picture.

From the front, you can clearly see the differences in the shape and curvature of the bulkheads of the faired port side (indicated by the red arrows) as opposed to the unfaired starboard side (indicated by the yellow arrows).

First phase fairing on the starboard side (I forgot to take a picture of this side yesterday, so this picture already shows some of the filler blocks at the bow.

This shows both sides faired viewed from the front. This picture was taken last night - hence no filler blocks yet. Pay attention to the double-scribed lines on Bulkhead #1 which serves as a planking indication for the first plank.

This picture shows the two filler pieces at the bow installed and sanded to shape. Now obviously the problem with this is that we "lose" the scribed lines. Don't fear though. As you are just about to finish the final shaping, you will see very feint indications where the lines start to reappear. When that happens, you can just mark them clearly like I have done in this picture. The filler pieces between the first and second bulkheads have also been added and I am waiting for the glue to dry so that I can start shaping them. Those unfinished filler pieces may look like a mess, but I can assure you that each one has been very strategically placed.
Until a little bit later when I can show you the finally shaped bow section.
Cough, cough, hack hack. Sorry H I forgot to put on my dust mask.
Lookin’ good
Lookin’ good
I assume you do all that sanding on the "balcony" or is Anna there with the vacuum? Your work looks splendid from the view I have in the audience.
Jan
Jan


