- Joined
- Jan 9, 2020
- Messages
- 10,566
- Points
- 938

Very dusty here Ron! She is getting shape. I just took a quick break from the sanding to see what is cooking here on SOS.Cough, cough, hack hack. Sorry H I forgot to put on my dust mask.
Lookin’ good
 |
As a way to introduce our brass coins to the community, we will raffle off a free coin during the month of August. Follow link ABOVE for instructions for entering. |
 |
 |
The beloved Ships in Scale Magazine is back and charting a new course for 2026! Discover new skills, new techniques, and new inspirations in every issue. NOTE THAT OUR FIRST ISSUE WILL BE JAN/FEB 2026 |
 |

Very dusty here Ron! She is getting shape. I just took a quick break from the sanding to see what is cooking here on SOS.Cough, cough, hack hack. Sorry H I forgot to put on my dust mask.
Lookin’ good

Nope! I am sanding in the KITCHEN Jan! That is where my "shipyard" is.I assume you do all that sanding on the "balcony" or is Anna there with the vacuum? Your work looks splendid from the view I have in the audience.
Jan
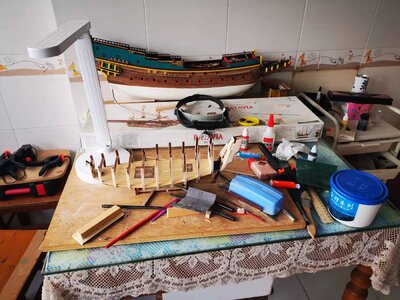

A kitchen table as the ship yard, nothing unusual there it's same with me.Nope! I am sanding in the KITCHEN Jan! That is where my "shipyard" is.
View attachment 274240
Once upon a time ... a long time ago ... a very long time ago ... that was a kitchen table!

Nice work and it will have curved decks too, very cool.Now it is time to show you the fairing of the hull that is in process. I sometimes find it bemusing to look at all the perfectly manicured and articulated photographs that my model building colleagues post of a finished step of the construction, but never pictures of how we actually get there.However, since I am trying to show aspirant builders of the Willem Barentsz the nitty gritty of how it all goes together, be prepared to get a bit dirty and dusty while reading my log.
View attachment 274228
Here you can see the "first stage" of the fairing on the Port Side completed. First phase means that I now have a smooth and equal fit of my pre-bent plank on all the bulkheads, but since the filler pieces had not yet been added, it can still not be regarded as a final fairing. This picture was obviously taken to focus on the WB, but upon downloading it, I feel sorry for her, because the Haarlem in the background just owns this picture.I just LOVE that big ship.
View attachment 274230
From the front, you can clearly see the differences in the shape and curvature of the bulkheads of the faired port side (indicated by the red arrows) as opposed to the unfaired starboard side (indicated by the yellow arrows).
View attachment 274231
First phase fairing on the starboard side (I forgot to take a picture of this side yesterday, so this picture already shows some of the filler blocks at the bow.
View attachment 274232
This shows both sides faired viewed from the front. This picture was taken last night - hence no filler blocks yet. Pay attention to the double-scribed lines on Bulkhead #1 which serves as a planking indication for the first plank.
View attachment 274233
This picture shows the two filler pieces at the bow installed and sanded to shape. Now obviously the problem with this is that we "lose" the scribed lines. Don't fear though. As you are just about to finish the final shaping, you will see very feint indications where the lines start to reappear. When that happens, you can just mark them clearly like I have done in this picture. The filler pieces between the first and second bulkheads have also been added and I am waiting for the glue to dry so that I can start shaping them. Those unfinished filler pieces may look like a mess, but I can assure you that each one has been very strategically placed.
Until a little bit later when I can show you the finally shaped bow section.


Thank you very much for the kind words Adi. The dust clouds have settled down so I will soon take a final look and do a final check-up on the hull fairing.When the dust clouds in your kitchen yard have cleared, you can rally see how beautiful your ahip will be. Very good development.

Once I start sanding again, I'll voluntarily exile myself to the (unheated) garage...Thank you very much for the kind words Adi. The dust clouds have settled down so I will soon take a final look and do a final check-up on the hull fairing.


Very good question Johan. I do not use cardboard templates, but that is why I leave the char marks on the bulkheads. Once I have done one side and I am happy with it, I always compare the char that is left on the frames to that which is left on the other side. That way I get a very good idea how "symmetrical my sanding was.When you do the sanding, do you also compare left with right to ensure symmetry of the hull? Cardboard templates?

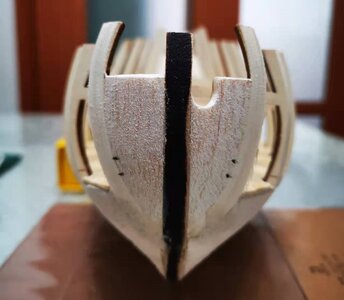
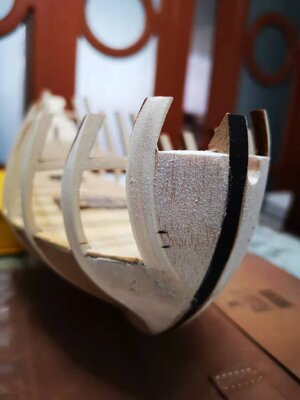
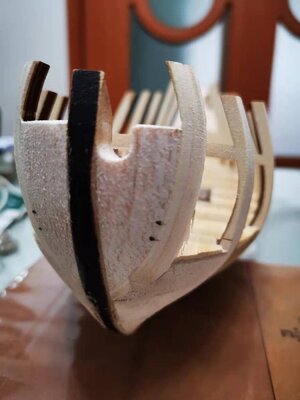
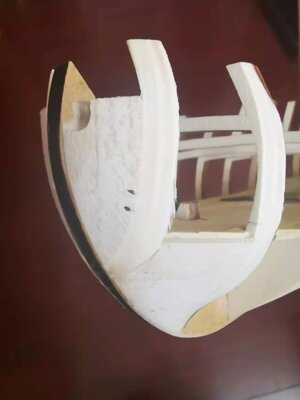
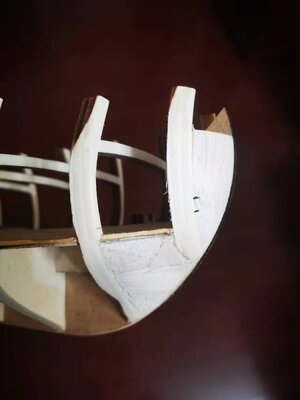
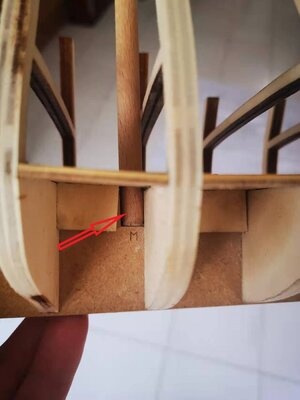
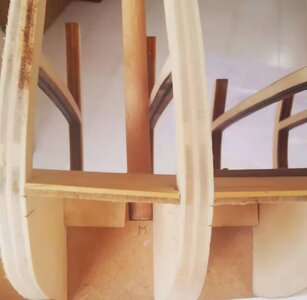


 These are the two pictures that you are no doubt referring to. Piet treats these two bulkheads a little differently which I will show at a slightly later stage. But spot on Paul!
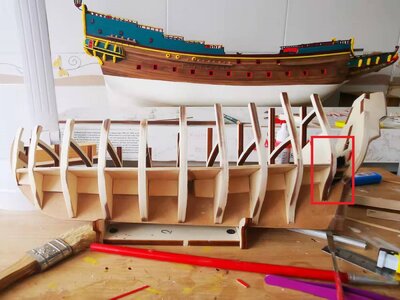
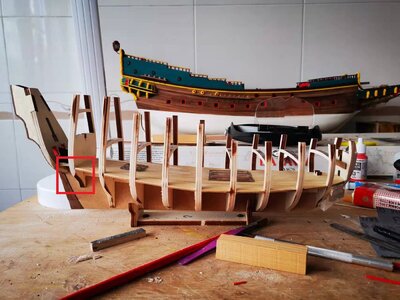

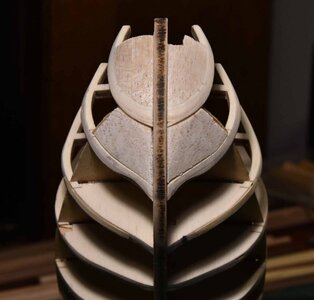

Jan - believe me - if I had my own, designated workplace, I would have much preferred it, but the kitchen does fine. The work is coming along well, but I fitted a test plank tonight and clearly I still have more work to do on the fairing and curvatures before I can even start thinking of planking. So, tomorrow, there will be more dust ... and more clean-up work again.Hi Heinrich,
Sanding in the kitchen sounds great. I approached the subject here, but “no joy”. I’m relegated to the front porch, have to wear a mask and this time of year hope for a warm day.
Seriously, your work to date looks great. I’m looking forward to starting on my WB .
Jan
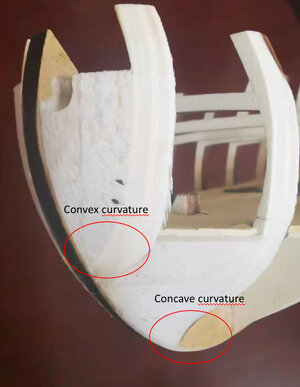
There are not that much modern drawings available regarding the form of such a ship. In the book about the ship of Willem Barentsz there are two drawings showing the lines and shape of the hull - one by Ab Hoving and Cor Emke, and one by Gerald de Weerdt. Which one to follow when you make the laser cut drawings? I decided to follow the Hoving/Emke lines, which have a little dent at the second bulkhead. Is this correct or wrong? Does it make the hull easier or more difficult to plank? I managed to get it done in a proper way, but I can imagine a complete convex curve would make things a bit easier. The funny thing here is that both the forms (with "dent" or without "dent") could both have been possible, as there was no "correct" way. The Dutch ship builders didn't use drawings (there were no drawings) and it was mainly the experience and the eye of the shipyards' master, combined with the available timber which would determine the form of the hull.@RDN1954 Johan that is another great question - one one that I cannot give you a definite answer to. Maybe that was the case on the bigger Spiegelretourschepen like the Batavia or on the warships, but it might have been different on the smaller ships like the "jachts" and "pinas". All I can do as illustration is to show you these pictures.
(pictures removed)
This is Piet's example at the bow which turned into this:
what I can tell you is that the WB has a much "sharper" bow compared to the relatively blunt bow of the Batavia and the even blunter/rounder bows of the warships, but maybe @Kolderstok Hans or @Maarten can you give you a better answer.

Thanks for your clarification. It shows again that we don't have unambiguous definition of these ships, not even on something as significant as the loftsurfaces of the hull.There are not that much modern drawings available regarding the form of such a ship. In the book about the ship of Willem Barentsz there are two drawings showing the lines and shape of the hull - one by Ab Hoving and Cor Emke, and one by Gerald de Weerdt. Which one to follow when you make the laser cut drawings? I decided to follow the Hoving/Emke lines, which have a little dent at the second bulkhead. Is this correct or wrong? Does it make the hull easier or more difficult to plank? I managed to get it done in a proper way, but I can imagine a complete convex curve would make things a bit easier. The funny thing here is that both the forms (with "dent" or without "dent") could both have been possible, as there was no "correct" way. The Dutch ship builders didn't use drawings (there were no drawings) and it was mainly the experience and the eye of the shipyards' master, combined with the available timber which would determine the form of the hull.

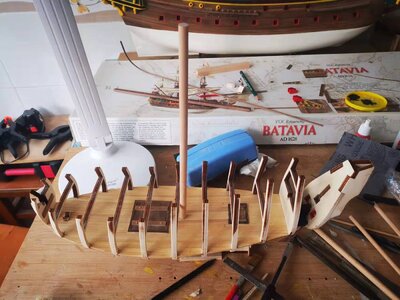
I see a stunning Batavia in the dry dock. Heinrich I don’t know how you do it building in such a small space.Nope! I am sanding in the KITCHEN Jan! That is where my "shipyard" is.
View attachment 274240
Once upon a time ... a long time ago ... a very long time ago ... that was a kitchen table!

