Great read
-

Win a Free Custom Engraved Brass Coin!!!
As a way to introduce our brass coins to the community, we will raffle off a free coin during the month of August. Follow link ABOVE for instructions for entering.
-

PRE-ORDER SHIPS IN SCALE TODAY!
The beloved Ships in Scale Magazine is back and charting a new course for 2026!
Discover new skills, new techniques, and new inspirations in every issue.
NOTE THAT OUR FIRST ISSUE WILL BE JAN/FEB 2026
You are using an out of date browser. It may not display this or other websites correctly.
You should upgrade or use an alternative browser.
You should upgrade or use an alternative browser.
HIGH HOPES, WILD MEN AND THE DEVIL’S JAW - Willem Barentsz Kolderstok 1:50
Excellent joinery as a Master Shipwright. RichSo earlier, I showed you @pietsan Piet's brilliant work on mounting the stern keel section. Now it was my turn.
The first thing I did was to remove the 12mm wood of 1mm depth at the bottom of the keel to provide for the three bottom strakes as in @pietsan Piet's photograph below.
View attachment 273094
I know I have posted this picture earlier as well, but I cannot stress enough the importance of doing this correctly.
Secondly, I started off by holding the stern section as firmly as I could to the hull and then drilling two 0.8mm holes through the keel and into the hull. Great care has to be taken here as you cannot clamp anything. Remember the stern section is 7mm in width and the hull frame is 5mm. When I checked that all was good, I then enlarged the drill bit to 1mm and did the same by drilling the 1mm hole through both the stern and into the hull. I then removed the stern section and finally enlarged the two holes in the stern to 2mm. The holes in the hull were left at 1mm. Lastly I simply allied PVA glue to the stern and placed it into position - applying finger pressure only for about 5 minutes. So good was the fit that it remained stuck into position. It was left untouched to dry for 3 hours.
The picture below summarizes all of the above work.
View attachment 273095
After 3 hours I cut two beech wood toothpicks to the correct length, immersed them in PVA glue and hammered them home - through the stern into the hull. I used a punch to make sure that they were countersunk by approximately 0.5mm each. The holes were then filled with PVA glue and rubbed and pressed my wood dust which I had collected from the sanding of the stern into the holes. After about half an hour, I just sanded the surface smooth with 360 grit sandpaper.
View attachment 273097
The three strakes of wood are just pressed against each other to show you what the effect is of what we are after. You can't really get it better than that and these are super-macro close-ups.
View attachment 273099
The notch in the stern ensures an excellent fit between the stern and Frame #11. (Starboard Side)
View attachment 273101
Fitment on Port Side.
And finally ... a normal macro-close-up of the overview.
View attachment 273102
I am very happy that this part is done, but I created a lot of extra work for myself by planking the stern section with 1.5mm planks instead of the prescribed 1mm. Read those instructions!
That is all for tonight - now I can relax and check out all the wonderful builds on SOS. Until tomorrow when I will play with small decks, gun ports and big cannons, its cheers for now.
- Joined
- Jan 9, 2020
- Messages
- 10,566
- Points
- 938

Thank you very much for your response. I apologize for not knowing your first name (maybe you can include that as part of the signatureIt is noteworthy that all this exploration was going on while the Dutch we're winning their independence from the Spanish Empire. The Eighty Year War was originally a war for religious freedom that morphed into a war for Dutch independence which was confirmed by the Treaty of Westphalia in1648 that also ended the Thirty Years War. The Dutch experience was strikingly similar to that of the United States two hundred years later.
- Joined
- Jan 9, 2020
- Messages
- 10,566
- Points
- 938

T
Thank you so much. I am thoroughly enjoying messing around in the shipyard with the Willem Barentsz as well as documenting her history as best as I can.Great read
- Joined
- Jan 9, 2020
- Messages
- 10,566
- Points
- 938

Thank you Rich. I am also very happy that the stern piece is in place and fits so well. If I had read the instructions properly, it is an extremely straightforward part to fit, but I assumed all 4mm planks had the same thickness. And we all know what they say about "assumptions" ...Excellent joinery as a Master Shipwright. Rich
Quick test fit: The cannons are more than long enough!!! With a size like that, they have to be! With the gun carriage moved back as far as it can go, the cannon still easily protrude through the gun port. And don't laugh at my trunnion nail!
View attachment 272978
What scale is that nail.... HAHAHA
That is really a long cannon.
Cheers
Daniel
Would that be in a similar vein to an "expert" as a "has-been drip under pressure"?Thank you Rich. I am also very happy that the stern piece is in place and fits so well. If I had read the instructions properly, it is an extremely straightforward part to fit, but I assumed all 4mm planks had the same thickness. And we all know what they say about "assumptions" ...
@GrantTyler Ok Grant - courtesy of our resident expert on Dutch ships - mind you, I think he is an expert on all ships - @Maarten has given you your answer. I quote him verbatim:
This is to reinforce the construction of the stern.
Dutch ships have far less deadwood in stern and stem then the English due to their flat bottom. This is creating a solid sandwich construction around the joint of the stern pist to the keel. You see it on most Dutch builds but certainly not all, see below the Pinas from Den Helder.
View attachment 273107
Here you see the bottom strakes ending at the stern and not extending all the way through.
Thank you so much for that question Grant. As a result of it, I also know more than before!
This hull picture remind me how sometimes my planking looks like. The positive side of my bad work is that now I can say to friends, if they ask why those cracks on my model,... Ohh " it is weathered hull " .
Cheers
Daniel
Last edited:
- Joined
- Jan 9, 2020
- Messages
- 10,566
- Points
- 938

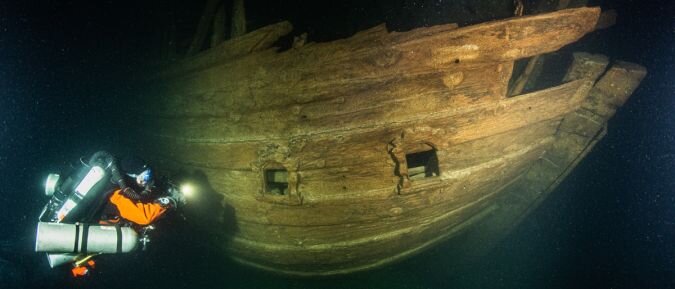
@Dematosdg Hi Daniel. Yes that hull does look a bit worse for wear doesn't it. But it's great that we still have such a complete ship-recovery for historical reference - that doesn't happen every day! Mind you, last year Badewanne (a team of volunteer Finnish divers) discovered the wreck of the Swaen - a 17th Century Dutch Fluit in an almost intact condition in the Baltic sea.

Port side hull view of the stern of the fluyt ship wreck. Decorated stern cabin window holes are visible. (Courtesy: Badewanne)

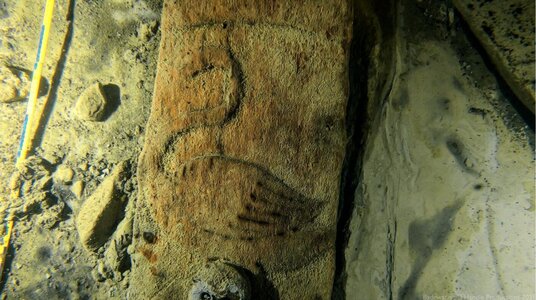
Note the very clear depiction of a Swan on the stern. Badewanne (C) Handle Productions 2021

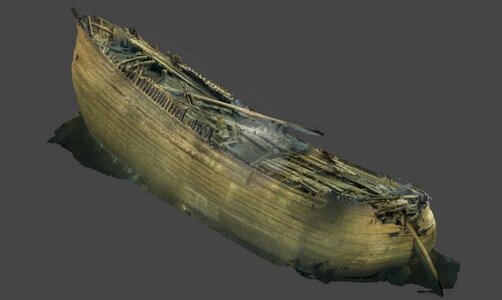
Photogrammetric 3D model of the wreck shown from starboard-bow side. (Image source: Badewanne Team, copyright Handle Productions 2021)

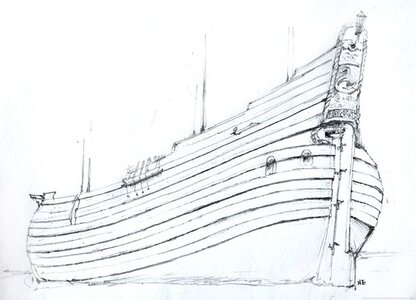
The archaeologists can even name the crew members on the ship (Image: Credit: Niklas Eriksson/Handle Productions/Pen )
)
For the full article, you can visit the following website:
 badewanne.fi

Port side hull view of the stern of the fluyt ship wreck. Decorated stern cabin window holes are visible. (Courtesy: Badewanne)

Note the very clear depiction of a Swan on the stern. Badewanne (C) Handle Productions 2021

Photogrammetric 3D model of the wreck shown from starboard-bow side. (Image source: Badewanne Team, copyright Handle Productions 2021)

The archaeologists can even name the crew members on the ship (Image: Credit: Niklas Eriksson/Handle Productions/Pen
 )
)For the full article, you can visit the following website:
“The Swan” – 1636 – Badewanne.fi
This coverage of the underwater archaeology work on the ship is a unique insight into the vessel and the remarkable condition, not buried but standing free, possibly in large part due to the cold waters. The link provides a lot if details to closely study. Thanks, Rich (PT-2)Please note that the above posting is of the find of the "Swaen" or "Swan" - a Dutch Fluit ship and should not be confused with the "Witte Swaen" which may have been the name of Willem Barentsz's ship.
- Joined
- Sep 3, 2021
- Messages
- 5,199
- Points
- 738

I don't have any intention of being dogmatic about the name of Willem Barentsz ship, or a model, resembling his ship, but to me it's not entirely right to name this ship after himself, while we know that it's most likely not the case. Apparently there is consensus on the name having been "Swaen" or "Witte Swaen", neglecting possible spelling errors.Please note that the above posting is of the find of the "Swaen" or "Swan" - a Dutch Fluit ship and should not be confused with the "Witte Swaen" which may have been the name of Willem Barentsz's ship.
If I were to build this model, I would prefer to christen it one of the above mentioned names.
Just to be clear, every shipwright has exclusive rights on naming is creation!
- Joined
- Sep 3, 2021
- Messages
- 5,199
- Points
- 738

Handle Productions, Finland, is making a documentary on this astonishing find. I think the documentary has not yet been released, but it might be worth to occasionally check this link: https://www.handleproductions.com/film/fluit/@Dematosdg Hi Daniel. Yes that hull does look a bit worse for wear doesn't it. But it's great that we still have such a complete ship-recovery for historical reference - that doesn't happen every day! Mind you, last year Badewanne (a team of volunteer Finnish divers) discovered the wreck of the Swaen - a 17th Century Dutch Fluit in an almost intact condition in the Baltic sea.
View attachment 273254
Port side hull view of the stern of the fluyt ship wreck. Decorated stern cabin window holes are visible. (Courtesy: Badewanne)
View attachment 273255
Note the very clear depiction of a Swan on the stern. Badewanne (C) Handle Productions 2021
View attachment 273256
Photogrammetric 3D model of the wreck shown from starboard-bow side. (Image source: Badewanne Team, copyright Handle Productions 2021)
View attachment 273257
The archaeologists can even name the crew members on the ship (Image: Credit: Niklas Eriksson/Handle Productions/Pen)
For the full article, you can visit the following website:
“The Swan” – 1636 – Badewanne.fi
badewanne.fi
Thanks Heinrich and Maarten. My learning curve is exponential right now - both building and knowledge of these amazing ships. Cheers@GrantTyler Ok Grant - courtesy of our resident expert on Dutch ships - mind you, I think he is an expert on all ships - @Maarten has given you your answer. I quote him verbatim:
This is to reinforce the construction of the stern.
Dutch ships have far less deadwood in stern and stem then the English due to their flat bottom. This is creating a solid sandwich construction around the joint of the stern pist to the keel. You see it on most Dutch builds but certainly not all, see below the Pinas from Den Helder.
View attachment 273107
Here you see the bottom strakes ending at the stern and not extending all the way through.
Thank you so much for that question Grant. As a result of it, I also know more than before!
- Joined
- Jan 9, 2020
- Messages
- 10,566
- Points
- 938

Christos my dear friend. It is wonderful to have you here. I hope that you will enjoy the build and I look forward to your suggestions.@Heinrich, have just found out about this marvellous build log of yours.... Am staying put following from now on!
- Joined
- Sep 3, 2021
- Messages
- 5,199
- Points
- 738

You're welcome!@RDN1954 Thank you very much for that link Johan. That should be a fascinating documentary to watch.
- Joined
- Jan 9, 2020
- Messages
- 10,566
- Points
- 938

Hi Grant. It is not only your learning curve which is rapidly on the increase - so is mine. That was a great question and once again, I learnt something too.Thanks Heinrich and Maarten. My learning curve is exponential right now - both building and knowledge of these amazing ships. Cheers
@Kolderstok Hans from Kolderstok has also added the following to answer your question:
The keel was often the weakest point of a ship and in a heavy storm the forces on the rudder could easily rip off the keel and whole backside of a ship. It would then sink within minutes... To add some strength to the keel construction the lower planks where extended.
Thanks Hans.


