Nice. that would look good as is also.
-

Win a Free Custom Engraved Brass Coin!!!
As a way to introduce our brass coins to the community, we will raffle off a free coin during the month of August. Follow link ABOVE for instructions for entering.
-

PRE-ORDER SHIPS IN SCALE TODAY!
The beloved Ships in Scale Magazine is back and charting a new course for 2026!
Discover new skills, new techniques, and new inspirations in every issue.
NOTE THAT OUR FIRST ISSUE WILL BE JAN/FEB 2026
You are using an out of date browser. It may not display this or other websites correctly.
You should upgrade or use an alternative browser.
You should upgrade or use an alternative browser.
HIGH HOPES, WILD MEN AND THE DEVIL’S JAW - Willem Barentsz Kolderstok 1:50
- Joined
- Jan 9, 2020
- Messages
- 10,566
- Points
- 938

Holy moly - no, Jan! There are till the side pieces, the holes, the handpaken, the knecht and the pal that need to be do done. Then cleaning up, sanding, and treating the whole assembly with shellac and then finding a way of installing it underneath the canopy!Nice. that would look good as is also.
So this would be effort number 7???Holy moly - no, Jan! There are till the side pieces, the holes, the handpaken, the knecht and the pal that need to be do done. Then cleaning up, sanding, and treating the whole assembly with shellac and then finding a way of installing it underneath the canopy!
- Joined
- Sep 3, 2021
- Messages
- 5,190
- Points
- 738

And counting...So this would be effort number 7???
Good morning Heinrich (you have skills)...must be a South African thing. I think we like the hard and challenging waydon’t forget a set of files and an electric drill (cordless variety) - that's it!
 . Cheers Grant
- Joined
- Jan 9, 2020
- Messages
- 10,566
- Points
- 938

Grant - very hard, very difficult, very challenging. @RDN1954 Johan said earlier he is counting the attempts ... well 7 to be precise.Good morning Heinrich (you have skills)...must be a South African thing. I think we like the hard and challenging way.....others may have different interpretations
. Cheers Grant
The octagonal windlass just would not work. I actually got two attempts done that weren't bad looking, but it didn't wow me.
And again, @Frank48 Frank was the one who put me on the right path,

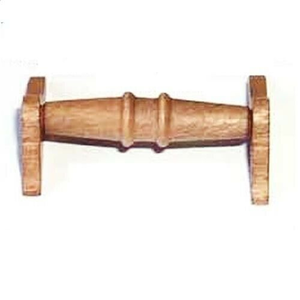
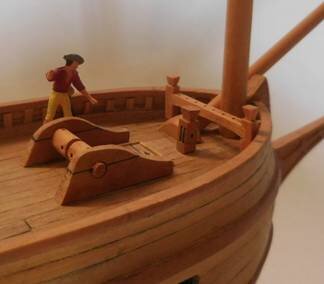
The man is a wealth of information and with a period-correct windlass, I could do further research. And indeed.

So onwards I went.
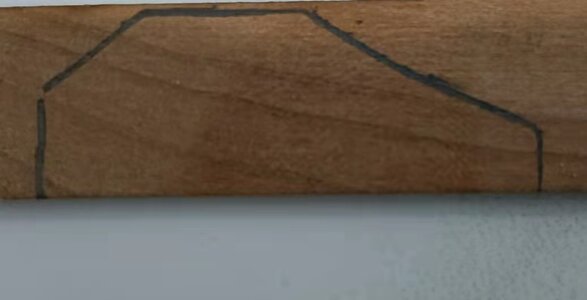
Traced the outline of the side pieces on some stash of Pearwood spares.
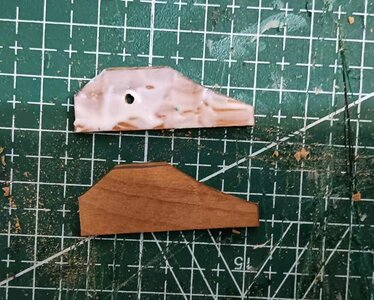
Then cut out the shape with an X-Acto knife (yes @dockattner Paul), and repeating the exercise because the thickness of the plywood, necessitated me to double up. Glue is applied to the one side.
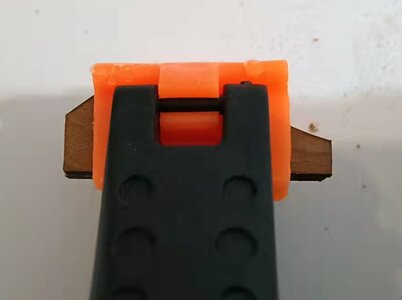
Clamped
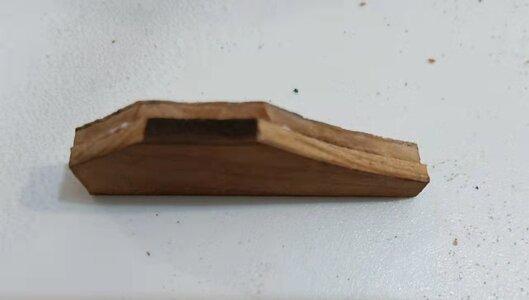
And emerging from the clamp, is this rather sad-looking piece of hogwash. Or is it? Next step - filing.
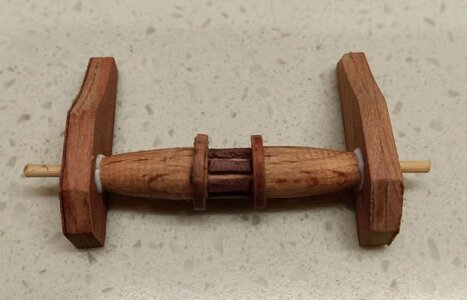
Just filed, I only sandpaper right at the before I apply the shellac, the three main components are glued. Note the ratchets in the center which allow the windlass to be stopped and locked in any given position, But more on that later.
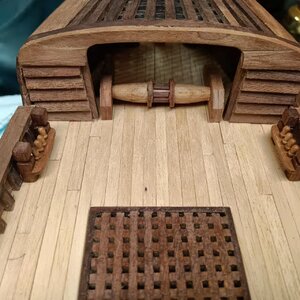
Test-fit to make sure that everything fits under the canopy like it should and is in scale.
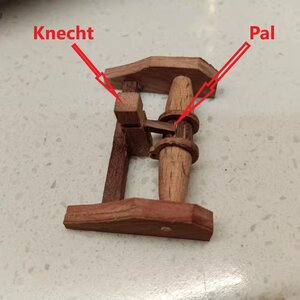
And here is the knecht (Knighthead) added which carries the pal (no idea of the English name) which locks the windlass by fitting in between the ratchets.
Now when the glue is dry, the holes still need to be drilled for the windlass Levers (handpaken), then everything sanded and then one coat of shellac applied.
Brilliant Heinrich. A very clever way of making the ratchets for the Pal. Cheers GrantGrant - very hard, very difficult, very challenging. @RDN1954 Johan said earlier he is counting the attempts ... well 7 to be precise.
The octagonal windlass just would not work. I actually got two attempts done that weren't bad looking, but it didn't wow me.
And again, @Frank48 Frank was the one who put me on the right path,
View attachment 304841
View attachment 304842
The man is a wealth of information and with a period-correct windlass, I could do further research. And indeed.
View attachment 304843
View attachment 304844
So onwards I went.
View attachment 304845
Traced the outline of the side pieces on some stash of Pearwood spares.
View attachment 304846
Then cut out the shape with an X-Acto knife (yes @dockattner Paul), and repeating the exercise because the thickness of the plywood, necessitated me to double up. Glue is applied to the one side.
View attachment 304847
Clamped
View attachment 304848
And emerging from the clamp, is this rather sad-looking piece of hogwash. Or is it? Next step - filing.
View attachment 304849
Just filed, I only sandpaper right at the before I apply the shellac, the three main components are glued. Note the ratchets in the center which allow the windlass to be stopped and locked in any given position, But more on that later.
View attachment 304850
Test-fit to make sure that everything fits under the canopy like it should and is in scale.
View attachment 304851
And here is the knecht (Knighthead) added which carries the pal (no idea of the English name) which locks the windlass by fitting in between the ratchets.
Now when the glue is dry, the holes still need to be drilled for the windlass Levers (handpaken), then everything sanded and then one coat of shellac applied.
Pawl or pallthe pal (no idea of the English name)
- Joined
- Jan 9, 2020
- Messages
- 10,566
- Points
- 938

Thanks Grant. It simulates it well.Brilliant Heinrich. A very clever way of making the ratchets for the Pal. Cheers Grant
- Joined
- Jan 9, 2020
- Messages
- 10,566
- Points
- 938

Thanks Hans!Pawl or pall

- Joined
- Jan 9, 2020
- Messages
- 10,566
- Points
- 938

Continued:
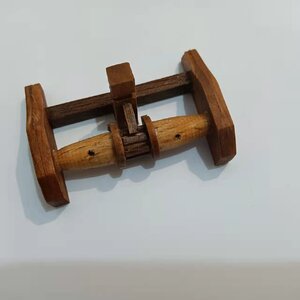
After the shellac had been applied.
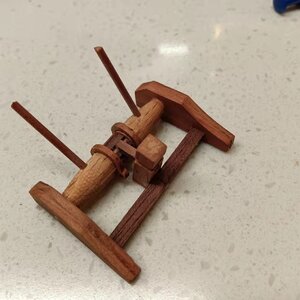
Holes drilled (I have no intention of making my windlass look like it has been shot with a shotgun - the functional holes are there) and handpaken (windlass levers/spikes/poles what have you) are installed. Now the tips need to be nicely sanded.
Installed on the ship.
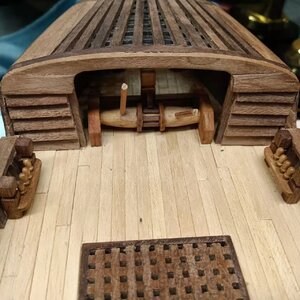
Here I still needed to dab the tips of the handpaken with shellac.
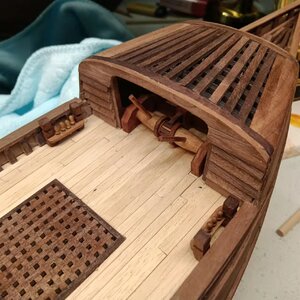
And done!
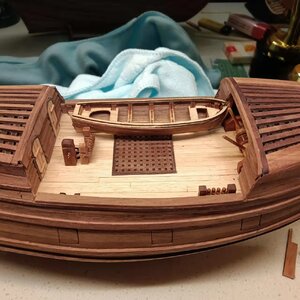
Without affecting the bigger of the two boats at all.

After the shellac had been applied.

Holes drilled (I have no intention of making my windlass look like it has been shot with a shotgun - the functional holes are there) and handpaken (windlass levers/spikes/poles what have you) are installed. Now the tips need to be nicely sanded.
Installed on the ship.

Here I still needed to dab the tips of the handpaken with shellac.

And done!

Without affecting the bigger of the two boats at all.
Hi Heinrich!
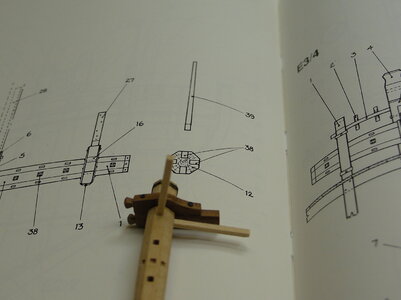
Please do not push the windlass too much under the canopy? To operate are usually two handspikes (39) in the engagement of the windlass sockets (38). Before a handspike touches the ship's deck, the next one is adjusted from above . This is not possible under the canopy (but just before).
This is just an idea. Perhaps the handspike sockets were offset but also differently?
Best regards
Thomas
- Joined
- Jan 9, 2020
- Messages
- 10,566
- Points
- 938

Thank you very much Thomas. The length of the handpaken (spikes) on the smaller Dutch ships were between 0.90 - 1,20 meter. Taking a length of 1.0meter and then working that back to scale, the spikes actually clear the canopy - during rotation they fit underneath the roof of the canopy. The height of the canopy was 1.70 m.Hi Heinrich!
View attachment 304883
Please do not push the windlass too much under the canopy? To operate are usually two handspikes (39) in the engagement of the windlass sockets (38). Before a handspike touches the ship's deck, the next one is adjusted from above . This is not possible under the canopy (but just before).
This is just an idea. Perhaps the handspike sockets were offset but also differently?
Best regards
Thomas
- Joined
- Jan 9, 2020
- Messages
- 10,566
- Points
- 938

@Thomas Marocke Hi Thomas. NOW I understand what you mean. My apologies - I have been so focused on this part of the build, that I can't even read properly. I even managed quite successfully to destroy my mobile phone in the laundry yesterday! 
You are right - you would not be able to change the handspikes below the canopy's roof. I do think I am good though as they almost reach a 90 degree rotation.
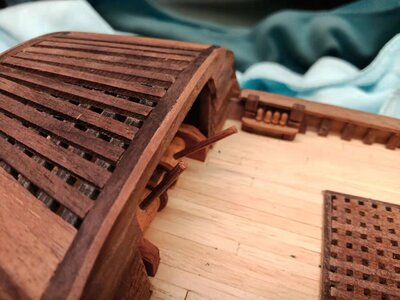
On the handspike on the port side, that would be the exact point at which they would change holes.
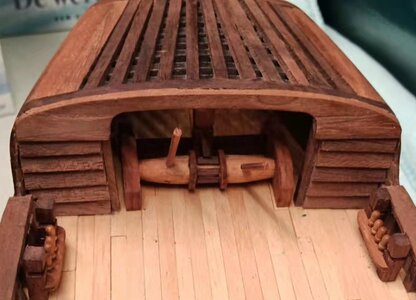
You are right - you would not be able to change the handspikes below the canopy's roof. I do think I am good though as they almost reach a 90 degree rotation.

On the handspike on the port side, that would be the exact point at which they would change holes.

A battle well fought Heinrich. Congratulations.
- Joined
- Sep 3, 2021
- Messages
- 5,190
- Points
- 738

While I admire your handiwork, which I could not dream of being able to replicate, I'm not convinced about the location of your windlass. You need to be an acrobat to go from the main deck to the deck fwd of the canopy and back under the best of circumstances, let alone in the middle of the night with a nice, force 10 northwestern blowing.@Thomas Marocke Hi Thomas. NOW I understand what you mean. My apologies - I have been so focused on this part of the build, that I can't even read properly. I even managed quite successfully to destroy my mobile phone in the laundry yesterday!
You are right - you would not be able to change the handspikes below the canopy's roof. I do think I am good though as they almost reach a 90 degree rotation.
View attachment 304904
On the handspike on the port side, that would be the exact point at which they would change holes.
View attachment 304909
But fortunately I'm not in charge of your build!
- Joined
- Jan 9, 2020
- Messages
- 10,566
- Points
- 938

Thank you Paul - that was indeed a battle!A battle well fought Heinrich. Congratulations.
- Joined
- Jan 9, 2020
- Messages
- 10,566
- Points
- 938

My position of the windlass is spot on Johan.While I admire your handiwork, which I could not dream of being able to replicate, I'm not convinced about the location of your windlass. You need to be an acrobat to go from the main deck to the deck fwd of the canopy and back under the best of circumstances, let alone in the middle of the night with a nice, force 10 northwestern blowing.
But fortunately I'm not in charge of your build!
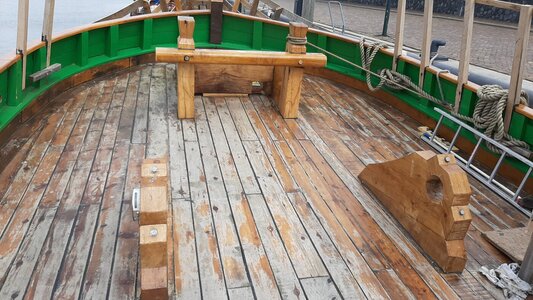
As you can see on the replica ...
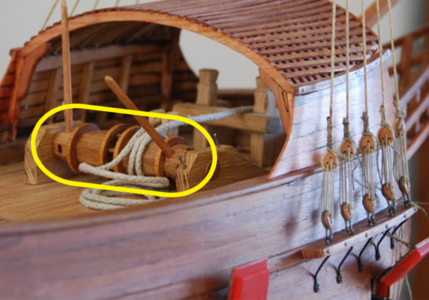
And on Koos Weestra's model that served as the blueprint for the replica.
My observation is that while the Kolderstok canopy has been partially closed both at the front and the back, it is completely open on this model. Had it been left open, it would not be a problem to get to the foredeck.
However, to rectify that, I will have to build another Willem Barentsz.
Nicely done Heinrich. A monumental struggle, a lot of thinking, research, trial and error. But by golly you’ve done it.
- Joined
- Sep 3, 2021
- Messages
- 5,190
- Points
- 738

Reserving first row, first class seat!However, to rectify that, I will have to build another Willem Barentsz.


