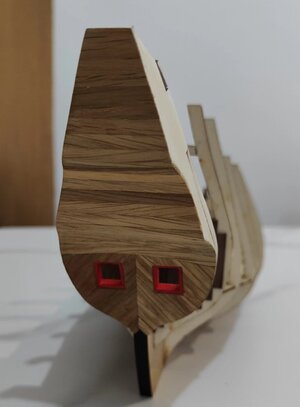
HIGH HOPES, WILD MEN AND THE DEVIL’S JAW - Willem Barentsz Kolderstok 1:50

Mooie update Heinrich, je marsen (mastheads) zijn goed gelukt, Ik ben heel benieuwd naar je 2e model van Barentsz in eik. Ik schrijf weinig commentaar omdat ik het schrijven in het Engels niet goed kan, maar ik volg bijna dagelijks je vorderingen en dat ziet er eer goed uit !!
Piet wrote:

Nice update Heinrich, your mastheads have worked out well, I am very curious about your 2nd model of Barentsz in oak. I don't comment much because I can't write well in English, but I follow your progress almost daily and that looks good!!

Hartelijk dank voor de vriendelijke woorden Piet. De marsen was een behoorlijke gepriegel, maar nu ken ik hun geheim. Ik ben net zo benieuwd hoe de eiken versie eruit komt te zien - ik hoop alleen dat de planking van de romp goed gaat. Je weet dat zelfs met walnoot de WB niet het gemakkelijkste schip is om te plank. En wat betreft niet schrijven in het Engels - geen probleem. Je kunt in het Nederlands schrijven en ik vertaal voor onze leden.

Thank you very much for the kind words, Piet. The mastheads were quite a hassle, but now I know their secret. I'm just as curious to see what the oak version will look like - I just hope the planking of the hull goes well. You know that even with walnut, the WB is not the easiest ship to plank. And as for not writing in English - no problem. You can write in Dutch, and I translate for our members.
 
I have also thought of one of those "fancy" cutting devices. Apparently this one from Ultimation - a Canadian company - is the bee's knees.

View attachment 314826
It's very pricey but apparently it offers extreme precision. I was told about this by Mike Shanks who, in turn, was told about it by @Dematosdg Daniel.

Here is their website: https://ultimation.ca/

BUT and this is the big BUT: Apart from the price, it means something else that has to be left behind. To justify its costs to the Admiral will be difficult - even for me. :)
Good evening Heinrich. Awesome looking tool- a trip to the Japanese restaurant and some negotiation is required ;). Cheers Grant
 
I have also thought of one of those "fancy" cutting devices. Apparently this one from Ultimation - a Canadian company - is the bee's knees.

View attachment 314826
It's very pricey but apparently it offers extreme precision. I was told about this by Mike Shanks who, in turn, was told about it by @Dematosdg Daniel.

Here is their website: https://ultimation.ca/

BUT and this is the big BUT: Apart from the price, it means something else that has to be left behind. To justify its costs to the Admiral will be difficult - even for me. :)
Heinrich, I have one of these cutters and I love it. It does make very precise cuts. I breezes right through Walnut and should do the same for your Oak. I did write about it in What’s new in the workshop.
 
Heinrich, I have one of these cutters and I love it. It does make very precise cuts. I breezes right through Walnut and should do the same for your Oak. I did write about it in What’s new in the workshop.
That's great Ron - thank you for that. This provides me with the right kind of ammunition when it comes to the restaurant! I will take a look at your write-up Ron. :D
 
That's great Ron - thank you for that. This provides me with the right kind of ammunition when it comes to the restaurant! I will take a look at your write-up Ron. :D
When I ordered mine I ordered a spare set of blades and a spare cutting pad. Didn’t realize it came with a spare set so I should be set for awhile. :) The largest I’ve cut is 2x6 mm without an issue. The blade has a bevel on one side only so the cut is very crisp. Their video shows that on heavier stock there is the possibility of a slight compression of the material on the bevel side. As yet I have not noticed it. If it’s an issue it can be overcome by flipping the stock and take a small slice off the stock then you’re good to go. Larger material cuts I use my Byrnes saw. I bought this for planking, decking etc.
This thing is very rigid and there is no need to clamp it to a table. Due to the position of the pivot point there is a slight slicing action to the cut rather than just cutting straight down which enhances cut. Shipphotographer has a video of this on YouTube.
 
Great stuff Ron. The thickest planks I will cut is 2mm x 3mm so I doubt whether it will present any problem. It is funny that you should mention the one-sided beveling of the blades. As you may or may not know, I am also a knife aficionado. Since a very long time ago Ernest Emerson of Emerson Knives has built his CQC-7 (Close-Quarters Combat) with the blade only sharpened on one side which results in a chisel-cut. This design has obviously had its detractors, but hard knife-users have always maintained that this is the best configuration.
 
Hello Dear Friends

This was just a superb weekend - the admiral relaxing on the couch and me building without interruptions. First on the agenda and Number #1 Priority were those two mastheads.

You may recall that my first effort ended up like this.

View attachment 314704
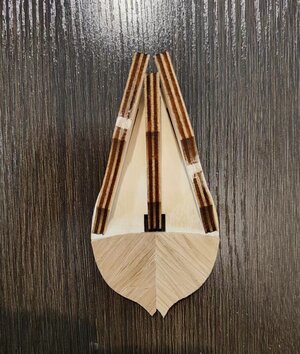
It is so simple to do. The stanchions simply need to be glued into the notches of the ring and then locked into position by the notches of the floor at the bottom. Of course, in the real world, it doesn't quite work this way. The alignment of the stanchions is a challenge they do not keep their positions and when wiggled to fit into the notches of the floor, they slip out of the top ring. The floor is also fragile and has to be treated with care - clearly more care than I gave this one.

View attachment 314705
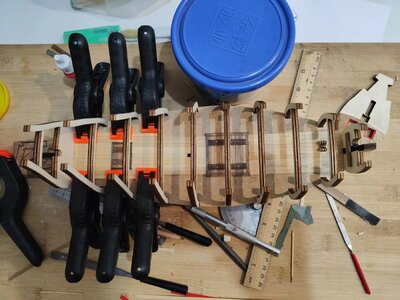
So, my method was to glue 4 stanchions opposite to one another, wait for the glue to dry sufficiently that they were more or less secure and then add the floor dry-fit only. Then I would leave it like that until the glue has dried completely, remove the floor, glue in the next two stanchions and repeat the process. With 12 stanchions on each masthead, you can imagine it took some time.

Eventually though, all succeeded.

View attachment 314706
The Floor section. That is how I like things to fit. Thumbsup (By the way - this was attempt #3 - you will soon se why.

View attachment 314721
View from the top! PLEASE NOTE! The mastheads get placed on the cross trees with the holes on the sides. The floor has to be positioned so that the laser-etched floor planking runs lengthwise ! Yep, you guessed it ... that was where H's second attempt went. ROTF

View attachment 314722
Mast heads just lying loosely on the cross-trees which also still need to be finished off.

View attachment 314726
The main masthead on the ship.

And then - of course!

View attachment 314723

The idea is most certainly not to duplicate the build report of WB #1 - but to indicate the differences between the two builds and to focus on the modified parts. Like all Kolderstok kits, the frames and Deck A went together with the minimum effort. I did pay 1000% attention to making sure that the tops of the frames were absolutely level with the top of the false keel - to that end I just had to remove the char from the notches in Frames # 4, 5 and 6.

View attachment 314724
Obviously, I was curious to see how the oak would look in real life and on the ship, so I assembled the larger of the two hatches (the front one) for Deck A.

View attachment 314725

Now with that, dear friends, I am extremely happy. I have bordered the 1.5mm x 6mm oak strips with 2mm x 3mm walnut strips, while the two cross beams were made from 1.5mm x 6mm walnut as well. In my opinion, what I have is a real workmanlike-look which was exactly the idea, The coarse grain of the oak shows up beautifully and is nicely contrasted by the walnut.

So, what I have discovered so far about oak? The edge alignment with an adjacent plank is extremely good - seamless in fact. I am also very happy with the tone. And the downside? It treats X-Acto blades with disdain. Cutting out gunports is no doubt going to expand my vocabulary considerably! ROTF

View attachment 314727
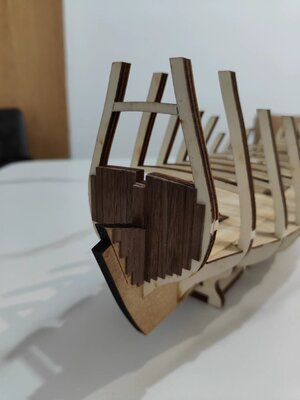
I have also made a start planking the stern. This time I made doubly sure that I used the 1mm planks instead of the 1.5mm ones.

View attachment 314728

And in closing, I thought I would end with a family picture!

Until next time dear friends - stay safe, love your cherished ones and enjoy your model building!
A bit late, but nice the Oak WB has arrived and you started with the building. Looking forward to the changes you will make.
Regards, Peter
 
A bit late, but nice the Oak WB has arrived and you started with the building. Looking forward to the changes you will make.
Regards, Peter
Thank you, Peter. This one I will take slowly as there is plenty of thinking and planning involved.
 
Great stuff Ron. The thickest planks I will cut is 2mm x 3mm so I doubt whether it will present any problem. It is funny that you should mention the one-sided beveling of the blades. As you may or may not know, I am also a knife aficionado. Since a very long time ago Ernest Emerson of Emerson Knives has built his CQC-7 (Close-Quarters Combat) with the blade only sharpened on one side which results in a chisel-cut. This design has obviously had its detractors, but hard knife-users have always maintained that this is the best configuration.
I’m more of a Karambit kind of guy.
 
Hello Dear Friends

I am still alive, still kicking and the WB is still the #1 priority :) ! If all goes well, I will hopefully be able to show a picture or two this weekend. This week is the last school week before the two months' long summer holiday so you can imagine that most of my time is spent marking scripts and compiling marks.

微信图片_20220626160153.jpg
 
Hello Dear Friends

I am still alive, still kicking and the WB is still the #1 priority :) ! If all goes well, I will hopefully be able to show a picture or two this weekend. This week is the last school week before the two months' long summer holiday so you can imagine that most of my time is spent marking scripts and compiling marks.

View attachment 315756
”DEJA VU”. I think I‘ve seen this step before.
 
”DEJA VU”. I think I‘ve seen this step before.
For sure. Once the transom is ready though, things will change. If you look carefully (it is half-hidden in the pic) you will see that I have cut out the gunports in the stern and this one will get cannons. So, I will have to devise a proper false deck there and then start thinking seriously about the build-up of the captain's cabin whilst things are still accessible. The cabin also goes between bulkheads #10 and 11 so things will get mighty cramped and busy there.
 
Hello Dear Friends

I am still alive, still kicking and the WB is still the #1 priority :) ! If all goes well, I will hopefully be able to show a picture or two this weekend. This week is the last school week before the two months' long summer holiday so you can imagine that most of my time is spent marking scripts and compiling marks.

View attachment 315756
It looks like the Abachi decking strips will complement the surrounding oak very nicely.
 
This is looking great Heinrich, this was the easy way to cut your gunports out i think?? :) :)
Hello Peter. Yes, this was easy part - except it wasn't easy. The oak seems to be brittle right on the edges, so you have to be very careful with splintering. Having said that, I think we are on for some amazing textures and tones.
 
It looks like the Abachi decking strips will complement the surrounding oak very nicely.
Hi Daniel. Yes, the Abachi will go very well with the oak. It won't be offset so sharply as with the walnut, so I will have to think carefully of how and where to use the walnut for maximum effect as the Abachi and Oak are in the same color palate range.
 
Hello Everyone

Let me show you what I have been up to. After the hull frame had been assembled, I started with planking the deck (picture in my last posting). However, I wanted to knuckle down and start with some of the nitty-gritty of the build.

微信图片_20220623195432.jpg

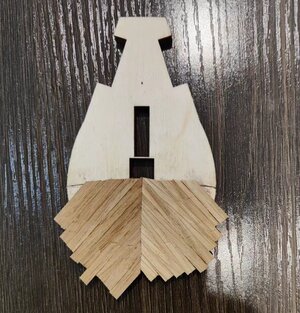
I started planking the lower part of the transom which is done at an angle of 45 degrees - exactly the same as on the previous build. I include tis picture for two reasons - first to show everyone what the oak looks like and secondly to show you the marks that the clamps made on the wood. Lesson learnt - I probably had the same marks on the walnut as well, but because of the much darker wood, it is far less visible. Seeing that I clamp and pin my strakes aggressively during planking, this is something that I will have to make a mental note of.

微信图片_20220626160029.jpg
This part finished and with some light sanding the marks are starting to disappear. However, I will tell you a trick a bit later. For me it is quite a culture shock to work with such light-colored wood as opposed to the dark walnut.

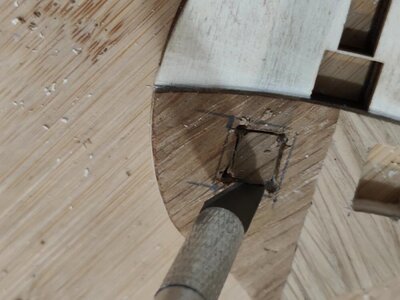
Before I cut out the gunports, I first went back to the hull structure and planked the rear of bulkhead #10 and that section of the false keel that would be directly visible behind the gunports.

微信图片_20220629192356.jpg
On WB #1 I painted this section black, which is fine, but now I wanted more. I did not just want to look into an abyss - this time I wanted a realistic wooden color and individual planks to be visible when looking through the gunports.

微信图片_20220629192416.jpg
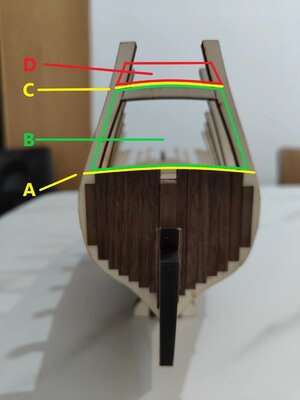
This also allows me the opportunity of showing you clearly what needs to be done with me changing the build to @Ab Hoving Ab's layout. A indicates the position of the next deck to be installed only much later. B shows the area which has to be built up with individual strakes planked vertically. The front side of this (when viewed from the bow) will form the front wall of the captain's cabin with two access doors. C indicates the next deck while D is the section that has to be built up above the top deck. How high this section exactly needs to protrude above the deck, is a challenge for another day.

微信图片_20220629192927.jpg
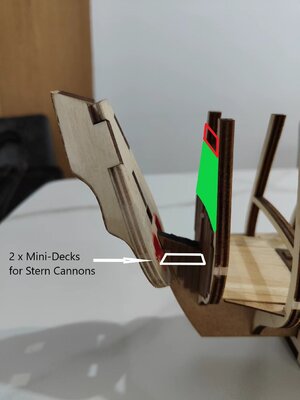
Whilst I am focusing on this part, I would also have to install two mini-decks for the two stern cannons to stand on. Again, the green and red sections indicate where the build-up of the front wall of the captain's cabin will be.

微信图片_20220626160146.jpg

Then came that part of the build for which I am never fully prepared. I am confident when doing this, but oh boy, just one slip and it's a case of ordering another transom from the Netherlands.

微信图片_20220629192409.jpg
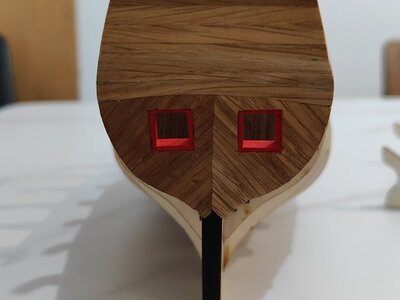
All went well however, and this then is the effect which I wanted to achieve by planking behind bulkhead #11 (the transom). With more light the wood paneling is clearly visible, and I just think that it gives a far neater, more finished effect than simply painting it black.

微信图片_20220629192349.jpg

And with that done, the transom was glued onto the hull and wiped with a layer of shellac. And the trick? ... you all know the old PVA mixed with sawdust solution for filling up little gaps or irregularities - well, shellac and sawdust works even better!

And that is where I am tonight. On the Dutch site builders regularly refer to the "uitstraling" of oak. Translated, it means "radiance" - and tonight, I must say, I am beginning to understand what they mean. You will also notice that I have not yet cut out the opening for the rudder in the transom. On this build I will do that only much later when I am actually installing the rudder as I can then use a much smaller/custom-made opening instead of the generic one which I think is too big for the WB.
 
Back
Top