-

Win a Free Custom Engraved Brass Coin!!!
As a way to introduce our brass coins to the community, we will raffle off a free coin during the month of August. Follow link ABOVE for instructions for entering.
-

PRE-ORDER SHIPS IN SCALE TODAY!
The beloved Ships in Scale Magazine is back and charting a new course for 2026!
Discover new skills, new techniques, and new inspirations in every issue.
NOTE THAT OUR FIRST ISSUE WILL BE JAN/FEB 2026
You are using an out of date browser. It may not display this or other websites correctly.
You should upgrade or use an alternative browser.
You should upgrade or use an alternative browser.
HIGH HOPES, WILD MEN AND THE DEVIL’S JAW - Willem Barentsz Kolderstok 1:50
- Joined
- Jan 9, 2020
- Messages
- 10,566
- Points
- 938

Oh yes Jan. There are several adjustments but none of which you need to worry about. Those adjustments have been purposely put there to widen the hull at the bow and make it rounder. The ones on the Port side were already removed, that is why you only see them on the SB side. This was why laying down these planks took such a long time.
I look forward to: “That was the whole idea from the start - I will elaborate on this feature in detail in some future postings.” 
- Joined
- Jan 9, 2020
- Messages
- 10,566
- Points
- 938

Piet Says; Well repaired, H. I was confident that it would turn out well.Prachtig hersteld Heinrich, ik had er alle vertrouwen in dat het goed ging komen...
Bedankt Piet! Ik ben ook tevrede met de reparaties. Ik is zeer blij dat ik gelijk uitgekomt hebt bij de boeg - dit behoort dinge makkelijker te maakt.
Thank you Piet. I am satisfied with the repairs. I am very happy that both sides of the bulwarks are the same height at the bow. This should make things easier.
- Joined
- Jan 9, 2020
- Messages
- 10,566
- Points
- 938

Hello Friends
This is an extremely busy and PRODUCTIVE day in the Lincoln Shipyard.
Yesterday I mentioned that I am creating a rounder bow and wider ship compared to WB #2.
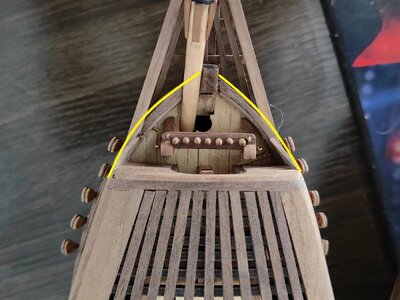
Here it is obvious that WB #1 has a very pointed bow where the curves follow a relatively "straight" line to the bow. This was intended as I wanted to move the bulwarks as close as possible to ensure that my roof beams for the front canopy (overkapping) was long enough. This had other complications though, as my front deck area was so small that installing the braadspit/winch there, was no option. I was forced to take the option as offered by De Weerdt and whilst I still prefer De Weerdt's option of placing the winch at the rear entrance of the front canopy, I do not like being painted into a corner and thus not having one more than option.
However, if we take a look at the bow as drawn by Hoving/Kolderstok and De Weerdt, we see a much rounder bow.
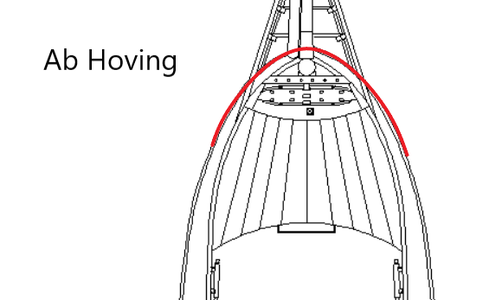
Kolderstok's drawing are basically identical to that of @Ab Hoving Ab Hoving's, so I did not post a separate picture of that.
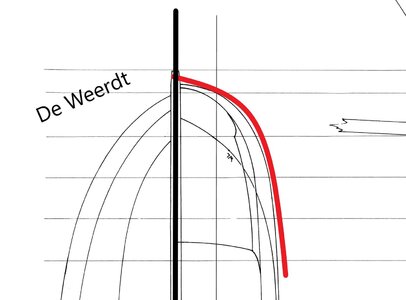
I have drawn the red line on the outside of the real line, but is gives a very good indication that De Weerdt's interpretation is even rounder and wider.
The result of all this is obvious for all see:
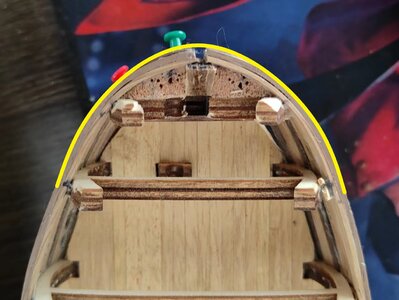
A markedly different bow on WB #2 compared to #1.
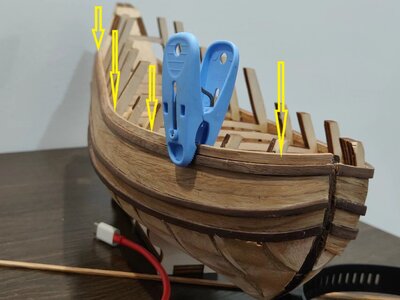
The building method I use for this section is another homegrown "invention". Seeing that the strake does not touch 5 of the bulkheads, it is only edge-glued there. Pins are used to provide downward pressure onto the existing strake (so that the glue has time to start curing). After half an hour or so, the pins are removed, and my heavy clamps are used. They serve a dual purpose. On the one hand the obviously secure the newly laid strake to the previous one, but they are also instrumental in shaping the line and curvature of the hull. You can imagine that this is "adventurous" to say the least but seeing that the bulkheads are cut away and removed once the deck is installed, they are - in effect - only edge-glued by design.
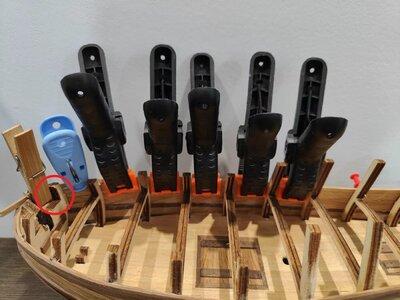
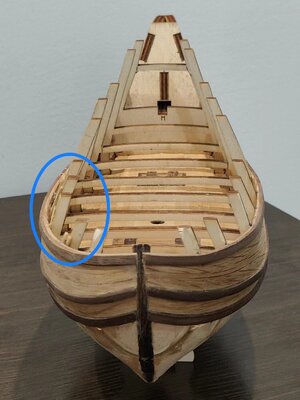
Apart from Bulkhead #1 (encircled in red) the newly laid plank is held in position and in line by the clamps. The strake is thus not pinned to the next five bulkheads (there is actually a pin behind the clamp on the far right). It continues in this vein until Bulkhead #8 when the pins take over again and the strake is fully pinned to the bulkheads. This is a nerve-racking exercise not to be attempted by less experienced builders as I rely entirely on my eye for the hull curvature. By the way this is the second last strake above the wales on the Starboard side.
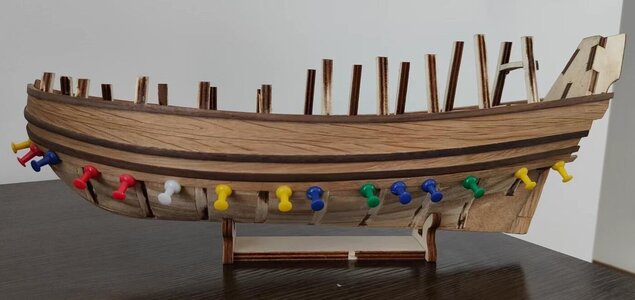
I have also laid down two strakes (this picture shows the first) below the wales on the Port Side. The advantage of the boxed hull which now allows for the entire length of the plank to be glued and pinned, is obvious.
Hold thumbs for the next three hours and then we will see how that strake looks on the Starboard side.
This is an extremely busy and PRODUCTIVE day in the Lincoln Shipyard.
Yesterday I mentioned that I am creating a rounder bow and wider ship compared to WB #2.

Here it is obvious that WB #1 has a very pointed bow where the curves follow a relatively "straight" line to the bow. This was intended as I wanted to move the bulwarks as close as possible to ensure that my roof beams for the front canopy (overkapping) was long enough. This had other complications though, as my front deck area was so small that installing the braadspit/winch there, was no option. I was forced to take the option as offered by De Weerdt and whilst I still prefer De Weerdt's option of placing the winch at the rear entrance of the front canopy, I do not like being painted into a corner and thus not having one more than option.
However, if we take a look at the bow as drawn by Hoving/Kolderstok and De Weerdt, we see a much rounder bow.

Kolderstok's drawing are basically identical to that of @Ab Hoving Ab Hoving's, so I did not post a separate picture of that.

I have drawn the red line on the outside of the real line, but is gives a very good indication that De Weerdt's interpretation is even rounder and wider.
The result of all this is obvious for all see:

A markedly different bow on WB #2 compared to #1.
The building method I use for this section is another homegrown "invention". Seeing that the strake does not touch 5 of the bulkheads, it is only edge-glued there. Pins are used to provide downward pressure onto the existing strake (so that the glue has time to start curing). After half an hour or so, the pins are removed, and my heavy clamps are used. They serve a dual purpose. On the one hand the obviously secure the newly laid strake to the previous one, but they are also instrumental in shaping the line and curvature of the hull. You can imagine that this is "adventurous" to say the least but seeing that the bulkheads are cut away and removed once the deck is installed, they are - in effect - only edge-glued by design.

Apart from Bulkhead #1 (encircled in red) the newly laid plank is held in position and in line by the clamps. The strake is thus not pinned to the next five bulkheads (there is actually a pin behind the clamp on the far right). It continues in this vein until Bulkhead #8 when the pins take over again and the strake is fully pinned to the bulkheads. This is a nerve-racking exercise not to be attempted by less experienced builders as I rely entirely on my eye for the hull curvature. By the way this is the second last strake above the wales on the Starboard side.

I have also laid down two strakes (this picture shows the first) below the wales on the Port Side. The advantage of the boxed hull which now allows for the entire length of the plank to be glued and pinned, is obvious.
Hold thumbs for the next three hours and then we will see how that strake looks on the Starboard side.
Oh my, Oh my. You are indeed a pioneer. But a vision is a vision and turning it into reality creates a masterpiece. 

- Joined
- Jan 9, 2020
- Messages
- 10,566
- Points
- 938

Jan, it is so difficult. I have three interpretations to follow - Hoving, De Weerdt and Kolderstok. Factually, I still believe Ab's come the closest, but even then, his is only an interpretation - and Ab being the true realist - will be the first to tell you so. That is why I have decided to rely heavily on De Veer's original drawings. He may not always have had his facts straight, but his drawings were superb. And what those drawings do better than any plan is to give you a sense of PROPORTION.Oh my, Oh my. You are indeed a pioneer. But a vision is a vision and turning it into reality creates a masterpiece.
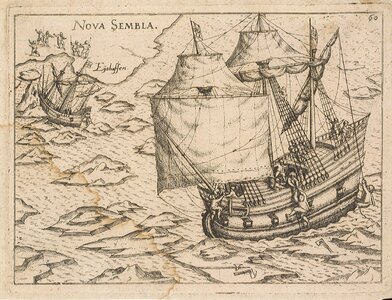
This drawing of De Weerdt has always been my favorite one and with my build I am now trying to emulate this sense of proportion. I have maintained the sharp, upwards curve of the wales but at the same time I am trying to create that bulbous, stocky look that I like so much of this picture. That is the vision - only time will tell if i am going to be successful or not.
I love the strake construction technique Heinrich. I'm sure you have mentioned this before, but I don't recall, do you soak or apply heat to any of the oak or walnut strakes prior to installation?Hello Friends
This is an extremely busy and PRODUCTIVE day in the Lincoln Shipyard.
Yesterday I mentioned that I am creating a rounder bow and wider ship compared to WB #2.
View attachment 319791
Here it is obvious that WB #1 has a very pointed bow where the curves follow a relatively "straight" line to the bow. This was intended as I wanted to move the bulwarks as close as possible to ensure that my roof beams for the front canopy (overkapping) was long enough. This had other complications though, as my front deck area was so small that installing the braadspit/winch there, was no option. I was forced to take the option as offered by De Weerdt and whilst I still prefer De Weerdt's option of placing the winch at the rear entrance of the front canopy, I do not like being painted into a corner and thus not having one more than option.
However, if we take a look at the bow as drawn by Hoving/Kolderstok and De Weerdt, we see a much rounder bow.
View attachment 319793
Kolderstok's drawing are basically identical to that of @Ab Hoving Ab Hoving's, so I did not post a separate picture of that.
View attachment 319794
I have drawn the red line on the outside of the real line, but is gives a very good indication that De Weerdt's interpretation is even rounder and wider.
The result of all this is obvious for all see:
View attachment 319792
A markedly different bow on WB #2 compared to #1.
The building method I use for this section is another homegrown "invention". Seeing that the strake does not touch 5 of the bulkheads, it is only edge-glued there. Pins are used to provide downward pressure onto the existing strake (so that the glue has time to start curing). After half an hour or so, the pins are removed, and my heavy clamps are used. They serve a dual purpose. On the one hand the obviously secure the newly laid strake to the previous one, but they are also instrumental in shaping the line and curvature of the hull. You can imagine that this is "adventurous" to say the least but seeing that the bulkheads are cut away and removed once the deck is installed, they are - in effect - only edge-glued by design.
View attachment 319795
Apart from Bulkhead #1 (encircled in red) the newly laid plank is held in position and in line by the clamps. The strake is thus not pinned to the next five bulkheads (there is actually a pin behind the clamp on the far right). It continues in this vein until Bulkhead #8 when the pins take over again and the strake is fully pinned to the bulkheads. This is a nerve-racking exercise not to be attempted by less experienced builders as I rely entirely on my eye for the hull curvature. By the way this is the second last strake above the wales on the Starboard side.
View attachment 319796
I have also laid down two strakes (this picture shows the first) below the wales on the Port Side. The advantage of the boxed hull which now allows for the entire length of the plank to be glued and pinned, is obvious.
Hold thumbs for the next three hours and then we will see how that strake looks on the Starboard side.
- Joined
- Jan 9, 2020
- Messages
- 10,566
- Points
- 938

@Daniel20 Oh yes, Daniel! They get soaked for about 15 minutes in hot water and then bent into shape with the plank bender. Then I re-wet the whole plan and glue it wet onto the ship. Leave it for three hours for glue to dry and voila! So far, I have not yet broken an oak strake (touch wood  ) which is apparently quite a rarity. The reason I glue the plank wet onto the ship, is because of the spring back of the oak. If I clamp the plank until it is dry and then remove the pins or clamps, it does not hold its shape.
 ) which is apparently quite a rarity. The reason I glue the plank wet onto the ship, is because of the spring back of the oak. If I clamp the plank until it is dry and then remove the pins or clamps, it does not hold its shape.
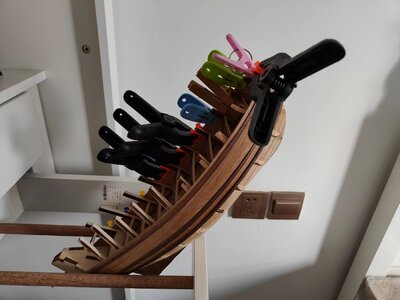
What an interesting looking drawer, it looks like you can hang stuff from it. You must have your ship wedged in there otherwise it looks like it could slip and fall out.
- Joined
- Jan 9, 2020
- Messages
- 10,566
- Points
- 938

It's a trouser drawer Daniel - something I discovered courtesy of the Admiral. The ship is just loosely placed between the spars - the stern fits nicely between them and at the front the front panel of the drawer keeps it moving. The weight of the clamps "locks" it in place. Definitely not what it was intended for, but it works well to serve the purpose  .
.
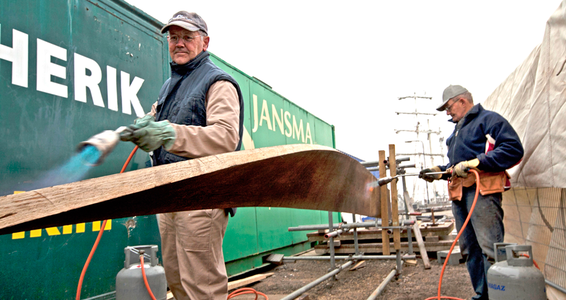
A blowtorch can solve many problems  .
.
 .
.Especially on pesky tight stern bends, or when your just fed up with the whole thingA blowtorch can solve many problems.


- Joined
- Jan 9, 2020
- Messages
- 10,566
- Points
- 938

I agree - and now working with oak, I can understand perfectly why those are needed on the 1:1 ship.A blowtorch can solve many problems.
- Joined
- Jan 9, 2020
- Messages
- 10,566
- Points
- 938

Funny enough the ordinary bending of planks - even tight ones - is not a problem. It is the vertical bending to conform to that sway, that the oak simply refuses to do unless treated with a very stern hand.Especially on pesky tight stern bends, or when your just fed up with the whole thing

Yes indeed, I’ve contemplated that myself many times.Especially on pesky tight stern bends, or when your just fed up with the whole thing

- Joined
- Jan 9, 2020
- Messages
- 10,566
- Points
- 938

Good morning dear friends.
The first-level planking on the Port Side has been completed.
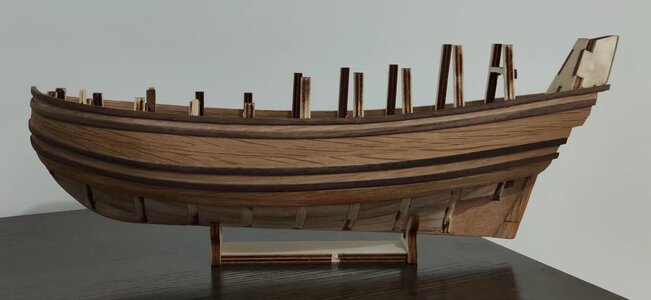
With that I am well pleased. Now there is one more plank to go on the Starboard Side to create the correct height and then double it into the next "false wale" as per @Ab Hoving Ab's plans. I must tell you that the more I get into this build and am beginning to understand the mechanicals of it all, the more impressed I am with Ab's knowledge and plans. In a next life, I would really like to build a POF model completely based on Ab's plans.
The first-level planking on the Port Side has been completed.

With that I am well pleased. Now there is one more plank to go on the Starboard Side to create the correct height and then double it into the next "false wale" as per @Ab Hoving Ab's plans. I must tell you that the more I get into this build and am beginning to understand the mechanicals of it all, the more impressed I am with Ab's knowledge and plans. In a next life, I would really like to build a POF model completely based on Ab's plans.

