• LUCZORAMA SHIPWRECK SCAVENGER HUNT GIVEAWAY. 4 Weeks of Fun • 1 Legendary Prize ((OcCre’s Fram Ship)) • Global Crew Welcome!
    **VIEW THREAD HERE**

HIGH HOPES, WILD MEN AND THE DEVIL’S JAW - Willem Barentsz Kolderstok 1:50

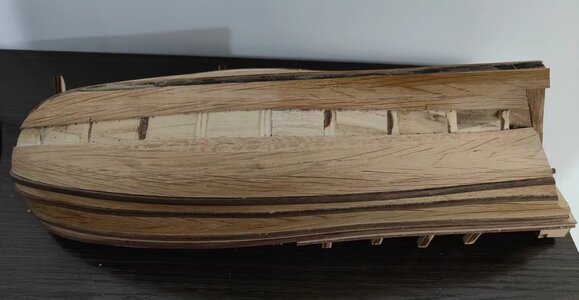
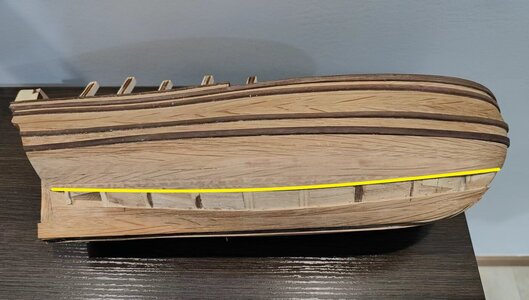
Paul there is a pretty fixed way of fitting the garboard strakes on these ships, so the garboard strake is pretty much in line.
Garboard Strake 2 (1).jpg

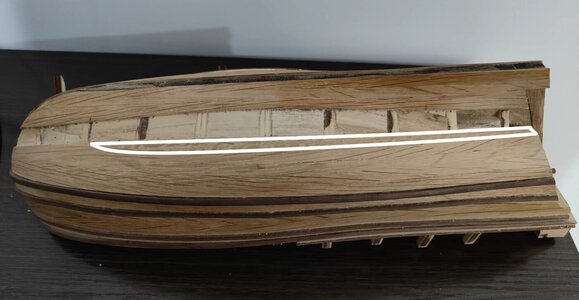
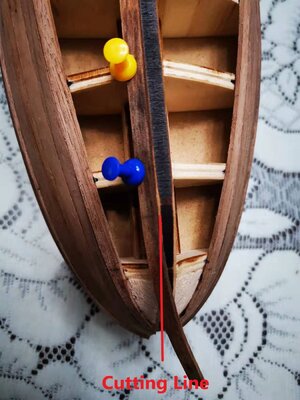
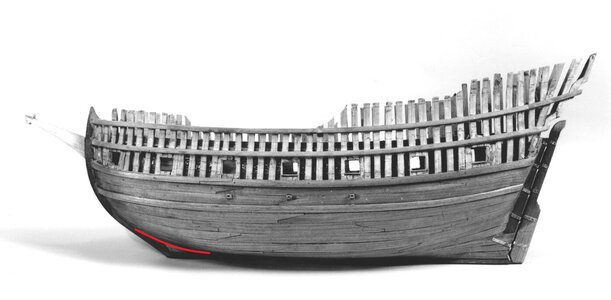
The red line is the cutting line where the garboard strake crosses the false keel. The way of installing the garboard strake is by cutting off the part that overlaps the keel and then simply fix it in its natural spot. So, the garboard strake will always lie halfway between the first bulkhead and the tip of the stem. Remember, I have to have that sharp upwards curve to keep it in line with De Veer's drawings and Ab's plans.
Barents-03.jpg
You can see that the gradient of the upwards curve is basically the same as on my model.

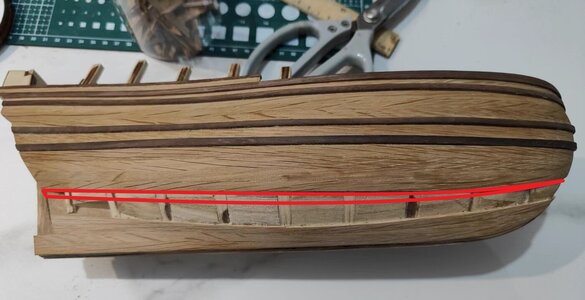
The challenge is caused by the sheer of the hull so on my next plank, I can try something like this by tapering it quite aggressively on both ends. A more radical solution will simply be to run a lost strake there - I don't know yet. I never plan these things too much, so we will see what the morning brings! ROTF
微信图片_20220804211937.jpg

Thank you so much for asking these questions necessitating me to revisit the issue. That is why I say that this log is my think tank in collaboration with my wonderful friends. The fact that they are also incredible modelers is a bonus! :D
 
Beautiful strake joinery Heinrich. I didn't spot the keel insert and still have a hard time spotting it after you pointed it out. I am amazed that you don't have to bevel the strakes, WOW really nice job!
Thank you so much Daniel - I really appreciate your very kind comments. But I have to confess, like I had to confess to @dockattner Paul as well. Because the filler blocks provide such a flat surface on which to plank, I HAVE to bevel the planks below the wales. :D If there were no filler blocks, I would simply have clamped the new plank to the previous laid-down ones where they are edge-glued and not beveled the planks. (Picture below)

微信图片_20211217124405.jpg
This is WB#1 without any filler blocks thus the planks are also edge-clamped.

On WB#2 though, I have to bevel the planks below the wales as I cannot edge-clamp them. I Hope this makes sense!
 
Hello Everyone.

There is not a huge amount of progress to report, but like I said to @shota70 Shota - "slowly, but surely..."


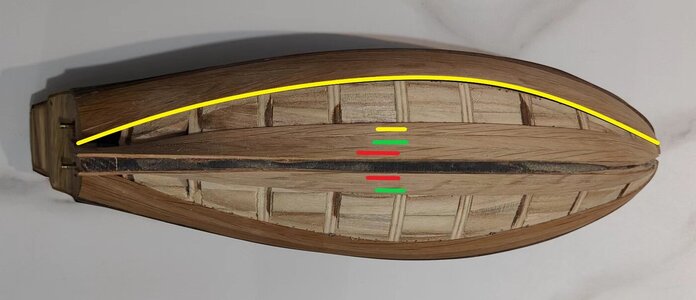
On both sides, the garboard strakes (red) have been laid down as well as their immediate neighbors (green). On the Starboard Side an insert and a third plank (yellow) has also been installed.


Spot the insert! ROTF Getting it to fit like that, took many attempts and at least two hours of finishing.


The position of the insert and the following plank.


Starboard Side: Overview

In closing I want to thank each one of you for following along, and for your tremendous support, your motivating comments and critique where warranted. This is what makes this a truly special build log and what spurs me on to try my best. It is sincerely appreciated. Thank You!
Planking master for sure. It is coming along very well indeed Heinrich. Slow but sure is the name of the game with planking it seems, and delivers the results that we are seeing here, well done Thumbsup
 
Planking master for sure. It is coming along very well indeed Heinrich. Slow but sure is the name of the game with planking it seems, and delivers the results that we are seeing here, well done Thumbsup
You are so right Mark - you cannot hurry this process. I am in the fortunate position that @Kolderstok Hans has supplied me with extra wood for this build, so I may even try out different options (dry-fitted of course) on the best way of closing up the hull.
 
Dear Friends

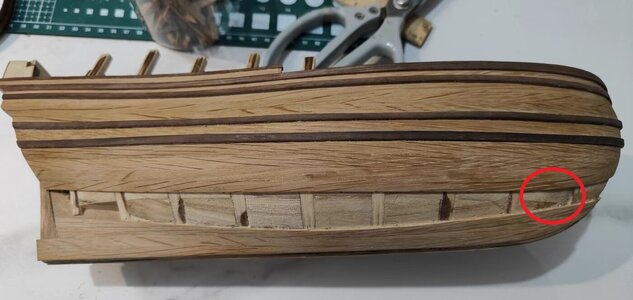
Last night @dockattner Paul made a very valid observation that there seemed to be a "choking" or "pinching" point in the way that that the strakes run toward the bow. I was very well aware of this - having experienced the same issue on WB #1.

微信图片_20220805201857.jpg
The red circle indicates the "choking" point I was referring to.

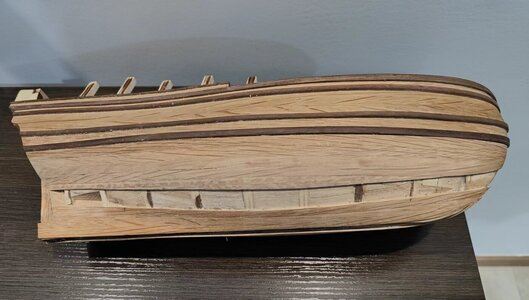
Tonight, it looks like this.

微信图片_20220805201838.jpg
My solution was to lay two dropped strakes - the second which is "lost" both towards the bow and the stern! I still have to make it pretty with some sanding, but as a first fit, I am very happy. You will see that the choking point has all but disappeared.

微信图片_20220805201916.jpg

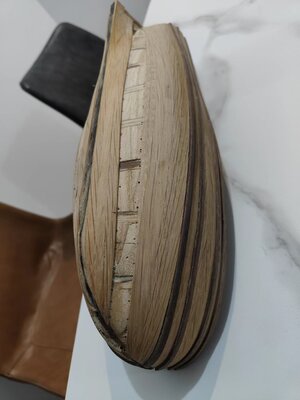
From the front you can see that the strakes are now symmetrical at the bow and no longer irregular.

The solution:

微信图片_20220805201831.jpg
The dropped strake which is "lost" at both ends. Mt caliper is not sensitive enough to measure the thickness at the ends. :eek: Who needs a Proxxon or Byrnes? ROTF
 
Good observation by Paul with a clever solution by you. Nice fix, I had trouble seeing the dropped strakes. Is this now a new term in shipbuilding - “a double pointed stealer” ROTF.
Hi Roger. You are absolutely right about @dockattner Paul's observation abilities. That is why he is one of my two artistic directors - that is what I expect of him! ROTF (Now, he's going to complain about his salary again!) As I said, I encountered the same issue on WB #1, so it did not come as a surprise. I think my solution is much "cleaner" this time around though. When the hull is fully closed, I promise you the lost strakes will be invisible.

About the terminology - you are right! It can be called a double-pointed stealer - or a completely lost strake - much like the builder! ROTF
 
AS my boys would say "Way Cool". What a great work around, nicely done.
Thank you, Jan. I am trying to get my planks running as straight as possible. On WB #1 you will see that I had to resort to closing up the hull with one plank on either side laid down in two sections. I am trying to prevent this from happening here and from ending up with odd-shaped and sized planks at the end. If I am going to be successful, I will hopefully know by the end of the weekend.
 
Again a beautifull and excellent executed performance my friend, this looks stunning :) :)
Thank you, my dear friend. The nice thing about oak wood, is that it sands to a VERY smooth and even finish - better than the walnut.
 
With this planking of the WB going back and forward I feel utterly lost.
I thoroughly appreciate the level of effort which apparently goes into this planking project, but this whole discussion goes way over my head.
The only thing I am taking away from this blog is to stay clear of any shipmodel, remotely looking something like the WB...
Kudos Heinrich!
I apologize if you feel "lost" Johan. In essence, the planking of this particular ship (in oak) comes down to three things.

1. Planking the hull of a WB is a challenge because of the zeeg.
2. This challenge is compounded by the oak wood which is more "stug" to work with than the walnut.
3. As I have built the hull rounder and wider at the bow, I cannot follow the same methods and planking layout I used on WB #1.

Therefore, I thought I would pen down both layouts I used so that a prospective builder of this kit has two options that he can follow depending on his choice of wood or hull shape.
Hey Heinrich, absolutely no need to apologize, this has all to do with lacking experience and "een te klein denkraam", to paraphrase a term from Maarten Toonder.
"Een te klein denkraam" translates roughly into "to little braincapacity".
I think I can wrap my mind around the three points you mention, plus I dealt enough with compound double curvature to know how problematic working with extreme curvature can be.
Not so easy to follow is how you go about with sealers and inserts, especially since you appear to be following a tailor made "WB-process". More specific, the choking phenomenon really left me clueless.
Now, after having read the posts about five times, I might have an idea of what's going on but still, this planking project is something I consider to be one of the higher level ranking ones.
Thanks for your to-the-point summary.
All my pleasure my friend - and the one thing I know for sure is that there is no shortage of "brain capacity" on your behalf. The "choking" is very difficult to explain.

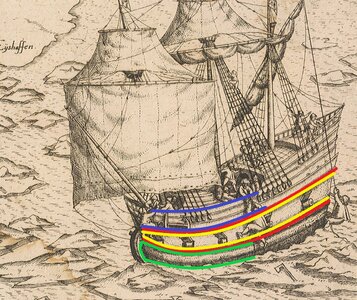
It is inherent to the shape of the hull as shown by the drawings of Gerrit de Veer. (Shown in yellow).

1977_65.jpg
微信图片_20220804211950.jpg
If the zeeg (yellow line) is left unattended, the planking will "choke up" at the bow in a way that it is almost impossible to close the hull satisfactorily.

By using "instekers" and "verlore gangen" I pull that zeeg much straighter - effectively reducing the effect of the "choking" and opening up the planking line at the bow.

微信图片_20220805201838.jpg

About each plank being custom-shaped - yes, they are! :)
 
All my pleasure my friend - and the one thing I know for sure is that there is no shortage of "brain capacity" on your behalf. The "choking" is very difficult to explain.

It is inherent to the shape of the hull as shown by the drawings of Gerrit de Veer. (Shown in yellow).

View attachment 321915
View attachment 321928
If the zeeg (yellow line) is left unattended, the planking will "choke up" at the bow in a way that it is almost impossible to close the hull satisfactorily.

By using "instekers" and "verlore gangen" I pull that zeeg much straighter - effectively reducing the effect of the "choking" and opening up the planking line at the bow.

View attachment 321929

About each plank being custom-shaped - yes, they are! :)
Good morning Heinrich. Played some catch up this morning with your log. Great tutorial my friend and you “owned it”. Cheers Grant
 
Back
Top