Brilliant Heinrich! She is going to be a beautiful little ship!
-

Win a Free Custom Engraved Brass Coin!!!
As a way to introduce our brass coins to the community, we will raffle off a free coin during the month of August. Follow link ABOVE for instructions for entering.
-

PRE-ORDER SHIPS IN SCALE TODAY!
The beloved Ships in Scale Magazine is back and charting a new course for 2026!
Discover new skills, new techniques, and new inspirations in every issue.
NOTE THAT OUR FIRST ISSUE WILL BE JAN/FEB 2026
You are using an out of date browser. It may not display this or other websites correctly.
You should upgrade or use an alternative browser.
You should upgrade or use an alternative browser.
HIGH HOPES, WILD MEN AND THE DEVIL’S JAW - Willem Barentsz Kolderstok 1:50
I cannot wait for the day that I can hit this walnut with Tung Oil though - I think it is really going to be all color! Now I still need to put down one plank on either side so that the transom is fully planked and then it's on to the garboard strakes.
That wood is beautiful now and will be gorgeous when hit with the oil.
- Joined
- Jan 9, 2020
- Messages
- 10,566
- Points
- 938

Brilliant Heinrich! She is going to be a beautiful little ship!
Thank you so much Paul. I really appreciate your generous comment - coming from someone who has such an artistic flair, it means a lot!
- Joined
- Jan 9, 2020
- Messages
- 10,566
- Points
- 938

Thank you Ron - it is much appreciated. That wood color is the reason why I love working with the Kolderstok walnut. I know that their oak is also beautiful, but I just prefer a darker hull color.That wood is beautiful now and will be gorgeous when hit with the oil.
That wood is gorgeous! And the planking is perfect so far! This going to be a beautiful ship.Hello Everyone. Work in the Nantong Shipyard continues unabated, but planking below the wales now, means that the going is S-L-O-W.
View attachment 277279
Even with the planks already laid down, it still sometimes requires a "re-adjustment". Here the push pins on the four bulkheads indicate that such an "adjustment" is in still in progress - hence no sanding at all on the portion below the wales.
View attachment 277278
The Port Side however, is up to QC and has been provisionally sanded. It is simply amazing to see what light does to the color of the wood. This picture was taken with the natural light coming from the bow's side.
View attachment 277280
But turning it so that the light squarely hits the side of the ship, creates this effect.
View attachment 277281
And when it is turned even more, this is what it looks like.
I cannot wait for the day that I can hit this walnut with Tung Oil though - I think it is really going to be all color! Now I still need to put down one plank on either side so that the transom is fully planked and then it's on to the garboard strakes.
- Joined
- Jan 9, 2020
- Messages
- 10,566
- Points
- 938

Thank you so much my friend. Obviously everything that I said to @dockattner Paul, about artistic flair and ability applies in equal measures to you as well and as such your words are highly appreciated! So far, I am very happy ... but you know how it goes ... with each plank that is laid down now, the pressure of maintaining that elusive "perfect" planking mounts. It's measure, cut, shape, fit, repeat and repeat - throw the plank away - and start all over ... sigh!That wood is gorgeous! And the planking is perfect so far! This going to be a beautiful ship.
Indeed, that makes two of us.
Ja
Too old to start another hobby?????? It is too late to stop now!!! RichHello Everyone. Work in the Nantong Shipyard continues unabated, but planking below the wales now, means that the going is S-L-O-W.
View attachment 277279
Even with the planks already laid down, it still sometimes requires a "re-adjustment". Here the push pins on the four bulkheads indicate that such an "adjustment" is in still in progress - hence no sanding at all on the portion below the wales.
View attachment 277278
The Port Side however, is up to QC and has been provisionally sanded. It is simply amazing to see what light does to the color of the wood. This picture was taken with the natural light coming from the bow's side.
View attachment 277280
But turning it so that the light squarely hits the side of the ship, creates this effect.
View attachment 277281
And when it is turned even more, this is what it looks like.
I cannot wait for the day that I can hit this walnut with Tung Oil though - I think it is really going to be all color! Now I still need to put down one plank on either side so that the transom is fully planked and then it's on to the garboard strakes.
Thank you! Despite any strengths I may have artistically, hull planking is a different art in wood working, that you can only learn by building ships. I have yet to perfect it, but I’m learning with every ship I build! My goal is a no putty single plank!Thank you so much my friend. Obviously everything that I said to @dockattner Paul, about artistic flair and ability applies in equal measures to you as well and as such your words are highly appreciated! So far, I am very happy ... but you know how it goes ... with each plank that is laid down now, the pressure of maintaining that elusive "perfect" planking mounts. It's measure, cut, shape, fit, repeat and repeat - throw the plank away - and start all over ... sigh!
I know you will succeed, hang in there!
- Joined
- Jan 9, 2020
- Messages
- 10,566
- Points
- 938

@Dean62 Thank you Dean! You are so right. Successful planking, in my opinion, depends on whether you can achieve a "feel" for the hull and visualize an overall hull line. And planking different ships obviously creates different challenges in each case. And with single planking, there is the constant reminder that there is actually no room for error.
With regards to goals or targets, I have identified three for myself:
1. Obviously no wood filler.
2. Full length strips - I just feel that it creates a smoother hull line overall.
3. Preferably no inserts - or if need be, not more than one or two.
However, I just had to concede defeat to my second target - that of full length strips. Luckily, I have managed to squeeze in on the underside of the hull, so it won't be visible.
With regards to goals or targets, I have identified three for myself:
1. Obviously no wood filler.
2. Full length strips - I just feel that it creates a smoother hull line overall.
3. Preferably no inserts - or if need be, not more than one or two.
However, I just had to concede defeat to my second target - that of full length strips.
Very nice again Heinrich, seems your kitchen will be clean before Christmas.
Wishing you and the family some wonderful days in these exciting days with moving houses etc.
Wishing you and the family some wonderful days in these exciting days with moving houses etc.
- Joined
- Jan 9, 2020
- Messages
- 10,566
- Points
- 938

Hello Maarten. Thank you very much for the kind words. I am not sure whether it will be clean before Christmas - the goal is to have the planking finished by New Year! Also thank you for the kind wishes re the moving that lies ahead. I wish you and your family a very blessed Christmas and a healthy 2022!Very nice again Heinrich, seems your kitchen will be clean before Christmas.
Wishing you and the family some wonderful days in these exciting days with moving houses etc.
- Joined
- Jan 9, 2020
- Messages
- 10,566
- Points
- 938

This is not an easy to post to make - in fact, it is probably one of the most difficult posts I have had to make in a long time.
Just yesterday, I did a motivational posting in @JDS73 Dirk's build log on how we sometimes have to take a step backwards to fix something that is not right or that we are not happy with. I also outlined my goals with regards to my planking earlier to @Dean62 Dean.
Well, just today (poetic justice or something ) I faced this exact same situation. This morning, I posted a picture of my hull on the starboard side with 4 push pins holding down the last plank that I had laid , saying an "adjustment" was in progress. That "adjustment" however, proved to be symptomatic of a much bigger problem.
My goal for the day was to lay down the last two planks (one on either side) that would see the transom fully planked.
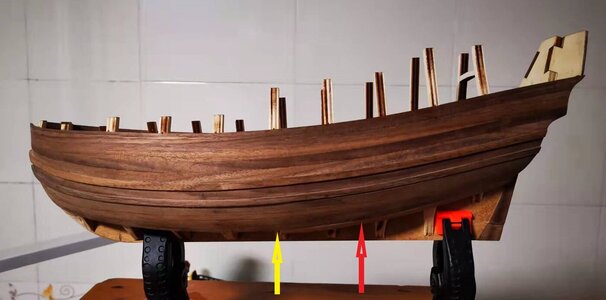
This was successfully done on the Port Side. This picture showing the latest status of the hull shows the last plank that was laid down (red arrow) today. You will also notice that I had to install this plank in two parts (the yellow arrow indicates where the rear section of the plank ends). This was necessitated by the fact that the curvature was too much for one strake. This is not an ideal situation, but as long as it is neatly done, I can live with it.
But when I started the same procedure on the starboard side, the penny dropped. Try as I might and calling on everything I have learned, I just could not get that plank to fit properly. And the problem???
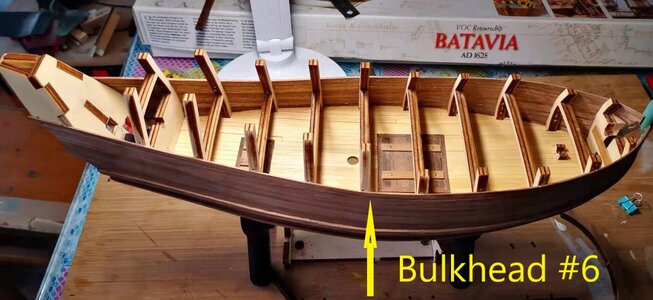
Bulkhead #6 which was not faired nearly enough. You will remember that I mentioned earlier that Bulkhead #6 is the widest point of the hull and is a potential danger - and so it proved to be. While planking around that curve, everything was still fine, but as the soon as the planks started sloping downwards and inwards, the problem reared its head.
What to do? STRIP or as we say in Dutch, SLOOP!!!
So in one day, the hull went from this in the morning:
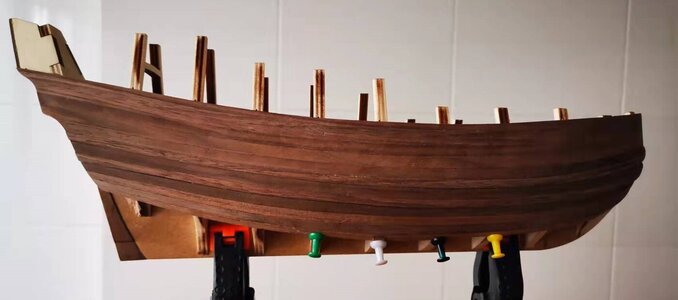
To this now:
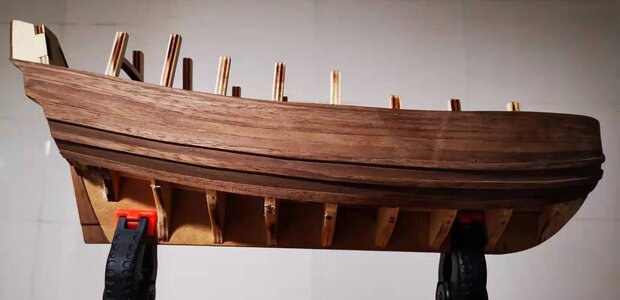
Obviously the starboard side is now soaking wet as I loosened the glue with very hot water, so there is no further work possible today.
So there you have it - the frustrations and bad days of model building. Tomorrow morning I am meeting one of my ex-colleagues in Starbucks for coffee and after that we will go to Pizza Hut for lunch - so it will be a real Western morning in China. After that, I will come back, regroup and start all over again.
Just yesterday, I did a motivational posting in @JDS73 Dirk's build log on how we sometimes have to take a step backwards to fix something that is not right or that we are not happy with. I also outlined my goals with regards to my planking earlier to @Dean62 Dean.
Well, just today (poetic justice or something
My goal for the day was to lay down the last two planks (one on either side) that would see the transom fully planked.

This was successfully done on the Port Side. This picture showing the latest status of the hull shows the last plank that was laid down (red arrow) today. You will also notice that I had to install this plank in two parts (the yellow arrow indicates where the rear section of the plank ends). This was necessitated by the fact that the curvature was too much for one strake. This is not an ideal situation, but as long as it is neatly done, I can live with it.
But when I started the same procedure on the starboard side, the penny dropped. Try as I might and calling on everything I have learned, I just could not get that plank to fit properly. And the problem???

Bulkhead #6 which was not faired nearly enough. You will remember that I mentioned earlier that Bulkhead #6 is the widest point of the hull and is a potential danger - and so it proved to be. While planking around that curve, everything was still fine, but as the soon as the planks started sloping downwards and inwards, the problem reared its head.
What to do? STRIP or as we say in Dutch, SLOOP!!!
So in one day, the hull went from this in the morning:

To this now:

Obviously the starboard side is now soaking wet as I loosened the glue with very hot water, so there is no further work possible today.
So there you have it - the frustrations and bad days of model building. Tomorrow morning I am meeting one of my ex-colleagues in Starbucks for coffee and after that we will go to Pizza Hut for lunch - so it will be a real Western morning in China.
Last edited:
Heinrich it is hard for me to tell from your pictures what the problem is, the wood is so beautifully grained it seems to mask your situation. I do understand walnut though and I imagine the grain fractured around the hard bend. You probably know this but incase not, someone mentioned a while back about using a womans curling iron as a heat source in plank bending. I can tell you it works absolutely fantastic for me when bending in the x;y plane. Quite often I don't even need to soak it. You have an exquisite hull planking going on and like you say I too am looking forward to the oil treatment.
Heinrich,
Take a step back a deep breath and enjoy your “Western” lunch. Things will look better. Unless of course you stuff yourself with too much pizza.
From what I see there is a definite bulge at #6
Ron
Take a step back a deep breath and enjoy your “Western” lunch. Things will look better. Unless of course you stuff yourself with too much pizza.
From what I see there is a definite bulge at #6
Ron
- Joined
- Jan 9, 2020
- Messages
- 10,566
- Points
- 938

Hi Daniel. I use my plank bender to bend the planks so breakages of planks around curves are not the problem. Because bulkhead #6 was not faired enough it creates large gaps as the plank travels from the preceding bulkheads to the following ones. So there is no mystery here - my fairing of Bulkhead #6 was up to ****. I don't even have excuses.Heinrich it is hard for me to tell from your pictures what the problem is, the wood is so beautifully grained it seems to mask your situation. I do understand walnut though and I imagine the grain fractured around the hard bend. You probably know this but incase not, someone mentioned a while back about using a womans curling iron as a heat source in plank bending. I can tell you it works absolutely fantastic for me when bending in the x;y plane. Quite often I don't even need to soak it. You have an exquisite hull planking going on and like you say I too am looking forward to the oil treatment.
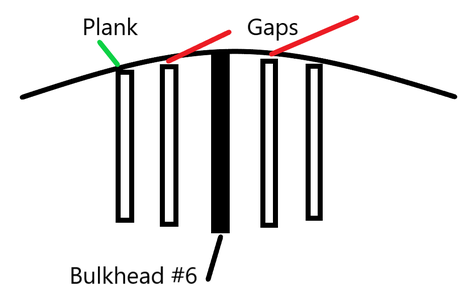
This demonstrates the problem. And as the planking moves lower down the hull, that gap becomes exponentially bigger.
- Joined
- Jan 9, 2020
- Messages
- 10,566
- Points
- 938

Luckily I am a small eater Ron, so too much pizza won't be a problem,Heinrich,
Take a step back a deep breath and enjoy your “Western” lunch. Things will look better. Unless of course you stuff yourself with too much pizza.
From what I see there is a definite bulge at #6
Ron
Rookie mistake maybe - but it takes a master to walk them back. Huzzah!
- Joined
- Jan 9, 2020
- Messages
- 10,566
- Points
- 938

Well, I hope I can walk them back Paul. For tonight though, that is that - the bulkheads are simply too wet to do anything.Rookie mistake maybe - but it takes a master to walk them back. Huzzah!
A rookie would say "That's good enough" A master would do what you are doing
Charcoal is easy, a diamond takes a little longer

Charcoal is easy, a diamond takes a little longer
Luckily I am a small eater Ron, so too much pizza won't be a problem,. I am not too perturbed by all of this, but I am frustrated and angry at myself for wasting three days and for making a real rookie mistake. Just unacceptable.


