HIGH HOPES, WILD MEN AND THE DEVIL’S JAW - Willem Barentsz Kolderstok 1:50

Dear Friends

Tonight, it was my turn at rigging the crows' feet on the bowsprit.

View attachment 351771

This step was accomplished after much consultation with @Kolderstok Hans to ensure that I get it right. As always, he was Mr Patient himself in explaining the process to me step by step.

Note on the instructions that the rope needs to be threaded not only from one side, but from both. You will see that there are five ropes entering from the starboard side and four from the port side. Also note the sequence that needs to be followed. Using this as the definitive parameter I can also safely say that very few of the models of the WB are rigged correctly as far as this goes - many builders either overlook or ignore this detail.

View attachment 351772
I am also extremely happy with the tension on the ropes.

View attachment 351773
One rope to go and then the standing rigging (sans the ratlines) is completed.
looks great!
 
Heinrich,

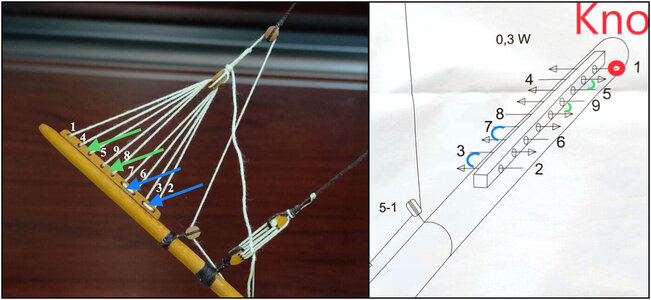
When looking at this little gem and in particular the crows' feet, I noticed that the drawing shows the crows' feet rope passing on the same side of the bow sprit to the next loop, a bit hard to see, but:
View attachment 352020
You, on the other hand, choose to swap sides: the first couple of loops pass on the starboard side of the bow sprit (green arrows), the aft two loops pass on the port side of the bow sprit (blue arrows):View attachment 352021

Is there any rationale behind this swapping sides?
Hoi Johan. I missed this post of yours - apologies!

I just love it when you ask questions like that - it shows just what a fine eye you have and how closely you look - that is something I appreciate very much. When you only look at the drawing on which you have indicated the blue arrows, it does indeed show the rope as you have described it. However, that is not the drawing that needs to be followed - I believe that is a more an artist's impression than anything else.

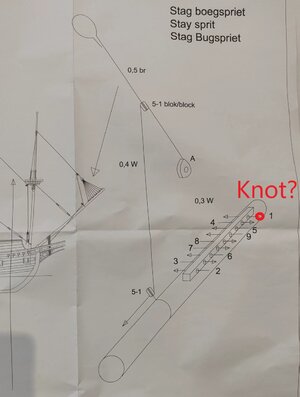
The drawing that needs to be followed is this one ...

微信图片_20230116093336.jpg

... in conjunction with this description:

A knot is made before the rope is entered through Hole 1 from the right-hand side.
The rope is led through Block A and entered through Hole 2 from the right side.
The rope enters Hole 3 from the left and goes up through Block A again.
It then enters Hole 4 from the left
and Hole 5 from the right before it is led through Block A again.
Next it passes through Hole 6 from the right
and Hole 7 from the left.
It then goes through Block A again
and enters Hole 8 from the left,
Hole 9 from the right and is then tied off above Block A.

If it gets done like this, it looks like mine - that is why I say I have not seen any other WB's crows' feet rigged this way and goes a long way towards explaining why mine look so good - no credit to me, but to @Kolderstok's instructions.
 
Hi, thank you for the warm welcome. Just wondering if this a Dutch ship?
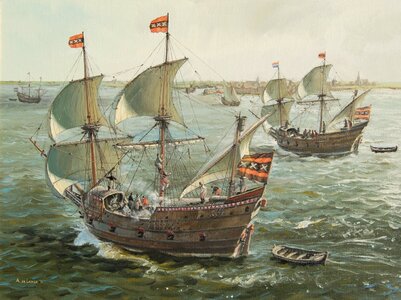
Yes, Jack. This is the expedition ship with which Dutch Explorer and Navigator, Willem Barentsz searched for a northern passage to China and India from Europe in 1596. In a nutshell, the men got stranded in pack-ice and decided to overwinter at Nova Zemlba by building a house using some [parts of the ship. After the winter they built a larger lifeboat from whatever they could find and were eventually rescued near the Kola peninsula. Ouyt of the original crew of 17 men, 12 made it back home. Among those who dies was Willem Barentsz himself. To this day, the name of ship is not yet known.

01.jpg
 
A moral I will now live by. Great work on rigging your crows' feet Heinrich, whether they should be there or not :p
Thank you, Mark. I have just come to the conclusion again that people see things in the way that they would like to see them, because that's what they know and thus it is comforting to them. Unfortunately, what they want to see is not always the reality, nor the truth! ;)
 
Hoi Johan. I missed this post of yours - apologies!

I just love it when you ask questions like that - it shows just what a fine eye you have and how closely you look - that is something I appreciate very much. When you only look at the drawing on which you have indicated the blue arrows, it does indeed show the rope as you have described it. However, that is not the drawing that needs to be followed - I believe that is a more an artist's impression than anything else.

The drawing that needs to be followed is this one ...

View attachment 352055

... in conjunction with this description:

A knot is made before the rope is entered through Hole 1 from the right-hand side.
The rope is led through Block A and entered through Hole 2 from the right side.
The rope enters Hole 3 from the left and goes up through Block A again.
It then enters Hole 4 from the left
and Hole 5 from the right before it is led through Block A again.
Next it passes through Hole 6 from the right
and Hole 7 from the left.
It then goes through Block A again
and enters Hole 8 from the left,
Hole 9 from the right and is then tied off above Block A.

If it gets done like this, it looks like mine - that is why I say I have not seen any other WB's crows' feet rigged this way and goes a long way towards explaining why mine look so good - no credit to me, but to @Kolderstok's instructions.
No apologies needed,
This actually makes sense, thanks for your explanation
 
Thank you, my friend. I mentioned earlier to Jan, that I quite enjoy the rigging process - something I had earlier not thought possible! :)

I seem to remember some posts back you were not really looking forward to the rigging. I see some very impressive work and the usual very interesting diagrams and explanations.

My wife just asked me what I was reading, I responded “about crows’ feet”. She stared at me and muttered indignantly something about “those lines around my eyes are laughter lines not crow’s feet”. I put my head down and kept reading your posts ROTF.
 
Heinrich,

When looking at this little gem and in particular the crows' feet, I noticed that the drawing shows the crows' feet rope passing on the same side of the bow sprit to the next loop, a bit hard to see, but:
View attachment 352020
You, on the other hand, choose to swap sides: the first couple of loops pass on the starboard side of the bow sprit (green arrows), the aft two loops pass on the port side of the bow sprit (blue arrows):View attachment 352021

Is there any rationale behind this swapping sides?
Hoi Johan. I missed this post of yours - apologies!

I just love it when you ask questions like that - it shows just what a fine eye you have and how closely you look - that is something I appreciate very much. When you only look at the drawing on which you have indicated the blue arrows, it does indeed show the rope as you have described it. However, that is not the drawing that needs to be followed - I believe that is a more an artist's impression than anything else.

The drawing that needs to be followed is this one ...

View attachment 352055

... in conjunction with this description:

A knot is made before the rope is entered through Hole 1 from the right-hand side.
The rope is led through Block A and entered through Hole 2 from the right side.
The rope enters Hole 3 from the left and goes up through Block A again.
It then enters Hole 4 from the left
and Hole 5 from the right before it is led through Block A again.
Next it passes through Hole 6 from the right
and Hole 7 from the left.
It then goes through Block A again
and enters Hole 8 from the left,
Hole 9 from the right and is then tied off above Block A.

If it gets done like this, it looks like mine - that is why I say I have not seen any other WB's crows' feet rigged this way and goes a long way towards explaining why mine look so good - no credit to me, but to @Kolderstok's instructions.
Perhaps I am wrong, but are you both talking the same?;)
Let me explain it with Johan his 'blue and green arrows photo' and Heinrich 'to be followed drawing':
WB.jpg
Heinrich's ropes from right 2 + left 3 gives a blue Johan's loop on the left side.
Heinrich's ropes from left 4 + right 5 gives a green Johan's loop on the right side.
Heinrich's ropes from right 6 + left 7 gives a blue Johan's loop on the left side.
Heinrich's ropes from left 8 + right 9 gives a green Johan's loop on the right side.
And rope 9 is fed to the top block and knotted on top that block.

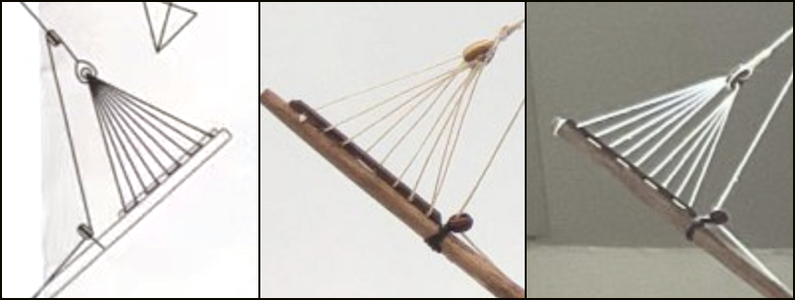
And the little cutout of the drawing in Johan's post, is what is shown in some of your posted examples of builded WB's:
1674154314787.png
All the loops on one side, except the one in the middle photo with 1 loop on a opposite side and only 8 ropes. And that is the Kolderstok prototype.
So different options. My preference would be a more 'balanced look'.
Regards, Peter
 
Last edited:
Oh and what I see here is a drawing with nine holes and a first build photo in the description which has only eight holes… :-(

The guy from Kolderstok must have had some fuzzy wuzzy brain while drawing this.

I can’t change the model anymore, so I will make a remark in the next version of the instructions about this.

Hans
 
Back
Top