Well Heinrich, I also want to thank you for your advice, sharing your expertise and experiences with me (and all of us). I learn more each day and there are so many great builders here on SOS. I wish you the best! I'll look for your occasional posts as time permits. I used to teach engineering and know the job of teaching requires time and effort. A hobby is a great respite...and being retired has its attractions....please take care!
-

Win a Free Custom Engraved Brass Coin!!!
As a way to introduce our brass coins to the community, we will raffle off a free coin during the month of August. Follow link ABOVE for instructions for entering.
-

PRE-ORDER SHIPS IN SCALE TODAY!
The beloved Ships in Scale Magazine is back and charting a new course for 2026!
Discover new skills, new techniques, and new inspirations in every issue.
NOTE THAT OUR FIRST ISSUE WILL BE JAN/FEB 2026
You are using an out of date browser. It may not display this or other websites correctly.
You should upgrade or use an alternative browser.
You should upgrade or use an alternative browser.
HIGH HOPES, WILD MEN AND THE DEVIL’S JAW - Willem Barentsz Kolderstok 1:50
- Joined
- Jan 9, 2020
- Messages
- 10,565
- Points
- 938

Thank you so much for the well wishes Phil. I only start the new term on the 10th of February, but I have to start packing and boxing things for when my new apartment becomes available. Once school has started, there won't be time for that. I will still help and encourage where I can and will enjoy the next few days looking at other logs and doing some further research.Well Heinrich, I also want to thank you for your advice, sharing your expertise and experiences with me (and all of us). I learn more each day and there are so many great builders here on SOS. I wish you the best! I'll look for your occasional posts as time permits. I used to teach engineering and know the job of teaching requires time and effort. A hobby is a great respite...and being retired has its attractions....please take care!
Hi Heinrich,Hello Dear Friends.
This is the one post that I had dreaded all during this build - the time when it has come to say that's that for now. From the start of the build I have moved my goalposts further and further as I went along - from having the hull planked, to include having the deck planked, then to finish the canopy and now I have even finished off the C-Deck. The instructions now call for the further build-up of the rear bulwarks, but that is a big job and one that I do not have a snowball's hope in hell of completing before I start work. I may fiddle with the helmsman's hut and the canopy doors, but I am not going to promise anything. This then is the status of the Willem Barentsz today.
View attachment 287845
View attachment 287846
View attachment 287847
Notice the walnut frame around the rear hatch. Here I have followed Piet's example once more. It is done with 1.5mm x 4mm walnut strips cut to size and will provide a much securer footing for the helmsman's hut to sit on.
View attachment 287848
View attachment 287849
View attachment 287850
looking at the deck I hope you will understand why I don't bother with caulking. Even though the deck is as smooth as a baby's bottom, each deck plank is individually defined - and it is all done a natural way by just playing around with different color-shaded Abachi planks and the wild format of the planking layout. Treenailing I will never do, as I have never seen any nailing effect (on the scale that we build) that has convinced me of its realism. (By the way, I have no idea why the decks show up so "yellowish" when I take pictures in the dining room - its under white fluorescent lighting.)
And now I come to the point of thanking each and ever one who has contributed to this build log in any form or way - be it a "Like", be it a friendly message, be it constructive criticism, be it a compliment or asking a question. You have no idea how much that means to me and how humbled I am that you joined me in such a wonderful and active way during the build. And of course there are two special thanks: @Kolderstok Hans for bringing such a phenomenal kit to market and @pietsan Piet Sanders for mentoring me during this build.
It has been a blast guys - but now I can also sit back slightly and enjoy your builds. But first ... there is a shipyard that is waiting for a final time to be cleaned up.
I cannot really add to the great words that have already been written. I look forward to your history lessons and progress at a slower pace. Also I wish you and your Admiral all the best for the future and hope that there is a change of heart at a government level before the 2 years are out.
Cheers,
Stephen.
Hi Heinrich,
It is a pitty you have to put your build on hold for the time being, now your won t surpass the 100+ pages of Paul @dockattner .
.
Your model sofar is a beauty and I guess you will be itching your hands the coming two years when you are looking at her.
Maybe a small model in between like a nice chaloupe? No mast and easy to take with you?
Keep up all the good work and I hope you can stay in China for more years to come. You would expect that with over 1 billion citizens you can t have enough English teachers.
It is a pitty you have to put your build on hold for the time being, now your won t surpass the 100+ pages of Paul @dockattner
Your model sofar is a beauty and I guess you will be itching your hands the coming two years when you are looking at her.
Maybe a small model in between like a nice chaloupe? No mast and easy to take with you?
Keep up all the good work and I hope you can stay in China for more years to come. You would expect that with over 1 billion citizens you can t have enough English teachers.
- Joined
- Jan 9, 2020
- Messages
- 10,565
- Points
- 938

Thank you for the very kind wishes Stephen. As I have said, I will still be around and I promise more history lessons!Hi Heinrich,
I cannot really add to the great words that have already been written. I look forward to your history lessons and progress at a slower pace. Also I wish you and your Admiral all the best for the future and hope that there is a change of heart at a government level before the 2 years are out.
Cheers,
Stephen.
- Joined
- Jan 9, 2020
- Messages
- 10,565
- Points
- 938

Dear Maarten - yes it is a pity, but it is what it is. You are right about the "itching part", I am already thinking about what I can do next in the few days ahead!Hi Heinrich,
It is a pitty you have to put your build on hold for the time being, now your won t surpass the 100+ pages of Paul @dockattner.
Your model sofar is a beauty and I guess you will be itching your hands the coming two years when you are looking at her.
Maybe a small model in between like a nice chaloupe? No mast and easy to take with you?
Keep up all the good work and I hope you can stay in China for more years to come. You would expect that with over 1 billion citizens you can t have enough English teachers.
- Joined
- Aug 30, 2020
- Messages
- 676
- Points
- 353

Hi Heinrich,
The content and speed of this log is amazing it's hard to keep up with but very enjoyable to read, after catching up now I might find some time to get back to my build

Great work on the the WB it looks fantastic, the precision you are approaching this build is something to admire and aspire too.
Thank you for your support along the journey as well much appreciated.
The content and speed of this log is amazing it's hard to keep up with but very enjoyable to read, after catching up now I might find some time to get back to my build


Great work on the the WB it looks fantastic, the precision you are approaching this build is something to admire and aspire too.
Thank you for your support along the journey as well much appreciated.
- Joined
- Jan 9, 2020
- Messages
- 10,565
- Points
- 938

Thank you very much for the compliment Richie. As to the speed of the log - I am really not a fast builder; it's just that this was all that I did the last two months!Hi Heinrich,
The content and speed of this log is amazing it's hard to keep up with but very enjoyable to read, after catching up now I might find some time to get back to my build
Great work on the the WB it looks fantastic, the precision you are approaching this build is something to admire and aspire too.
Thank you for your support along the journey as well much appreciated.
Hey Heinrich, I wish you the best on your new job, but why will you stop the built ? After a settlement time, I am sure you will find a few hours here and there to move on with the built, like Paul mentioned. Did I miss something?
Best !!
Daniel
Best !!
Daniel
- Joined
- Jan 9, 2020
- Messages
- 10,565
- Points
- 938

Hi Daniel. That is exactly the idea - so this is just a temporary halt in proceedings. There is no way that I will not complete this build - but obviously the resettlement, the new job and 8.30 - 18H00 working days will cut down the available build time considerably. And when I'm not building and do have some time available, I will check up on what you guys are doing with your builds.Hey Heinrich, I wish you the best on your new job, but why will you stop the built ? After a settlement time, I am sure you will find a few hours here and there to move on with the built, like Paul mentioned. Did I miss something?
Best !!
Daniel
Also I will continue the historical background and the progress on the replica that is being built.
- Joined
- Jan 9, 2020
- Messages
- 10,565
- Points
- 938

Hello Everyone
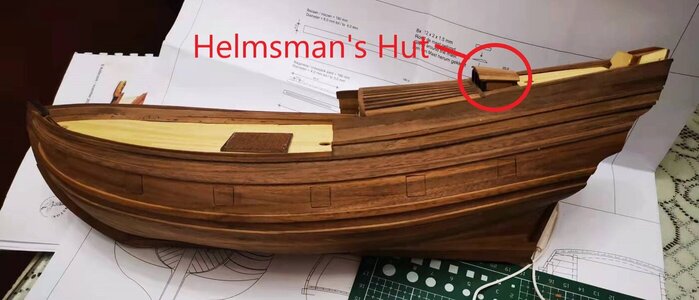
Even though most of the shipyard tools are in the process of being packed away, I still have my X-Acto knife, files and glue on standby. This was all I needed for the helmsman’s hut.
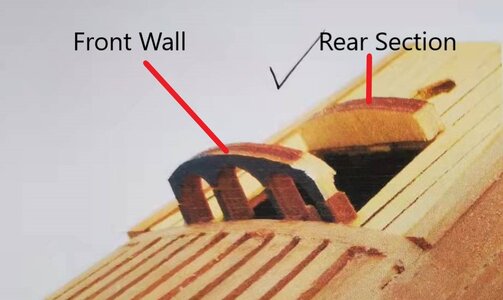
The kit supplies two laser-cut from triplex parts for this – the front wall and the rear section. The instructions call for gluing these two parts into position and then planking the deck with 1.5mm x 4mm walnut planks. Nowhere could I see anything in the instructions about side walls.
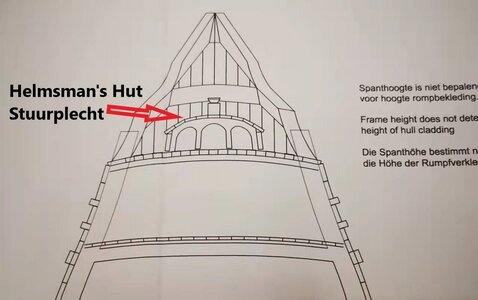
Front view of the helmsman’s hut as indicated on the plans.
For this process I am relying on @pietsan Piet’s photographs (again). My intention was only to test-fit these parts ... then, one thing led to another and before I knew it, I had a completed assembly. When I immerse myself (and it’s easy to do with the admiral not here at the moment), I get so engrossed that taking pictures is the last thing on my mind.

Photograph: Piet Sanders
I mentioned in my previous posting, that I copied Piet by making a frame for the Hatch on the C-Deck. Not only does it look pretty and rounded-off, but it also provides a very stable platform for the hut to be constructed on.

Photograph: Piet Sanders
Here the front and rear walls are glued in place …
Photograph: Piet Sanders
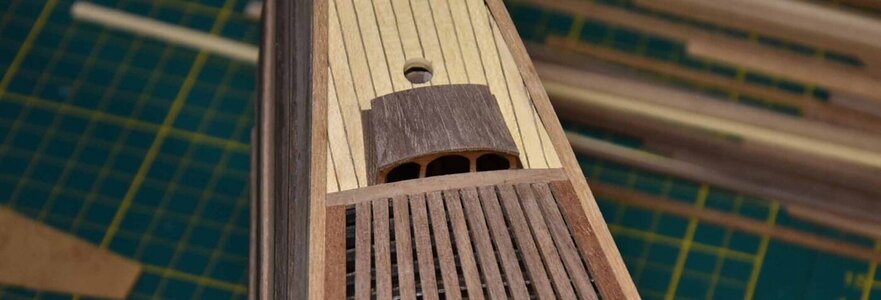
And the roof is planked. Piet chose to plank the roof with 1mm x 3mm walnut planks’ instead of the 1.5mm x 4mm planks that the instructions call for.
Photograph: Piet Sanders
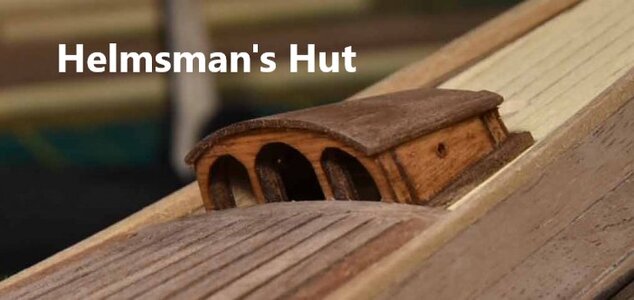
After that he added the side walls and the assembly was complete. Note the little hole in the side wall which simulates a “port hole” through which the helmsman could look. With the bulwarks though that will still be considerably extended (go higher) on either side of the hut, that view will be totally blocked. It remains a nice little detail though.
My build differed on two accounts from Piet and both are the results of attempting to emulate Piet’s build in a way that I was confident with. First, I have no idea how Piet managed to squeeze in those side walls with the roof in place – therefore I scratch-built and put down the side walls first and then planked roof. Secondly, I stuck to the 4mm planks of the instructions as the planking layout indicated on the plans, took any guesswork or unnecessary calculations out of the equation. I did go for the 1mm x 4mm planks instead of the 1.5mm ones though as the thinner planks resulted in finer and more accurate seams.
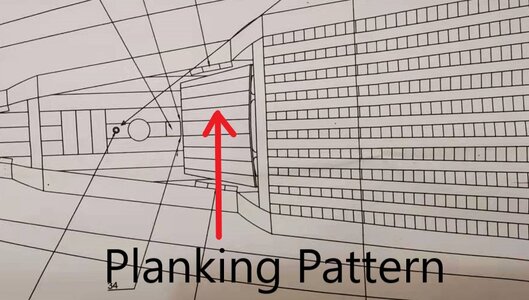
Note that only the centre plank is used full-width. After that all other 8 planks need to be narrowed – the two outermost ones – to only half their original width.
And with that all done, this is what my Willem Barentsz looks like with its steering hut.
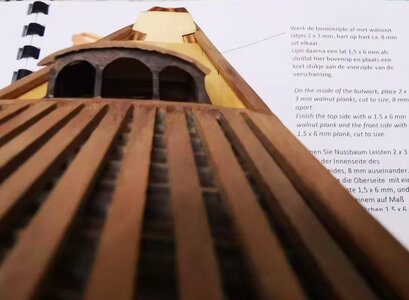
I stained the front - and rear wall with Dark Oak - everything else was left untouched. Once this is finally treated with tung oil, it will have a much darker and more uniform look to it - now the stain gives a "blotchy" effect.
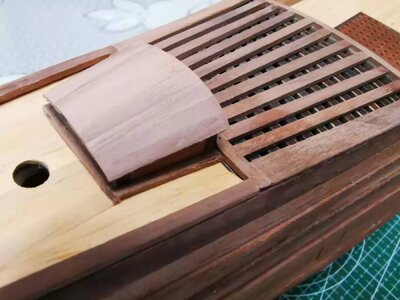
I am very happy that these super-macro exposures look the way they do.
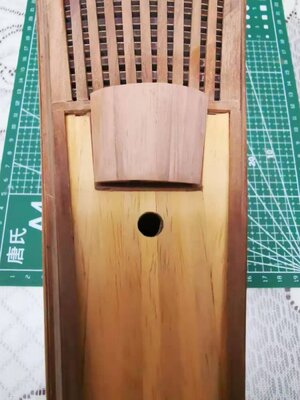
TIP:
It is very important to fair the inner edge of the front wall and the outer edge of the rear wall in order for the planks to lie down completely flat, and follow the downwards slope towards the stern nicely.
And finally - an overview in outside daylight, that also shows the color of the deck more accurately.
The sharp-eyed will see that I have already started another part of the build, but that is for next time. Until then, cheers!
Even though most of the shipyard tools are in the process of being packed away, I still have my X-Acto knife, files and glue on standby. This was all I needed for the helmsman’s hut.

The kit supplies two laser-cut from triplex parts for this – the front wall and the rear section. The instructions call for gluing these two parts into position and then planking the deck with 1.5mm x 4mm walnut planks. Nowhere could I see anything in the instructions about side walls.

Front view of the helmsman’s hut as indicated on the plans.
For this process I am relying on @pietsan Piet’s photographs (again). My intention was only to test-fit these parts ... then, one thing led to another and before I knew it, I had a completed assembly. When I immerse myself (and it’s easy to do with the admiral not here at the moment), I get so engrossed that taking pictures is the last thing on my mind.

Photograph: Piet Sanders
I mentioned in my previous posting, that I copied Piet by making a frame for the Hatch on the C-Deck. Not only does it look pretty and rounded-off, but it also provides a very stable platform for the hut to be constructed on.

Photograph: Piet Sanders
Here the front and rear walls are glued in place …

Photograph: Piet Sanders
And the roof is planked. Piet chose to plank the roof with 1mm x 3mm walnut planks’ instead of the 1.5mm x 4mm planks that the instructions call for.

Photograph: Piet Sanders
After that he added the side walls and the assembly was complete. Note the little hole in the side wall which simulates a “port hole” through which the helmsman could look. With the bulwarks though that will still be considerably extended (go higher) on either side of the hut, that view will be totally blocked. It remains a nice little detail though.
My build differed on two accounts from Piet and both are the results of attempting to emulate Piet’s build in a way that I was confident with. First, I have no idea how Piet managed to squeeze in those side walls with the roof in place – therefore I scratch-built and put down the side walls first and then planked roof. Secondly, I stuck to the 4mm planks of the instructions as the planking layout indicated on the plans, took any guesswork or unnecessary calculations out of the equation. I did go for the 1mm x 4mm planks instead of the 1.5mm ones though as the thinner planks resulted in finer and more accurate seams.

Note that only the centre plank is used full-width. After that all other 8 planks need to be narrowed – the two outermost ones – to only half their original width.
And with that all done, this is what my Willem Barentsz looks like with its steering hut.

I stained the front - and rear wall with Dark Oak - everything else was left untouched. Once this is finally treated with tung oil, it will have a much darker and more uniform look to it - now the stain gives a "blotchy" effect.

I am very happy that these super-macro exposures look the way they do.


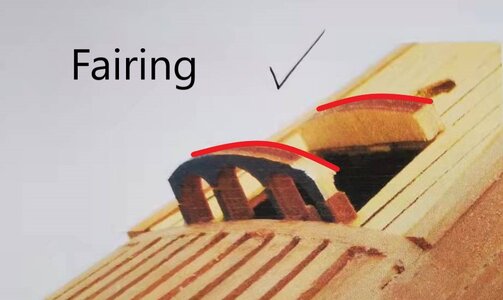
TIP:

It is very important to fair the inner edge of the front wall and the outer edge of the rear wall in order for the planks to lie down completely flat, and follow the downwards slope towards the stern nicely.
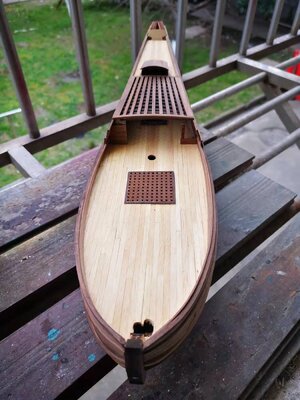
And finally - an overview in outside daylight, that also shows the color of the deck more accurately.

The sharp-eyed will see that I have already started another part of the build, but that is for next time. Until then, cheers!
It's great that you couldn't resist the temptation to continue building. Nice cabin, Heinrich. Use your time!Hello Everyone
Even though most of the shipyard tools are in the process of being packed away, I still have my X-Acto knife, files and glue on standby. This was all I needed for the helmsman’s hut.
View attachment 288223
The kit supplies two laser-cut from triplex parts for this – the front wall and the rear section. The instructions call for gluing these two parts into position and then planking the deck with 1.5mm x 4mm walnut planks. Nowhere could I see anything in the instructions about side walls.
View attachment 288224
Front view of the helmsman’s hut as indicated on the plans.
For this process I am relying on @pietsan Piet’s photographs (again). My intention was only to test-fit these parts ... then, one thing led to another and before I knew it, I had a completed assembly. When I immerse myself (and it’s easy to do with the admiral not here at the moment), I get so engrossed that taking pictures is the last thing on my mind.
View attachment 288226
Photograph: Piet Sanders
I mentioned in my previous posting, that I copied Piet by making a frame for the Hatch on the C-Deck. Not only does it look pretty and rounded-off, but it also provides a very stable platform for the hut to be constructed on.
View attachment 288228
Photograph: Piet Sanders
Here the front and rear walls are glued in place …
View attachment 288229
Photograph: Piet Sanders
And the roof is planked. Piet chose to plank the roof with 1mm x 3mm walnut planks’ instead of the 1.5mm x 4mm planks that the instructions call for.
View attachment 288231
Photograph: Piet Sanders
After that he added the side walls and the assembly was complete. Note the little hole in the side wall which simulates a “port hole” through which the helmsman could look. With the bulwarks though that will still be considerably extended (go higher) on either side of the hut, that view will be totally blocked. It remains a nice little detail though.
My build differed on two accounts from Piet and both are the results of attempting to emulate Piet’s build in a way that I was confident with. First, I have no idea how Piet managed to squeeze in those side walls with the roof in place – therefore I scratch-built and put down the side walls first and then planked roof. Secondly, I stuck to the 4mm planks of the instructions as the planking layout indicated on the plans, took any guesswork or unnecessary calculations out of the equation. I did go for the 1mm x 4mm planks instead of the 1.5mm ones though as the thinner planks resulted in finer and more accurate seams.
View attachment 288236
Note that only the centre plank is used full-width. After that all other 8 planks need to be narrowed – the two outermost ones – to only half their original width.
And with that all done, this is what my Willem Barentsz looks like with its steering hut.
View attachment 288237
I stained the front - and rear wall with Dark Oak - everything else was left untouched. Once this is finally treated with tung oil, it will have a much darker and more uniform look to it - now the stain gives a "blotchy" effect.
View attachment 288238
I am very happy that these super-macro exposures look the way they do.
View attachment 288239
View attachment 288240
TIP:
View attachment 288241
It is very important to fair the inner edge of the front wall and the outer edge of the rear wall in order for the planks to lie down completely flat, and follow the downwards slope towards the stern nicely.
And finally - an overview in outside daylight, that also shows the color of the deck more accurately.
View attachment 288243
The sharp-eyed will see that I have already started another part of the build, but that is for next time. Until then, cheers!
Regards, Peter
- Joined
- Jan 9, 2020
- Messages
- 10,565
- Points
- 938

It's called ... addiction, Peter.It's great that you couldn't resist the temptation to continue building. Nice cabin, Heinrich. Use your time!
Regards, Peter
- Joined
- Sep 3, 2021
- Messages
- 5,190
- Points
- 738

The more your build progresses, the more I come to like this little ship. The helmsman's hut adds beautiful detail. Too bad the kolderstok isn't visible anymore.Hello Everyone
Even though most of the shipyard tools are in the process of being packed away, I still have my X-Acto knife, files and glue on standby. This was all I needed for the helmsman’s hut.
View attachment 288223
The kit supplies two laser-cut from triplex parts for this – the front wall and the rear section. The instructions call for gluing these two parts into position and then planking the deck with 1.5mm x 4mm walnut planks. Nowhere could I see anything in the instructions about side walls.
View attachment 288224
Front view of the helmsman’s hut as indicated on the plans.
For this process I am relying on @pietsan Piet’s photographs (again). My intention was only to test-fit these parts ... then, one thing led to another and before I knew it, I had a completed assembly. When I immerse myself (and it’s easy to do with the admiral not here at the moment), I get so engrossed that taking pictures is the last thing on my mind.
View attachment 288226
Photograph: Piet Sanders
I mentioned in my previous posting, that I copied Piet by making a frame for the Hatch on the C-Deck. Not only does it look pretty and rounded-off, but it also provides a very stable platform for the hut to be constructed on.
View attachment 288228
Photograph: Piet Sanders
Here the front and rear walls are glued in place …
View attachment 288229
Photograph: Piet Sanders
And the roof is planked. Piet chose to plank the roof with 1mm x 3mm walnut planks’ instead of the 1.5mm x 4mm planks that the instructions call for.
View attachment 288231
Photograph: Piet Sanders
After that he added the side walls and the assembly was complete. Note the little hole in the side wall which simulates a “port hole” through which the helmsman could look. With the bulwarks though that will still be considerably extended (go higher) on either side of the hut, that view will be totally blocked. It remains a nice little detail though.
My build differed on two accounts from Piet and both are the results of attempting to emulate Piet’s build in a way that I was confident with. First, I have no idea how Piet managed to squeeze in those side walls with the roof in place – therefore I scratch-built and put down the side walls first and then planked roof. Secondly, I stuck to the 4mm planks of the instructions as the planking layout indicated on the plans, took any guesswork or unnecessary calculations out of the equation. I did go for the 1mm x 4mm planks instead of the 1.5mm ones though as the thinner planks resulted in finer and more accurate seams.
View attachment 288236
Note that only the centre plank is used full-width. After that all other 8 planks need to be narrowed – the two outermost ones – to only half their original width.
And with that all done, this is what my Willem Barentsz looks like with its steering hut.
View attachment 288237
I stained the front - and rear wall with Dark Oak - everything else was left untouched. Once this is finally treated with tung oil, it will have a much darker and more uniform look to it - now the stain gives a "blotchy" effect.
View attachment 288238
I am very happy that these super-macro exposures look the way they do.
View attachment 288239
View attachment 288240
TIP:
View attachment 288241
It is very important to fair the inner edge of the front wall and the outer edge of the rear wall in order for the planks to lie down completely flat, and follow the downwards slope towards the stern nicely.
And finally - an overview in outside daylight, that also shows the color of the deck more accurately.
View attachment 288243
The sharp-eyed will see that I have already started another part of the build, but that is for next time. Until then, cheers!
Personally I also think the decision to have the gunports closed is a stroke of genius; the unmarred hull lines are "een lust voor het oog" (feast for the eyes).
Last edited:
- Joined
- Sep 3, 2021
- Messages
- 5,190
- Points
- 738

Suffering from withdrawal symptoms so soon, Heinrich?It's called ... addiction, Peter.
- Joined
- Jan 9, 2020
- Messages
- 10,565
- Points
- 938

I am glad that you are liking her more and more Johan.The more your build progresses, the more I come to like this little ship. The helmsman's hut adds beautiful detail. To bad the kolderstok isn't visible anymore.
Personally I also think the decision to have the gunports closed is a stroke of genius; the unmarred hull lines are "een lust voor het oog" (feast for the eyes).
- Joined
- Jan 9, 2020
- Messages
- 10,565
- Points
- 938

Yes indeed. I started packing most of the stuff away, but seeing that I am on my own I got bored quickly. Famous last words ...Suffering from withdrawal symptoms so soon, Heinrich?
I love the helmsman's hut, sort of like the 'cherry on top'. Looks like you started a ship-lap wall on the main deck at the crossbeam deck in what looks like typical Dutch fashion.
- Joined
- Jan 9, 2020
- Messages
- 10,565
- Points
- 938

Hi Daniel - I am very happy to hear that like the helmsman's hut - I love that detail as well. However, when the bulwarks are built up further, the hut will lose of some prominence that it now enjoys. You are spot on with the next step. That is indeed the front wall of the canopy.I love the helmsman's hut, sort of like the 'cherry on top'. Looks like you started a ship-lap wall on the main deck at the crossbeam deck in what looks like typical Dutch fashion.
Canoe21
Lawrence
Hello Heinrich, Fantastic job you are doing on your W B K she sure is standing out. Great fix on the Whipstaff, I caught that in reading trough your build but I see that Johan beat me to it. Just love your Helmsmen's Hutt that is a real beauty and fits in very well with your Whipstaff. I do not envy you in having to move to a new home, for us it would be a night mare with over 45 years of collectable, not to mention what is in the Old Ship Yard.
I do hope that you can retire in your very much loved China, do not give up hope as so many things can change in two years.
Regards Lawrence
I do hope that you can retire in your very much loved China, do not give up hope as so many things can change in two years.
Regards Lawrence


